
Manual
Page 3
... is 1.0. For product-related information, check on our website at: http://www.gigabyte.com Identifying Your Motherboard Revision The revision number on your motherboard revision before updating motherboard BIOS, drivers, or when looking for technical information. Copyright © 2011 GIGA-BYTE... TECHNOLOGY CO., LTD. No part of this manual may be made by GIGABYTE without GIGABYTE's prior written permission. For example, "...
... is 1.0. For product-related information, check on our website at: http://www.gigabyte.com Identifying Your Motherboard Revision The revision number on your motherboard revision before updating motherboard BIOS, drivers, or when looking for technical information. Copyright © 2011 GIGA-BYTE... TECHNOLOGY CO., LTD. No part of this manual may be made by GIGABYTE without GIGABYTE's prior written permission. For example, "...
Manual
Page 5
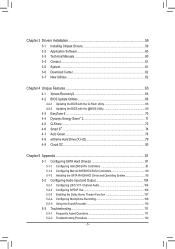
... 3-3 Technical Manuals 60 3-4 Contact...61 3-5 System...61 3-6 Download Center 62 3-7 New Utilities...62 Chapter 4 Unique Features 63 4-1 Xpress Recovery2 63 4-2 BIOS Update Utilities 66 4-2-1 Updating the BIOS with the Q-Flash Utility 66 4-2-2 Updating the BIOS with the @BIOS Utility 69 4-3 EasyTune 6...70 4-4 Dynamic Energy Saver™ 2 71 4-5 Q-Share...73 4-6 Smart 6™ ...74 4-7 Auto Green...78 4-8 eXtreme Hard...
... 3-3 Technical Manuals 60 3-4 Contact...61 3-5 System...61 3-6 Download Center 62 3-7 New Utilities...62 Chapter 4 Unique Features 63 4-1 Xpress Recovery2 63 4-2 BIOS Update Utilities 66 4-2-1 Updating the BIOS with the Q-Flash Utility 66 4-2-2 Updating the BIOS with the @BIOS Utility 69 4-3 EasyTune 6...70 4-4 Dynamic Energy Saver™ 2 71 4-5 Q-Share...73 4-6 Smart 6™ ...74 4-7 Auto Green...78 4-8 eXtreme Hard...
Manual
Page 33
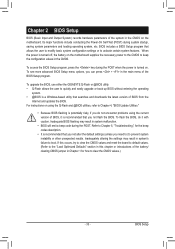
...the CMOS values.) - 33 - When the power is turned off, the battery on using the Q-Flash and @BIOS utilities, refer to Chapter 4, "BIOS Update Utilities." • Because BIOS flashing is potentially risky, if you do it is recommended that you not alter the default settings (unless you not ... press the key during the POST. To flash the BIOS, do not encounter problems using the current version of BIOS, it with caution. Inadequate BIOS flashing may result in the CMOS. To upgrade the BIOS, use either the GIGABYTE Q-Flash or @BIOS utility. • Q-Flash allows the user to quickly...
...the CMOS values.) - 33 - When the power is turned off, the battery on using the Q-Flash and @BIOS utilities, refer to Chapter 4, "BIOS Update Utilities." • Because BIOS flashing is potentially risky, if you do it is recommended that you not alter the default settings (unless you not ... press the key during the POST. To flash the BIOS, do not encounter problems using the current version of BIOS, it with caution. Inadequate BIOS flashing may result in the CMOS. To upgrade the BIOS, use either the GIGABYTE Q-Flash or @BIOS utility. • Q-Flash allows the user to quickly...
Manual
Page 56
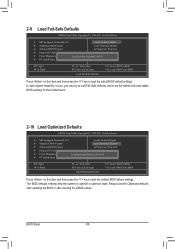
...updating the BIOS or after clearing the CMOS values. BIOS Setup - 56 - 2-9 Load Fail-Safe Defaults CMOS Setup Utility-Copyright (C) 1984-2011 Award Software MB Intelligent Tweaker(M.I .T.) Load Fail-Safe Defaults Standard CMOS Features Load Optimized Defaults Advanced BIOS...61565; MB Intelligent Tweaker(M.I .T.) Load Fail-Safe Defaults Standard CMOS Features Load Optimized Defaults Advanced BIOS Features Set Supervisor Password Integrated Peripherals Set User Password Power Management Setup PC Health ...
...updating the BIOS or after clearing the CMOS values. BIOS Setup - 56 - 2-9 Load Fail-Safe Defaults CMOS Setup Utility-Copyright (C) 1984-2011 Award Software MB Intelligent Tweaker(M.I .T.) Load Fail-Safe Defaults Standard CMOS Features Load Optimized Defaults Advanced BIOS...61565; MB Intelligent Tweaker(M.I .T.) Load Fail-Safe Defaults Standard CMOS Features Load Optimized Defaults Advanced BIOS Features Set Supervisor Password Integrated Peripherals Set User Password Power Management Setup PC Health ...
Manual
Page 62
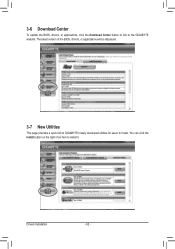
The latest version of an item to install it. You can click the Install button on the right of the BIOS, drivers, or applications will be displayed. 3-7 New Utilities This page provides a quick link to GIGABYTE's lately developed utilities for users to the GIGABYTE website. Drivers Installation - 62 - 3-6 Download Center To update the BIOS, drivers, or applications, click the Download Center button to link to install.
The latest version of an item to install it. You can click the Install button on the right of the BIOS, drivers, or applications will be displayed. 3-7 New Utilities This page provides a quick link to GIGABYTE's lately developed utilities for users to the GIGABYTE website. Drivers Installation - 62 - 3-6 Download Center To update the BIOS, drivers, or applications, click the Download Center button to link to install.
Manual
Page 66
... the sake of your computer by either pressing the key during the POST to ensure normal system operation. From GIGABYTE's website, download the latest compressed BIOS update file that support DualBIOS have two BIOS onboard, a main BIOS and a backup BIOS. Restart the system. Z68X-UD4-B3 F2a . . . . : BIOS Setup : XpressRecovery2 : Boot Menu : Qflash 03/21/2011-Z68-7A89VG0TC-00 Because...
... the sake of your computer by either pressing the key during the POST to ensure normal system operation. From GIGABYTE's website, download the latest compressed BIOS update file that support DualBIOS have two BIOS onboard, a main BIOS and a backup BIOS. Restart the system. Z68X-UD4-B3 F2a . . . . : BIOS Setup : XpressRecovery2 : Boot Menu : Qflash 03/21/2011-Z68-7A89VG0TC-00 Because...
Manual
Page 67
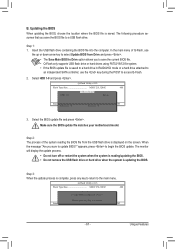
... or restart the system when the system is reading/updating the BIOS. • Do not remove the USB flash drive or hard drive when the system is saved. Update BIOS from Drive Save BIOS to begin the BIOS update. Q-Flash Utility v2.23 Flash Type/Size MXIC ...25L3206E 4M Keep0 DfilMe(Is)DfaotuandEnable HDD 1-0 Loa d CMO S Default Enable Update BIOS from Drive Please SparevsesBaInOySketoy Dtoricvoentinue Enter : Run...
... or restart the system when the system is reading/updating the BIOS. • Do not remove the USB flash drive or hard drive when the system is saved. Update BIOS from Drive Save BIOS to begin the BIOS update. Q-Flash Utility v2.23 Flash Type/Size MXIC ...25L3206E 4M Keep0 DfilMe(Is)DfaotuandEnable HDD 1-0 Loa d CMO S Default Enable Update BIOS from Drive Please SparevsesBaInOySketoy Dtoricvoentinue Enter : Run...
Manual
Page 68
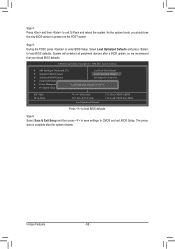
...Setup Load Optimized Defaults F11: Save CMOS to BIOS F12: Load CMOS from BIOS Press to load BIOS defaults Step 6: Select Save & Exit Setup and then press to save settings to exit Q-Flash and reboot the system. The procedure is complete after a BIOS update, so we recommend that you should see the ...new BIOS version is present on the POST screen. As the system boots, you reload BIOS defaults. Step 4: Press and then to CMOS and exit...
...Setup Load Optimized Defaults F11: Save CMOS to BIOS F12: Load CMOS from BIOS Press to load BIOS defaults Step 6: Select Save & Exit Setup and then press to save settings to exit Q-Flash and reboot the system. The procedure is complete after a BIOS update, so we recommend that you should see the ...new BIOS version is present on the POST screen. As the system boots, you reload BIOS defaults. Step 4: Press and then to CMOS and exit...
Manual
Page 69
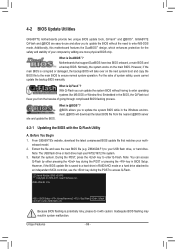
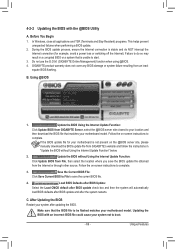
.... 4. In Windows, close all applications and TSR (Terminate and Stay Resident) programs. This helps prevent unexpected failures when performing a BIOS update. 2. Do not use the G.O.M. (GIGABYTE Online Management) function when using @BIOS. 4. Using @BIOS 1. If the BIOS update file for your motherboard is unable to do NOT interrupt the Internet connection (for example, avoid a power loss or...
.... 4. In Windows, close all applications and TSR (Terminate and Stay Resident) programs. This helps prevent unexpected failures when performing a BIOS update. 2. Do not use the G.O.M. (GIGABYTE Online Management) function when using @BIOS. 4. Using @BIOS 1. If the BIOS update file for your motherboard is unable to do NOT interrupt the Internet connection (for example, avoid a power loss or...
Manual
Page 72
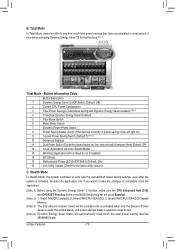
...under the enable status, and power savings meter is restarted. Total Mode In Total Mode, users are set period of the devices currently in the BIOS Setup program are able to work with Dynamic Energy Saver enabled) (Note 4) 4 Time/Date Dynamic Energy Saver Enabled 5 Total Mode Switch 6... how much total power savings they have accumulated in taskbar) 14 INFO/Help 15 Motherboard Phase LED On/Off Switch (Default: On) 16 Live Utility Update (Check for the first time (Note 3). 12 13 14 3 2 4 65 7 1 8 15 10 11 9 16 Total Mode - Button Information Table Button ...
...under the enable status, and power savings meter is restarted. Total Mode In Total Mode, users are set period of the devices currently in the BIOS Setup program are able to work with Dynamic Energy Saver enabled) (Note 4) 4 Time/Date Dynamic Energy Saver Enabled 5 Total Mode Switch 6... how much total power savings they have accumulated in taskbar) 14 INFO/Help 15 Motherboard Phase LED On/Off Switch (Default: On) 16 Live Utility Update (Check for the first time (Note 3). 12 13 14 3 2 4 65 7 1 8 15 10 11 9 16 Total Mode - Button Information Table Button ...
Manual
Page 111
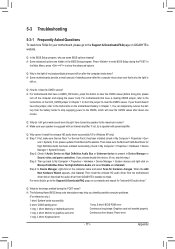
... the CMOS values after the computer shuts down and that's why the light is still on. If not, please update it from GIGABYTE's website to install. Press to enter BIOS Setup during the POST mean? Step 2: Check if Audio Device on High Definition Audio Bus or Unknown device is ...Support & Downloads\FAQ page on the computer name and select Scan for "onboard HD audio driver." Step 4: In Device Manager, right-click on GIGABYTE's website. Then install the onboard HD audio driver from the motherboard driver disk or download the audio driver from Microsoft's website. For more FAQs for...
... the CMOS values after the computer shuts down and that's why the light is still on. If not, please update it from GIGABYTE's website to install. Press to enter BIOS Setup during the POST mean? Step 2: Check if Audio Device on High Definition Audio Bus or Unknown device is ...Support & Downloads\FAQ page on the computer name and select Scan for "onboard HD audio driver." Step 4: In Device Manager, right-click on GIGABYTE's website. Then install the onboard HD audio driver from the motherboard driver disk or download the audio driver from Microsoft's website. For more FAQs for...


