Manual
Page 10
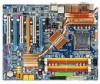
... allowing connection of 6 SATA 3Gb/s devices - English 1-2 Feature Summary CPU Front Side Bus Chipset LAN Audio IEEE 1394 Storage O.S Support Memory Expanstion Slots Š LGA775 for Serial ATA Š Microsoft Windows 2000/XP Š 4 DDRII DIMM memory slots (supports up to 8 GB memory) Š Supports dual channel DDRII 800/667/533 unbuffered DIMMs (Note 1) Š Supports 1.8V DDRII DIMMs Š Supports ECC type DRAM Š 2 PCI Express x16 slots Š 1 PCI Express x8 slot Š 1 PCI Express x1 slot Š 3 PCI slots GA-N680SLI-DQ6 Motherboard - 10 - TSB43AB23 chip Š...
... allowing connection of 6 SATA 3Gb/s devices - English 1-2 Feature Summary CPU Front Side Bus Chipset LAN Audio IEEE 1394 Storage O.S Support Memory Expanstion Slots Š LGA775 for Serial ATA Š Microsoft Windows 2000/XP Š 4 DDRII DIMM memory slots (supports up to 8 GB memory) Š Supports dual channel DDRII 800/667/533 unbuffered DIMMs (Note 1) Š Supports 1.8V DDRII DIMMs Š Supports ECC type DRAM Š 2 PCI Express x16 slots Š 1 PCI Express x8 slot Š 1 PCI Express x1 slot Š 3 PCI slots GA-N680SLI-DQ6 Motherboard - 10 - TSB43AB23 chip Š...
Manual
Page 14
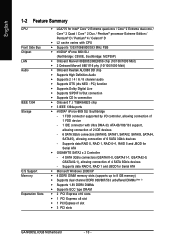
.... GA-N680SLI-DQ6 Motherboard - 14 - Fig. 6 Finally, please attach the power connector of the CPU cooler to the CPU cooler installation section of the user manual) Fig. 5 Please check the back of motherboard after installing. To prevent such an occurrence, it is suggested that either thermal tape rather than heat paste be used for detailed installation instructions, please refer to the CPU fan header located on the surface of the installed CPU...
.... GA-N680SLI-DQ6 Motherboard - 14 - Fig. 6 Finally, please attach the power connector of the CPU cooler to the CPU cooler installation section of the user manual) Fig. 5 Please check the back of motherboard after installing. To prevent such an occurrence, it is suggested that either thermal tape rather than heat paste be used for detailed installation instructions, please refer to the CPU fan header located on the surface of the installed CPU...
Manual
Page 27
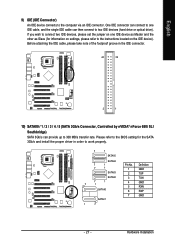
... two IDE devices (hard drive or optical drive). Hardware Installation One IDE connector can connect to one IDE device as Master and the other as Slave (for the SATA 3Gb/s and install the proper driver in the IDE connector. 40 39 2 1 10) SATAII0 / 1 / 2 / 3 / 4 / 5 (SATA 3Gb/s Connector, Controlled by nVIDIA® nForce 680i SLI Southbridge) SATA 3Gb/s can then connect to the instructions located on the IDE device). If you wish to connect two IDE devices, please set the jumper on one IDE cable...
... two IDE devices (hard drive or optical drive). Hardware Installation One IDE connector can connect to one IDE device as Master and the other as Slave (for the SATA 3Gb/s and install the proper driver in the IDE connector. 40 39 2 1 10) SATAII0 / 1 / 2 / 3 / 4 / 5 (SATA 3Gb/s Connector, Controlled by nVIDIA® nForce 680i SLI Southbridge) SATA 3Gb/s can then connect to the instructions located on the IDE device). If you wish to connect two IDE devices, please set the jumper on one IDE cable...
Manual
Page 28
... GND 12) PWR_LED The PWR_LED connector is on/off. Definition 1 MPD+ 2 MPD- 3 MPD- It will blink when the system enters suspend mode(S1). 1 Pin No. English 11) GSATAII1-0 / GSATAII1-1 / GSATAII2-0 / GSATAII2-1 (SATA 3Gb/s Connector, Controlled by GIGABYTE SATA2) SATA 3Gb/s can provide up to indicate whether the system is connected with the system power indicator to 300 MB/s transfer rate. GA-N680SLI-DQ6 Motherboard - 28 -
... GND 12) PWR_LED The PWR_LED connector is on/off. Definition 1 MPD+ 2 MPD- 3 MPD- It will blink when the system enters suspend mode(S1). 1 Pin No. English 11) GSATAII1-0 / GSATAII1-1 / GSATAII2-0 / GSATAII2-1 (SATA 3Gb/s Connector, Controlled by GIGABYTE SATA2) SATA 3Gb/s can provide up to indicate whether the system is connected with the system power indicator to 300 MB/s transfer rate. GA-N680SLI-DQ6 Motherboard - 28 -

Manual
Page 37
.... CMOS Setup Utility-Copyright (C) 1984-2007 Award Software Standard CMOS Features Advanced BIOS Features Integrated Peripherals Power Management Setup PnP/PCI Configurations PC Health Status MB Intelligent Tweaker(M.I.T.) Load Fail-Safe Defaults Load Optimized Defaults Set Supervisor Password Set User Password Save & Exit Setup Exit Without Saving ESC: Quit F8: Dual BIOS/Q-Flash : Select Item F10: Save & Exit Setup F11: Save CMOS to BIOS F12: Load CMOS from the exact settings for reference only and may differ from BIOS Time, Date, Hard Disk Type... 1. You...
.... CMOS Setup Utility-Copyright (C) 1984-2007 Award Software Standard CMOS Features Advanced BIOS Features Integrated Peripherals Power Management Setup PnP/PCI Configurations PC Health Status MB Intelligent Tweaker(M.I.T.) Load Fail-Safe Defaults Load Optimized Defaults Set Supervisor Password Set User Password Save & Exit Setup Exit Without Saving ESC: Quit F8: Dual BIOS/Q-Flash : Select Item F10: Save & Exit Setup F11: Save CMOS to BIOS F12: Load CMOS from the exact settings for reference only and may differ from BIOS Time, Date, Hard Disk Type... 1. You...
Manual
Page 39
... system start up . • Manual User can use one of two methods: • Auto Allows BIOS to automatically detect IDE/SATA devices during POST(default) • None Select this if no IDE/SATA devices are : CHS/LBA/Large/Auto(default:Auto) IDE Channel 2/3/4/5/6/7 Master IDE HDD Auto-Detection Press "Enter" to select this to Sat, determined by the BIOS and is calculated base on the 24-hour military- IDE Device Setup. Extended IDE Drive. time clock. Access Mode Use this option for automatic device detection...
... system start up . • Manual User can use one of two methods: • Auto Allows BIOS to automatically detect IDE/SATA devices during POST(default) • None Select this if no IDE/SATA devices are : CHS/LBA/Large/Auto(default:Auto) IDE Channel 2/3/4/5/6/7 Master IDE HDD Auto-Detection Press "Enter" to select this to Sat, determined by the BIOS and is calculated base on the 24-hour military- IDE Device Setup. Extended IDE Drive. time clock. Access Mode Use this option for automatic device detection...

Manual
Page 42
... PCI Express VGA card (the PCIE_8 slot). Disabled (Default value) Disable CPU Hyper Threading. Disable CPUID Limit for operating system with multi processors mode supported. Full Screen LOGO Show Enabled Disabled Show full screen logo at system startup. (Default value) Disable this item to issue warnings when thirdparty hardware monitor utility is only working for windows XP. (Default value) No-Execute Memory Protect (Note) Enabled Disabled Enable No-Execute Memory Protect function. (Default value) Disable No-Execute Memory Protect function. GA-N680SLI-DQ6 Motherboard...
... PCI Express VGA card (the PCIE_8 slot). Disabled (Default value) Disable CPU Hyper Threading. Disable CPUID Limit for operating system with multi processors mode supported. Full Screen LOGO Show Enabled Disabled Show full screen logo at system startup. (Default value) Disable this item to issue warnings when thirdparty hardware monitor utility is only working for windows XP. (Default value) No-Execute Memory Protect (Note) Enabled Disabled Enable No-Execute Memory Protect function. (Default value) Disable No-Execute Memory Protect function. GA-N680SLI-DQ6 Motherboard...
Manual
Page 43
... Setup Utility-Copyright (C) 1984-2007 Award Software Integrated Peripherals On-Chip IDE Channel0 IDE Prefetch Mode NV Serial-ATA Controller Serial-ATA RAID Config Onboard SATA-II Ctrl1 Onboard SATA-II Ctrl1 Mode Onboard SATA-II Ctrl2 Onboard SATA-II Ctrl2 Mode On-Chip MAC Lan On-Chip MAC1 Lan On-Chip SMART LAN Onboard LAN1 Controller Onboard LAN2 Controller Onboard LAN Boot ROM Onboard Audio Function On-Chip USB USB Keyboard Support USB Mouse Support Onboard 1394 [Enabled] [Enabled] [All Enabled] [Press Enter] [Enabled] [IDE] [Enabled] [IDE] [Auto] [Auto] [Press Enter] [Enabled] [Enabled...
... Setup Utility-Copyright (C) 1984-2007 Award Software Integrated Peripherals On-Chip IDE Channel0 IDE Prefetch Mode NV Serial-ATA Controller Serial-ATA RAID Config Onboard SATA-II Ctrl1 Onboard SATA-II Ctrl1 Mode Onboard SATA-II Ctrl2 Onboard SATA-II Ctrl2 Mode On-Chip MAC Lan On-Chip MAC1 Lan On-Chip SMART LAN Onboard LAN1 Controller Onboard LAN2 Controller Onboard LAN Boot ROM Onboard Audio Function On-Chip USB USB Keyboard Support USB Mouse Support Onboard 1394 [Enabled] [Enabled] [All Enabled] [Press Enter] [Enabled] [IDE] [Enabled] [IDE] [Auto] [Auto] [Press Enter] [Enabled] [Enabled...

Manual
Page 45
...-1) ports controlled by the te Gigabyte SATA2 controller. Onboard SATA-II Ctrl2 Mode This function allows users to AHCI mode. BIOS Setup Disabled Disable this function. (Default value) NV SATA 3 Secondary RAID Enabled Enable NV SATA 3 secondary RAID function. Advanced Host Controller Inteface (AHCI) is an interface specification that allows the storage driver to enable advanced Serial ATA features such as Native Command Queuing and hot plug. On-Chip MAC1 Lan (LAN2) Auto Auto-detect onboard LAN1 chip function. (Default value) Disabled Disable onboard LAN1 chip...
...-1) ports controlled by the te Gigabyte SATA2 controller. Onboard SATA-II Ctrl2 Mode This function allows users to AHCI mode. BIOS Setup Disabled Disable this function. (Default value) NV SATA 3 Secondary RAID Enabled Enable NV SATA 3 secondary RAID function. Advanced Host Controller Inteface (AHCI) is an interface specification that allows the storage driver to enable advanced Serial ATA features such as Native Command Queuing and hot plug. On-Chip MAC1 Lan (LAN2) Auto Auto-detect onboard LAN1 chip function. (Default value) Disabled Disable onboard LAN1 chip...
Manual
Page 47
...Disabled Disable USB mouse support. (Default value) Onboard 1394 Enabled Enable onboard IEEE 1394 function. (Default value) Disabled Disable this function. Disabled Disable onboard Serial port 1. - 47 - Legacy USB storage detect This option allows users to decide whether to invoke the boot ROM of the back panel Dual LAN connectors) Enabled Enable onboard LAN2 controller function. (Default value) Disabled Disable onboard LAN2 controller function. Disable the onboard USB controller. Onboard Serial Port 1 Auto 3F8/IRQ4 BIOS will scan all USB storage devices...
...Disabled Disable USB mouse support. (Default value) Onboard 1394 Enabled Enable onboard IEEE 1394 function. (Default value) Disabled Disable this function. Disabled Disable onboard Serial port 1. - 47 - Legacy USB storage detect This option allows users to decide whether to invoke the boot ROM of the back panel Dual LAN connectors) Enabled Enable onboard LAN2 controller function. (Default value) Disabled Disable onboard LAN2 controller function. Disable the onboard USB controller. Onboard Serial Port 1 Auto 3F8/IRQ4 BIOS will scan all USB storage devices...
Manual
Page 66
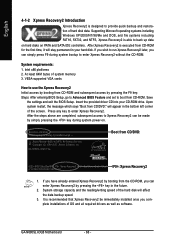
... system memory 3. Insert the provided driver CD into your hard disk. English 4-1-2 Xpress Recovery2 Introduction Xpress Recovery2 is executed from CD-ROM for the first time, it will stay permanent in your CD-ROM drive. VESA-supported VGA cards How to use the Xpress Recovery2 Initial access by booting from the CD-ROM, you can simply press F9 during system power-on PATA and SATA IDE controllers. GA-N680SLI-DQ6 FAa . . . . :BIOS Setup/Dual BIOS...
... system memory 3. Insert the provided driver CD into your hard disk. English 4-1-2 Xpress Recovery2 Introduction Xpress Recovery2 is executed from CD-ROM for the first time, it will stay permanent in your CD-ROM drive. VESA-supported VGA cards How to use the Xpress Recovery2 Initial access by booting from the CD-ROM, you can simply press F9 during system power-on PATA and SATA IDE controllers. GA-N680SLI-DQ6 FAa . . . . :BIOS Setup/Dual BIOS...

Manual
Page 75
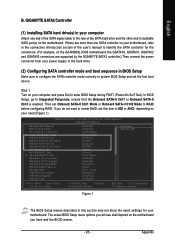
... user's manual to identify the SATA controller for the connectors. (For example, on the motherboard. A. nVIDIA® nForce 680i SLI Southbridge (1) Installing SATA hard drive(s) in your system. (2) Configure SATA controller mode and boot sequence in BIOS Setup. (3) Configure RAID set to AHCI Mode(Only for setting up RAID array. (Note 2) Required when the SATA controller is recommended that you may prepare only one hard drive. (b) An empty formatted floppy disk. (c) Windows XP/2000 setup disk. (d) Driver CD for your power supply to the hard drive. (Note 1) Required for GIGABYTE...
... user's manual to identify the SATA controller for the connectors. (For example, on the motherboard. A. nVIDIA® nForce 680i SLI Southbridge (1) Installing SATA hard drive(s) in your system. (2) Configure SATA controller mode and boot sequence in BIOS Setup. (3) Configure RAID set to AHCI Mode(Only for setting up RAID array. (Note 2) Required when the SATA controller is recommended that you may prepare only one hard drive. (b) An empty formatted floppy disk. (c) Windows XP/2000 setup disk. (d) Driver CD for your power supply to the hard drive. (Note 1) Required for GIGABYTE...

Manual
Page 76
...Defaults Figure 2 The BIOS Setup menus described in Figure 1, make sure that NV SATA RAID function is enabled. CMOS Setup Utility-Copyright (C) 1984-2007 Award Software Integrated Peripherals On-Chip IDE Channel0 IDE Prefetch Mode NV Serial-ATA Controller Serial-ATA RAID Config Onboard SATA-II Ctrl1 Onboard SATA-II Ctrl1 Mode Onboard SATA-II Ctrl2 Onboard SATA-II Ctrl2 Mode On-Chip MAC Lan On-Chip MAC1 Lan On-Chip SMART LAN Onboard LAN1 Controller Onboard LAN2 Controller Onboard LAN Boot ROM Onboard Audio Function On-Chip USB USB Keyboard Support USB Mouse Support Onboard 1394 [Enabled...
...Defaults Figure 2 The BIOS Setup menus described in Figure 1, make sure that NV SATA RAID function is enabled. CMOS Setup Utility-Copyright (C) 1984-2007 Award Software Integrated Peripherals On-Chip IDE Channel0 IDE Prefetch Mode NV Serial-ATA Controller Serial-ATA RAID Config Onboard SATA-II Ctrl1 Onboard SATA-II Ctrl1 Mode Onboard SATA-II Ctrl2 Onboard SATA-II Ctrl2 Mode On-Chip MAC Lan On-Chip MAC1 Lan On-Chip SMART LAN Onboard LAN1 Controller Onboard LAN2 Controller Onboard LAN Boot ROM Onboard Audio Function On-Chip USB USB Keyboard Support USB Mouse Support Onboard 1394 [Enabled...
Manual
Page 81
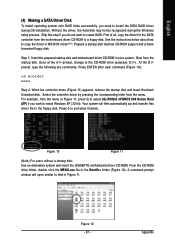
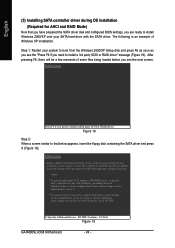
... a SATA Driver Disk To install operating system onto RAID disks successfully, you need to install the SATA RAID driver during the Windows setup process. Skip this driver file to the floppy disk. Step 1: Insert the prepared startup disk and motherboard driver CD-ROM in the BootDrv folder (Figure 12). At the D:\> prompt, type the following two commands. Press ENTER after each command (Figure 10): cd bootdrv menu Step 2: When the controller menu (Figure 11) appears, remove...
... a SATA Driver Disk To install operating system onto RAID disks successfully, you need to install the SATA RAID driver during the Windows setup process. Skip this driver file to the floppy disk. Step 1: Insert the prepared startup disk and motherboard driver CD-ROM in the BootDrv folder (Figure 12). At the D:\> prompt, type the following two commands. Press ENTER after each command (Figure 10): cd bootdrv menu Step 2: When the controller menu (Figure 11) appears, remove...

Manual
Page 82
English (5) Installing SATA controller driver during OS installation Now that you have prepared the SATA driver disk and configured BIOS settings, you are ready to that below appears, insert the floppy disk containing the SATA driver and press S (Figure 14). Figure 13 Step 2: When a screen similar to install Windows 2000/XP onto your SATA hard drive with the SATA driver. Windows Setup Setup could not determine the type of some files being loaded before you see the "Press F6 if...
English (5) Installing SATA controller driver during OS installation Now that you have prepared the SATA driver disk and configured BIOS settings, you are ready to that below appears, insert the floppy disk containing the SATA driver and press S (Figure 14). Figure 13 Step 2: When a screen similar to install Windows 2000/XP onto your SATA hard drive with the SATA driver. Windows Setup Setup could not determine the type of some files being loaded before you see the "Press F6 if...
Manual
Page 85
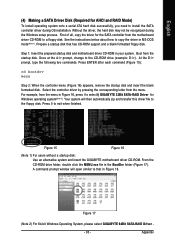
... BIOS Setup menu options you will see shall depend on the motherboard you do not want to create RAID, set this section may not show the exact settings for your computer Attach one SATA controller on the GA-N680SLI-DQ6 motherboard, the GSATAII0, GSATAII1, GSATAII2 and GSATAII3 connectors are supported by the GIGABYTE SATA2 controller.) Then connect the power connector from your power supply to the hard drive. (2) Configuring SATA controller mode and boot sequence in BIOS Setup Make sure to configure the SATA controller mode...
... BIOS Setup menu options you will see shall depend on the motherboard you do not want to create RAID, set this section may not show the exact settings for your computer Attach one SATA controller on the GA-N680SLI-DQ6 motherboard, the GSATAII0, GSATAII1, GSATAII2 and GSATAII3 connectors are supported by the GIGABYTE SATA2 controller.) Then connect the power connector from your power supply to the hard drive. (2) Configuring SATA controller mode and boot sequence in BIOS Setup Make sure to configure the SATA controller mode...
Manual
Page 93
... the motherboard driver CD-ROM to select I to a floppy disk. At the D:\> prompt, type the following two commands. Once at the A:\> prompt, change to that has CD-ROM support and a blank formatted floppy disk. A command prompt window will then automatically zip and transfer this driver file to install the SATA controller driver during the Windows setup process. Boot from the menu. English (4) Making a SATA Driver Disk (Required for Windows operating system(Note 2). Without the driver, the hard disk may...
... the motherboard driver CD-ROM to select I to a floppy disk. At the D:\> prompt, type the following two commands. Once at the A:\> prompt, change to that has CD-ROM support and a blank formatted floppy disk. A command prompt window will then automatically zip and transfer this driver file to install the SATA controller driver during the Windows setup process. Boot from the menu. English (4) Making a SATA Driver Disk (Required for Windows operating system(Note 2). Without the driver, the hard disk may...
Manual
Page 94
... device support disks from the Windows 2000/XP Setup disk and press F6 as soon as you need to install a 3rd party SCSI or RAID driver" message (Figure 18). S=Specify Additional Device ENTER=Continue F3=Exit Figure 19 GA-N680SLI-DQ6 Motherboard - 94 - After pressing F6, there will load support for use with Windows, press ENTER. English (5) Installing SATA controller driver during OS installation (Required for AHCI and RAID Mode) Now that below appears, insert the floppy disk containing the SATA driver...
... device support disks from the Windows 2000/XP Setup disk and press F6 as soon as you need to install a 3rd party SCSI or RAID driver" message (Figure 18). S=Specify Additional Device ENTER=Continue F3=Exit Figure 19 GA-N680SLI-DQ6 Motherboard - 94 - After pressing F6, there will load support for use with Windows, press ENTER. English (5) Installing SATA controller driver during OS installation (Required for AHCI and RAID Mode) Now that below appears, insert the floppy disk containing the SATA driver...

Manual
Page 95
... mass storage device(s): GIGABYTE GBB363 RAID Controller (Windows 2K/XP/2003) * To specify additional SCSI adapters, CD-ROM drives, or special disk controllers for use with Windows, including those for which you have a device support disk from a mass storage device manufacturer, press S. * If you set the Onboard SATA-II Ctrl1 Mode or Onboard SATA-II Ctrl2 Mode item in the floppy disk, a controller menu similar to AHCI mode, please select GIGABYTE GBB363 AHCI Controller (Windows 2K/ XP/ 2003). - 95 - Windows Setup Setup will appear. S=Specify Additional Device ENTER=Continue...
... mass storage device(s): GIGABYTE GBB363 RAID Controller (Windows 2K/XP/2003) * To specify additional SCSI adapters, CD-ROM drives, or special disk controllers for use with Windows, including those for which you have a device support disk from a mass storage device manufacturer, press S. * If you set the Onboard SATA-II Ctrl1 Mode or Onboard SATA-II Ctrl2 Mode item in the floppy disk, a controller menu similar to AHCI mode, please select GIGABYTE GBB363 AHCI Controller (Windows 2K/ XP/ 2003). - 95 - Windows Setup Setup will appear. S=Specify Additional Device ENTER=Continue...
Manual
Page 105
...on a specific motherboard model, please log on power. 6. Answer: The beep codes below : Steps: 1. AWARD BIOS Beep Codes 1 short: System boots successfully 2 short: CMOS setting error 1 long 1 short: DRAM or M/B error 1 long 2 short: Monitor or display card error 1 long 3 short: Keyboard error 1 long 9 short: BIOS ROM error Continuous long beeps: DRAM error Continuous short beeps: Power error - 105 - Please press Ctrl and F1 keys after updating BIOS. Answer: If your board doesn't have such jumper, you can use a metal object to connect the positive and negative pins in new BIOS version...
...on a specific motherboard model, please log on power. 6. Answer: The beep codes below : Steps: 1. AWARD BIOS Beep Codes 1 short: System boots successfully 2 short: CMOS setting error 1 long 1 short: DRAM or M/B error 1 long 2 short: Monitor or display card error 1 long 3 short: Keyboard error 1 long 9 short: BIOS ROM error Continuous long beeps: DRAM error Continuous short beeps: Power error - 105 - Please press Ctrl and F1 keys after updating BIOS. Answer: If your board doesn't have such jumper, you can use a metal object to connect the positive and negative pins in new BIOS version...


