Manual
Page 35
...numeric value or make changes Decrease the numeric value or make changes General help window that describes the appropriate keys to a new BIOS, either Gigabyte's Q-Flash or @BIOS utility can enter the BIOS setup screen by pressing "Ctrl + F1". Status Page Setup Menu / Option Page ...the highlighted item. Because BIOS flashing is potentially risky, please do it with caution and avoid inadequate operation that does not require users to boot to activate certain system features. The CMOS SETUP saves the configuration in system malfunction. - 35 - You can be used. When the ...
...numeric value or make changes Decrease the numeric value or make changes General help window that describes the appropriate keys to a new BIOS, either Gigabyte's Q-Flash or @BIOS utility can enter the BIOS setup screen by pressing "Ctrl + F1". Status Page Setup Menu / Option Page ...the highlighted item. Because BIOS flashing is potentially risky, please do it with caution and avoid inadequate operation that does not require users to boot to activate certain system features. The CMOS SETUP saves the configuration in system malfunction. - 35 - You can be used. When the ...
Manual
Page 36
GA-N680SLI-DQ6 Motherboard - 36 - English Startup Screen: :POST Screen :BIOS Setup/Dual BIOS :XpressRecovery2 :Boot Menu : Qflash : POST Screen Press the TAB key to see BIOS POST screen. (To show the BIOS POST screen at system startup, refer to the ....) : BIOS Setup/Dual BIOS Press the DELETE key to enter BIOS Setup program. : Xpress Recovery2 Press the F9 key to enter the Xpress Recovery2 screen. : Boot Menu Press the F12 key to enter Boot Menu to select the first boot device. : Qflash Press the End key to enter Q-Flash utility.
GA-N680SLI-DQ6 Motherboard - 36 - English Startup Screen: :POST Screen :BIOS Setup/Dual BIOS :XpressRecovery2 :Boot Menu : Qflash : POST Screen Press the TAB key to see BIOS POST screen. (To show the BIOS POST screen at system startup, refer to the ....) : BIOS Setup/Dual BIOS Press the DELETE key to enter BIOS Setup program. : Xpress Recovery2 Press the F9 key to enter the Xpress Recovery2 screen. : Boot Menu Press the F12 key to enter Boot Menu to select the first boot device. : Qflash Press the End key to enter Q-Flash utility.
Manual
Page 40
...K byte capacity. 1.44M, 3.5" 3.5 inch double-sided drive; 1.44 M byte capacity. 2.88M, 3.5" 3.5 inch double-sided drive; 2.88 M byte capacity. GA-N680SLI-DQ6 Motherboard - 40 - Number of cylinders Number of heads Precomp Write precomp Landing Zone Landing zone Sector Number of sectors Drive A The category identifies the types...in the system. Halt on the motherboard. it will stop for all other errors. (Default value) All, But Diskette The system boot will stop for a keyboard or disk error; Base Memory The POST of the BIOS will determine the amount of floppy disk drive...
...K byte capacity. 1.44M, 3.5" 3.5 inch double-sided drive; 1.44 M byte capacity. 2.88M, 3.5" 3.5 inch double-sided drive; 2.88 M byte capacity. GA-N680SLI-DQ6 Motherboard - 40 - Number of cylinders Number of heads Precomp Write precomp Landing Zone Landing zone Sector Number of sectors Drive A The category identifies the types...in the system. Halt on the motherboard. it will stop for all other errors. (Default value) All, But Diskette The system boot will stop for a keyboard or disk error; Base Memory The POST of the BIOS will determine the amount of floppy disk drive...
Manual
Page 41
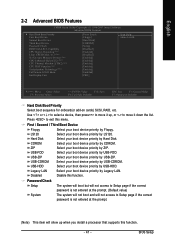
... will not access to Setup page if the correct password is not entered at the prompt. (Default value) System The system will not boot and will not access to Setup page if the correct password is not entered at the prompt. (Note) This item will show up , or to ... Enter: Select F5: Previous Values +/-/PU/PD: Value F10: Save F6: Fail-Safe Defaults ESC: Exit F1: General Help F7: Optimized Defaults Hard Disk Boot Priority Select boot sequence for onboard(or add-on cards) SCSI, RAID, etc. to move it up when you install a processor that supports this function. - 41 - USB...
... will not access to Setup page if the correct password is not entered at the prompt. (Default value) System The system will not boot and will not access to Setup page if the correct password is not entered at the prompt. (Note) This item will show up , or to ... Enter: Select F5: Previous Values +/-/PU/PD: Value F10: Save F6: Fail-Safe Defaults ESC: Exit F1: General Help F7: Optimized Defaults Hard Disk Boot Priority Select boot sequence for onboard(or add-on cards) SCSI, RAID, etc. to move it up when you install a processor that supports this function. - 41 - USB...
Manual
Page 43
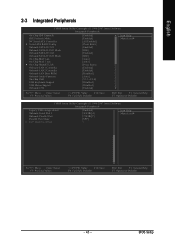
... Onboard SATA-II Ctrl2 Mode On-Chip MAC Lan On-Chip MAC1 Lan On-Chip SMART LAN Onboard LAN1 Controller Onboard LAN2 Controller Onboard LAN Boot ROM Onboard Audio Function On-Chip USB USB Keyboard Support USB Mouse Support Onboard 1394 [Enabled] [Enabled] [All Enabled] [Press Enter] [Enabled] [IDE] [Enabled] [IDE...
... Onboard SATA-II Ctrl2 Mode On-Chip MAC Lan On-Chip MAC1 Lan On-Chip SMART LAN Onboard LAN1 Controller Onboard LAN2 Controller Onboard LAN Boot ROM Onboard Audio Function On-Chip USB USB Keyboard Support USB Mouse Support Onboard 1394 [Enabled] [Enabled] [All Enabled] [Press Enter] [Enabled] [IDE] [Enabled] [IDE...
Manual
Page 47
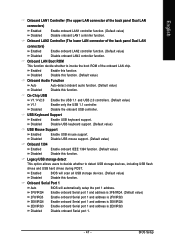
.... (Default value) Disabled Disable this function. Legacy USB storage detect This option allows users to decide whether to invoke the boot ROM of the back panel Dual LAN connectors) Enabled Enable onboard LAN1 controller function. (Default value) Disabled Disable onboard LAN1 controller function.... Onboard LAN Boot ROM This function decide whether to detect USB storage devices, including USB flash drives and USB hard drives during POST. On-...
.... (Default value) Disabled Disable this function. Legacy USB storage detect This option allows users to decide whether to invoke the boot ROM of the back panel Dual LAN connectors) Enabled Enable onboard LAN1 controller function. (Default value) Disabled Disable onboard LAN1 controller function.... Onboard LAN Boot ROM This function decide whether to detect USB storage devices, including USB flash drives and USB hard drives during POST. On-...

Manual
Page 52
... Case Opened value, enable Reset Case Open Status and save the change to CMOS, and then your computer will show "No." GA-N680SLI-DQ6 Motherboard - 52 - English 2-6 PC Health Status CMOS Setup Utility-Copyright (C) 1984-2007 Award Software PC Health Status Reset Case Open.../ 158oF Monitor CPU temperature at 70oC / 158oF. 80oC / 176oF Monitor CPU temperature at 80oC / 176oF. 90oC / 194oF Monitor CPU temperature at next boot. Current Voltage(V) Vcore / DDR2 1.8V / +3.3V / +12V Detect system's voltage status automatically. Current CPU/SYSTEM/POWER FAN Speed (RPM) Detect CPU...
... Case Opened value, enable Reset Case Open Status and save the change to CMOS, and then your computer will show "No." GA-N680SLI-DQ6 Motherboard - 52 - English 2-6 PC Health Status CMOS Setup Utility-Copyright (C) 1984-2007 Award Software PC Health Status Reset Case Open.../ 158oF Monitor CPU temperature at 70oC / 158oF. 80oC / 176oF Monitor CPU temperature at 80oC / 176oF. 90oC / 194oF Monitor CPU temperature at next boot. Current Voltage(V) Vcore / DDR2 1.8V / +3.3V / +12V Detect system's voltage status automatically. Current CPU/SYSTEM/POWER FAN Speed (RPM) Detect CPU...
Manual
Page 58
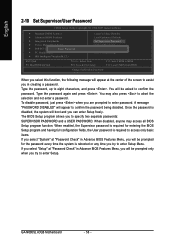
... password every time the system is disabled, the system will boot and you can enter Setup freely. A message "PASSWORD DISABLED" will appear at "Password Check" in creating a password. When disabled, anyone may also press to abort the selection and not enter a password. GA-N680SLI-DQ6 Motherboard - 58 - To disable password, just press when you...
... password every time the system is disabled, the system will boot and you can enter Setup freely. A message "PASSWORD DISABLED" will appear at "Password Check" in creating a password. When disabled, anyone may also press to abort the selection and not enter a password. GA-N680SLI-DQ6 Motherboard - 58 - To disable password, just press when you...
Manual
Page 66
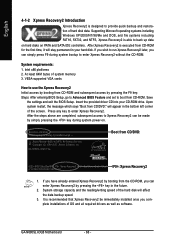
...CD-ROM for the first time, it will affect the data backup speed. 3. Press any key to enter Xpress Recovery2. GA-N680SLI-DQ6 FAa . . . . :BIOS Setup/Dual BIOS : Xpress Recovery2 : Boot Menu : Qflash 4/12/2007-NF68-6A61IG01C-00 : Xpress Recovery2 1. English 4-1-2 Xpress Recovery2 Introduction Xpress Recovery2 is designed ... made by pressing the F9 key: Steps: After entering BIOS Setup, go to Advanced BIOS Feature and set to boot from CD/DVD: Press any key to startup XpressRecovery2..... Intel x86 platforms 2. GA-N680SLI-DQ6 Motherboard - 66 - At least 64M bytes of system memory 3.
...CD-ROM for the first time, it will affect the data backup speed. 3. Press any key to enter Xpress Recovery2. GA-N680SLI-DQ6 FAa . . . . :BIOS Setup/Dual BIOS : Xpress Recovery2 : Boot Menu : Qflash 4/12/2007-NF68-6A61IG01C-00 : Xpress Recovery2 1. English 4-1-2 Xpress Recovery2 Introduction Xpress Recovery2 is designed ... made by pressing the F9 key: Steps: After entering BIOS Setup, go to Advanced BIOS Feature and set to boot from CD/DVD: Press any key to startup XpressRecovery2..... Intel x86 platforms 2. GA-N680SLI-DQ6 Motherboard - 66 - At least 64M bytes of system memory 3.
Manual
Page 68
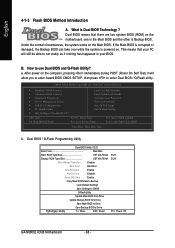
... Drive Save Backup BIOS to Drive PgDn/PgUp: Modify : Move ESC: Reset 512K 512K F10: Power Off GA-N680SLI-DQ6 Motherboard - 68 - Dual BIOS / Q-Flash Programming Utility Dual BIOS Utility V2.02 Boot From Main Bios Main ROM Type/Size SST 49LF004A Backup ROM Type/Size SST 49LF004A Wide Range Protection Disable... Boot From Main Bios Auto Recovery Enable Halt On Error Disable Keep DMI Data Enable Copy Main ROM Data to Backup Load Default Settings ...
... Drive Save Backup BIOS to Drive PgDn/PgUp: Modify : Move ESC: Reset 512K 512K F10: Power Off GA-N680SLI-DQ6 Motherboard - 68 - Dual BIOS / Q-Flash Programming Utility Dual BIOS Utility V2.02 Boot From Main Bios Main ROM Type/Size SST 49LF004A Backup ROM Type/Size SST 49LF004A Wide Range Protection Disable... Boot From Main Bios Auto Recovery Enable Halt On Error Disable Keep DMI Data Enable Copy Main ROM Data to Backup Load Default Settings ...

Manual
Page 69
... Management Setup of the system after the power is on peripherals cards(ex. BIOS Recovery: Backup to "Enable", the PC will not be changed to boot from Main BIOS or Backup BIOS. Dual BIOS Item explanation: Wide Range Protection: Disable(Default), Enable Status 1: If any alteration on the... changed by flashing new BIOS. Copy Main ROM Data to Backup (If you want to enter the BIOS setting, please press "Del" key when the boot screen appears.) Halt On Error : Disable(Default), Enable If the BIOS occurs a checksum error or the Main BIOS occurs a WIDE RANGE PROTECTION error and Halt...
... Management Setup of the system after the power is on peripherals cards(ex. BIOS Recovery: Backup to "Enable", the PC will not be changed to boot from Main BIOS or Backup BIOS. Dual BIOS Item explanation: Wide Range Protection: Disable(Default), Enable Status 1: If any alteration on the... changed by flashing new BIOS. Copy Main ROM Data to Backup (If you want to enter the BIOS setting, please press "Del" key when the boot screen appears.) Halt On Error : Disable(Default), Enable If the BIOS occurs a checksum error or the Main BIOS occurs a WIDE RANGE PROTECTION error and Halt...
Manual
Page 70
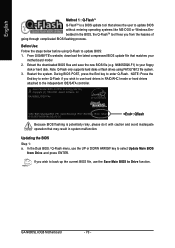
...before using FAT32/16/12 file system. 3. Restart the system. N680SDQ6.F1) to your motherboard model 2. GA-N680SLI-DQ6 FAa . . . . :BIOS Setup/Dual BIOS : Xpress Recovery2 : Boot Menu : Qflash 4/12/2007-NF68-6A61IG01C-00 : Qflash Because BIOS flashing is a BIOS update tool that ...Update Main BIOS from the hassles of going through complicated BIOS flashing process. From GIGABYTE's website, download the latest compressed BIOS update file that matches your floppy disk or hard disk. GA-N680SLI-DQ6 Motherboard - 70 - English Method 1 : Q-FlashTM Q-FlashTM is potentially risky,...
...before using FAT32/16/12 file system. 3. Restart the system. N680SDQ6.F1) to your motherboard model 2. GA-N680SLI-DQ6 FAa . . . . :BIOS Setup/Dual BIOS : Xpress Recovery2 : Boot Menu : Qflash 4/12/2007-NF68-6A61IG01C-00 : Qflash Because BIOS flashing is a BIOS update tool that ...Update Main BIOS from the hassles of going through complicated BIOS flashing process. From GIGABYTE's website, download the latest compressed BIOS update file that matches your floppy disk or hard disk. GA-N680SLI-DQ6 Motherboard - 70 - English Method 1 : Q-FlashTM Q-FlashTM is potentially risky,...
Manual
Page 71
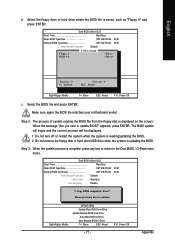
... Drive Save Main BIOS to Drive Save Backup BIOS to the Dual BIOS / Q-Flash main menu. appears, press ENTER. Appendix Dual BIOS Utility V2.02 Boot From Main Bios Main ROM Type/Size SST 49LF004A 512K Backup ROM Type/Size SST 49LF004A 512K Wide Range Protection Disable... Boot From0 file(s) fMoauindBios Floppy AAuto Recovery HDD 0-0 Halt On Error Enable Disable Keep DMI Data Enable Copy Main ROM Data to Backup Load Default Settings ...
... Drive Save Main BIOS to Drive Save Backup BIOS to the Dual BIOS / Q-Flash main menu. appears, press ENTER. Appendix Dual BIOS Utility V2.02 Boot From Main Bios Main ROM Type/Size SST 49LF004A 512K Backup ROM Type/Size SST 49LF004A 512K Wide Range Protection Disable... Boot From0 file(s) fMoauindBios Floppy AAuto Recovery HDD 0-0 Halt On Error Enable Disable Keep DMI Data Enable Copy Main ROM Data to Backup Load Default Settings ...
Manual
Page 74
... III. Check out supported motherboard and Flash ROM: In the very beginning, there is "Save Current BIOS" icon shown in @BIOSTM server, please go onto Gigabyte's web site for downloading and updating it shows two or more motherboard's model names to save the current BIOS version. II. III. V. It means to.... Note: I , if the BIOS file you check out which kind of motherboard and which brand of Flash ROM are the same as your system won't boot. Do not use @BIOS and C.O.M. (Corporate Online Management) at the same time. GA-N680SLI-DQ6 Motherboard - 74 -
... III. Check out supported motherboard and Flash ROM: In the very beginning, there is "Save Current BIOS" icon shown in @BIOSTM server, please go onto Gigabyte's web site for downloading and updating it shows two or more motherboard's model names to save the current BIOS version. II. III. V. It means to.... Note: I , if the BIOS file you check out which kind of motherboard and which brand of Flash ROM are the same as your system won't boot. Do not use @BIOS and C.O.M. (Corporate Online Management) at the same time. GA-N680SLI-DQ6 Motherboard - 74 -

Manual
Page 75
... follow the steps below: (1) Install SATA hard drive(s) in your system. (2) Configure SATA controller mode and boot sequence in BIOS Setup. (3) Configure RAID set to AHCI Mode(Only for GIGABYTE SATA2 Controller). - 75 - nVIDIA® nForce 680i SLI Southbridge (1) Installing SATA hard drive(s) in RAID BIOS... motherboard, refer to the connectors introduction section of the SATA hard drive and the other end to available SATA port(s) on the GA-N680SLI-DQ6 motherboard, the SATAII0, SATAII1, SATAII2, SATAII3, SATAII4 and SATAII5 connectors are more than one hard drive. (b) An empty formatted ...
... follow the steps below: (1) Install SATA hard drive(s) in your system. (2) Configure SATA controller mode and boot sequence in BIOS Setup. (3) Configure RAID set to AHCI Mode(Only for GIGABYTE SATA2 Controller). - 75 - nVIDIA® nForce 680i SLI Southbridge (1) Installing SATA hard drive(s) in RAID BIOS... motherboard, refer to the connectors introduction section of the SATA hard drive and the other end to available SATA port(s) on the GA-N680SLI-DQ6 motherboard, the SATAII0, SATAII1, SATAII2, SATAII3, SATAII4 and SATAII5 connectors are more than one hard drive. (b) An empty formatted ...

Manual
Page 76
...(Figure 2). The actual BIOS Setup menu options you will see shall depend on the Serial-ATA RAID Config item to enter the submenu . GA-N680SLI-DQ6 Motherboard - 76 - CMOS Setup Utility-Copyright (C) 1984-2007 Award Software Integrated Peripherals On-Chip IDE Channel0 IDE Prefetch Mode NV Serial-ATA ... Onboard SATA-II Ctrl2 Mode On-Chip MAC Lan On-Chip MAC1 Lan On-Chip SMART LAN Onboard LAN1 Controller Onboard LAN2 Controller Onboard LAN Boot ROM Onboard Audio Function On-Chip USB USB Keyboard Support USB Mouse Support Onboard 1394 [Enabled] [Enabled] [All Enabled] [Press Enter] [Enabled]...
...(Figure 2). The actual BIOS Setup menu options you will see shall depend on the Serial-ATA RAID Config item to enter the submenu . GA-N680SLI-DQ6 Motherboard - 76 - CMOS Setup Utility-Copyright (C) 1984-2007 Award Software Integrated Peripherals On-Chip IDE Channel0 IDE Prefetch Mode NV Serial-ATA ... Onboard SATA-II Ctrl2 Mode On-Chip MAC Lan On-Chip MAC1 Lan On-Chip SMART LAN Onboard LAN1 Controller Onboard LAN2 Controller Onboard LAN Boot ROM Onboard Audio Function On-Chip USB USB Keyboard Support USB Mouse Support Onboard 1394 [Enabled] [Enabled] [All Enabled] [Press Enter] [Enabled]...
Manual
Page 77
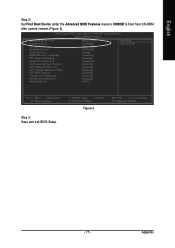
CMOS Setup Utility-Copyright (C) 1984-2007 Award Software Advanced BIOS Features Hard Disk Boot Priority First Boot Device Second Boot Device Third Boot Device Password Check HDD S.M.A.R.T. English Step 2: Set First Boot Device under the Advanced BIOS Features menu to CDROM to 3 No-Execute Memory Protect CPU Enhanced Halt (C1E) CPU Thermal Monitor 2(TM2) CPU ... Value F10: Save F6: Fail-Safe Defaults Figure 3 ESC: Exit F1: General Help F7: Optimized Defaults - 77 - Capability CPU Hyper-Threading Limit CPUID Max. to boot from CD-ROM after system restarts (Figure 3). Appendix
CMOS Setup Utility-Copyright (C) 1984-2007 Award Software Advanced BIOS Features Hard Disk Boot Priority First Boot Device Second Boot Device Third Boot Device Password Check HDD S.M.A.R.T. English Step 2: Set First Boot Device under the Advanced BIOS Features menu to CDROM to 3 No-Execute Memory Protect CPU Enhanced Halt (C1E) CPU Thermal Monitor 2(TM2) CPU ... Value F10: Save F6: Fail-Safe Defaults Figure 3 ESC: Exit F1: General Help F7: Optimized Defaults - 77 - Capability CPU Hyper-Threading Limit CPUID Max. to boot from CD-ROM after system restarts (Figure 3). Appendix

Manual
Page 78
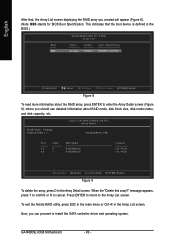
...Disks Port Disk Model [ ] Add Capacity [ ] Del [ESC] Quit [F6] Back [F7] Finish [TAB] Navigate [ ] Select [ENTER] Popup Figure 5 GA-N680SLI-DQ6 Motherboard - 78 - Detecting array ... RAID Mode: Striping MediaShield Utility Nov 2 2006 - You can manually set the Striping Block size. Step 1: After the POST ...memory test begins and before the operating system boot begins, look for a message which says "Press F10 to enter the RAID BIOS setup utility. Figure 4 Step 2: The Define a New ...
...Disks Port Disk Model [ ] Add Capacity [ ] Del [ESC] Quit [F6] Back [F7] Finish [TAB] Navigate [ ] Select [ENTER] Popup Figure 5 GA-N680SLI-DQ6 Motherboard - 78 - Detecting array ... RAID Mode: Striping MediaShield Utility Nov 2 2006 - You can manually set the Striping Block size. Step 1: After the POST ...memory test begins and before the operating system boot begins, look for a message which says "Press F10 to enter the RAID BIOS setup utility. Figure 4 Step 2: The Define a New ...
Manual
Page 80
English After that the boot device is defined in the BIOS.) Boot BBS MediaShield Utility Nov 2 2006 - message appears, press Y to confirm or N to install the SATA controller driver and operating system. To exit the Nvidia... NVIDIA STRIPE 223.57G [Ctrl-X] Exit [ ] Select [B] Set Boot [N] New Array [ENTER] Detail Figure 8 To read more information about the RAID array, press ENTER to the Array List screen. Array Detail - RAID Mode: Striping Striping Width : 2 Array 1: NVIDIA STRIPE 233.57G - GA-N680SLI-DQ6 Motherboard - 80 - Array List - This indicates that , the ...
English After that the boot device is defined in the BIOS.) Boot BBS MediaShield Utility Nov 2 2006 - message appears, press Y to confirm or N to install the SATA controller driver and operating system. To exit the Nvidia... NVIDIA STRIPE 223.57G [Ctrl-X] Exit [ ] Select [B] Set Boot [N] New Array [ENTER] Detail Figure 8 To read more information about the RAID array, press ENTER to the Array List screen. Array Detail - RAID Mode: Striping Striping Width : 2 Array 1: NVIDIA STRIPE 233.57G - GA-N680SLI-DQ6 Motherboard - 80 - Array List - This indicates that , the ...
Manual
Page 81
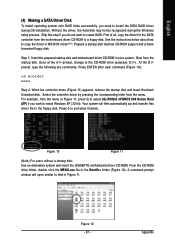
... a blank formatted floppy disk. Figure 10 Figure 11 (Note) For users without a startup disk: Use an alternative system and insert the GIGABYTE motherboard driver CD-ROM. Figure 12 - 81 - Boot from the menu. Appendix A command prompt window will then automatically zip and transfer this step if you wish to install Windows XP...
... a blank formatted floppy disk. Figure 10 Figure 11 (Note) For users without a startup disk: Use an alternative system and insert the GIGABYTE motherboard driver CD-ROM. Figure 12 - 81 - Boot from the menu. Appendix A command prompt window will then automatically zip and transfer this step if you wish to install Windows XP...


