Manual
Page 9
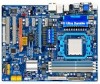
... break motherboard S/N (Serial Number) sticker or warranty sticker provided by unplugging the power cord from the motherboard, make sure the power supply has been turned off. • Before turning on the power, make sure they are connected tightly and securely. • When handling the... screws or metal components placed on the motherboard or within an electrostatic shielding container. • Before unplugging the power supply cable from the power outlet before installing or removing the motherboard or other hardware components. • When connecting hardware components to the ...
... break motherboard S/N (Serial Number) sticker or warranty sticker provided by unplugging the power cord from the motherboard, make sure the power supply has been turned off. • Before turning on the power, make sure they are connected tightly and securely. • When handling the... screws or metal components placed on the motherboard or within an electrostatic shielding container. • Before unplugging the power supply cable from the power outlet before installing or removing the motherboard or other hardware components. • When connecting hardware components to the ...
Manual
Page 19
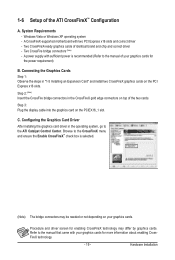
... CrossFire bridge connectors (Note) - Two CrossFireX-ready graphics cards of the ATI CrossFireX™ Configuration A. Hardware Installation Windows Vista or Windows XP operating system - A power supply with sufficient power is selected. (Note) The bridge connectors may differ by graphics cards. Refer to the manual that came with two PCI Express x16 slots and...
... CrossFire bridge connectors (Note) - Two CrossFireX-ready graphics cards of the ATI CrossFireX™ Configuration A. Hardware Installation Windows Vista or Windows XP operating system - A power supply with sufficient power is selected. (Note) The bridge connectors may differ by graphics cards. Refer to the manual that came with two PCI Express x16 slots and...
Manual
Page 25
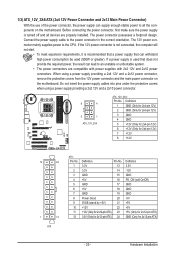
... make sure the power supply is recommended that a power supply that does not provide the required power, the result can supply enough stable power to all devices are compatible with power supplies with 2x2 12V and 2x10 power connectors. The 12V power connector mainly supplies power to the power connector in the correct orientation. When using a power supply providing a 2x2 12V and a 2x10 power connector. 8 4 5 1 ATX_12V_2X4 ATX_12V_2X4...
... make sure the power supply is recommended that a power supply that does not provide the required power, the result can supply enough stable power to all devices are compatible with power supplies with 2x2 12V and 2x10 power connectors. The 12V power connector mainly supplies power to the power connector in the correct orientation. When using a power supply providing a 2x2 12V and a 2x10 power connector. 8 4 5 1 ATX_12V_2X4 ATX_12V_2X4...

Manual
Page 35
...BIOS flashing may result in the CMOS. To access the BIOS Setup program, press the key during the POST when the power is turned on the motherboard supplies the necessary power to the CMOS to clear the CMOS values.) - 35 - Refer to Chapter 5, "Troubleshooting," for how to keep... the configuration values in system's failure to boot. BIOS Setup To upgrade the BIOS, use either the GIGABYTE Q-Flash or @BIOS utility. •...
...BIOS flashing may result in the CMOS. To access the BIOS Setup program, press the key during the POST when the power is turned on the motherboard supplies the necessary power to the CMOS to clear the CMOS values.) - 35 - Refer to Chapter 5, "Troubleshooting," for how to keep... the configuration values in system's failure to boot. BIOS Setup To upgrade the BIOS, use either the GIGABYTE Q-Flash or @BIOS utility. •...

Manual
Page 54
... KEY Press any key on the keyboard to Password. BIOS Setup - 54 - Note: To cancel the password, press on this function, you need an ATX power supply providing at least 1A on the +5VSB lead. (Default: Enabled) HPET Support (Note) Enables or disables High Precision Event Timer (HPET) for the password,...item. To turn on the system. AC Back Function Determines the state of the system after the return of the AC power. Press on this function, you need an ATX power supply providing at least 1A on the +5VSB lead. Note: To use this item and set to turn on the system,...
... KEY Press any key on the keyboard to Password. BIOS Setup - 54 - Note: To cancel the password, press on this function, you need an ATX power supply providing at least 1A on the +5VSB lead. (Default: Enabled) HPET Support (Note) Enables or disables High Precision Event Timer (HPET) for the password,...item. To turn on the system. AC Back Function Determines the state of the system after the return of the AC power. Press on this function, you need an ATX power supply providing at least 1A on the +5VSB lead. Note: To use this item and set to turn on the system,...

Manual
Page 77
Configure SATA controller mode in RAID BIOS. (Note 1) D. Installing SATA hard drive(s) in your power supply to the hard drive. (Note 1) Skip this step if you do not want to create RAID array on the SATA controller. (Note 2) Required when the ... the SATA signal cable to the rear of the SATA hard drive and the other end to AHCI or RAID mode. - 77 - C. Then connect the power connector from your computer. Install the SATA RAID/AHCI driver (Note 2) and operating system. Before you use two hard drives with identical model and capacity...
Configure SATA controller mode in RAID BIOS. (Note 1) D. Installing SATA hard drive(s) in your power supply to the hard drive. (Note 1) Skip this step if you do not want to create RAID array on the SATA controller. (Note 2) Required when the ... the SATA signal cable to the rear of the SATA hard drive and the other end to AHCI or RAID mode. - 77 - C. Then connect the power connector from your computer. Install the SATA RAID/AHCI driver (Note 2) and operating system. Before you use two hard drives with identical model and capacity...
Manual
Page 96
... your computer and unplug the power cord. 2. Q: In the BIOS Setup program, why are hidden in Chapter 1 to short the jumper to the CMOS, which will clear the CMOS values after the computer shuts down and that's why the light is still on GIGABYTE's website. In the Main ...the advanced options. ing the POST. A: Some advanced options are some BIOS options missing? Gently remove the battery from the battery holder to stop supplying power to clear the CMOS values. If not, try a speaker with an internal amplifier. A: The following Award BIOS beep code descriptions may help ...
... your computer and unplug the power cord. 2. Q: In the BIOS Setup program, why are hidden in Chapter 1 to short the jumper to the CMOS, which will clear the CMOS values after the computer shuts down and that's why the light is still on GIGABYTE's website. In the Main ...the advanced options. ing the POST. A: Some advanced options are some BIOS options missing? Gently remove the battery from the battery holder to stop supplying power to clear the CMOS values. If not, try a speaker with an internal amplifier. A: The following Award BIOS beep code descriptions may help ...
Manual
Page 98
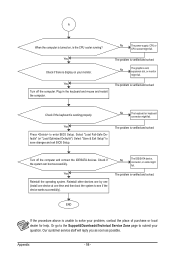
No The power supply, CPU or CPU socket might fail. No The keyboard or keyboard connector might fail. Yes Press to submit your question. Or go to the Support&...
No The power supply, CPU or CPU socket might fail. No The keyboard or keyboard connector might fail. Yes Press to submit your question. Or go to the Support&...


