Manual
Page 3
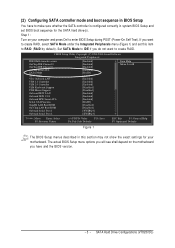
... the BIOS version. - 3 - If you want to RAID (RAID by default). Set SATA Mode to IDE if you have to make sure whether the SATA controller is configured correctly in this item to create RAID. CMOS Setup Utility-Copyright (C) 1984-2004 Award Software Integrated Peripherals IDE DMA transfer access OnChip IDE Channel 0 OnChip IDE Channel 1 OnChip Serial ATA SATA Mode AC97 Audio VIA Onboard LAN USB 1.1 Controller USB 2.0 Controller USB Keyboard Support USB Mouse Support Onboard H/W LAN Onboard H/W 1394 Onboard H/W Serial ATA Serial ATA Function GigaBit LAN Boot ROM On-Chip LAN Boot ROM...
... the BIOS version. - 3 - If you want to RAID (RAID by default). Set SATA Mode to IDE if you have to make sure whether the SATA controller is configured correctly in this item to create RAID. CMOS Setup Utility-Copyright (C) 1984-2004 Award Software Integrated Peripherals IDE DMA transfer access OnChip IDE Channel 0 OnChip IDE Channel 1 OnChip Serial ATA SATA Mode AC97 Audio VIA Onboard LAN USB 1.1 Controller USB 2.0 Controller USB Keyboard Support USB Mouse Support Onboard H/W LAN Onboard H/W 1394 Onboard H/W Serial ATA Serial ATA Function GigaBit LAN Boot ROM On-Chip LAN Boot ROM...

Manual
Page 4
... the Hard Disk Boot Priority submenu, select the model of the SATA hard drive onto which you intent to boot from CD-ROM after system restarts (Figure 3). CMOS Setup Utility-Copyright (C) 1984-2004 Award Software Hard Disk Boot Priority 1. CMOS Setup Utility-Copyright (C) 1984-2004 Award Software Advanced BIOS Features } Hard Disk Boot Priority First Boot Device [Press Enter] [CDROM] Item Help Menu Level} Second Boot Device [Hard Disk] Third Boot Device [CDROM] Boot Up Floopy Seek Password Check Flexible AGP 8X [Disabled] [Setup] [Auto] Init Display First [AGP] higf: Move Enter...
... the Hard Disk Boot Priority submenu, select the model of the SATA hard drive onto which you intent to boot from CD-ROM after system restarts (Figure 3). CMOS Setup Utility-Copyright (C) 1984-2004 Award Software Hard Disk Boot Priority 1. CMOS Setup Utility-Copyright (C) 1984-2004 Award Software Advanced BIOS Features } Hard Disk Boot Priority First Boot Device [Press Enter] [CDROM] Item Help Menu Level} Second Boot Device [Hard Disk] Third Boot Device [CDROM] Boot Up Floopy Seek Password Check Flexible AGP 8X [Disabled] [Setup] [Auto] Init Display First [AGP] higf: Move Enter...
Manual
Page 10
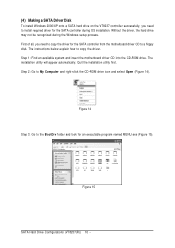
... to install required driver for the SATA controller during the Windows setup process. ¤å First of all, you need to copy the driver for an executable program named MENU.exe (Figure 15). Figure 15 SATA Hard Drive Configurations (VT8237(R)) 10 - Figure 14 Step 3: Go to the BootDrv folder and look for the SATA controller from the motherboard driver CD to a floppy disk. The installation utility will appear automatically. The instructions...
... to install required driver for the SATA controller during the Windows setup process. ¤å First of all, you need to copy the driver for an executable program named MENU.exe (Figure 15). Figure 15 SATA Hard Drive Configurations (VT8237(R)) 10 - Figure 14 Step 3: Go to the BootDrv folder and look for the SATA controller from the motherboard driver CD to a floppy disk. The installation utility will appear automatically. The instructions...

Manual
Page 12
... type of ¤¤ Windows XP installation. ¤å Step 1: Restart your SATA hard drive with Windows, press ENTER. Windows Setup Press F6 if you have a device support disk from a mass storage device manufacturer, press S. * If you need to boot from the Windows 2000/XP Setup disk and press F6 as soon as you see the next screen. The following mass storage devices(s) * To specify additional SCSI adapters, CD-ROM drives, or special disk controllers for use...
... type of ¤¤ Windows XP installation. ¤å Step 1: Restart your SATA hard drive with Windows, press ENTER. Windows Setup Press F6 if you have a device support disk from a mass storage device manufacturer, press S. * If you need to boot from the Windows 2000/XP Setup disk and press F6 as soon as you see the next screen. The following mass storage devices(s) * To specify additional SCSI adapters, CD-ROM drives, or special disk controllers for use...

Serial ATA manual
Page 4
Key Features The VIA SATA RAID solution uses the VT6420 chip as a RAID controller, which is not really a RAID and does not support fault tolerance. The RAID software is a Windows-based software utility with mainboard IDE controller. 8. Supports hard disk drive larger than 137 GB (48-bits LBA). 5. Supports PCI Plug and Play. Bootable disk or disk array support. 12. On-line help for easy operation for easy troubleshooting. 19. Listed below are having different capacities. Microsoft Windows 98, Me, NT4.0, 2000...
Key Features The VIA SATA RAID solution uses the VT6420 chip as a RAID controller, which is not really a RAID and does not support fault tolerance. The RAID software is a Windows-based software utility with mainboard IDE controller. 8. Supports hard disk drive larger than 137 GB (48-bits LBA). 5. Supports PCI Plug and Play. Bootable disk or disk array support. 12. On-line help for easy operation for easy troubleshooting. 19. Listed below are having different capacities. Microsoft Windows 98, Me, NT4.0, 2000...

Serial ATA manual
Page 5
... connect SATA hard disk drivers according to operate with the VT6420 SATA RAID controller. 2. Four SATA Configuration: Supports RAID 0, RAID 1, and JBOD. Only SATA hard disk drive supports RAID, so it supports RAID 0, RAID 1, and JBOD. For maximized performance, installing all identical SATA drives of Drives 1 2 3 4 SATA Channel 0 Master Master Master & Slave Master & Slave SATA Channel 1 -----Master Master Master & Slave Revision 1.01, May 19, 2003 3 Installing The Hard Drives Number of the same model and capacity is recommended. INSTALLING THE HARD DRIVES The VT6420 SATA...
... connect SATA hard disk drivers according to operate with the VT6420 SATA RAID controller. 2. Four SATA Configuration: Supports RAID 0, RAID 1, and JBOD. Only SATA hard disk drive supports RAID, so it supports RAID 0, RAID 1, and JBOD. For maximized performance, installing all identical SATA drives of Drives 1 2 3 4 SATA Channel 0 Master Master Master & Slave Master & Slave SATA Channel 1 -----Master Master Master & Slave Revision 1.01, May 19, 2003 3 Installing The Hard Drives Number of the same model and capacity is recommended. INSTALLING THE HARD DRIVES The VT6420 SATA...

Serial ATA manual
Page 17
After Windows has finished booting up, the system will automatically find the newly installed adapter and prompt the Found New Hardware Wizard window. Revision 1.01, May 19, 2003 15 Driver and RAID Software Installation Insert the RAID driver and software installation CD or diskettes. Browse the CD or diskettes and double click on setup.exe to skip it. 2. DRIVER AND RAID SOFTWARE INSTALLATION Microsoft Windows Driver Installation 1. Click Cancel to begin the driver and software installation.
After Windows has finished booting up, the system will automatically find the newly installed adapter and prompt the Found New Hardware Wizard window. Revision 1.01, May 19, 2003 15 Driver and RAID Software Installation Insert the RAID driver and software installation CD or diskettes. Browse the CD or diskettes and double click on setup.exe to skip it. 2. DRIVER AND RAID SOFTWARE INSTALLATION Microsoft Windows Driver Installation 1. Click Cancel to begin the driver and software installation.

User Manual
Page 6
... Processing Unit (CPU 16 Step 2: Install Memory Modules 18 Step 3: Install expansion cards 20 Step 3-1: AGP Card Installation 20 Step 4: Connect ribbon cables, cabinet wires and power supply 21 Step 4-1: I/O Back Panel Introduction 21 Step 4-2: Connectors Introduction 23 Chapter 3 BIOS Setup 36 The Main Menu (For example: BIOS Ver. : F1 37 Standard CMOS Features 39 Advanced BIOS Features 42 Integrated Peripherals 44 Power Management Setup 49 PnP/PCI Configurations 52 PC Health Status 53 Frequency/Voltage Control 54 GA-K8VT800M Motherboard - 6 -
... Processing Unit (CPU 16 Step 2: Install Memory Modules 18 Step 3: Install expansion cards 20 Step 3-1: AGP Card Installation 20 Step 4: Connect ribbon cables, cabinet wires and power supply 21 Step 4-1: I/O Back Panel Introduction 21 Step 4-2: Connectors Introduction 23 Chapter 3 BIOS Setup 36 The Main Menu (For example: BIOS Ver. : F1 37 Standard CMOS Features 39 Advanced BIOS Features 42 Integrated Peripherals 44 Power Management Setup 49 PnP/PCI Configurations 52 PC Health Status 53 Frequency/Voltage Control 54 GA-K8VT800M Motherboard - 6 -

User Manual
Page 8
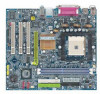
... 533MHz - 3 PCI slots support 33MHz & PCI 2.2 compliant - 2 IDE controllers provide IDE HDD/CD-ROM (IDE1, IDE2) with PIO, Bus Master(DMA33/ATA66/ATA100/ATA133) operation modes GA-K8VT800M Motherboard - 8 - Support core frequencies in excess of 1.6 GHz(2800+) and faster - to 2GB DRAM (Max) - VIA VT8237 Integrated Peripheral Controller (PSIPC) - 2 184-pin DDR DIMM sockets - Supports up to be continued... SATA cable x 1; VIA K8T800 H.T. English Chapter 1 Introduction 1.1 Item Checklist The GA-K8VT800M motherboard CD for AMD AlthlonTM 64 processor (K8) 128K...
... 533MHz - 3 PCI slots support 33MHz & PCI 2.2 compliant - 2 IDE controllers provide IDE HDD/CD-ROM (IDE1, IDE2) with PIO, Bus Master(DMA33/ATA66/ATA100/ATA133) operation modes GA-K8VT800M Motherboard - 8 - Support core frequencies in excess of 1.6 GHz(2800+) and faster - to 2GB DRAM (Max) - VIA VT8237 Integrated Peripheral Controller (PSIPC) - 2 184-pin DDR DIMM sockets - Supports up to be continued... SATA cable x 1; VIA K8T800 H.T. English Chapter 1 Introduction 1.1 Item Checklist The GA-K8VT800M motherboard CD for AMD AlthlonTM 64 processor (K8) 128K...

User Manual
Page 9
English Serial ATA On-Board Peripherals Hardware Monitor On-Board LAN On-Board Sound On-Board SATA RAID PS/2 Connector BIOS y 2 Serial ATA connectors in 150 MB/s operation mode y Built-in VIA VT8237 (Note 1) y 1 Floppy port supports 2 FDD with 360K, 720K,1.2M, 1.44M and 2.88M bytes y 1 Parallel port supports Normal/EPP/ECP mode y 2 Serial ports (COMA & COMB) y 8 x USB 2.0/1.1 ports y 1 IrDA connector for IR y 1 Front Audio connector y CPU/System fan revolution detect y CPU temperature detect y CPU warning temperature y System voltage detect y CPU/System fan fail warning y Thermal shutdown ...
English Serial ATA On-Board Peripherals Hardware Monitor On-Board LAN On-Board Sound On-Board SATA RAID PS/2 Connector BIOS y 2 Serial ATA connectors in 150 MB/s operation mode y Built-in VIA VT8237 (Note 1) y 1 Floppy port supports 2 FDD with 360K, 720K,1.2M, 1.44M and 2.88M bytes y 1 Parallel port supports Normal/EPP/ECP mode y 2 Serial ports (COMA & COMB) y 8 x USB 2.0/1.1 ports y 1 IrDA connector for IR y 1 Front Audio connector y CPU/System fan revolution detect y CPU temperature detect y CPU warning temperature y System voltage detect y CPU/System fan fail warning y Thermal shutdown ...
User Manual
Page 15
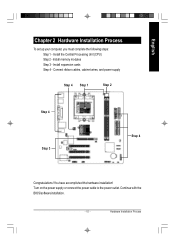
Install memory modules Step 3 - Connect ribbon cables, cabinet wires, and power supply Step 4 Step 1 Step 2 Step 4 Step 3 Step 4 Congratulations! You have accomplished the hardware installation! Hardware Installation Process Install expansion cards Step 4 - Continue with the BIOS/software installation. - 15 - English Chapter 2 Hardware Installation Process To set up your computer, you must complete the following steps: Step 1 - Turn on the power supply or connect the power cable to the power outlet. Install the Central Processing Unit (CPU) Step 2 -
Install memory modules Step 3 - Connect ribbon cables, cabinet wires, and power supply Step 4 Step 1 Step 2 Step 4 Step 3 Step 4 Congratulations! You have accomplished the hardware installation! Hardware Installation Process Install expansion cards Step 4 - Continue with the BIOS/software installation. - 15 - English Chapter 2 Hardware Installation Process To set up your computer, you must complete the following steps: Step 1 - Turn on the power supply or connect the power cable to the power outlet. Install the Central Processing Unit (CPU) Step 2 -
User Manual
Page 22
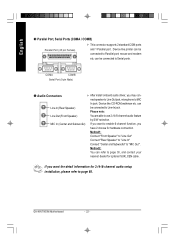
... 2-/4-/6-channel audio setup installation, please refer to "MIC Out ". GA-K8VT800M Motherboard - 22 - Device like CD-ROM,walkman etc. If you want to Parallel port; Method1: Connect "Front Speaker" to "Line Out" Connect "Rear Speaker" to "Line In" Connect "Center and Subwoofer" to page 68. If you want the detail information for optional SUR_CEN cable. mouse and modem etc. English w Parallel Port, Serial Ports (COMA / COMB) Parallel Port (25 pin Female) This connector supports...
... 2-/4-/6-channel audio setup installation, please refer to "MIC Out ". GA-K8VT800M Motherboard - 22 - Device like CD-ROM,walkman etc. If you want to Parallel port; Method1: Connect "Front Speaker" to "Line Out" Connect "Rear Speaker" to "Line In" Connect "Center and Subwoofer" to page 68. If you want the detail information for optional SUR_CEN cable. mouse and modem etc. English w Parallel Port, Serial Ports (COMA / COMB) Parallel Port (25 pin Female) This connector supports...

User Manual
Page 40
... your drive must match with the drive table. C IDE Primary Master, Slave / IDE Secondary Master, Slave The category identifies the types of your hard disk vendor or the system manufacturer. 8CYLS. The hard disk will not work properly if you enter improper information for this category. There are two types: auto type, and manual type. Note that has been installed in the computer. 8None No floppy driv e installed 8360K...
... your drive must match with the drive table. C IDE Primary Master, Slave / IDE Secondary Master, Slave The category identifies the types of your hard disk vendor or the system manufacturer. 8CYLS. The hard disk will not work properly if you enter improper information for this category. There are two types: auto type, and manual type. Note that has been installed in the computer. 8None No floppy driv e installed 8360K...

User Manual
Page 44
... Key board Support [Enabled] [Disabled] [Disabled] [ATA66/100/133] Set Conductor cable to ATA66/100/133(80 USB Mouse Support [Disabled] -pins) Onboard H/W LAN [Enabled] Onboard H/W ATA / RAID [Enabled] [ATA33] Onboard LAN Boot ROM Onboard FDC Controller Onboard Serial Port 1 [Disabled] [Enabled] [3F8/IRQ4] Set Conductor cable to ATA33(40-pins) Onboard Serial Port 2 [2F8/IRQ3] UART Mode Select [Normal] x UR2 Duplex Mode Half Onboard Parallel Port [378/IRQ7] Parallel Port Mode [SPP] Game Port Address [201] Midi Port Address [330] Midi Port IRQ [10] higf: Mov e Enter...
... Key board Support [Enabled] [Disabled] [Disabled] [ATA66/100/133] Set Conductor cable to ATA66/100/133(80 USB Mouse Support [Disabled] -pins) Onboard H/W LAN [Enabled] Onboard H/W ATA / RAID [Enabled] [ATA33] Onboard LAN Boot ROM Onboard FDC Controller Onboard Serial Port 1 [Disabled] [Enabled] [3F8/IRQ4] Set Conductor cable to ATA33(40-pins) Onboard Serial Port 2 [2F8/IRQ3] UART Mode Select [Normal] x UR2 Duplex Mode Half Onboard Parallel Port [378/IRQ7] Parallel Port Mode [SPP] Game Port Address [201] Midi Port Address [330] Midi Port IRQ [10] higf: Mov e Enter...

User Manual
Page 46
...) 8Disabled Disable onboard FDC Controller. English C USB Keyboard Support When USB key board is installed, please set at Enabled. 8Enabled Enable USB Key board Support. 8Disabled Disable USB Key board Support. (Default v alue) C USB Mouse Support When USB mouse is 2E8. 8Disabled Disable onboard Serial port 1. - 46 - Onboard H/W ATA / RAID Enabled Enable onboard H/WATA/RAID function. (Default v alue) Disabled Disable this function. BIOS Setup C Onboard Serial Port 1 8Auto BIOS w ill automatically setup the port 1 address. 83F8/IRQ4 Enable onboard Serial port...
...) 8Disabled Disable onboard FDC Controller. English C USB Keyboard Support When USB key board is installed, please set at Enabled. 8Enabled Enable USB Key board Support. 8Disabled Disable USB Key board Support. (Default v alue) C USB Mouse Support When USB mouse is 2E8. 8Disabled Disable onboard Serial port 1. - 46 - Onboard H/W ATA / RAID Enabled Enable onboard H/WATA/RAID function. (Default v alue) Disabled Disable this function. BIOS Setup C Onboard Serial Port 1 8Auto BIOS w ill automatically setup the port 1 address. 83F8/IRQ4 Enable onboard Serial port...

User Manual
Page 49
GA-K8VT800M Motherboard - 49 - USB Device Wake-up From S3 Disa bled Disable USB Dev Wakeup F rom S3. (Default Value) Enab led Enable USB Dev Wakeup From S3. English Power Management Setup CMOS Setup Utility -Copy right (C) 1984-2003 Aw ard Softw are Pow er Management Setup ACPI Suspend Ty pe [S1(POS)] Item Help x USB Dev ice Wake-Up From S3 [Disabled] Menu Lev el u Soft-Off by PWRBTTN [Instant-Off] [S1] AC Back...
GA-K8VT800M Motherboard - 49 - USB Device Wake-up From S3 Disa bled Disable USB Dev Wakeup F rom S3. (Default Value) Enab led Enable USB Dev Wakeup From S3. English Power Management Setup CMOS Setup Utility -Copy right (C) 1984-2003 Aw ard Softw are Pow er Management Setup ACPI Suspend Ty pe [S1(POS)] Item Help x USB Dev ice Wake-Up From S3 [Disabled] Menu Lev el u Soft-Off by PWRBTTN [Instant-Off] [S1] AC Back...

User Manual
Page 63
.... Obviously, Gigabyte EasyTune 4 has already turned the "Overclock" technology toward to the experts in EasyTune 4, user can choose either BIOS no ". But have autoed and immediate CPU overclocking. This windows based utility has totally changed on the heritage so as to have many users ever tried it? If user runs EasyTune 4 over -clocking method s, Ea syTun e 4 doesn't req uire users to change the system bus / AGP / Memory working frequency in small...
.... Obviously, Gigabyte EasyTune 4 has already turned the "Overclock" technology toward to the experts in EasyTune 4, user can choose either BIOS no ". But have autoed and immediate CPU overclocking. This windows based utility has totally changed on the heritage so as to have many users ever tried it? If user runs EasyTune 4 over -clocking method s, Ea syTun e 4 doesn't req uire users to change the system bus / AGP / Memory working frequency in small...
User Manual
Page 76
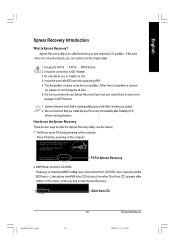
... . BMP Mode: boot from CD-ROM Please go to "Advanced BIOS"setting menu and setboot from CD:"appears atthe bottom of the screen , press any key to use Xpress Recovery if you install Xpress Re covery immediately after installing O.S , drivers and applications. TextMode: press F9 during powering on the computer. Press DEL to NTFS format. 1. Later,please insertMB driver CD into your drive when "Boot from CD-ROM...
... . BMP Mode: boot from CD-ROM Please go to "Advanced BIOS"setting menu and setboot from CD:"appears atthe bottom of the screen , press any key to use Xpress Recovery if you install Xpress Re covery immediately after installing O.S , drivers and applications. TextMode: press F9 during powering on the computer. Press DEL to NTFS format. 1. Later,please insertMB driver CD into your drive when "Boot from CD-ROM...

User Manual
Page 84
... keys after entering BIOS menu and you will not be able to see some files in the CD-ROM to install RAID and ATA drivers under Win 2000 and XP on boards that 's why the light is still on after turning up the speaker to the Clear CMOS steps in the installation process. Turn off the on power. 6. Connect power cord to enter BIOS and load Fail-Safe Defaults. 7. Press Del to MB again and turn on -board battery...
... keys after entering BIOS menu and you will not be able to see some files in the CD-ROM to install RAID and ATA drivers under Win 2000 and XP on boards that 's why the light is still on after turning up the speaker to the Clear CMOS steps in the installation process. Turn off the on power. 6. Connect power cord to enter BIOS and load Fail-Safe Defaults. 7. Press Del to MB again and turn on -board battery...
User Manual
Page 85
...System boots successfully *Except for reference purposes. What do I disable onboard VGA card in the Front USB Panel. English Question 8: How do these codes are always fatal. 2 short: CMOS setting error 1 beep Refresh failure 1 long 1 short: DRAM or M/B error 2 beeps Parity error 1 long 2 short: Monitor or display card error 3 beeps Base 64K memory failure 1 long 3 short: Keyboard error 4 beeps Timer not operational 1 long 9 short: BIOS ROM error 5 beeps Processor error Continuous long beeps: DRAM error 6 beeps 8042 - The situations might differ from the IDE/ SCSI/ RAID card...
...System boots successfully *Except for reference purposes. What do I disable onboard VGA card in the Front USB Panel. English Question 8: How do these codes are always fatal. 2 short: CMOS setting error 1 beep Refresh failure 1 long 1 short: DRAM or M/B error 2 beeps Parity error 1 long 2 short: Monitor or display card error 3 beeps Base 64K memory failure 1 long 3 short: Keyboard error 4 beeps Timer not operational 1 long 9 short: BIOS ROM error 5 beeps Processor error Continuous long beeps: DRAM error 6 beeps 8042 - The situations might differ from the IDE/ SCSI/ RAID card...


