Manual
Page 4
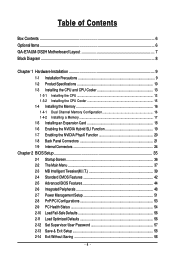
...GA-E7AUM-DS2H Motherboard Layout 7 Block Diagram ...8 Chapter 1 Hardware Installation 9 1-1 Installation Precautions 9 1-2 Product Specifications 10 1-3 Installing the CPU and CPU Cooler 13 1-3-1 Installing the CPU 13 1-3-2 Installing the CPU Cooler 15 1-4 Installing the Memory 16 1-4-1 Dual Channel Memory Configuration 16 1-4-2 Installing a Memory 17 1-5 Installing an Expansion Card 18 1-6 Enabling the NVIDIA... Hybrid SLI Function 19 1-7 Enabling the NVIDIA PhysX Function 20 1-8 Back Panel Connectors 21 1-9 Internal ...
...GA-E7AUM-DS2H Motherboard Layout 7 Block Diagram ...8 Chapter 1 Hardware Installation 9 1-1 Installation Precautions 9 1-2 Product Specifications 10 1-3 Installing the CPU and CPU Cooler 13 1-3-1 Installing the CPU 13 1-3-2 Installing the CPU Cooler 15 1-4 Installing the Memory 16 1-4-1 Dual Channel Memory Configuration 16 1-4-2 Installing a Memory 17 1-5 Installing an Expansion Card 18 1-6 Enabling the NVIDIA... Hybrid SLI Function 19 1-7 Enabling the NVIDIA PhysX Function 20 1-8 Back Panel Connectors 21 1-9 Internal ...

Manual
Page 7
GA-E7AUM-DS2H Motherboard Layout DDR2_1 DDR2_2 PHASE LED DDR2_3 DDR2_4 KB_USB CPU_FAN ATX_12V LGA775 ATX DVI-D VGA HDMI GA-E7AUM-DS2H OPTICAL ESATA 1394 USB LAN USB RTL8211CL AUDIO F_AUDIO PCIEX1 CD_IN PCIEX16 CODEC PCI1 SPDIF_IO PCI2 F_USB3 F_USB2 F_USB1 NVIDIA® GeForce 9400 JMicron 368 IDE M_BIOS IT8718 BAT B_BIOS LPT CLR_CMOS SATA2_3 SATA2_1 TSB43AB23 SATA2_0 SATA2_2 SATA2_4 F_1394 PWR_LED CI FDD SYS_FAN F_PANEL COMA - 7 -
GA-E7AUM-DS2H Motherboard Layout DDR2_1 DDR2_2 PHASE LED DDR2_3 DDR2_4 KB_USB CPU_FAN ATX_12V LGA775 ATX DVI-D VGA HDMI GA-E7AUM-DS2H OPTICAL ESATA 1394 USB LAN USB RTL8211CL AUDIO F_AUDIO PCIEX1 CD_IN PCIEX16 CODEC PCI1 SPDIF_IO PCI2 F_USB3 F_USB2 F_USB1 NVIDIA® GeForce 9400 JMicron 368 IDE M_BIOS IT8718 BAT B_BIOS LPT CLR_CMOS SATA2_3 SATA2_1 TSB43AB23 SATA2_0 SATA2_2 SATA2_4 F_1394 PWR_LED CI FDD SYS_FAN F_PANEL COMA - 7 -

Manual
Page 8
... 368 1 PCI Express x1 ATA-133/100/66/33 IDE Channel PCI Bus TSB43AB23 2 IEEE 1394a Host Interface DDR2 800/667 MHz Dual Channel Memory NVIDIA® GeForce 9400 6 SATA 3Gb/s 12 USB Ports RTL 8211CL LAN RJ45 LPC BUS IT8718 CODEC Dual BIOS Floppy COM Port PS/2 KB or Mouse...
... 368 1 PCI Express x1 ATA-133/100/66/33 IDE Channel PCI Bus TSB43AB23 2 IEEE 1394a Host Interface DDR2 800/667 MHz Dual Channel Memory NVIDIA® GeForce 9400 6 SATA 3Gb/s 12 USB Ports RTL 8211CL LAN RJ45 LPC BUS IT8718 CODEC Dual BIOS Floppy COM Port PS/2 KB or Mouse...
Manual
Page 10
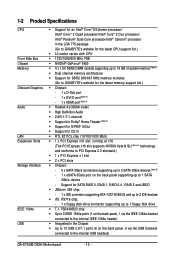
...NVIDIA Hybrid SLI (Note 5) technology and conforms to PCI Express 2.0 standard.) 1 x PCI Express x1 slot 2 x PCI slots Chipset: - 5 x SATA 3Gb/s connectors supporting up to 5 SATA 3Gb/s devices (Note 6) - 1 x eSATA 3Gb/s port on the back panel, 1 via the USB brackets connected to the internal USB headers) GA-E7AUM-DS2H... header) Integrated in the LGA 775 package (Go to GIGABYTE's website for the latest CPU support list.) L2 cache varies with CPU 1333/1066/800 MHz FSB NVIDIA® GeForce® 9400 4 x 1.8V DDR2 DIMM...
...NVIDIA Hybrid SLI (Note 5) technology and conforms to PCI Express 2.0 standard.) 1 x PCI Express x1 slot 2 x PCI slots Chipset: - 5 x SATA 3Gb/s connectors supporting up to 5 SATA 3Gb/s devices (Note 6) - 1 x eSATA 3Gb/s port on the back panel, 1 via the USB brackets connected to the internal USB headers) GA-E7AUM-DS2H... header) Integrated in the LGA 775 package (Go to GIGABYTE's website for the latest CPU support list.) L2 cache varies with CPU 1333/1066/800 MHz FSB NVIDIA® GeForce® 9400 4 x 1.8V DDR2 DIMM...

Manual
Page 19
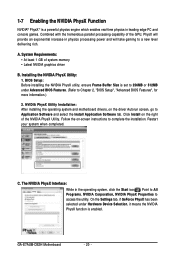
...or 512MB. (Refer to Chapter 2, "BIOS Setup", "Advanced BIOS Features", for Hybrid SLI Mode: Click the Hybrid SLI icon to NVIDIA's website for installation. Driver Installation: Insert the motherboard driver disk and select Installing Chipset Drivers. Pause your system when completed. •...- Choose Additional displays if you want to see the current mode of system memory • Windows Vista operating system • Latest NVIDIA graphics driver • System BIOS that the Hybrid SLI-ready graphics card be installed after the motherboard driver installation. Enabling Hybrid SLI: ...
...or 512MB. (Refer to Chapter 2, "BIOS Setup", "Advanced BIOS Features", for Hybrid SLI Mode: Click the Hybrid SLI icon to NVIDIA's website for installation. Driver Installation: Insert the motherboard driver disk and select Installing Chipset Drivers. Pause your system when completed. •...- Choose Additional displays if you want to see the current mode of system memory • Windows Vista operating system • Latest NVIDIA graphics driver • System BIOS that the Hybrid SLI-ready graphics card be installed after the motherboard driver installation. Enabling Hybrid SLI: ...
Manual
Page 20
...PC and console games. GA-E7AUM-DS2H Motherboard - 20 - System Requirements: • At least 1 GB of the GPU, PhysX will provide an exponential increase in physics processing power and will take gaming to Application Software and select the Install Application Software tab. NVIDIA PhysX Utility Installation: ... PhysX has been selected under Advanced BIOS Features. (Refer to 256MB or 512MB under Hardware Device Selection, it means the NVIDIA PhysX function is a powerful physics engine which enables real-time physics in the operating system, click the Start icon . A. BIOS Setup: ...
...PC and console games. GA-E7AUM-DS2H Motherboard - 20 - System Requirements: • At least 1 GB of the GPU, PhysX will provide an exponential increase in physics processing power and will take gaming to Application Software and select the Install Application Software tab. NVIDIA PhysX Utility Installation: ... PhysX has been selected under Advanced BIOS Features. (Refer to 256MB or 512MB under Hardware Device Selection, it means the NVIDIA PhysX function is a powerful physics engine which enables real-time physics in the operating system, click the Start icon . A. BIOS Setup: ...

Manual
Page 21
...port to this port. D-Sub Port The D-Sub port supports a 15-pin D-Sub connector. In Windows Vista, select Start>Control Panel> Sound, select NVIDIA HDMI Audio Device and then click Set Default. • When removing the cable connected to this port. Connect the HDMI audio/ video device to a ...first remove the cable from your device and then remove it from the motherboard. • When removing the cable, pull it side to side to NVIDIA HDMI Audio Wave. 1-8 Back Panel Connectors USB Port The USB port supports the USB 2.0/1.1 specification. Do not rock it straight out from the ...
...port to this port. D-Sub Port The D-Sub port supports a 15-pin D-Sub connector. In Windows Vista, select Start>Control Panel> Sound, select NVIDIA HDMI Audio Device and then click Set Default. • When removing the cable connected to this port. Connect the HDMI audio/ video device to a ...first remove the cable from your device and then remove it from the motherboard. • When removing the cable, pull it side to side to NVIDIA HDMI Audio Wave. 1-8 Back Panel Connectors USB Port The USB port supports the USB 2.0/1.1 specification. Do not rock it straight out from the ...

Manual
Page 27
...Drive(s)," for the IDE devices, read the instructions from the device manufacturers.) 40 39 2 1 7) SATA2_0/1/2/3/4 (SATA 3Gb/s Connectors, Controlled by NVIDIA® GeForce 9400) The SATA connectors conform to SATA 3Gb/s standard and are to be used, the total number of hard drives must be an... two IDE devices such as hard drives and optical drives. Before attaching the IDE cable, locate the foolproof groove on configuring a RAID array. The NVIDIA® GeForce 9400 controller supports RAID 0, RAID 1, RAID 0+1, RAID 5 and JBOD. If more than two hard drives are compatible with SATA 1....
...Drive(s)," for the IDE devices, read the instructions from the device manufacturers.) 40 39 2 1 7) SATA2_0/1/2/3/4 (SATA 3Gb/s Connectors, Controlled by NVIDIA® GeForce 9400) The SATA connectors conform to SATA 3Gb/s standard and are to be used, the total number of hard drives must be an... two IDE devices such as hard drives and optical drives. Before attaching the IDE cable, locate the foolproof groove on configuring a RAID array. The NVIDIA® GeForce 9400 controller supports RAID 0, RAID 1, RAID 0+1, RAID 5 and JBOD. If more than two hard drives are compatible with SATA 1....

Manual
Page 72
...or click Default to restore to monitor hardware temperature, voltage and fan speed and set . GA-E7AUM-DS2H Motherboard - 72 - The EasyTune 6 Interface Tabs Information Tab Function The CPU tab provides ...making changes, be changed linearly based on a specific slot to -use your ATI or NVIDIA graphics card. Smart Fan Advance Mode allows the CPU fan speed to be sure to...user-friendly EasyTune 6 interface also includes tabbed pages for these components. 4-3 EasyTune 6 GIGABYTE's EasyTune 6 is not supported. The Smart tab allows you do overclock/overvoltage in damage to specify a ...
...or click Default to restore to monitor hardware temperature, voltage and fan speed and set . GA-E7AUM-DS2H Motherboard - 72 - The EasyTune 6 Interface Tabs Information Tab Function The CPU tab provides ...making changes, be changed linearly based on a specific slot to -use your ATI or NVIDIA graphics card. Smart Fan Advance Mode allows the CPU fan speed to be sure to...user-friendly EasyTune 6 interface also includes tabbed pages for these components. 4-3 EasyTune 6 GIGABYTE's EasyTune 6 is not supported. The Smart tab allows you do overclock/overvoltage in damage to specify a ...

Manual
Page 79
...Mirrored, Striped, Spanned, Striped Mirror, and RAID5. The following procedure demonstrates how a RAID 0 array is the first option screen when you enter the NVIDIA RAID setup utility. (Figure 3). Appendix In the Stripe Block field, use the up or down arrow key to configure a RAID array. We recommend you... BIOS Feb 13 2008 - Step 3: In the RAID Mode field, use the up or down arrow key to set from field to enter the NVIDIA RAID setup utility. Step 4: If RAID 0 (Striped) is highlighted. Stripe block size is 64 KB. Configuring RAID set the stripe block size....
...Mirrored, Striped, Spanned, Striped Mirror, and RAID5. The following procedure demonstrates how a RAID 0 array is the first option screen when you enter the NVIDIA RAID setup utility. (Figure 3). Appendix In the Stripe Block field, use the up or down arrow key to configure a RAID array. We recommend you... BIOS Feb 13 2008 - Step 3: In the RAID Mode field, use the up or down arrow key to set from field to enter the NVIDIA RAID setup utility. Step 4: If RAID 0 (Striped) is highlighted. Stripe block size is 64 KB. Configuring RAID set the stripe block size....

Manual
Page 81
... SATA controller driver and operating system. - 81 - RAID Mode: Striped Stripe Width : 2 MediaShield BIOS Feb 13 2008 - Appendix To exit the NVIDIA RAID setup utility, press in the main menu or + in the Array Detail screen. Now, you have created (Figure 6). (Note: BBS stands ... information about the RAID array, press to the Array List screen. This indicates that you can proceed to cancel. Status Vendor Array Size Healthy NVIDIA STRIPE 223.57G [Ctrl-X] Exit [] Select [B] Set Bootable [N] New Array [ENTER] Detail Figure 6 To read more information about...
... SATA controller driver and operating system. - 81 - RAID Mode: Striped Stripe Width : 2 MediaShield BIOS Feb 13 2008 - Appendix To exit the NVIDIA RAID setup utility, press in the main menu or + in the Array Detail screen. Now, you have created (Figure 6). (Note: BBS stands ... information about the RAID array, press to the Array List screen. This indicates that you can proceed to cancel. Status Vendor Array Size Healthy NVIDIA STRIPE 223.57G [Ctrl-X] Exit [] Select [B] Set Bootable [N] New Array [ENTER] Detail Figure 6 To read more information about...

Manual
Page 82
...to your optical drive folder, double click the MENU.exe file in Figure 2, • In RAID mode, select C) NVIDIA MCP7A Series RAID Driver(XP) for Windows XP 32-bit operating system or E) NVIDIA MCP7A Series RAID Driver(XP64Bit) for Windows XP 64-bit. • In AHCI mode, select... B) NVIDIA MCP7A Series AHCI Driver(XP) for Windows XP 32-bit operating system or D) NVIDIA MCP7A Series AHCI Driver(XP64Bit) for Windows XP 64-bit. From your optical drive (example: D:\>). GA-E7AUM-DS2H Motherboard Figure 3 - 82 - Without the driver, the hard drive...
...to your optical drive folder, double click the MENU.exe file in Figure 2, • In RAID mode, select C) NVIDIA MCP7A Series RAID Driver(XP) for Windows XP 32-bit operating system or E) NVIDIA MCP7A Series RAID Driver(XP64Bit) for Windows XP 64-bit. • In AHCI mode, select... B) NVIDIA MCP7A Series AHCI Driver(XP) for Windows XP 32-bit operating system or D) NVIDIA MCP7A Series AHCI Driver(XP64Bit) for Windows XP 64-bit. From your optical drive (example: D:\>). GA-E7AUM-DS2H Motherboard Figure 3 - 82 - Without the driver, the hard drive...

Manual
Page 83
... drive. For example, to that in the USB flash drive. When a screen similar to install the Windows Vista 32-bit operating system(Note) on the NVIDIA GeForce 9400 SATA controller, copy the N7ARV32 file (Figure 4) located in the BootDrv folder in Figure 5 appears, type "yes" after the "Continue extraction?" Figure 5 Figure...
... drive. For example, to that in the USB flash drive. When a screen similar to install the Windows Vista 32-bit operating system(Note) on the NVIDIA GeForce 9400 SATA controller, copy the N7ARV32 file (Figure 4) located in the BootDrv folder in Figure 5 appears, type "yes" after the "Continue extraction?" Figure 5 Figure...

Manual
Page 85
...driver again from a mass storage device manufacturer, or do not have chosen to select NVIDIA RAID Driver and press . Select NVIDIA nForce Storage Controller and press . NVIDIA RAID Driver (required) NVIDIA nForce Storage Controller (required) ENTER=Select F3=Exit Figure 3 Windows Setup Setup will ... a SCSI Adapter for use with Windows, including those for which you have a device support disk from the following mass storage device(s): NVIDIA RAID Driver (required) * To specify additional SCSI adapters, CD-ROM drives, or special disk controllers for use with Windows, press ENTER...
...driver again from a mass storage device manufacturer, or do not have chosen to select NVIDIA RAID Driver and press . Select NVIDIA nForce Storage Controller and press . NVIDIA RAID Driver (required) NVIDIA nForce Storage Controller (required) ENTER=Select F3=Exit Figure 3 Windows Setup Setup will ... a SCSI Adapter for use with Windows, including those for which you have a device support disk from the following mass storage device(s): NVIDIA RAID Driver (required) * To specify additional SCSI adapters, CD-ROM drives, or special disk controllers for use with Windows, press ENTER...

Manual
Page 86
... device(s): NVIDIA RAID Driver (required) NVIDIA nForce Storage Controller (required) * To specify additional SCSI adapters, CD-ROM drives, or special disk controllers for use with Windows, including those for use with the Windows XP installation. When the screen as shown below appears, press to Setup. Enter= Continue R=Repair F3=Exit Figure 6 GA-E7AUM-DS2H Motherboard...
... device(s): NVIDIA RAID Driver (required) NVIDIA nForce Storage Controller (required) * To specify additional SCSI adapters, CD-ROM drives, or special disk controllers for use with Windows, including those for use with the Windows XP installation. When the screen as shown below appears, press to Setup. Enter= Continue R=Repair F3=Exit Figure 6 GA-E7AUM-DS2H Motherboard...

Manual
Page 88
GA-E7AUM-DS2H Motherboard - 88 - Figure 9 Step 4: After the driver is loaded, the screen will install. Step 3: When a screen as shown in Figure 9 may differ according to continue the OS installation (Figure 10). Figure 10 (Note) The selectable item(s) displayed in Figure 9 appears, select NVIDIA nForce RAID Controller (Note) and press Next. Select the RAID hard drive onto which you want to install the operating system and then press Next to the RAID or AHCI driver you will show the RAID hard drive.
GA-E7AUM-DS2H Motherboard - 88 - Figure 9 Step 4: After the driver is loaded, the screen will install. Step 3: When a screen as shown in Figure 9 may differ according to continue the OS installation (Figure 10). Figure 10 (Note) The selectable item(s) displayed in Figure 9 appears, select NVIDIA nForce RAID Controller (Note) and press Next. Select the RAID hard drive onto which you want to install the operating system and then press Next to the RAID or AHCI driver you will show the RAID hard drive.

Manual
Page 89
... 4: Select a drive to add to rebuild a RAID 1 array. Step 6: The rebuilding progress is displayed in the Start Menu. Launch the NVIDIA Control Panel from other drives in the Select a Task pane. The procedures below assume a new drive is added to replace a failed drive to... the array and click Next. Step 2: When the NVIDIA Rebuild Array Wizard appears, click Next. Appendix Step 1: In NVIDIA Control Panel, click Rebuild array under Storage in the array. Step 3: Select the array to start the rebuilding process. Step...
... 4: Select a drive to add to rebuild a RAID 1 array. Step 6: The rebuilding progress is displayed in the Start Menu. Launch the NVIDIA Control Panel from other drives in the Select a Task pane. The procedures below assume a new drive is added to replace a failed drive to... the array and click Next. Step 2: When the NVIDIA Rebuild Array Wizard appears, click Next. Appendix Step 1: In NVIDIA Control Panel, click Rebuild array under Storage in the array. Step 3: Select the array to start the rebuilding process. Step...


