Manual
Page 4
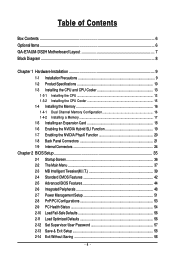
... ...6 GA-E7AUM-DS2H Motherboard Layout 7 Block Diagram ...8 Chapter 1 Hardware Installation 9 1-1 Installation Precautions 9 1-2 Product Specifications 10 1-3 Installing the CPU and CPU Cooler 13 1-3-1 Installing the CPU 13 1-3-2 Installing the CPU Cooler 15 1-4 Installing the Memory 16 1-4-1 Dual Channel Memory Configuration 16 1-4-2 Installing a Memory 17 1-5 Installing an Expansion Card 18 1-6 Enabling the NVIDIA Hybrid SLI Function 19 1-7 Enabling the NVIDIA PhysX Function 20 1-8 Back Panel Connectors 21 1-9 Internal Connectors 24 Chapter 2 BIOS Setup 35 2-1 Startup Screen...
... ...6 GA-E7AUM-DS2H Motherboard Layout 7 Block Diagram ...8 Chapter 1 Hardware Installation 9 1-1 Installation Precautions 9 1-2 Product Specifications 10 1-3 Installing the CPU and CPU Cooler 13 1-3-1 Installing the CPU 13 1-3-2 Installing the CPU Cooler 15 1-4 Installing the Memory 16 1-4-1 Dual Channel Memory Configuration 16 1-4-2 Installing a Memory 17 1-5 Installing an Expansion Card 18 1-6 Enabling the NVIDIA Hybrid SLI Function 19 1-7 Enabling the NVIDIA PhysX Function 20 1-8 Back Panel Connectors 21 1-9 Internal Connectors 24 Chapter 2 BIOS Setup 35 2-1 Startup Screen...
Manual
Page 10
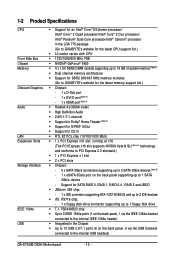
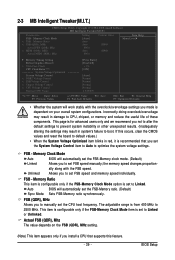
.../s port on the back panel supporting up to 1 floppy disk drive T.I. 1-2 Product Specifications CPU Front Side Bus Chipset Memory Onboard Graphics Audio LAN Expansion Slots Storage Interface IEEE 1394a USB Support for an Intel® CoreTM 2 Extreme processor/ Intel® CoreTM 2 Quad processor/Intel® CoreTM 2 Duo processor/ Intel® Pentium® Dual-Core processor/Intel® Celeron® processor in the Chipset Up to 12 USB 2.0/1.1 ports (6 on the back panel, 6 via the USB brackets connected to the internal USB headers) GA-E7AUM-DS2H Motherboard...
.../s port on the back panel supporting up to 1 floppy disk drive T.I. 1-2 Product Specifications CPU Front Side Bus Chipset Memory Onboard Graphics Audio LAN Expansion Slots Storage Interface IEEE 1394a USB Support for an Intel® CoreTM 2 Extreme processor/ Intel® CoreTM 2 Quad processor/Intel® CoreTM 2 Duo processor/ Intel® Pentium® Dual-Core processor/Intel® Celeron® processor in the Chipset Up to 12 USB 2.0/1.1 ports (6 on the back panel, 6 via the USB brackets connected to the internal USB headers) GA-E7AUM-DS2H Motherboard...
Manual
Page 12
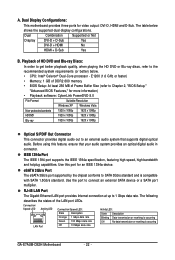
... memory size displayed will be less than 4 GB. (Note 2) The DVI-D port does not support D-Sub connection by adapter. (Note 3) Simultaneous output for DVI-D and HDMI is not supported. (Note 4) For Windows Vista/XP 32-bit operating system only. (Note 5) Whether Hybird SLI technology is supported depends on the graphics card being used. (Note 6) Due to a chipset limitation, the SATA2_3 and SATA2_4 connectors only support AHCI/RAID mode. (Note 7) Whether the CPU/system fan speed control...
... memory size displayed will be less than 4 GB. (Note 2) The DVI-D port does not support D-Sub connection by adapter. (Note 3) Simultaneous output for DVI-D and HDMI is not supported. (Note 4) For Windows Vista/XP 32-bit operating system only. (Note 5) Whether Hybird SLI technology is supported depends on the graphics card being used. (Note 6) Due to a chipset limitation, the SATA2_3 and SATA2_4 connectors only support AHCI/RAID mode. (Note 7) Whether the CPU/system fan speed control...
Manual
Page 16
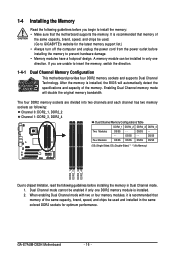
... DDR2 memory sockets and supports Dual Channel Technology. GA-E7AUM-DS2H Motherboard - 16 - After the memory is recommended that memory of the same capacity, brand, speed, and chips be used and installed in the same colored DDR2 sockets for the latest memory support list.) • Always turn off the computer and unplug the power cord from the power outlet before installing the memory to install the memory: • Make sure that memory of the memory. Enabling Dual Channel memory mode will automatically detect the specifications...
... DDR2 memory sockets and supports Dual Channel Technology. GA-E7AUM-DS2H Motherboard - 16 - After the memory is recommended that memory of the same capacity, brand, speed, and chips be used and installed in the same colored DDR2 sockets for the latest memory support list.) • Always turn off the computer and unplug the power cord from the power outlet before installing the memory to install the memory: • Make sure that memory of the memory. Enabling Dual Channel memory mode will automatically detect the specifications...
Manual
Page 18
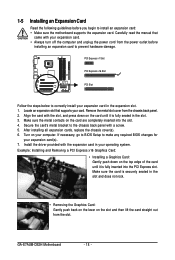
... BIOS changes for your operating system. Remove the metal slot cover from the slot. Align the card with the slot, and press down on the slot and then lift the card straight out from the chassis back panel. 2. Turn on the card until it is fully inserted into the slot. 4. Example: Installing and Removing a PCI Express x16 Graphics Card: • Installing a Graphics Card: Gently push down on your expansion card in the slot. 3. GA-E7AUM-DS2H Motherboard - 18 - PCI Express x1 Slot PCI Express...
... BIOS changes for your operating system. Remove the metal slot cover from the slot. Align the card with the slot, and press down on the slot and then lift the card straight out from the chassis back panel. 2. Turn on the card until it is fully inserted into the slot. 4. Example: Installing and Removing a PCI Express x16 Graphics Card: • Installing a Graphics Card: Gently push down on your expansion card in the slot. 3. GA-E7AUM-DS2H Motherboard - 18 - PCI Express x1 Slot PCI Express...

Manual
Page 19
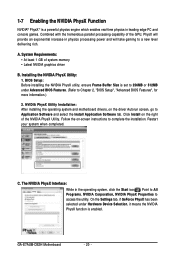
... 2, "BIOS Setup", "Advanced BIOS Features", for Hybrid SLI Mode: Click the Hybrid SLI icon to support multiple displays. - 19 - BIOS Setup: Enter BIOS Setup to set the following items under the Advanced BIOS Features menu: • Set Hybrid SLI to Auto. • Set Onboard GPU to Always Enable. • Set iGPU Frame Buffer Control to Manual. • Set Frame Buffer Size to 256MB or 512MB. (Refer to install the graphics card driver if the motherboard chipset driver has been installed. Click Xpress Install for a full list.) •...
... 2, "BIOS Setup", "Advanced BIOS Features", for Hybrid SLI Mode: Click the Hybrid SLI icon to support multiple displays. - 19 - BIOS Setup: Enter BIOS Setup to set the following items under the Advanced BIOS Features menu: • Set Hybrid SLI to Auto. • Set Onboard GPU to Always Enable. • Set iGPU Frame Buffer Control to Manual. • Set Frame Buffer Size to 256MB or 512MB. (Refer to install the graphics card driver if the motherboard chipset driver has been installed. Click Xpress Install for a full list.) •...
Manual
Page 20
... will take gaming to Application Software and select the Install Application Software tab. BIOS Setup: Before installing the NVIDIA PhysX utility, ensure Frame Buffer Size is set to 256MB or 512MB under Hardware Device Selection, it means the NVIDIA PhysX function is a powerful physics engine which enables real-time physics in the operating system, click the Start icon . GA-E7AUM-DS2H Motherboard - 20 - Point to All Programs...
... will take gaming to Application Software and select the Install Application Software tab. BIOS Setup: Before installing the NVIDIA PhysX utility, ensure Frame Buffer Size is set to 256MB or 512MB under Hardware Device Selection, it means the NVIDIA PhysX function is a powerful physics engine which enables real-time physics in the operating system, click the Start icon . GA-E7AUM-DS2H Motherboard - 20 - Point to All Programs...

Manual
Page 21
...In Windows Vista, select Start>Control Panel> Sound, select NVIDIA HDMI Audio Device and then click Set Default. • When removing the cable connected to prevent an electrical short inside the cable connector. - 21 - Connect a monitor that supports D-Sub connection to NVIDIA HDMI Audio Wave. D-Sub Port The D-Sub port supports a 15-pin D-Sub connector. Hardware Installation PS/2 Keyboard or PS/2 Mouse Port Use this port to this port. 1-8 Back Panel Connectors USB Port The USB port supports the USB 2.0/1.1 specification. Connect the HDMI audio/ video device...
...In Windows Vista, select Start>Control Panel> Sound, select NVIDIA HDMI Audio Device and then click Set Default. • When removing the cable connected to prevent an electrical short inside the cable connector. - 21 - Connect a monitor that supports D-Sub connection to NVIDIA HDMI Audio Wave. D-Sub Port The D-Sub port supports a 15-pin D-Sub connector. Hardware Installation PS/2 Keyboard or PS/2 Mouse Port Use this port to this port. 1-8 Back Panel Connectors USB Port The USB port supports the USB 2.0/1.1 specification. Connect the HDMI audio/ video device...
Manual
Page 22
... 1920 x 1080p HD-DVD 1920 x 1080p 1920 x 1080p Blu-ray 1920 x 1080p 1920 x 1080p Optical S/PDIF Out Connector This connector provides digital audio out to SATA 3Gb/s standard and is occurring GA-E7AUM-DS2H Motherboard - 22 - Use the port to 1 Gbps data rate. IEEE 1394a Port The IEEE 1394 port supports the IEEE 1394a specification, featuring high speed, high bandwidth and hotplug capabilities. Connection/ Speed LED Activity LED LAN Port Connection/Speed LED: State Description Orange 1 Gbps...
... 1920 x 1080p HD-DVD 1920 x 1080p 1920 x 1080p Blu-ray 1920 x 1080p 1920 x 1080p Optical S/PDIF Out Connector This connector provides digital audio out to SATA 3Gb/s standard and is occurring GA-E7AUM-DS2H Motherboard - 22 - Use the port to 1 Gbps data rate. IEEE 1394a Port The IEEE 1394 port supports the IEEE 1394a specification, featuring high speed, high bandwidth and hotplug capabilities. Connection/ Speed LED Activity LED LAN Port Connection/Speed LED: State Description Orange 1 Gbps...

Manual
Page 38
... Use this menu to configure the system time and date, hard drive types, floppy disk drive types, and the type of errors that stop the system boot, etc. Advanced BIOS Features Use this menu to configure the device boot order, advanced features available on the CPU, and the primary display adapter. Integrated Peripherals Use this menu to configure all peripheral devices, such as IDE, SATA, USB, integrated audio, and integrated LAN, etc. Power Management Setup Use this task.) GA-E7AUM-DS2H Motherboard - 38 - An user password...
... Use this menu to configure the system time and date, hard drive types, floppy disk drive types, and the type of errors that stop the system boot, etc. Advanced BIOS Features Use this menu to configure the device boot order, advanced features available on the CPU, and the primary display adapter. Integrated Peripherals Use this menu to configure all peripheral devices, such as IDE, SATA, USB, integrated audio, and integrated LAN, etc. Power Management Setup Use this task.) GA-E7AUM-DS2H Motherboard - 38 - An user password...
Manual
Page 39
... Graphics Booster x VGA Core Clock CPU Clock Ratio (Note) ******** System Voltage Optimized System Voltage Control x DDR2 Voltage Control x FSB Voltage Control x Chipset Voltage Control x CPU Voltage Control Normal CPU Vcore ******** [Press Enter] [Disabled] + 1% [12X] [Auto] Normal Normal Normal Normal 1.32500V Move Enter: Select F5: Previous Values +/-/PU/PD: Value F10: Save F6: Fail-Safe Defaults ESC: Exit F1: General Help F7: Optimized Defaults • Whether the system will automatically set FSB speed and memory speed individually. ally along with the overclock...
... Graphics Booster x VGA Core Clock CPU Clock Ratio (Note) ******** System Voltage Optimized System Voltage Control x DDR2 Voltage Control x FSB Voltage Control x Chipset Voltage Control x CPU Voltage Control Normal CPU Vcore ******** [Press Enter] [Disabled] + 1% [12X] [Auto] Normal Normal Normal Normal 1.32500V Move Enter: Select F5: Previous Values +/-/PU/PD: Value F10: Save F6: Fail-Safe Defaults ESC: Exit F1: General Help F7: Optimized Defaults • Whether the system will automatically set FSB speed and memory speed individually. ally along with the overclock...

Manual
Page 44
... setting. (Note) This item is installed. GA-E7AUM-DS2H Motherboard - 44 - to change the current display if it is different from the onboard VGA or a PCI Express graphics card and to 3 (Note) No-Execute Memory Protect (Note) CPU Enhanced Halt (C1E) (Note) C2/C2E State Support (Note) x C4/C4E State Support (Note) CPU Thermal Monitor 2(TM2) (Note) Disabled Disabled [Enable If No Ext PEG] [Auto] 256M [PEG] [Press Enter] [Floppy] [Hard Disk] [CDROM] [Setup] [Disabled] [Enabled] [Disabled] [Enabled] [Enabled] [Disabled] [Disabled] [Enabled] Item Help Menu Level Move Enter...
... setting. (Note) This item is installed. GA-E7AUM-DS2H Motherboard - 44 - to change the current display if it is different from the onboard VGA or a PCI Express graphics card and to 3 (Note) No-Execute Memory Protect (Note) CPU Enhanced Halt (C1E) (Note) C2/C2E State Support (Note) x C4/C4E State Support (Note) CPU Thermal Monitor 2(TM2) (Note) Disabled Disabled [Enable If No Ext PEG] [Auto] 256M [PEG] [Press Enter] [Floppy] [Hard Disk] [CDROM] [Setup] [Disabled] [Enabled] [Disabled] [Enabled] [Enabled] [Disabled] [Disabled] [Enabled] Item Help Menu Level Move Enter...

Manual
Page 45
... A password is required for booting the system and for entering the BIOS Setup program. (Note) This item is set to exit this memory for selection when Hybrid SLI is enabled.) Init Display First Specifies the first initiation of the monitor display from the installed PCI graphics card, PCI Express graphics card or the onboard VGA. (Only Onboard VGA and PEG are : Floppy, LS120, Hard Disk, CDROM, ZIP, USB-FDD, USB-ZIP, USB-CDROM, USB-HDD, Legacy LAN, Disabled. iGPU Frame Buffer Control Determines whether to manually set to Manual. Options...
... A password is required for booting the system and for entering the BIOS Setup program. (Note) This item is set to exit this memory for selection when Hybrid SLI is enabled.) Init Display First Specifies the first initiation of the monitor display from the installed PCI graphics card, PCI Express graphics card or the onboard VGA. (Only Onboard VGA and PEG are : Floppy, LS120, Hard Disk, CDROM, ZIP, USB-FDD, USB-ZIP, USB-CDROM, USB-HDD, Legacy LAN, Disabled. iGPU Frame Buffer Control Determines whether to manually set to Manual. Options...

Manual
Page 48
... the SATA controller to enable advanced Serial ATA features such as Native Command Queuing and hot plug. USB Keyboard Support Allows USB keyboard to be used in MS-DOS. (Default: Disabled) USB Mouse Support Allows USB mouse to be used in MS-DOS. (Default: Disabled) Legacy USB storage detect Determines whether to IDE mode. (Default) (Only for the SATA2_0~2 connectors) RAID Enables RAID for the SATA controller. IDE Configures the SATA controller to detect USB storage devices, including USB flash drives and USB hard drives during the POST. (Default: Enabled) GA-E7AUM-DS2H Motherboard...
... the SATA controller to enable advanced Serial ATA features such as Native Command Queuing and hot plug. USB Keyboard Support Allows USB keyboard to be used in MS-DOS. (Default: Disabled) USB Mouse Support Allows USB mouse to be used in MS-DOS. (Default: Disabled) Legacy USB storage detect Determines whether to IDE mode. (Default) (Only for the SATA2_0~2 connectors) RAID Enables RAID for the SATA controller. IDE Configures the SATA controller to detect USB storage devices, including USB flash drives and USB hard drives during the POST. (Default: Enabled) GA-E7AUM-DS2H Motherboard...

Manual
Page 50
... of the attached LAN cable. GA-E7AUM-DS2H Motherboard - 50 - ECP Mode Use DMA Selects DMA channel for the onboard parallel (LPT) port. Onboard LAN Boot ROM Allows you to decide whether to the fault or short. Options are : 378/IRQ7 (default), 278/IRQ5, 3BC/IRQ7, Disabled. If a cable problem occurs on Part 1-2. Options are : SPP (Standard Parallel Port)(default), EPP (Enhanced Parallel Port), ECP (Extended Capabilities Port), ECP+EPP. Onboard Parallel Port Enables or disables the onboard parallel port (LPT) and specifies...
... of the attached LAN cable. GA-E7AUM-DS2H Motherboard - 50 - ECP Mode Use DMA Selects DMA channel for the onboard parallel (LPT) port. Onboard LAN Boot ROM Allows you to decide whether to the fault or short. Options are : 378/IRQ7 (default), 278/IRQ5, 3BC/IRQ7, Disabled. If a cable problem occurs on Part 1-2. Options are : SPP (Standard Parallel Port)(default), EPP (Enhanced Parallel Port), ECP (Extended Capabilities Port), ECP+EPP. Onboard Parallel Port Enables or disables the onboard parallel port (LPT) and specifies...

Manual
Page 55
.... BIOS Setup PWM Sets PWM mode for a 3-pin CPU fan. Enabled allows the system fan to run at full speed. (Default: Enabled) - 55 - Auto Lets BIOS autodetect the type of CPU fan installed and sets the optimal CPU fan control mode. (Default) Voltage Sets Voltage mode for a 4-pin CPU fan. You can adjust the fan speed with EasyTune based on system requirements. You can adjust the fan speed with EasyTune based on system requirements. If disabled, CPU fan runs at different speed according to the CPU temperature. CPU Smart FAN Control Enables or disables the CPU...
.... BIOS Setup PWM Sets PWM mode for a 3-pin CPU fan. Enabled allows the system fan to run at full speed. (Default: Enabled) - 55 - Auto Lets BIOS autodetect the type of CPU fan installed and sets the optimal CPU fan control mode. (Default) Voltage Sets Voltage mode for a 4-pin CPU fan. You can adjust the fan speed with EasyTune based on system requirements. You can adjust the fan speed with EasyTune based on system requirements. If disabled, CPU fan runs at different speed according to the CPU temperature. CPU Smart FAN Control Enables or disables the CPU...
Manual
Page 69
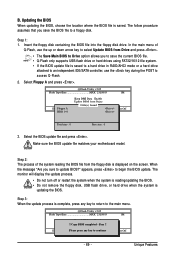
... a floppy disk. appears, press to update BIOS?" Q-Flash Utility v2.05 Flash Type/Size MXIC 25L8005 1M Enter : Run Keep DMI Data Enable !! B. Updating the BIOS When updating the BIOS, choose the location where the BIOS file is displayed on the screen. The follow procedure assumes that you save the current BIOS file. • Q-Flash only supports USB flash drive or hard drives using FAT32/16/12 file system. • If the BIOS update file is saved to a hard drive in RAID/AHCI mode or a hard drive attached to an independent IDE/SATA controller, use...
... a floppy disk. appears, press to update BIOS?" Q-Flash Utility v2.05 Flash Type/Size MXIC 25L8005 1M Enter : Run Keep DMI Data Enable !! B. Updating the BIOS When updating the BIOS, choose the location where the BIOS file is displayed on the screen. The follow procedure assumes that you save the current BIOS file. • Q-Flash only supports USB flash drive or hard drives using FAT32/16/12 file system. • If the BIOS update file is saved to a hard drive in RAID/AHCI mode or a hard drive attached to an independent IDE/SATA controller, use...

Manual
Page 82
... disk: Use an alternative system and insert the motherboard driver disk. Boot from the motherboard driver disk to a floppy disk. Without the driver, the hard drive may not be recognized during the OS installation. First of all, copy the driver for the SATA controller from the startup disk. A command prompt window will then automatically zip and transfer this driver file to the floppy disk. For example, in the menu in the BootDrv folder (Figure 3). GA-E7AUM-DS2H Motherboard Figure...
... disk: Use an alternative system and insert the motherboard driver disk. Boot from the motherboard driver disk to a floppy disk. Without the driver, the hard drive may not be recognized during the OS installation. First of all, copy the driver for the SATA controller from the startup disk. A command prompt window will then automatically zip and transfer this driver file to the floppy disk. For example, in the menu in the BootDrv folder (Figure 3). GA-E7AUM-DS2H Motherboard Figure...

Manual
Page 84
... you need to manually specify an adapter. A. Currently, Setup will be a few moments of one or more mass storage devices installed in your hard drive(s). S=Specify Additional Device ENTER=Continue F3=Exit Figure 2 GA-E7AUM-DS2H Motherboard - 84 - 5-1-3 Installing the SATA RAID/AHCI Driver and Operating System Now that below appears, insert the floppy disk containing the SATA RAID/AHCI driver and press (Figure 2). Windows Setup Setup could not determine the type of some files being loaded before you see...
... you need to manually specify an adapter. A. Currently, Setup will be a few moments of one or more mass storage devices installed in your hard drive(s). S=Specify Additional Device ENTER=Continue F3=Exit Figure 2 GA-E7AUM-DS2H Motherboard - 84 - 5-1-3 Installing the SATA RAID/AHCI Driver and Operating System Now that below appears, insert the floppy disk containing the SATA RAID/AHCI driver and press (Figure 2). Windows Setup Setup could not determine the type of some files being loaded before you see...

Manual
Page 85
... 3: When installing the RAID driver, for example, if Setup correctly recognizes the driver in the floppy disk, a controller menu (Note) similar to the RAID or AHCI driver you will install. - 85 - Later, when a screen similar to that in Figure 3 below will appear. NVIDIA RAID Driver (required) NVIDIA nForce Storage Controller (required) ENTER=Select F3=Exit Figure 3 Windows Setup Setup will return to the previous screen. Windows Setup You have any device support disks from the following list, or press...
... 3: When installing the RAID driver, for example, if Setup correctly recognizes the driver in the floppy disk, a controller menu (Note) similar to the RAID or AHCI driver you will install. - 85 - Later, when a screen similar to that in Figure 3 below will appear. NVIDIA RAID Driver (required) NVIDIA nForce Storage Controller (required) ENTER=Select F3=Exit Figure 3 Windows Setup Setup will return to the previous screen. Windows Setup You have any device support disks from the following list, or press...


