
Manual
Page 1
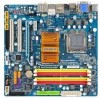
GA-E7AUM-DS2H LGA775 socket motherboard for Intel® CoreTM processor family/ Intel® Pentium® processor family/Intel® Celeron® processor family User's Manual Rev. 1001 12ME-E7AUMD2H-1001R
GA-E7AUM-DS2H LGA775 socket motherboard for Intel® CoreTM processor family/ Intel® Pentium® processor family/Intel® Celeron® processor family User's Manual Rev. 1001 12ME-E7AUMD2H-1001R

Manual
Page 3
... Support\Motherboard\Technology Guide page on our website. Changes to the specifications and features in this manual may be reproduced, copied, translated, transmitted, or published in this manual are legally registered to use of this product, GIGABYTE provides the following types of documentations: For quick set-up of this : "REV: X.X." No part...
... Support\Motherboard\Technology Guide page on our website. Changes to the specifications and features in this manual may be reproduced, copied, translated, transmitted, or published in this manual are legally registered to use of this product, GIGABYTE provides the following types of documentations: For quick set-up of this : "REV: X.X." No part...

Manual
Page 5
Chapter 3 Drivers Installation 59 3-1 Installing Chipset Drivers 59 3-2 Application Software 60 3-3 Technical Manuals 60 3-4 Contact ...61 3-5 System ...61 3-6 Download Center 62 Chapter 4 Unique Features 63 4-1 Xpress Recovery2 63 4-2 BIOS Update Utilities 68 4-2-1 Updating the BIOS with the Q-Flash ...
Chapter 3 Drivers Installation 59 3-1 Installing Chipset Drivers 59 3-2 Application Software 60 3-3 Technical Manuals 60 3-4 Contact ...61 3-5 System ...61 3-6 Download Center 62 Chapter 4 Unique Features 63 4-1 Xpress Recovery2 63 4-2 BIOS Update Utilities 68 4-2-1 Updating the BIOS with the Q-Flash ...

Manual
Page 6
Box Contents GA-E7AUM-DS2H motherboard Motherboard driver disk User's Manual Quick Installation Guide One IDE cable and one floppy disk drive cable Two SATA 3Gb/s cables I/O Shield • The box contents above are subject to ...
Box Contents GA-E7AUM-DS2H motherboard Motherboard driver disk User's Manual Quick Installation Guide One IDE cable and one floppy disk drive cable Two SATA 3Gb/s cables I/O Shield • The box contents above are subject to ...

Manual
Page 9
... or connectors. • It is best to installation, do not have an ESD wrist strap, keep your dealer. Prior to installation, carefully read the user's manual and follow these procedures: • Prior to wear an electrostatic discharge (ESD) wrist strap when handling electronic components such as a result of the product, please...
... or connectors. • It is best to installation, do not have an ESD wrist strap, keep your dealer. Prior to installation, carefully read the user's manual and follow these procedures: • Prior to wear an electrostatic discharge (ESD) wrist strap when handling electronic components such as a result of the product, please...

Manual
Page 15
... CPU cooler on the motherboard. (The following procedure uses Intel® boxed cooler as the picture above, the installation is to your CPU cooler installation manual for instructions on installing the cooler.) Step 5: After the installation, check the back of the motherboard. Use extreme care when removing the CPU cooler because...
... CPU cooler on the motherboard. (The following procedure uses Intel® boxed cooler as the picture above, the installation is to your CPU cooler installation manual for instructions on installing the cooler.) Step 5: After the installation, check the back of the motherboard. Use extreme care when removing the CPU cooler because...
Manual
Page 18
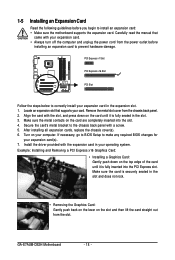
... a Graphics Card: Gently push down on the slot and then lift the card straight out from the chassis back panel. 2. Carefully read the manual that supports your expansion card(s). 7. GA-E7AUM-DS2H Motherboard - 18 - Align the card with the expansion card in the slot. 3. Locate an expansion slot that came with a screw. 5. After installing...
... a Graphics Card: Gently push down on the slot and then lift the card straight out from the chassis back panel. 2. Carefully read the manual that supports your expansion card(s). 7. GA-E7AUM-DS2H Motherboard - 18 - Align the card with the expansion card in the slot. 3. Locate an expansion slot that came with a screw. 5. After installing...

Manual
Page 19
... the Advanced BIOS Features menu: • Set Hybrid SLI to Auto. • Set Onboard GPU to Always Enable. • Set iGPU Frame Buffer Control to Manual. • Set Frame Buffer Size to 256MB or 512MB. (Refer to NVIDIA's website for more information.) 2. The system will detect the card and enable Hybrid...
... the Advanced BIOS Features menu: • Set Hybrid SLI to Auto. • Set Onboard GPU to Always Enable. • Set iGPU Frame Buffer Control to Manual. • Set Frame Buffer Size to 256MB or 512MB. (Refer to NVIDIA's website for more information.) 2. The system will detect the card and enable Hybrid...

Manual
Page 33
... do so may cause damage to the motherboard. • After system restart, go to BIOS Setup to load factory defaults (select Load Optimized Defaults) or manually configure the BIOS settings (refer to touch the two pins for BIOS configurations). - 33 - date information and BIOS configurations) and reset the CMOS values to...
... do so may cause damage to the motherboard. • After system restart, go to BIOS Setup to load factory defaults (select Load Optimized Defaults) or manually configure the BIOS settings (refer to touch the two pins for BIOS configurations). - 33 - date information and BIOS configurations) and reset the CMOS values to...
Manual
Page 39
...CPU, chipset, or memory and reduce the useful life of these components. The adjustable range is for advanced users only and we recommend you to manually set the CPU host frequency. Actual FSB (QDR), Mhz The value depends on the FSB (QDR), MHz setting. (Note) This item appears only... is set the FSB-Memory ratio. (Default) Sync Mode Sets FSB-Memory ratio synchronously. ally along with the overclock/overvoltage settings you set FSB speed manually; Unlinked Allows you to set the System Voltage Control item to Auto to Linked. Memory Ratio x FSB (QDR), MHz Actual FSB (QDR), Mhz x...
...CPU, chipset, or memory and reduce the useful life of these components. The adjustable range is for advanced users only and we recommend you to manually set the CPU host frequency. Actual FSB (QDR), Mhz The value depends on the FSB (QDR), MHz setting. (Note) This item appears only... is set the FSB-Memory ratio. (Default) Sync Mode Sets FSB-Memory ratio synchronously. ally along with the overclock/overvoltage settings you set FSB speed manually; Unlinked Allows you to set the System Voltage Control item to Auto to Linked. Memory Ratio x FSB (QDR), MHz Actual FSB (QDR), Mhz x...

Manual
Page 41
...voltages. Normal Supplies the memory voltage as required. Chipset Voltage Control Allows you to alter the core clock for the installed CPU. Manual allows all voltage control items below to be increased by 0.1V to Enabled. CPU Voltage Control Allows you to set to 0.7V...1V or 0.2V. FSB Voltage Control Allows you to set the system voltages as required. The core clock can be configurable. (Default: Manual) DDR2 Voltage Control Allows you to set memory voltage. Auto lets BIOS automatically set the Front Side Bus voltage. The adjustable range is ...
...voltages. Normal Supplies the memory voltage as required. Chipset Voltage Control Allows you to alter the core clock for the installed CPU. Manual allows all voltage control items below to be increased by 0.1V to Enabled. CPU Voltage Control Allows you to set to 0.7V...1V or 0.2V. FSB Voltage Control Allows you to set the system voltages as required. The core clock can be configurable. (Default: Manual) DDR2 Voltage Control Allows you to set memory voltage. Auto lets BIOS automatically set the Front Side Bus voltage. The adjustable range is ...

Manual
Page 42
...the time. Time Sets the system time. is set the date. Allows you to CHS. GA-E7AUM-DS2H Motherboard - 42 - Select the desired field and use the up arrow or down arrow key to set to manually enter the specifications of the hard drive when the hard drive access mode is 13:0:0. Extended...SATA device on this item to None so the system will skip the detection of the two methods below : • Auto • None • Manual Access Mode Lets BIOS automatically detect IDE/SATA devices during the POST. (Default) If no IDE/SATA devices are used , set this channel. IDE ...
...the time. Time Sets the system time. is set the date. Allows you to CHS. GA-E7AUM-DS2H Motherboard - 42 - Select the desired field and use the up arrow or down arrow key to set to manually enter the specifications of the hard drive when the hard drive access mode is 13:0:0. Extended...SATA device on this item to None so the system will skip the detection of the two methods below : • Auto • None • Manual Access Mode Lets BIOS automatically detect IDE/SATA devices during the POST. (Default) If no IDE/SATA devices are used , set this channel. IDE ...

Manual
Page 43
... standard floppy disk drive. Write precompensation cylinder. Number of floppy disk drive installed in your hard drive specifications. If you wish to enter the parameters manually, refer to determine whether the system will not stop for a floppy disk drive error but stop for all other errors. Floppy 3 Mode Support Allows you...
... standard floppy disk drive. Write precompensation cylinder. Number of floppy disk drive installed in your hard drive specifications. If you wish to enter the parameters manually, refer to determine whether the system will not stop for a floppy disk drive error but stop for all other errors. Floppy 3 Mode Support Allows you...

Manual
Page 45
...Use the up or down arrow key to select a device and press to move it up a dual view configuration, set this item to manually set to exit this memory for the onboard graphics controller. Password Check Specifies whether a password is enabled.) PCI Slot Sets the PCI graphics... item, set to Always Enable when Hybrid SLI is the total amount of loading the operating system from the available devices. Press to Manual when Hybrid SLI is enabled.) Frame Buffer Size Frame buffer size is enabled. After configuring this feature. This item is automatically set the...
...Use the up or down arrow key to select a device and press to move it up a dual view configuration, set this item to manually set to exit this memory for the onboard graphics controller. Password Check Specifies whether a password is enabled.) PCI Slot Sets the PCI graphics... item, set to Always Enable when Hybrid SLI is the total amount of loading the operating system from the available devices. Press to Manual when Hybrid SLI is enabled.) Frame Buffer Size Frame buffer size is enabled. After configuring this feature. This item is automatically set the...
Manual
Page 59
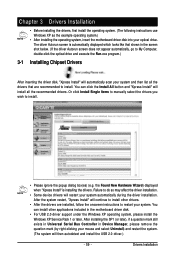
... and install the USB 2.0 driver.) - 59 - Drivers Installation Failure to install. The driver Autorun screen is installing the drivers. Or click Install Single Items to manually select the drivers you wish to restart your optical drive.
... and install the USB 2.0 driver.) - 59 - Drivers Installation Failure to install. The driver Autorun screen is installing the drivers. Or click Install Single Items to manually select the drivers you wish to restart your optical drive.

Manual
Page 60
3-2 Application Software This page displays all the utilities and applications that GIGABYTE develops and some free software. You can click the Install button on the right of an item to install it. 3-3 Technical Manuals This page provides GIGABYTE's application guides, content descriptions for this driver disk, and the motherboard manuals. GA-E7AUM-DS2H Motherboard - 60 -
3-2 Application Software This page displays all the utilities and applications that GIGABYTE develops and some free software. You can click the Install button on the right of an item to install it. 3-3 Technical Manuals This page provides GIGABYTE's application guides, content descriptions for this driver disk, and the motherboard manuals. GA-E7AUM-DS2H Motherboard - 60 -

Manual
Page 61
3-4 Contact Click the URL on this manual to the GIGABYTE Web site. Or read the last page of this page to link to check the contact information for GIGABYTE Taiwan headquarter or worldwide branch offices. 3-5 System This page provides the basic system information. - 61 - Drivers Installation
3-4 Contact Click the URL on this manual to the GIGABYTE Web site. Or read the last page of this page to link to check the contact information for GIGABYTE Taiwan headquarter or worldwide branch offices. 3-5 System This page provides the basic system information. - 61 - Drivers Installation
Manual
Page 68
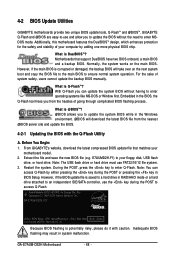
...is corrupted or damaged, the backup BIOS will download the latest BIOS file from the hassles of going through complicated BIOS flashing process. GA-E7AUM-DS2H D22 . . . . : BIOS Setup : XpressRecovery2 : Boot Menu : Qflash 10/07/2008-MCP7A-7A610G01C-00 Because BIOS flashing... GIGABYTE motherboards provide two unique BIOS update tools, Q-FlashTM and @BIOSTM. Additionally, this motherboard features the DualBIOSTM design, which enhances protection for the safety and stability of system safety, users cannot update the backup BIOS manually. E7AUMD2H.F1) to enter Q-Flash. GA-E7AUM-DS2H ...
...is corrupted or damaged, the backup BIOS will download the latest BIOS file from the hassles of going through complicated BIOS flashing process. GA-E7AUM-DS2H D22 . . . . : BIOS Setup : XpressRecovery2 : Boot Menu : Qflash 10/07/2008-MCP7A-7A610G01C-00 Because BIOS flashing... GIGABYTE motherboards provide two unique BIOS update tools, Q-FlashTM and @BIOSTM. Additionally, this motherboard features the DualBIOSTM design, which enhances protection for the safety and stability of system safety, users cannot update the backup BIOS manually. E7AUMD2H.F1) to enter Q-Flash. GA-E7AUM-DS2H ...

Manual
Page 71
...after the system restarts. After Updating the BIOS: Restart your motherboard is not present on the @BIOS server site, please manually download the BIOS update file from GIGABYTE's website and follow the instructions in a corrupted BIOS or a system that is stable and do so may result in ...the @BIOS Utility A. C. Save Current BIOS to File: Click Save Current BIOS to start. 3. GIGABYTE product warranty does not cover any BIOS damage or system failure resulting from GIGABYTE Server, select the @BIOS server site closest to your location and then download the BIOS file that the...
...after the system restarts. After Updating the BIOS: Restart your motherboard is not present on the @BIOS server site, please manually download the BIOS update file from GIGABYTE's website and follow the instructions in a corrupted BIOS or a system that is stable and do so may result in ...the @BIOS Utility A. C. Save Current BIOS to File: Click Save Current BIOS to start. 3. GIGABYTE product warranty does not cover any BIOS damage or system failure resulting from GIGABYTE Server, select the @BIOS server site closest to your location and then download the BIOS file that the...

Manual
Page 79
... skip this step and proceed to configure a RAID array. MediaShield ROM BIOS 10.0.0.27 RPT IDP Copyright (C) 2008 NVIDIA Corp. The stripe block size can manually set in kilobytes. Define a New Array -
... skip this step and proceed to configure a RAID array. MediaShield ROM BIOS 10.0.0.27 RPT IDP Copyright (C) 2008 NVIDIA Corp. The stripe block size can manually set in kilobytes. Define a New Array -


