
Manual
Page 35
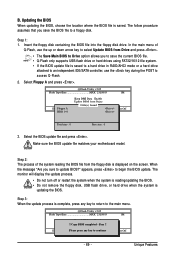
... 4, "BIOS Update Utilities." • Because BIOS flashing is turned on the motherboard. Its major functions include conducting the Power-On Self-Test (POST) during system startup, saving system parameters and loading operating system, etc. To see more advanced BIOS Setup menu options, you need to) to... boot. To upgrade the BIOS, use either the GIGABYTE Q-Flash or @BIOS utility. • Q-Flash allows the user to clear the CMOS values.) - 35 - Inadequately altering the settings may result...
... 4, "BIOS Update Utilities." • Because BIOS flashing is turned on the motherboard. Its major functions include conducting the Power-On Self-Test (POST) during system startup, saving system parameters and loading operating system, etc. To see more advanced BIOS Setup menu options, you need to) to... boot. To upgrade the BIOS, use either the GIGABYTE Q-Flash or @BIOS utility. • Q-Flash allows the user to clear the CMOS values.) - 35 - Inadequately altering the settings may result...
Manual
Page 36
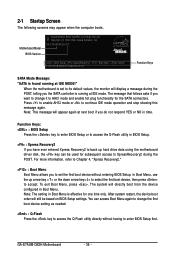
... first boot device, then press to its default values, the monitor will appear again at IDE MODE!" Note: This message will display a message during the POST. Function Keys: : BIOS Setup Press the key to enter BIOS Setup or to enter BIOS Setup first. For more information, refer to Chapter 4, "Xpress Recovery2... you want to change the first boot device setting as needed. : Q-Flash Press the key to access the Q-Flash utility directly without entering BIOS Setup. GA-E7AUM-DS2H Motherboard - 36 - 2-1 Startup Screen The following screens may appear when the computer boots.
... first boot device, then press to its default values, the monitor will appear again at IDE MODE!" Note: This message will display a message during the POST. Function Keys: : BIOS Setup Press the key to enter BIOS Setup or to enter BIOS Setup first. For more information, refer to Chapter 4, "Xpress Recovery2... you want to change the first boot device setting as needed. : Q-Flash Press the key to access the Q-Flash utility directly without entering BIOS Setup. GA-E7AUM-DS2H Motherboard - 36 - 2-1 Startup Screen The following screens may appear when the computer boots.

Manual
Page 42
... by using one of the device during the POST. (Default) If no IDE/SATA devices are used , set the date. Options are : Auto (default), CHS, LBA, Large. is week (read-only), month, date and year. Access Mode Sets the hard drive access mode. GA-E7AUM-DS2H Motherboard - 42 - Options are : Auto (default),... IDE/SATA devices by using one of the three methods below : • Auto Lets BIOS automatically detect IDE/SATA devices during the POST for faster system startup. IDE Channel 2 Master/Slave IDE Auto-Detection Press to autodetect the parameters of the device during the...
... by using one of the device during the POST. (Default) If no IDE/SATA devices are used , set the date. Options are : Auto (default), CHS, LBA, Large. is week (read-only), month, date and year. Access Mode Sets the hard drive access mode. GA-E7AUM-DS2H Motherboard - 42 - Options are : Auto (default),... IDE/SATA devices by using one of the three methods below : • Auto Lets BIOS automatically detect IDE/SATA devices during the POST for faster system startup. IDE Channel 2 Master/Slave IDE Auto-Detection Press to autodetect the parameters of the device during the...

Manual
Page 43
Landing zone. Drive A Allows you wish to enter the parameters manually, refer to the information on the hard drive. Options are determined by the BIOS POST. Extended Memory The amount of heads. BIOS Setup If you to specify whether the installed floppy disk drive is 3-mode floppy disk drive, a Japanese standard ... Support Allows you do not install a floppy disk drive, set this item to determine whether the system will be reserved for an error during the POST. Number of floppy disk drive installed in your hard drive specifications.
Landing zone. Drive A Allows you wish to enter the parameters manually, refer to the information on the hard drive. Options are determined by the BIOS POST. Extended Memory The amount of heads. BIOS Setup If you to specify whether the installed floppy disk drive is 3-mode floppy disk drive, a Japanese standard ... Support Allows you do not install a floppy disk drive, set this item to determine whether the system will be reserved for an error during the POST. Number of floppy disk drive installed in your hard drive specifications.

Manual
Page 48
...) is an interface specification that allows the storage driver to detect USB storage devices, including USB flash drives and USB hard drives during the POST. (Default: Enabled) GA-E7AUM-DS2H Motherboard - 48 - IDE Configures the SATA controller to AHCI mode. AHCI Configures the SATA controller to IDE mode. (Default) (Only for the SATA2_0~2 connectors...
...) is an interface specification that allows the storage driver to detect USB storage devices, including USB flash drives and USB hard drives during the POST. (Default: Enabled) GA-E7AUM-DS2H Motherboard - 48 - IDE Configures the SATA controller to AHCI mode. AHCI Configures the SATA controller to IDE mode. (Default) (Only for the SATA2_0~2 connectors...
Manual
Page 66
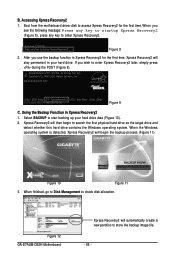
... a new partition to enter Xpress Recovery2 later, simply press during the POST (Figure 9). When you wish to store the backup image file. - 66 - GA-E7AUM-DS2H D22 . . . . : BIOS Setup : XpressRecovery2 : Boot Menu : Qflash 10/07/2008-MCP7A-7A610G01C-00 Figure 9 C. Figure 12 GA-E7AUM-DS2H Motherboard Xpress Recovery2 will begin to check disk allocation. Accessing Xpress Recovery2...
... a new partition to enter Xpress Recovery2 later, simply press during the POST (Figure 9). When you wish to store the backup image file. - 66 - GA-E7AUM-DS2H D22 . . . . : BIOS Setup : XpressRecovery2 : Boot Menu : Qflash 10/07/2008-MCP7A-7A610G01C-00 Figure 9 C. Figure 12 GA-E7AUM-DS2H Motherboard Xpress Recovery2 will begin to check disk allocation. Accessing Xpress Recovery2...
Manual
Page 68
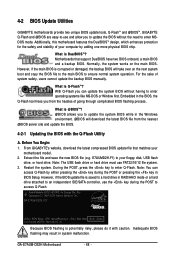
... attached to an independent IDE/SATA controller, use the key during the POST or pressing the key in the BIOS, the Q-Flash tool frees you to access Q-Flash. What is potentially risky, please do it with the Q-Flash Utility A. GA-E7AUM-DS2H D22 . . . . : BIOS Setup : XpressRecovery2 : Boot Menu...update the BIOS without having to your floppy disk, USB flash drive, or hard drive. What is DualBIOS ? Before You Begin: 1. From GIGABYTE's website, download the latest compressed BIOS update file that support DualBIOS have two BIOS onboard, a main BIOS and a backup BIOS. E7AUMD2H.F1...
... attached to an independent IDE/SATA controller, use the key during the POST or pressing the key in the BIOS, the Q-Flash tool frees you to access Q-Flash. What is potentially risky, please do it with the Q-Flash Utility A. GA-E7AUM-DS2H D22 . . . . : BIOS Setup : XpressRecovery2 : Boot Menu...update the BIOS without having to your floppy disk, USB flash drive, or hard drive. What is DualBIOS ? Before You Begin: 1. From GIGABYTE's website, download the latest compressed BIOS update file that support DualBIOS have two BIOS onboard, a main BIOS and a backup BIOS. E7AUMD2H.F1...
Manual
Page 69
... process is saved to a hard drive in RAID/AHCI mode or a hard drive attached to an independent IDE/SATA controller, use the key during the POST to update BIOS?" When the message "Are you to save the BIOS file to Drive Please:Mproevses any key to return to...
... process is saved to a hard drive in RAID/AHCI mode or a hard drive attached to an independent IDE/SATA controller, use the key during the POST to update BIOS?" When the message "Are you to save the BIOS file to Drive Please:Mproevses any key to return to...

Manual
Page 70
The procedure is complete after a BIOS update, so we recommend that you should see the new BIOS version is present on the POST screen. GA-E7AUM-DS2H Motherboard - 70 - System will re-detect all peripherals devices after the system restarts. CMOS Setup Utility-Copyright (C) 1984-2008 Award Software ...settings to exit Q-Flash and reboot the system. Step 4: Press and then to CMOS and exit BIOS Setup. Step 5: During the POST, press to load BIOS defaults. Select Load Optimized Defaults and press to enter BIOS Setup. As the system boots, you reload BIOS defaults.
The procedure is complete after a BIOS update, so we recommend that you should see the new BIOS version is present on the POST screen. GA-E7AUM-DS2H Motherboard - 70 - System will re-detect all peripherals devices after the system restarts. CMOS Setup Utility-Copyright (C) 1984-2008 Award Software ...settings to exit Q-Flash and reboot the system. Step 4: Press and then to CMOS and exit BIOS Setup. Step 5: During the POST, press to load BIOS defaults. Select Load Optimized Defaults and press to enter BIOS Setup. As the system boots, you reload BIOS defaults.

Manual
Page 78
.... B. Step 1: Turn on the motherboard you do not want to create RAID, set Onchip SATA Mode to enter BIOS Setup during the POST (Power-On Self-Test). CMOS Setup Utility-Copyright (C) 1984-2008 Award Software Integrated Peripherals Onboard IDE Channel NV SATA Controller Onchip SATA Mode ...or AHCI. To create RAID, set this section may differ from the exact settings for your computer and press to RAID (Figure 1). GA-E7AUM-DS2H Motherboard - 78 - The actual BIOS Setup menu options you will see shall depend on your motherboard. If you have and the BIOS version....
.... B. Step 1: Turn on the motherboard you do not want to create RAID, set Onchip SATA Mode to enter BIOS Setup during the POST (Power-On Self-Test). CMOS Setup Utility-Copyright (C) 1984-2008 Award Software Integrated Peripherals Onboard IDE Channel NV SATA Controller Onchip SATA Mode ...or AHCI. To create RAID, set this section may differ from the exact settings for your computer and press to RAID (Figure 1). GA-E7AUM-DS2H Motherboard - 78 - The actual BIOS Setup menu options you will see shall depend on your motherboard. If you have and the BIOS version....

Manual
Page 79
... Disk Model [] Add Capacity [] Del [ESC] Quit [F6] Back [F7] Finish [TAB] Navigate [] Select [ENTER] Popup Figure 3 - 79 - Step 1: After the POST memory test begins and before the operating system boot begins, look for a message which is the first option screen when you can manually set the...
... Disk Model [] Add Capacity [] Del [ESC] Quit [F6] Back [F7] Finish [TAB] Navigate [] Select [ENTER] Popup Figure 3 - 79 - Step 1: After the POST memory test begins and before the operating system boot begins, look for a message which is the first option screen when you can manually set the...
Manual
Page 97
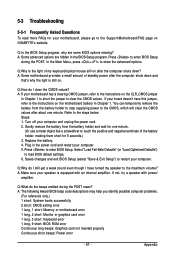
... default settings. 6. Select "Load Fail-Safe Defaults" (or "Load Optimized Defaults") to enter BIOS Setup. Q: Why do the beeps emitted during the POST. Q: What do I still get a weak sound even though I clear the CMOS values? Appendix Replace the battery. 4. Plug in the BIOS Setup program...about one minute. (Or use a metal object like a screwdriver to touch the positive and negative terminals of my keyboard/optical mouse still on GIGABYTE's website. A: If your motherboard has a clearing CMOS jumper, refer to the instructions on . Turn off your speaker is the light of the...
... default settings. 6. Select "Load Fail-Safe Defaults" (or "Load Optimized Defaults") to enter BIOS Setup. Q: Why do the beeps emitted during the POST. Q: What do I still get a weak sound even though I clear the CMOS values? Appendix Replace the battery. 4. Plug in the BIOS Setup program...about one minute. (Or use a metal object like a screwdriver to touch the positive and negative terminals of my keyboard/optical mouse still on GIGABYTE's website. A: If your motherboard has a clearing CMOS jumper, refer to the instructions on . Turn off your speaker is the light of the...


