
Owner's Manual
Page 11
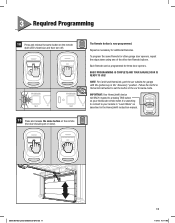
... "Accessory" position. Follow the Car2U or HomeLink instruction to set the button in the car to pressing THIS button on the remote (the door should open or close). to connect to your remote in "Learn Mode" as necessary for additional Remotes. To program the same Remote for...the HomeLink® instruction manual. 19 Press and release the same button on your Intellicode remote when it's searching SET - The Remote button is now programmed. PROGRAM IMPORTANT: Your HomeLink® device will ONLY respond to Genie mode. G999-393 Manual-ScrewBeltChain-EN indd 11 11 7/13/...
... "Accessory" position. Follow the Car2U or HomeLink instruction to set the button in the car to pressing THIS button on the remote (the door should open or close). to connect to your remote in "Learn Mode" as necessary for additional Remotes. To program the same Remote for...the HomeLink® instruction manual. 19 Press and release the same button on your Intellicode remote when it's searching SET - The Remote button is now programmed. PROGRAM IMPORTANT: Your HomeLink® device will ONLY respond to Genie mode. G999-393 Manual-ScrewBeltChain-EN indd 11 11 7/13/...
Owner's Manual
Page 14
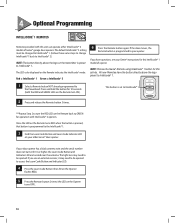
... lens may need to turn ON). If your Genie® instructions for operation with Intellicode® 2 openers. If the door moves, the Remote button is preset to access the Learn Code Button and Indicator LED. 4 Press the Learn Code Button (the LED on the Opener 5 Press the Remote button 2 times (the LED on the Remote indicates the...
... lens may need to turn ON). If your Genie® instructions for operation with Intellicode® 2 openers. If the door moves, the Remote button is preset to access the Learn Code Button and Indicator LED. 4 Press the Learn Code Button (the LED on the Opener 5 Press the Remote button 2 times (the LED on the Remote indicates the...
Owner's Manual
Page 18
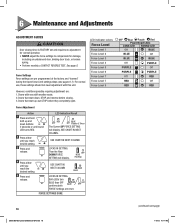
...EN indd 18 (continued next page) 7/13/12 10 17 AM However, conditions possibly requiring adjustment are pre programmed at the factory and "learned" during the Open/Close Limit settings steps (see pages 6-7). SEE CHART IN NEXT COLUMN. Both LEDs turn BLUE then OFF BLUE confirms ... Guides CAUTION Door closing . 3. For normal use, these settings should not need adjustment with very stiff weather seals. 2. Doors that start down buttons 2 seconds or until round LED turns RED. 2 Press either until you reach the desired setting. 5 Press and release. PROGRAM SET LED Indication...
...EN indd 18 (continued next page) 7/13/12 10 17 AM However, conditions possibly requiring adjustment are pre programmed at the factory and "learned" during the Open/Close Limit settings steps (see pages 6-7). SEE CHART IN NEXT COLUMN. Both LEDs turn BLUE then OFF BLUE confirms ... Guides CAUTION Door closing . 3. For normal use, these settings should not need adjustment with very stiff weather seals. 2. Doors that start down buttons 2 seconds or until round LED turns RED. 2 Press either until you reach the desired setting. 5 Press and release. PROGRAM SET LED Indication...


