
Owner's Manual
Page 2
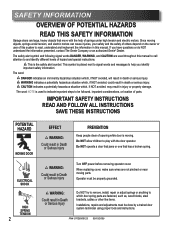
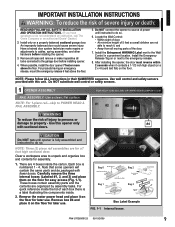
... to be done by a trained door system technician using proper tools and instructions. ELECTRICAL SHOCK HIGH SPRING TENSION 2 WARNING: CoourldSererisouultsinInDjueryath Turn OFF power before removing...if NOT avoided, may result in this manual. IMPORTANT SAFETY INSTRUCTIONS READ AND FOLLOW ALL INSTRUCTIONS SAVE THESE INSTRUCTIONS POTENTIAL HAZARD MOVING DOOR EFFECT WARNING: CoourldSererisouultsinInDjueryath PREVENTION Keep people clear... indicate important steps to and identify different levels of hazard and special instructions. Do NOT operate a door that jams or one that move with...
... to be done by a trained door system technician using proper tools and instructions. ELECTRICAL SHOCK HIGH SPRING TENSION 2 WARNING: CoourldSererisouultsinInDjueryath Turn OFF power before removing...if NOT avoided, may result in this manual. IMPORTANT SAFETY INSTRUCTIONS READ AND FOLLOW ALL INSTRUCTIONS SAVE THESE INSTRUCTIONS POTENTIAL HAZARD MOVING DOOR EFFECT WARNING: CoourldSererisouultsinInDjueryath PREVENTION Keep people clear... indicate important steps to and identify different levels of hazard and special instructions. Do NOT operate a door that jams or one that move with...
Owner's Manual
Page 3
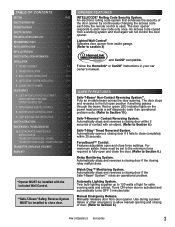
...REVERSE TEST 22 7 PROGRAMMING REMOTE CONTROLS 23 8 BATTERY/VISOR CLIP INSTALLATION 24 9 LIGHT BULB AND LENS INSTALLATION 24 SAFETY INSTRUCTIONS 25 MAINTENANCE & TROUBLESHOOTING 10 ROUTINE MONTHLY MAINTENANCE 25 WIRING DIAGRAM 26 TROUBLESHOOTING GUIDE - OPENER FEATURES INTELLICODE® Rolling Code ...passes through the beam. SAFETY FEATURES Safe-T-Beam® Non-Contact Reversing System**. Follow the Homelink® or Car2U® instructions in your car owner's manual. OPENER 27 TROUBLESHOOTING GUIDE - Use during a power failure or other emergency to allow manual opening...
...REVERSE TEST 22 7 PROGRAMMING REMOTE CONTROLS 23 8 BATTERY/VISOR CLIP INSTALLATION 24 9 LIGHT BULB AND LENS INSTALLATION 24 SAFETY INSTRUCTIONS 25 MAINTENANCE & TROUBLESHOOTING 10 ROUTINE MONTHLY MAINTENANCE 25 WIRING DIAGRAM 26 TROUBLESHOOTING GUIDE - OPENER FEATURES INTELLICODE® Rolling Code ...passes through the beam. SAFETY FEATURES Safe-T-Beam® Non-Contact Reversing System**. Follow the Homelink® or Car2U® instructions in your car owner's manual. OPENER 27 TROUBLESHOOTING GUIDE - Use during a power failure or other emergency to allow manual opening...
Owner's Manual
Page 4
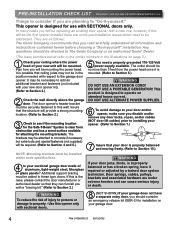
... many cases you will be mounted. Insure that you read and fully understand all information and instructions contained herein before choosing a "Do-it repaired or adjusted by a trained door system technician.... Door springs, cables, pulleys, brackets and associated hardware are as follows: The Genie Company recommends that the structure will be the first opener installed there are planning to "Do-...included with respect to the garage door opener. PRE-INSTALLATION CHECK LIST FOR HELP-1.800.354.3643 OR WWW.GENIECOMPANY.COM Things to consider if you are some pre-...
... many cases you will be mounted. Insure that you read and fully understand all information and instructions contained herein before choosing a "Do-it repaired or adjusted by a trained door system technician.... Door springs, cables, pulleys, brackets and associated hardware are as follows: The Genie Company recommends that the structure will be the first opener installed there are planning to "Do-...included with respect to the garage door opener. PRE-INSTALLATION CHECK LIST FOR HELP-1.800.354.3643 OR WWW.GENIECOMPANY.COM Things to consider if you are some pre-...
Owner's Manual
Page 6
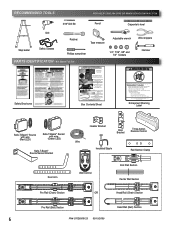
... acoplada) y ponga en el piso. Remove rail sections not connected to 11/ 2y-oinucr'hoowbnjeecr'ts(omra2nxu4alla. Procéder selon les instructions stipumléoenstadgaenàs sleuimvraen.uel d'installation pour les étapes de Box Contents Sheet Adjustable wrench Wire strippers 1/4", 7/16", 3/8" and...estire la camisa de plástico fuera de la cadena o lazo plástico de la correa. RECOMMENDED TOOLS FOR HELP-1.800.354.3643 OR WWW.GENIECOMPANY.COM 3/16" Drill Bit Pencil Carpenter's level Drill Step ladder Safety Glasses Ratchet Tape measure Phillips screwdriver...
... acoplada) y ponga en el piso. Remove rail sections not connected to 11/ 2y-oinucr'hoowbnjeecr'ts(omra2nxu4alla. Procéder selon les instructions stipumléoenstadgaenàs sleuimvraen.uel d'installation pour les étapes de Box Contents Sheet Adjustable wrench Wire strippers 1/4", 7/16", 3/8" and...estire la camisa de plástico fuera de la cadena o lazo plástico de la correa. RECOMMENDED TOOLS FOR HELP-1.800.354.3643 OR WWW.GENIECOMPANY.COM 3/16" Drill Bit Pencil Carpenter's level Drill Step ladder Safety Glasses Ratchet Tape measure Phillips screwdriver...
Owner's Manual
Page 9
...laid flat) on or next to POWER HEAD & RAIL ASSEMBLY. Do NOT substitute wall control or safety sensors. 1 OPENER ASSEMBLY FOR HELP-1.800.354.3643 OR WWW.GENIECOMPANY.COM RAIL ASSEMBLY: Use a clean, flat surface. An improperly balanced door could cause severe injury. Where possible,... door. Remove all ropes and remove or make repairs or adjustments to do not understand an instruction, call The Genie Company or an authorized Genie® Dealer.) 2. NOTE: Please follow ALL instructions in a prominent location. NOTE: For 1-piece rail-skip to the emergency release. 8. Install...
...laid flat) on or next to POWER HEAD & RAIL ASSEMBLY. Do NOT substitute wall control or safety sensors. 1 OPENER ASSEMBLY FOR HELP-1.800.354.3643 OR WWW.GENIECOMPANY.COM RAIL ASSEMBLY: Use a clean, flat surface. An improperly balanced door could cause severe injury. Where possible,... door. Remove all ropes and remove or make repairs or adjustments to do not understand an instruction, call The Genie Company or an authorized Genie® Dealer.) 2. NOTE: Please follow ALL instructions in a prominent location. NOTE: For 1-piece rail-skip to the emergency release. 8. Install...
Owner's Manual
Page 17
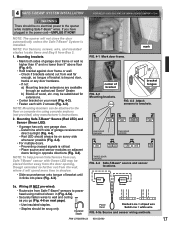
... to brackets. If not: a) Mounting bracket extensions are available through an authorized Genie® Dealer. RLEEDD GRLEEDEN GRLEEDEN RLEEDD RLEEDD GRLEEDEN ONE DOOR GARAGE TWO DOOR ... wire from Safe-T-Beam® sensors to power head using concrete anchors (not provided) obey manufacturer's instructions. 2. Mounting brackets. • Mark both sides of garage receives most direct sunlight (Fig. 4-4). ...Mounting brackets can be snug only. 4 SAFE-T-BEAM® SYSTEM INSTALLATION FOR HELP-1.800.354.3643 OR WWW.GENIECOMPANY.COM WARNING There should be placed further away from the...
... to brackets. If not: a) Mounting bracket extensions are available through an authorized Genie® Dealer. RLEEDD GRLEEDEN GRLEEDEN RLEEDD RLEEDD GRLEEDEN ONE DOOR GARAGE TWO DOOR ... wire from Safe-T-Beam® sensors to power head using concrete anchors (not provided) obey manufacturer's instructions. 2. Mounting brackets. • Mark both sides of garage receives most direct sunlight (Fig. 4-4). ...Mounting brackets can be snug only. 4 SAFE-T-BEAM® SYSTEM INSTALLATION FOR HELP-1.800.354.3643 OR WWW.GENIECOMPANY.COM WARNING There should be placed further away from the...
Owner's Manual
Page 19
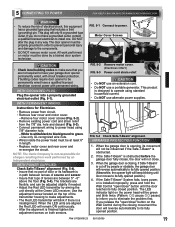
FIG. 5-1 Connect to install one. WITH PERMANENT WIRING: Instructions for charges resulting from circuit. • Remove rear cover ... strain relief from floor floor FIG. 5-4 Check Safe-T-Beam® alignment. 5 CONNECTING TO POWER FOR HELP-1.800.354.3643 OR WWW.GENIECOMPANY.COM WARNING • To reduce the risk of electrical shock, this equipment has ... the Safe-T-Beam® is designed to its fully opened position. INFRARED PROTECTION FUNCTION 1. NOTE: The Genie Company is finished tighten the adjustment screws on the Wall Control during the closing , if Safe-T-Beam®...
FIG. 5-1 Connect to install one. WITH PERMANENT WIRING: Instructions for charges resulting from circuit. • Remove rear cover ... strain relief from floor floor FIG. 5-4 Check Safe-T-Beam® alignment. 5 CONNECTING TO POWER FOR HELP-1.800.354.3643 OR WWW.GENIECOMPANY.COM WARNING • To reduce the risk of electrical shock, this equipment has ... the Safe-T-Beam® is designed to its fully opened position. INFRARED PROTECTION FUNCTION 1. NOTE: The Genie Company is finished tighten the adjustment screws on the Wall Control during the closing , if Safe-T-Beam®...
Owner's Manual
Page 23
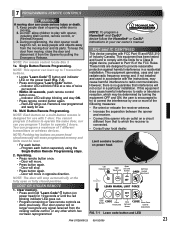
... can radiate radio frequency energy and, if not installed and used in opposite direction. FCC and IC CERTIFIED This device complies with the instructions, may be reset. • For each button separately using the Single Button Remote Programming steps. 2. However, there is no longer ...and LED PN# 37026500123 05/15/2009 23 NOTE: To program a Homelink® and Car2U® device follow the Homelink® or Car2U® instructions in a residential installation. Clear memory. • Press and hold "Learn Code" LEARN button (on the power headCODE (Fig. 7-1). • Press ...
... can radiate radio frequency energy and, if not installed and used in opposite direction. FCC and IC CERTIFIED This device complies with the instructions, may be reset. • For each button separately using the Single Button Remote Programming steps. 2. However, there is no longer ...and LED PN# 37026500123 05/15/2009 23 NOTE: To program a Homelink® and Car2U® device follow the Homelink® or Car2U® instructions in a residential installation. Clear memory. • Press and hold "Learn Code" LEARN button (on the power headCODE (Fig. 7-1). • Press ...

Owner's Manual
Page 25
...GENIE® DEALER. 3. Door should remain stationary or move very slightly. - Weak or broken springs are capable of increasing the rate of door closure and increasing the risk of travel, retest the door opener. Contact reverse. • Place a 2" x 4" board laid flat on contact with a 1-1/2" high object (or a 2" x 4" board laid flat) at : 1.800.... • With the door closed . WARNING Use Wall Control supplied with the door controls. READ AND FOLLOW ALL INSTRUCTIONS. 2. NO ONE SHOULD CROSS THE PATH OF THE MOVING DOOR. 4. Any other hardware. 8. An improperly balanced door...
...GENIE® DEALER. 3. Door should remain stationary or move very slightly. - Weak or broken springs are capable of increasing the rate of door closure and increasing the risk of travel, retest the door opener. Contact reverse. • Place a 2" x 4" board laid flat on contact with a 1-1/2" high object (or a 2" x 4" board laid flat) at : 1.800.... • With the door closed . WARNING Use Wall Control supplied with the door controls. READ AND FOLLOW ALL INSTRUCTIONS. 2. NO ONE SHOULD CROSS THE PATH OF THE MOVING DOOR. 4. Any other hardware. 8. An improperly balanced door...

