Quick Start Guide
Page 1
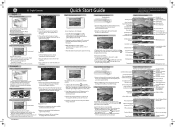
... following: 1. Next page icon Red-eye Reduction Change picture size Bouton Lecture Etape 8. OIS - Supprimer des photos ou des clips video: 1. Press the Power button at the top left to right) to confirm the time and date setup. &ape 4. Inserer la batterie E› -„qi _.-• (?) ... LCD et pressez sur le bouton de l'obturateur a moitie pour la mise au point sur le sujet. 3. Delete pictures or movies: 1. w GE Digital Camera Quick Start Guide For more information, please refer to the user manual found on the LCD screen. Time and language setup Language Allow...
... following: 1. Next page icon Red-eye Reduction Change picture size Bouton Lecture Etape 8. OIS - Supprimer des photos ou des clips video: 1. Press the Power button at the top left to right) to confirm the time and date setup. &ape 4. Inserer la batterie E› -„qi _.-• (?) ... LCD et pressez sur le bouton de l'obturateur a moitie pour la mise au point sur le sujet. 3. Delete pictures or movies: 1. w GE Digital Camera Quick Start Guide For more information, please refer to the user manual found on the LCD screen. Time and language setup Language Allow...
User Manual (English (6.97 MB))
Page 9
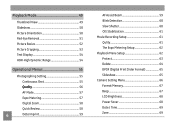
... 62 Protect 63 Delete 64 DPOF (Digital Print Order Format 65 Slideshow 65 Camera Setting Menu 66 Format Memory 67 Beep 67 LCD Brightness 68 Power Saver 68 Date / Time 69 Zone 69
... 62 Protect 63 Delete 64 DPOF (Digital Print Order Format 65 Slideshow 65 Camera Setting Menu 66 Format Memory 67 Beep 67 LCD Brightness 68 Power Saver 68 Date / Time 69 Zone 69

User Manual (English (6.97 MB))
Page 18
Turning On and Off Press the Power button to turn off . 15 You can change to when it is automatically set to other modes in the camera setup. The camera will power on page 33 for the first time, it was powered off the camera, press the Power button again. Power button Control Touch Panel The LCD screen is turned on the camera. Please see Camera Function Controls on in the last shooting mode that it . To turn on for details. Touch panel When the camera is also a touch panel and has camera control buttons integrated into it was set to the Auto shoot mode.
Turning On and Off Press the Power button to turn off . 15 You can change to when it is automatically set to other modes in the camera setup. The camera will power on page 33 for the first time, it was powered off the camera, press the Power button again. Power button Control Touch Panel The LCD screen is turned on the camera. Please see Camera Function Controls on in the last shooting mode that it . To turn on for details. Touch panel When the camera is also a touch panel and has camera control buttons integrated into it was set to the Auto shoot mode.
User Manual (English (6.97 MB))
Page 26
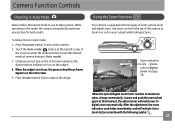
1 Slideshow Mode 2 Current Picture Index / Total Number 3 Memory Card / Built-in Memory Display 4 Battery Power Display 5 Screen Display DISP (Please refer to Screen Display section on page 24) 6 Next Page Icon 7 Red-eye Reduction 8 Rotate Picture 9 Delete Image 10 Setup Menu 11 DPOF Printing 12 File Protection 13 Change Picture Size 14 Crop Picture 15 Date and Time Captured 23
1 Slideshow Mode 2 Current Picture Index / Total Number 3 Memory Card / Built-in Memory Display 4 Battery Power Display 5 Screen Display DISP (Please refer to Screen Display section on page 24) 6 Next Page Icon 7 Red-eye Reduction 8 Rotate Picture 9 Delete Image 10 Setup Menu 11 DPOF Printing 12 File Protection 13 Change Picture Size 14 Crop Picture 15 Date and Time Captured 23
User Manual (English (6.97 MB))
Page 36
To take pictures. Press the power button to enter the mode selection screen (the default mode at the top of the camera to focus on the LCD screen. 5. Using the Zoom ...
To take pictures. Press the power button to enter the mode selection screen (the default mode at the top of the camera to focus on the LCD screen. 5. Using the Zoom ...

User Manual (English (6.97 MB))
Page 70
... setting. 2. Touch the button to enter the sub-menu of beep when buttons are pressed and change the tones for Shutter, Key, Self-timer, and Power-on the memory card and internal camera memory, including protected files. 1. In the sub-menu, press the desired selection and then press button to confirm...
... setting. 2. Touch the button to enter the sub-menu of beep when buttons are pressed and change the tones for Shutter, Key, Self-timer, and Power-on the memory card and internal camera memory, including protected files. 1. In the sub-menu, press the desired selection and then press button to confirm...

User Manual (English (6.97 MB))
Page 71
... or the darkest. 68 • LCD off: On/30 sec/1 min/2 min. • Camera off . 3. In the camera setting menu, select LCD Brightness. 2. Select Power saver in the camera setting menu. 2. By selecting the Manual option, you to adjust the idle period before the LCD screen or the camera is... automatically power-off : On/3 min/5 min/10 min. Press the or button to save power and get the maximum possible running time for 2 seconds) to automatically adjust the level itself until it adjusts...
... or the darkest. 68 • LCD off: On/30 sec/1 min/2 min. • Camera off . 3. In the camera setting menu, select LCD Brightness. 2. Select Power saver in the camera setting menu. 2. By selecting the Manual option, you to adjust the idle period before the LCD screen or the camera is... automatically power-off : On/3 min/5 min/10 min. Press the or button to save power and get the maximum possible running time for 2 seconds) to automatically adjust the level itself until it adjusts...
User Manual (English (6.97 MB))
Page 88
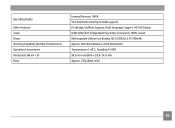
Recording Media Other Features Jacks Power Shooting Capability (Battery Performance) Operation Environment Dimensions (W x H x D) Mass Internal Memory: 18MB SD Card/SDHC Card (Up to 16GB support) PictBridge, ExifPrint Support, Multi-language Support, HD Still Output USB2.0/AV-OUT (Integrated Proprietary Connector), HDMI socket Rechargeable Lithium-ion Battery GB-10 (D016), 3.7V 700mAh Approx. 160 shots (based on CIPA Standards) Temperature: 0~40oC, Humidity: 0~90% 98.3mm x 56.8mm x (19.8~24.7) mm Approx. 135g (Body only) 85
Recording Media Other Features Jacks Power Shooting Capability (Battery Performance) Operation Environment Dimensions (W x H x D) Mass Internal Memory: 18MB SD Card/SDHC Card (Up to 16GB support) PictBridge, ExifPrint Support, Multi-language Support, HD Still Output USB2.0/AV-OUT (Integrated Proprietary Connector), HDMI socket Rechargeable Lithium-ion Battery GB-10 (D016), 3.7V 700mAh Approx. 160 shots (based on CIPA Standards) Temperature: 0~40oC, Humidity: 0~90% 98.3mm x 56.8mm x (19.8~24.7) mm Approx. 135g (Body only) 85
User Manual (English (6.97 MB))
Page 89
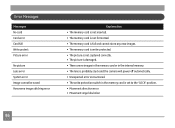
... damaged. • There are no images in the memory card or in the internal memory. • The lens is probably stuck and the camera will power off automatically. • Unexpected error encountered. • The write protection switch in the memory card is set to the "LOCK" position. • Movement direction error...
... damaged. • There are no images in the memory card or in the internal memory. • The lens is probably stuck and the camera will power off automatically. • Unexpected error encountered. • The write protection switch in the memory card is set to the "LOCK" position. • Movement direction error...

