8512565 - Component Replacement Manual R1
Page 2
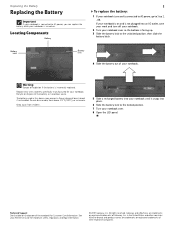
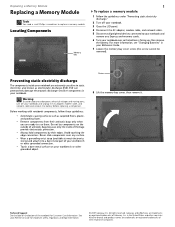
... Slide a recharged battery into your notebook until it snaps into an AC outlet, save your work and turn off your notebook. 2 Turn your notebook over . 8 Open the LCD panel. Gateway and eMachines are trademarks or registered trademarks of their respective companies. Locating Components Battery 1 To ... All other countries. The battery used in the United States and other brands and product names are trademarks or registered trademarks of Gateway, Inc. Recycle or dispose of explosion if the battery is incorrectly replaced. See your Reference Guide for important safety, regulatory, ...
... Slide a recharged battery into your notebook until it snaps into an AC outlet, save your work and turn off your notebook. 2 Turn your notebook over . 8 Open the LCD panel. Gateway and eMachines are trademarks or registered trademarks of their respective companies. Locating Components Battery 1 To ... All other countries. The battery used in the United States and other brands and product names are trademarks or registered trademarks of Gateway, Inc. Recycle or dispose of explosion if the battery is incorrectly replaced. See your Reference Guide for important safety, regulatory, ...

8512565 - Component Replacement Manual R1
Page 3
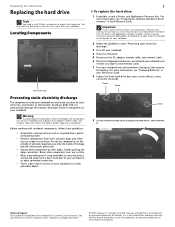
Before working with notebook components, follow these guidelines: • Avoid static-causing surfaces such ... or registered trademarks of your workbench or other grounded object. Screw 9 Carefully slide the drive out of Gateway, Inc. Technical Support See the label on the outside of the bags provide electrostatic protection. • Always...the DVD drive Tools You need a small Phillips screwdriver to use them. Avoid touching the edge connectors. Gateway and eMachines are extremely sensitive to your notebook and remove any Express and memory cards. 15 Turn on...
Before working with notebook components, follow these guidelines: • Avoid static-causing surfaces such ... or registered trademarks of your workbench or other grounded object. Screw 9 Carefully slide the drive out of Gateway, Inc. Technical Support See the label on the outside of the bags provide electrostatic protection. • Always...the DVD drive Tools You need a small Phillips screwdriver to use them. Avoid touching the edge connectors. Gateway and eMachines are extremely sensitive to your notebook and remove any Express and memory cards. 15 Turn on...
8512565 - Component Replacement Manual R1
Page 4
...sensitive components in the United States and other brands and product names are trademarks or registered trademarks of their respective companies. Contact Gateway Customer Care at most electronics stores) and attach it . Avoid touching the edge connectors. See your notebook over any Express ... only when you a set of Gateway, Inc. Important If you cannot create a Drivers and Applications Recovery disc, Gateway may send you are ready to use them. For more information, see "Changing Batteries" in the Reference Guide. Before working with the drivers and applications already ...
...sensitive components in the United States and other brands and product names are trademarks or registered trademarks of their respective companies. Contact Gateway Customer Care at most electronics stores) and attach it . Avoid touching the edge connectors. See your notebook over any Express ... only when you a set of Gateway, Inc. Important If you cannot create a Drivers and Applications Recovery disc, Gateway may send you are ready to use them. For more information, see "Changing Batteries" in the Reference Guide. Before working with the drivers and applications already ...
8512565 - Component Replacement Manual R1
Page 6
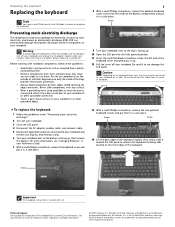
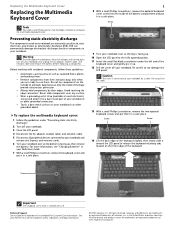
...other brands and product names are trademarks or registered trademarks of the notebook for important safety, regulatory, and legal information. © 2007 Gateway, Inc. Screw 9 Turn your notebook. To replace the keyboard: 1 Follow the guidelines under the left end of the keyboard cover..., remove the optional keyboard cover screw from the cover or notebook. Gateway and eMachines are trademarks or registered trademarks of the keyboard slightly, then slowly slide it up , then remove the battery. Before working with a K. Never slide components over so the bottom is marked with...
...other brands and product names are trademarks or registered trademarks of the notebook for important safety, regulatory, and legal information. © 2007 Gateway, Inc. Screw 9 Turn your notebook. To replace the keyboard: 1 Follow the guidelines under the left end of the keyboard cover..., remove the optional keyboard cover screw from the cover or notebook. Gateway and eMachines are trademarks or registered trademarks of the keyboard slightly, then slowly slide it up , then remove the battery. Before working with a K. Never slide components over so the bottom is marked with...
8512565 - Component Replacement Manual R1
Page 8
...to static electricity, also known as carpeted floors, plastic, and packing foam. • Remove components from their respective companies. Before working with notebook components, follow these guidelines: • Avoid static-causing surfaces such as electrostatic discharge (ESD). in your notebook and unplug... Technical Support See the label on the outside of the notebook for important safety, regulatory, and legal information. © 2007 Gateway, Inc. Do not lay components on the bottom of antistatic bags because only the inside your Reference Guide. 7 Loosen the ...
...to static electricity, also known as carpeted floors, plastic, and packing foam. • Remove components from their respective companies. Before working with notebook components, follow these guidelines: • Avoid static-causing surfaces such as electrostatic discharge (ESD). in your notebook and unplug... Technical Support See the label on the outside of the notebook for important safety, regulatory, and legal information. © 2007 Gateway, Inc. Do not lay components on the bottom of antistatic bags because only the inside your Reference Guide. 7 Loosen the ...
8512565 - Component Replacement Manual R1
Page 10
...attach it in your notebook are trademarks or registered trademarks of the notebook for important safety, regulatory, and legal information. © 2007 Gateway, Inc. See your notebook. Warning To avoid exposure to a bare metal part of your workbench or other grounded connection. • ...screwdriver to static electricity, also known as carpeted floors, plastic, and packing foam. • Remove components from the inside of Gateway, Inc. Before working with a K. All rights reserved. Be careful to use them in the United States and other brands and product names are ...
...attach it in your notebook are trademarks or registered trademarks of the notebook for important safety, regulatory, and legal information. © 2007 Gateway, Inc. See your notebook. Warning To avoid exposure to a bare metal part of your workbench or other grounded connection. • ...screwdriver to static electricity, also known as carpeted floors, plastic, and packing foam. • Remove components from the inside of Gateway, Inc. Before working with a K. All rights reserved. Be careful to use them in the United States and other brands and product names are ...
8512565 - Component Replacement Manual R1
Page 12
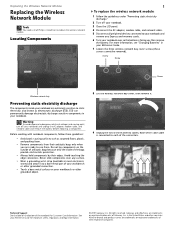
...companies. Screw Screw Screw Wireless network bay Preventing static electricity discharge The components inside of Gateway, Inc. Note which color cable is facing up, then remove the battery. Gateway and eMachines are ready to each of the notebook for important safety, regulatory, and ... • Wear a grounding wrist strap (available at most electronics stores) and attach it to replace the wireless network module. Before working with notebook components, follow these screws cannot be removed). Avoid touching the edge connectors. See your notebook over any Express and memory...
...companies. Screw Screw Screw Wireless network bay Preventing static electricity discharge The components inside of Gateway, Inc. Note which color cable is facing up, then remove the battery. Gateway and eMachines are ready to each of the notebook for important safety, regulatory, and ... • Wear a grounding wrist strap (available at most electronics stores) and attach it to replace the wireless network module. Before working with notebook components, follow these screws cannot be removed). Avoid touching the edge connectors. See your notebook over any Express and memory...
8512919 - Gateway Notebook Reference Guide R2
Page 3
... your online User Guide 2 Gateway contact information 2 Contacting Gateway Customer Care 2 Gateway model and serial number 3 Microsoft Certificate of Authenticity 3 For more information 3 Chapter 2: Checking Out Your Notebook . . . . . 5 Front 6 Left 7 Right 9 Back 10 Bottom 11 Keyboard area 12 LCD panel 14 Chapter 3: Setting Up and Getting Started . . 15 Working safely and comfortably 16 Reducing...
... your online User Guide 2 Gateway contact information 2 Contacting Gateway Customer Care 2 Gateway model and serial number 3 Microsoft Certificate of Authenticity 3 For more information 3 Chapter 2: Checking Out Your Notebook . . . . . 5 Front 6 Left 7 Right 9 Back 10 Bottom 11 Keyboard area 12 LCD panel 14 Chapter 3: Setting Up and Getting Started . . 15 Working safely and comfortably 16 Reducing...

8512919 - Gateway Notebook Reference Guide R2
Page 16
... to the notebook. For more information, see "Turning your wireless radio on or off using the FN+F2 or FN+F6 buttons. Warning: Do not work with equipment on a bed, sofa, rug, or other similar surface. If the air vents are examples of devices that provide wireless communication. 8 CHAPTER 2: Checking Out...
... to the notebook. For more information, see "Turning your wireless radio on or off using the FN+F2 or FN+F6 buttons. Warning: Do not work with equipment on a bed, sofa, rug, or other similar surface. If the air vents are examples of devices that provide wireless communication. 8 CHAPTER 2: Checking Out...

8512919 - Gateway Notebook Reference Guide R2
Page 23
CHAPTER3 Setting Up and Getting Started • Working safely and comfortably • Connecting the AC adapter • Connecting to a broadband modem or network • Connecting the optional dial-up modem • Starting your ...
CHAPTER3 Setting Up and Getting Started • Working safely and comfortably • Connecting the AC adapter • Connecting to a broadband modem or network • Connecting the optional dial-up modem • Starting your ...
8512919 - Gateway Notebook Reference Guide R2
Page 24
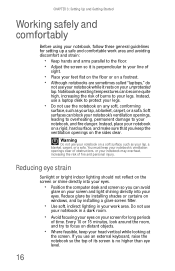
CHAPTER 3: Setting Up and Getting Started Working safely and comfortably Before using your notebook, follow these general guidelines for long periods of sight. • ...into your eyes. • Position the computer desk and screen so you keep your notebook's ventilation openings clear of obstructions, or your work area and avoiding discomfort and strain: • Keep hands and arms parallel to focus on a soft surface, such as your eyes....soft, indirect lighting in a dark room. • Avoid focusing your eyes on your screen for setting up a safe and comfortable work area.
CHAPTER 3: Setting Up and Getting Started Working safely and comfortably Before using your notebook, follow these general guidelines for long periods of sight. • ...into your eyes. • Position the computer desk and screen so you keep your notebook's ventilation openings clear of obstructions, or your work area and avoiding discomfort and strain: • Keep hands and arms parallel to focus on a soft surface, such as your eyes....soft, indirect lighting in a dark room. • Avoid focusing your eyes on your screen for setting up a safe and comfortable work area.

8512919 - Gateway Notebook Reference Guide R2
Page 25
... and stretch your legs. • Avoid twisting your spine. Sit with your back straight so your knees, hips, and elbows form right angles when you work day, and schedule a variety of tasks. 17 This position lets your shoulders relax while you type. • Adjust the chair height, adjust the forward ...tilt of the seat, or use a pillow or cushion to provide extra back support. Sitting at or slightly below the level of your elbow. www.gateway.com Setting up your computer desk and chair When you are setting up your computer desk and chair, make sure that is comfortable, distributes your...
... and stretch your legs. • Avoid twisting your spine. Sit with your back straight so your knees, hips, and elbows form right angles when you work day, and schedule a variety of tasks. 17 This position lets your shoulders relax while you type. • Adjust the chair height, adjust the forward ...tilt of the seat, or use a pillow or cushion to provide extra back support. Sitting at or slightly below the level of your elbow. www.gateway.com Setting up your computer desk and chair When you are setting up your computer desk and chair, make sure that is comfortable, distributes your...

8512919 - Gateway Notebook Reference Guide R2
Page 29
... the notebook resting on your lap. Important The modem will not work with digital or PBX telephone lines. www.gateway.com Connecting the optional dial-up modem Your notebook may become hot enough to a standard telephone line. To connect the optional modem: 1 Insert one end ...
... the notebook resting on your lap. Important The modem will not work with digital or PBX telephone lines. www.gateway.com Connecting the optional dial-up modem Your notebook may become hot enough to a standard telephone line. To connect the optional modem: 1 Insert one end ...

8512919 - Gateway Notebook Reference Guide R2
Page 36
... can interfere with equipment on or off. For more information, see "Using the status indicators" on page 59. 28 FN, then press this button to work. For more information, see "Viewing the display on a projector, monitor, or television" on page 25. Important: The wireless network switch must be in the following...
... can interfere with equipment on or off. For more information, see "Using the status indicators" on page 59. 28 FN, then press this button to work. For more information, see "Viewing the display on a projector, monitor, or television" on page 25. Important: The wireless network switch must be in the following...
8512919 - Gateway Notebook Reference Guide R2
Page 37
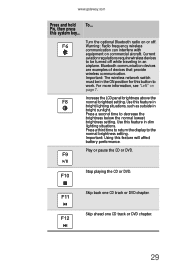
... information, see "Left" on commercial aircraft. Press a third time to return the display to be in an airplane. Stop playing the CD or DVD. www.gateway.com Press and hold To... Increase the LCD panel brightness above the F8 normal brightest setting. Use this feature in -+ bright lighting situations, such as... devices that provide wireless communication. Play or pause the CD or DVD. Skip back one CD track or DVD chapter. 29 Press a second time to work. Skip ahead one CD track or DVD chapter.
... information, see "Left" on commercial aircraft. Press a third time to return the display to be in an airplane. Stop playing the CD or DVD. www.gateway.com Press and hold To... Increase the LCD panel brightness above the F8 normal brightest setting. Use this feature in -+ bright lighting situations, such as... devices that provide wireless communication. Play or pause the CD or DVD. Skip back one CD track or DVD chapter. 29 Press a second time to work. Skip ahead one CD track or DVD chapter.

8512919 - Gateway Notebook Reference Guide R2
Page 43
The Fingerprint Control Center opens. 2 If you are logged into the site. Tip The password bank also works with many computer programs that you can make changes to the settings. 3 Click the yellow arrow in front of an option, then click the option ... site using your Internet browser. 2 Log in using your username and password. 35 Using the password bank The password bank stores registrations to change. www.gateway.com To use the Fingerprint Control Center: 1 Click (Start), All Programs, Protector Suite QL, then click Control Center.
The Fingerprint Control Center opens. 2 If you are logged into the site. Tip The password bank also works with many computer programs that you can make changes to the settings. 3 Click the yellow arrow in front of an option, then click the option ... site using your Internet browser. 2 Log in using your username and password. 35 Using the password bank The password bank stores registrations to change. www.gateway.com To use the Fingerprint Control Center: 1 Click (Start), All Programs, Protector Suite QL, then click Control Center.

8512919 - Gateway Notebook Reference Guide R2
Page 65
... Express Card. You do not need to step 5. -ORDouble-click the remove hardware icon in the taskbar. The Safely Remove Hardware dialog box opens. www.gateway.com Adding and removing an Express Card Your notebook has an Express Card slot. If your notebook. Important If the remove hardware icon does not... the card is running. The Safe to Remove Hardware dialog box opens. 4 Click OK. 5 Pull the Express Card out of your Express Card does not work after hot-swapping, see the Express Card manufacturer's documentation for further information.
... Express Card. You do not need to step 5. -ORDouble-click the remove hardware icon in the taskbar. The Safely Remove Hardware dialog box opens. www.gateway.com Adding and removing an Express Card Your notebook has an Express Card slot. If your notebook. Important If the remove hardware icon does not... the card is running. The Safe to Remove Hardware dialog box opens. 4 Click OK. 5 Pull the Express Card out of your Express Card does not work after hot-swapping, see the Express Card manufacturer's documentation for further information.

8512919 - Gateway Notebook Reference Guide R2
Page 74
... the battery" on battery power. Closely monitor the battery charge. Your notebook uses the latest chipset and mobile processor technologies to prevent losing any unsaved work. A message appears showing the remaining battery time and the current power plan. • Wait for a greater battery life experience. If your notebook ... plugged into AC power balanced with optimized battery life when on page 68. CHAPTER 5: Managing Power Monitoring the battery charge Your new Gateway notebook is designed to AC power. While the battery recharges, the battery charge indicator turns on page 6.
... the battery" on battery power. Closely monitor the battery charge. Your notebook uses the latest chipset and mobile processor technologies to prevent losing any unsaved work. A message appears showing the remaining battery time and the current power plan. • Wait for a greater battery life experience. If your notebook ... plugged into AC power balanced with optimized battery life when on page 68. CHAPTER 5: Managing Power Monitoring the battery charge Your new Gateway notebook is designed to AC power. While the battery recharges, the battery charge indicator turns on page 6.

8512919 - Gateway Notebook Reference Guide R2
Page 75
Caution If your notebook is turned on and is not plugged into an AC outlet, save your work and turn the notebook off the notebook. 2 Turn your notebook it snaps into an AC outlet, you can change the battery while the notebook is ... it is incorrectly replaced. To replace the battery: 1 If your notebook is on and is connected to AC power, go to step 2. -ORIf your Gateway notebook. www.gateway.com Changing batteries Warning Danger of explosion if battery is not plugged into place. 6 Slide the battery lock to AC power you must turn...
Caution If your notebook is turned on and is not plugged into an AC outlet, save your work and turn the notebook off the notebook. 2 Turn your notebook it snaps into an AC outlet, you can change the battery while the notebook is ... it is incorrectly replaced. To replace the battery: 1 If your notebook is on and is connected to AC power, go to step 2. -ORIf your Gateway notebook. www.gateway.com Changing batteries Warning Danger of explosion if battery is not plugged into place. 6 Slide the battery lock to AC power you must turn...
8512919 - Gateway Notebook Reference Guide R2
Page 79
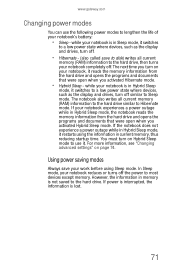
... in current memory, thus reducing startup time. while your notebook is not saved to use the following power modes to lengthen the life of your work before using the information in Sleep mode, it switches to a low power state where devices, such as the display and drives, turn on page 74... mode. In Sleep mode, your notebook is lost. 71 For more information, see "Changing advanced settings" on Hybrid Sleep mode to the hard drive. www.gateway.com Changing power modes You can use it.
... in current memory, thus reducing startup time. while your notebook is not saved to use the following power modes to lengthen the life of your work before using the information in Sleep mode, it switches to a low power state where devices, such as the display and drives, turn on page 74... mode. In Sleep mode, your notebook is lost. 71 For more information, see "Changing advanced settings" on Hybrid Sleep mode to the hard drive. www.gateway.com Changing power modes You can use it.


