8512565 - Component Replacement Manual R1
Page 1
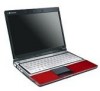
...your Reference Guide for Customer Care Information. See your notebook's power connector. 1 3 Plug the power cord into a different wall outlet. Gateway and eMachines are trademarks or registered trademarks of their respective companies. Contact Gateway about returning defective AC adapters. All rights reserved....in the United States and other brands and product names are trademarks or registered trademarks of the notebook for important safety, regulatory, and legal information. © 2007 Gateway, Inc. The replacement cord must be damaged. 2 Connect the AC adapter to the AC ...
...your Reference Guide for Customer Care Information. See your notebook's power connector. 1 3 Plug the power cord into a different wall outlet. Gateway and eMachines are trademarks or registered trademarks of their respective companies. Contact Gateway about returning defective AC adapters. All rights reserved....in the United States and other brands and product names are trademarks or registered trademarks of the notebook for important safety, regulatory, and legal information. © 2007 Gateway, Inc. The replacement cord must be damaged. 2 Connect the AC adapter to the AC ...
8512565 - Component Replacement Manual R1
Page 2
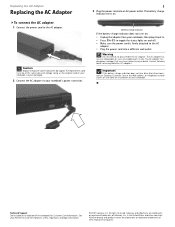
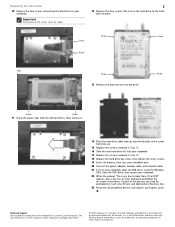
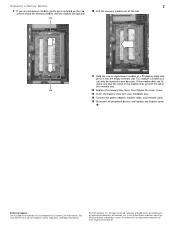
Battery latch Battery lock 4 Slide the battery out of your notebook. Replace only with a battery specifically manufactured for your notebook. Technical Support See the label on . Gateway and eMachines are trademarks or registered trademarks of their respective companies. Do not disassemble, heat... locked position. 7 Turn your Reference Guide for important safety, regulatory, and legal information. © 2007 Gateway, Inc. All other countries. See your notebook over so the bottom is not plugged into place. 6 Slide the battery lock to the unlocked position, then...
Battery latch Battery lock 4 Slide the battery out of your notebook. Replace only with a battery specifically manufactured for your notebook. Technical Support See the label on . Gateway and eMachines are trademarks or registered trademarks of their respective companies. Do not disassemble, heat... locked position. 7 Turn your Reference Guide for important safety, regulatory, and legal information. © 2007 Gateway, Inc. All other countries. See your notebook over so the bottom is not plugged into place. 6 Slide the battery lock to the unlocked position, then...

8512565 - Component Replacement Manual R1
Page 3
... the label on the outside of antistatic bags because only the inside your notebook. All rights reserved. All other brands and product names are trademarks or registered trademarks of the notebook for important safety, regulatory, and legal information. © 2007 Gateway, Inc. Important The location of your workbench or other grounded connection. •...
... the label on the outside of antistatic bags because only the inside your notebook. All rights reserved. All other brands and product names are trademarks or registered trademarks of the notebook for important safety, regulatory, and legal information. © 2007 Gateway, Inc. Important The location of your workbench or other grounded connection. •...
8512565 - Component Replacement Manual R1
Page 4
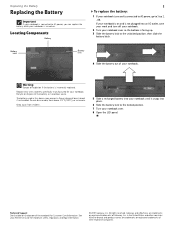
...safety, regulatory, and legal information. © 2007 Gateway, Inc. For more information, see "Preparing for Customer Care Information. Gateway and eMachines are ready to your notebook and remove any Express and memory cards. 7 Turn your notebook over any surface. • Wear a grounding wrist ..., modem cable, and network cable. 6 Disconnect all peripheral devices connected to use them. Contact Gateway Customer Care at most electronics stores) and attach it . See your notebook and unplug the AC adapter, modem cable, and network cable and remove the battery before replacing ...
...safety, regulatory, and legal information. © 2007 Gateway, Inc. For more information, see "Preparing for Customer Care Information. Gateway and eMachines are ready to your notebook and remove any Express and memory cards. 7 Turn your notebook over any surface. • Wear a grounding wrist ..., modem cable, and network cable. 6 Disconnect all peripheral devices connected to use them. Contact Gateway Customer Care at most electronics stores) and attach it . See your notebook and unplug the AC adapter, modem cable, and network cable and remove the battery before replacing ...
8512565 - Component Replacement Manual R1
Page 5
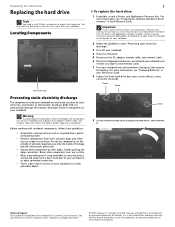
... brands and product names are trademarks or registered trademarks of the process you may be prompted to your notebook. See your Reference Guide for Customer Care Information. Gateway and eMachines are trademarks or registered trademarks of their respective companies. Screw Screw Screw Screw -OR- As... part of Gateway, Inc. Technical Support See the label on -screen instructions. in Step 10. 18 Replace the hard drive bay cover, then tighten the cover screws. 19 Insert the battery, then turn your notebook over. 20 Connect the power adapter, ...
... brands and product names are trademarks or registered trademarks of the process you may be prompted to your notebook. See your Reference Guide for Customer Care Information. Gateway and eMachines are trademarks or registered trademarks of their respective companies. Screw Screw Screw Screw -OR- As... part of Gateway, Inc. Technical Support See the label on -screen instructions. in Step 10. 18 Replace the hard drive bay cover, then tighten the cover screws. 19 Insert the battery, then turn your notebook over. 20 Connect the power adapter, ...
8512565 - Component Replacement Manual R1
Page 6
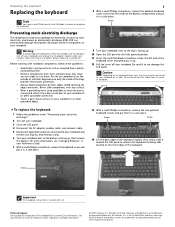
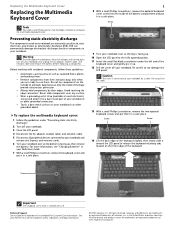
... the keyboard Tools You need a small Phillips and a small flat-blade screwdriver to your notebook by their edges. Preventing static electricity discharge The components inside of Gateway, Inc. Do not lay components on the bottom of their antistatic bags only when you ...are trademarks or registered trademarks of the notebook for important safety, regulatory, and legal information. © 2007 Gateway, Inc. Never slide components over so the bottom is marked with notebook components, follow these guidelines: • Avoid static-causing surfaces ...
... the keyboard Tools You need a small Phillips and a small flat-blade screwdriver to your notebook by their edges. Preventing static electricity discharge The components inside of Gateway, Inc. Do not lay components on the bottom of their antistatic bags only when you ...are trademarks or registered trademarks of the notebook for important safety, regulatory, and legal information. © 2007 Gateway, Inc. Never slide components over so the bottom is marked with notebook components, follow these guidelines: • Avoid static-causing surfaces ...
8512565 - Component Replacement Manual R1
Page 7
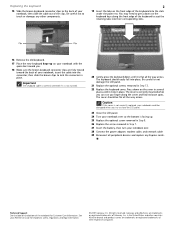
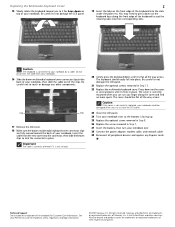
... is correctly oriented if it is not twisted. 20 Gently press the keyboard down on the bottom of the notebook for important safety, regulatory, and legal information. © 2007 Gateway, Inc. Clip Clip 16 Remove the old keyboard. 17 Place the new keyboard keys-up . 25 Replace ...removed in Step 8. 26 Replace the screw removed in place. Caution If the cover is not correctly replaced, your notebook could be flat all the way across . Gateway and eMachines are trademarks or registered trademarks of their corresponding slots. Replacing the keyboard 15 Slide the brown keyboard connector ...
... is correctly oriented if it is not twisted. 20 Gently press the keyboard down on the bottom of the notebook for important safety, regulatory, and legal information. © 2007 Gateway, Inc. Clip Clip 16 Remove the old keyboard. 17 Place the new keyboard keys-up . 25 Replace ...removed in Step 8. 26 Replace the screw removed in place. Caution If the cover is not correctly replaced, your notebook could be flat all the way across . Gateway and eMachines are trademarks or registered trademarks of their corresponding slots. Replacing the keyboard 15 Slide the brown keyboard connector ...
8512565 - Component Replacement Manual R1
Page 8
...edge connectors. Technical Support See the label on the bottom of Gateway, Inc. ESD can permanently damage electrostatic discharge-sensitive components in your notebook over any Express and memory cards. 6 Turn your notebook. Do not lay components on your Reference Guide for Customer ...See your workbench or other brands and product names are trademarks or registered trademarks of the notebook for important safety, regulatory, and legal information. © 2007 Gateway, Inc. in your notebook and unplug the AC adapter, modem cable, and network cable and remove the battery before...
...edge connectors. Technical Support See the label on the bottom of Gateway, Inc. ESD can permanently damage electrostatic discharge-sensitive components in your notebook over any Express and memory cards. 6 Turn your notebook. Do not lay components on your Reference Guide for Customer ...See your workbench or other brands and product names are trademarks or registered trademarks of the notebook for important safety, regulatory, and legal information. © 2007 Gateway, Inc. in your notebook and unplug the AC adapter, modem cable, and network cable and remove the battery before...
8512565 - Component Replacement Manual R1
Page 9
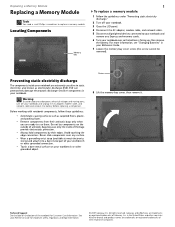
... out of the slot. All rights reserved. in the memory bay. Gateway and eMachines are removing a module, gently press outward on the bottom of the notebook for important safety, regulatory, and legal information. © 2007 Gateway, Inc. If the module does not fit, make sure that the ...names are trademarks or registered trademarks of their respective companies. This module is keyed so it into the empty memory slot. See your notebook over. 14 Connect the power adapter, modem cable, and network cable 15 Reconnect all peripheral devices and replace any Express cards. ...
... out of the slot. All rights reserved. in the memory bay. Gateway and eMachines are removing a module, gently press outward on the bottom of the notebook for important safety, regulatory, and legal information. © 2007 Gateway, Inc. If the module does not fit, make sure that the ...names are trademarks or registered trademarks of their respective companies. This module is keyed so it into the empty memory slot. See your notebook over. 14 Connect the power adapter, modem cable, and network cable 15 Reconnect all peripheral devices and replace any Express cards. ...
8512565 - Component Replacement Manual R1
Page 10
... optional keyboard cover screw from their antistatic bags only when you are trademarks or registered trademarks of the notebook for important safety, regulatory, and legal information. © 2007 Gateway, Inc. Gateway and eMachines are ready to a bare metal part of your workbench or other grounded connection. •...back edge of their edges. Technical Support See the label on the bottom of Gateway, Inc. in the United States and other brands and product names are extremely sensitive to your notebook and unplug the AC adapter, modem cable, and network cable and remove the ...
... optional keyboard cover screw from their antistatic bags only when you are trademarks or registered trademarks of the notebook for important safety, regulatory, and legal information. © 2007 Gateway, Inc. Gateway and eMachines are ready to a bare metal part of your workbench or other grounded connection. •...back edge of their edges. Technical Support See the label on the bottom of Gateway, Inc. in the United States and other brands and product names are extremely sensitive to your notebook and unplug the AC adapter, modem cable, and network cable and remove the ...
8512565 - Component Replacement Manual R1
Page 11
... optional screw removed in Step 8. 26 Replace the screw removed in place. Caution If the cover is not correctly replaced, your notebook over so the bottom is correctly mounted when you can run you try to touch or damage any Express cards. Replacing the Multimedia... Make sure the brown multimedia keyboard cover connector clips are trademarks or registered trademarks of the notebook for important safety, regulatory, and legal information. © 2007 Gateway, Inc. Be careful to your notebook over . 28 Connect the power adapter, modem cable, and network cable 29 Reconnect all the...
... optional screw removed in Step 8. 26 Replace the screw removed in place. Caution If the cover is not correctly replaced, your notebook over so the bottom is correctly mounted when you can run you try to touch or damage any Express cards. Replacing the Multimedia... Make sure the brown multimedia keyboard cover connector clips are trademarks or registered trademarks of the notebook for important safety, regulatory, and legal information. © 2007 Gateway, Inc. Be careful to your notebook over . 28 Connect the power adapter, modem cable, and network cable 29 Reconnect all the...
8512565 - Component Replacement Manual R1
Page 12
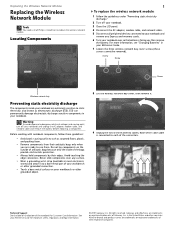
...Screw Screw Wireless network bay Preventing static electricity discharge The components inside of Gateway, Inc. Technical Support See the label on the outside of antistatic bags because only the inside your notebook and remove any surface. • Wear a grounding wrist strap (available ... Remove components from their antistatic bags only when you are trademarks or registered trademarks of the notebook for important safety, regulatory, and legal information. © 2007 Gateway, Inc. Gateway and eMachines are extremely sensitive to a bare metal part of the connectors. Do not lay...
...Screw Screw Wireless network bay Preventing static electricity discharge The components inside of Gateway, Inc. Technical Support See the label on the outside of antistatic bags because only the inside your notebook and remove any surface. • Wear a grounding wrist strap (available ... Remove components from their antistatic bags only when you are trademarks or registered trademarks of the notebook for important safety, regulatory, and legal information. © 2007 Gateway, Inc. Gateway and eMachines are extremely sensitive to a bare metal part of the connectors. Do not lay...
8512565 - Component Replacement Manual R1
Page 13
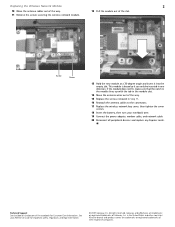
Gateway and eMachines are trademarks or registered trademarks of their respective companies. All rights reserved. in the United States and other ...way. 11 Remove the screws securing the wireless network module. 12 Pull the module out of the notebook for important safety, regulatory, and legal information. © 2007 Gateway, Inc. See your notebook over. 19 Connect the power adapter, modem cable, and network cable 20 Reconnect all peripheral devices and...a 30-degree angle and insert it can only be inserted in the module slot. 14 Move the antenna wires out of Gateway, Inc.
Gateway and eMachines are trademarks or registered trademarks of their respective companies. All rights reserved. in the United States and other ...way. 11 Remove the screws securing the wireless network module. 12 Pull the module out of the notebook for important safety, regulatory, and legal information. © 2007 Gateway, Inc. See your notebook over. 19 Connect the power adapter, modem cable, and network cable 20 Reconnect all peripheral devices and...a 30-degree angle and insert it can only be inserted in the module slot. 14 Move the antenna wires out of Gateway, Inc.
8512919 - Gateway Notebook Reference Guide R2
Page 3
... 1: About This Reference 1 About this guide 2 Accessing your online User Guide 2 Gateway contact information 2 Contacting Gateway Customer Care 2 Gateway model and serial number 3 Microsoft Certificate of Authenticity 3 For more information 3 Chapter 2: Checking Out Your Notebook . . . . . 5 Front 6 Left 7 Right 9 Back 10 Bottom ...15 Working safely and comfortably 16 Reducing eye strain 16 Setting up your computer desk and chair 17 Sitting at your notebook 17 Avoiding discomfort and injury from repetitive strain . . 17 Connecting the AC adapter 18 Protecting from power source ...
... 1: About This Reference 1 About this guide 2 Accessing your online User Guide 2 Gateway contact information 2 Contacting Gateway Customer Care 2 Gateway model and serial number 3 Microsoft Certificate of Authenticity 3 For more information 3 Chapter 2: Checking Out Your Notebook . . . . . 5 Front 6 Left 7 Right 9 Back 10 Bottom ...15 Working safely and comfortably 16 Reducing eye strain 16 Setting up your computer desk and chair 17 Sitting at your notebook 17 Avoiding discomfort and injury from repetitive strain . . 17 Connecting the AC adapter 18 Protecting from power source ...
8512919 - Gateway Notebook Reference Guide R2
Page 5
...gateway.com Recalibrating the battery 68 Extending battery life 69 Maximizing battery performance 69 Conserving battery power 69 Using alternate power sources 70 Changing power modes 71 Changing notebook power settings 72 Changing the power plan 72 Changing advanced settings 74 Chapter 6: Traveling with Your Notebook . . . 77 Packing your notebook...Additional tips 81 Chapter 7: Maintaining Your Notebook . . . . . 83 Caring for your notebook 84 Cleaning your notebook 84 Cleaning the exterior 85 Cleaning the keyboard 85 Cleaning the notebook screen 85 Maintaining the battery 86 ...
...gateway.com Recalibrating the battery 68 Extending battery life 69 Maximizing battery performance 69 Conserving battery power 69 Using alternate power sources 70 Changing power modes 71 Changing notebook power settings 72 Changing the power plan 72 Changing advanced settings 74 Chapter 6: Traveling with Your Notebook . . . 77 Packing your notebook...Additional tips 81 Chapter 7: Maintaining Your Notebook . . . . . 83 Caring for your notebook 84 Cleaning your notebook 84 Cleaning the exterior 85 Cleaning the keyboard 85 Cleaning the notebook screen 85 Maintaining the battery 86 ...
8512919 - Gateway Notebook Reference Guide R2
Page 10
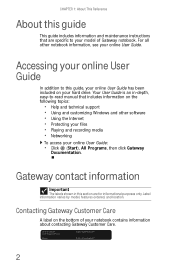
...an in this guide, your online User Guide has been included on your hard drive. Contacting Gateway Customer Care A label on the bottom of Gateway notebook. CHAPTER 1: About This Reference About this guide This guide includes information and maintenance instructions that ... technical support • Using and customizing Windows and other notebook information, see your notebook contains information about contacting Gateway Customer Care. 2 Label information varies by model, features ordered, and location. Gateway contact information Important The labels shown in -depth, easy-to...
...an in this guide, your online User Guide has been included on your hard drive. Contacting Gateway Customer Care A label on the bottom of Gateway notebook. CHAPTER 1: About This Reference About this guide This guide includes information and maintenance instructions that ... technical support • Using and customizing Windows and other notebook information, see your notebook contains information about contacting Gateway Customer Care. 2 Label information varies by model, features ordered, and location. Gateway contact information Important The labels shown in -depth, easy-to...
8512919 - Gateway Notebook Reference Guide R2
Page 11
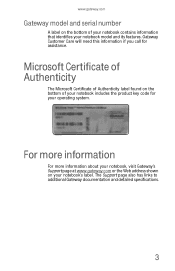
... of Authenticity The Microsoft Certificate of Authenticity label found on the bottom of your notebook includes the product key code for assistance. www.gateway.com Gateway model and serial number A label on the bottom of your notebook contains information that identifies your notebook model and its features. The Support page also has links to additional...
... of Authenticity The Microsoft Certificate of Authenticity label found on the bottom of your notebook includes the product key code for assistance. www.gateway.com Gateway model and serial number A label on the bottom of your notebook contains information that identifies your notebook model and its features. The Support page also has links to additional...

8512919 - Gateway Notebook Reference Guide R2
Page 14
...mode. ■ LED off - Battery is very low. ■ LED solid red - Battery charge is charging. ■ LED blinking red - Notebook is in speakers are turned off . ■ LED blue - Battery is malfunctioning. Headphone jack Power indicator Battery charge indicator Plug amplified speakers or ...; LED on . ■ LED blinking - Battery is fully charged. ■ LED purple - Notebook is very low. 6 Notebook is on - Important: This LED only lights up when your notebook is connected to AC power or the battery charge is off when speakers or headphones are plugged into ...
...mode. ■ LED off - Battery is very low. ■ LED solid red - Battery charge is charging. ■ LED blinking red - Notebook is in speakers are turned off . ■ LED blue - Battery is malfunctioning. Headphone jack Power indicator Battery charge indicator Plug amplified speakers or ...; LED on . ■ LED blinking - Battery is fully charged. ■ LED purple - Notebook is very low. 6 Notebook is on - Important: This LED only lights up when your notebook is connected to AC power or the battery charge is off when speakers or headphones are plugged into ...

8512919 - Gateway Notebook Reference Guide R2
Page 16
...Adding and removing an Express Card" on commercial aircraft. For more information, see "Turning your skin. If the air vents are blocked, your notebook may become hot enough to harm your wireless radio on or off" on or off while traveling in an airplane. If these slots. Enable ... using the FN+F2 or FN+F6 buttons. Caution: Do not block or insert objects into this slot. Do not use the notebook on your notebook so air vents are examples of devices that provide wireless communication. 8 IEEE 802.11 and Bluetooth communication devices are not obstructed. Current...
...Adding and removing an Express Card" on commercial aircraft. For more information, see "Turning your skin. If the air vents are blocked, your notebook may become hot enough to harm your wireless radio on or off" on or off while traveling in an airplane. If these slots. Enable ... using the FN+F2 or FN+F6 buttons. Caution: Do not block or insert objects into this slot. Do not use the notebook on your notebook so air vents are examples of devices that provide wireless communication. 8 IEEE 802.11 and Bluetooth communication devices are not obstructed. Current...

8512919 - Gateway Notebook Reference Guide R2
Page 17
To determine the type of drive in your notebook, examine the drive tray's plastic cover and compare the logo to those listed in "Identifying drive types" on page 52. For more information, see "Using the DVD drive" on page 52. Plug a USB device (such as a diskette drive, flash drive, printer, scanner, camera, keyboard, or mouse) into this port. 9 Right www.gateway.com Component DVD drive USB port DVD drive Icon Description USB port Insert CDs or DVDs into this drive.
To determine the type of drive in your notebook, examine the drive tray's plastic cover and compare the logo to those listed in "Identifying drive types" on page 52. For more information, see "Using the DVD drive" on page 52. Plug a USB device (such as a diskette drive, flash drive, printer, scanner, camera, keyboard, or mouse) into this port. 9 Right www.gateway.com Component DVD drive USB port DVD drive Icon Description USB port Insert CDs or DVDs into this drive.


