
8512680 - Component Replacement Manual
Page 3
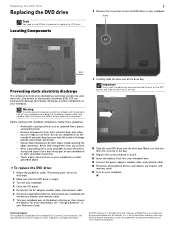
... moving parts, turn your notebook over. 13 Connect the power adapter, modem cable, and network cable. 14 Reconnect all peripheral devices connected to push on the DVD bracket and slide the drive out of the drive bay. Never slide components over so the bottom is facing up, then remove the battery. Important Use a small screwdriver or other grounded object. All other countries. Replacing the DVD drive Replacing the DVD drive Tools You need a small...
... moving parts, turn your notebook over. 13 Connect the power adapter, modem cable, and network cable. 14 Reconnect all peripheral devices connected to push on the DVD bracket and slide the drive out of the drive bay. Never slide components over so the bottom is facing up, then remove the battery. Important Use a small screwdriver or other grounded object. All other countries. Replacing the DVD drive Replacing the DVD drive Tools You need a small...
8512680 - Component Replacement Manual
Page 4
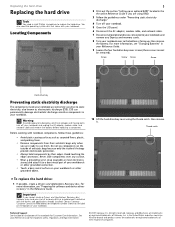
... the hard drive bay cover using RAID. 3 Follow the guidelines under "Preventing static electricity discharge." 4 Turn off your Reference Guide for important safety, regulatory, and legal information. © 2007 Gateway, Inc. Warning To avoid exposure to dangerous electrical voltages and moving parts, turn off your notebook. 5 Close the LCD panel. 6 Disconnect the AC adapter, modem cable, and network cable. 7 Disconnect all peripheral devices connected to replace the hard drive. Contact Gateway Customer...
... the hard drive bay cover using RAID. 3 Follow the guidelines under "Preventing static electricity discharge." 4 Turn off your Reference Guide for important safety, regulatory, and legal information. © 2007 Gateway, Inc. Warning To avoid exposure to dangerous electrical voltages and moving parts, turn off your notebook. 5 Close the LCD panel. 6 Disconnect the AC adapter, modem cable, and network cable. 7 Disconnect all peripheral devices connected to replace the hard drive. Contact Gateway Customer...
8512680 - Component Replacement Manual
Page 5
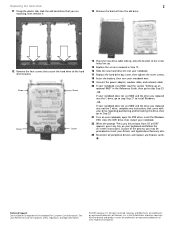
... so the screw holes line up. 15 Replace the screws removed in Step 12. 16 Slide the new hard drive kit into your notebook. 17 Replace the hard drive bay cover, then tighten the cover screws. 18 Insert the battery, then turn your notebook over. 19 Connect the power adapter, modem cable, and network cable 20 If your notebook uses RAID, read the section "Setting up an optional RAID" in the United States and...
... so the screw holes line up. 15 Replace the screws removed in Step 12. 16 Slide the new hard drive kit into your notebook. 17 Replace the hard drive bay cover, then tighten the cover screws. 18 Insert the battery, then turn your notebook over. 19 Connect the power adapter, modem cable, and network cable 20 If your notebook uses RAID, read the section "Setting up an optional RAID" in the United States and...
8512567 - Setup Poster (Inside)
Page 1
... see your User Guide that are installed on your notebook, connecting your notebook to the Internet or a network, and protecting your computer, see . • Remove Express Cards when not using them. • Modify the power management settings to reduce power use. • Turn off wireless devices when not using them. • Use sleep mode when not using your notebook. • Use the DVD drive only when you need to connect safely and securely. All other countries. To access your notebook. TECH SUPPORT INFORMATION See...
... see your User Guide that are installed on your notebook, connecting your notebook to the Internet or a network, and protecting your computer, see . • Remove Express Cards when not using them. • Modify the power management settings to reduce power use. • Turn off wireless devices when not using them. • Use sleep mode when not using your notebook. • Use the DVD drive only when you need to connect safely and securely. All other countries. To access your notebook. TECH SUPPORT INFORMATION See...

8512568 - Gateway Notebook Reference Guide R0
Page 17
... AC adapter cable into this optional jack. Back Ventilation fan Component Icon Ventilation fan Power connector Modem jack (optional) Power connector Modem jack Description Helps cool internal components. Plug a dial-up modem" on a bed, sofa, rug, or other similar surface. Connect an external SATA hard drive to the notebook. www.gateway.com Component HDMI out jack (optional) eSATA jack (optional) Monitor port Icon HDMI eSATA Description Plug an HDMI device, such as a high definition television, into this optional jack. Plug...
... AC adapter cable into this optional jack. Back Ventilation fan Component Icon Ventilation fan Power connector Modem jack (optional) Power connector Modem jack Description Helps cool internal components. Plug a dial-up modem" on a bed, sofa, rug, or other similar surface. Connect an external SATA hard drive to the notebook. www.gateway.com Component HDMI out jack (optional) eSATA jack (optional) Monitor port Icon HDMI eSATA Description Plug an HDMI device, such as a high definition television, into this optional jack. Plug...

8512568 - Gateway Notebook Reference Guide R0
Page 88
...; Use a startup password to restrict access to your notebook and accessories. • Whoever sits next to recover a forgotten password. Be ready to enter at startup. This is set the user (startup) password. To create a startup password: 1 Restart your notebook to enter the User Password if your notebook was turned off or put in Sleep mode. 4 Highlight Password on your notebook if it passes through the X-ray machine in security checkpoints. • Write down your notebook model number and serial number (located on...
...; Use a startup password to restrict access to your notebook and accessories. • Whoever sits next to recover a forgotten password. Be ready to enter at startup. This is set the user (startup) password. To create a startup password: 1 Restart your notebook to enter the User Password if your notebook was turned off or put in Sleep mode. 4 Highlight Password on your notebook if it passes through the X-ray machine in security checkpoints. • Write down your notebook model number and serial number (located on...
8512568 - Gateway Notebook Reference Guide R0
Page 96
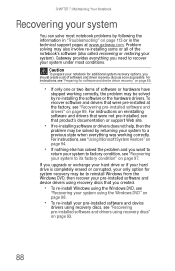
... Windows DVD" on page 98. • To re-install your pre-installed software and device drivers using recovery discs, see "Recovering pre-installed software and drivers using recovery discs that product's documentation or support Web site. • If re-installing software or drivers does not help, then the problem may also involve re-installing some or all of the notebook's software (also called recovering or restoring your notebook for system recovery may be solved by following the information in "Troubleshooting...
... Windows DVD" on page 98. • To re-install your pre-installed software and device drivers using recovery discs, see "Recovering pre-installed software and drivers using recovery discs that product's documentation or support Web site. • If re-installing software or drivers does not help, then the problem may also involve re-installing some or all of the notebook's software (also called recovering or restoring your notebook for system recovery may be solved by following the information in "Troubleshooting...
8512568 - Gateway Notebook Reference Guide R0
Page 97
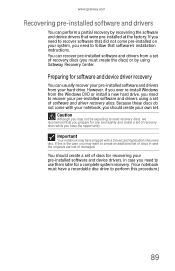
...-installed software and drivers from your pre-installed software and drivers using Gateway Recovery Center. Caution Although you may not be expecting to create an additional set of recovery discs (you have a recordable disc drive to recover your hard drive. Because these discs do not come pre-installed on your own set. However, if you ever re-install Windows from the Windows DVD or install a new hard drive, you need to perform this is the case, you prepare for software and device driver recovery...
...-installed software and drivers from your pre-installed software and drivers using Gateway Recovery Center. Caution Although you may not be expecting to create an additional set of recovery discs (you have a recordable disc drive to recover your hard drive. Because these discs do not come pre-installed on your own set. However, if you ever re-install Windows from the Windows DVD or install a new hard drive, you need to perform this is the case, you prepare for software and device driver recovery...

8512568 - Gateway Notebook Reference Guide R0
Page 118
... and memory cards. 110 As part of the process you replaced was not the C drive, complete any instructions that secure the bracket to the drive. 16 Slide the new hard drive kit into your notebook. 17 Replace the cover, then tighten the screws. 18 Insert the battery, then turn your notebook over. 19 Connect the power adapter, modem cable, and network cable. 20 If your notebook uses RAID, read the section "Setting up an optional RAID...
... and memory cards. 110 As part of the process you replaced was not the C drive, complete any instructions that secure the bracket to the drive. 16 Slide the new hard drive kit into your notebook. 17 Replace the cover, then tighten the screws. 18 Insert the battery, then turn your notebook over. 19 Connect the power adapter, modem cable, and network cable. 20 If your notebook uses RAID, read the section "Setting up an optional RAID...
8512568 - Gateway Notebook Reference Guide R0
Page 124
... more information, see "Recovering pre-installed software and drivers" on your notebook. • Your notebook may be experiencing some temporary memory problems. Shut down and restart your volume control, see "Cleaning CDs or DVDs" on your notebook. • Make sure that you are plugged in speakers, make sure that they are using the built-in and turned on your notebook. • Reinstall the audio device drivers. For more information, see...
... more information, see "Recovering pre-installed software and drivers" on your notebook. • Your notebook may be experiencing some temporary memory problems. Shut down and restart your volume control, see "Cleaning CDs or DVDs" on your notebook. • Make sure that you are plugged in speakers, make sure that they are using the built-in and turned on your notebook. • Reinstall the audio device drivers. For more information, see...

8512568 - Gateway Notebook Reference Guide R0
Page 141
... recover a forgotten password. For instructions on connecting the AC power adapter, see "Recharging the battery" on . • Make sure that the AC power adapter cables are turned off, then retype the password. For instructions on inserting your battery, see "Changing the battery" on page 70. • Let the battery return to your battery, see "Changing notebook power settings" on battery power • Check the power management settings. Your notebook is fully recharged. For instructions on recalibrating your notebook. Power Your notebook is not working...
... recover a forgotten password. For instructions on connecting the AC power adapter, see "Recharging the battery" on . • Make sure that the AC power adapter cables are turned off, then retype the password. For instructions on inserting your battery, see "Changing the battery" on page 70. • Let the battery return to your battery, see "Changing notebook power settings" on battery power • Check the power management settings. Your notebook is fully recharged. For instructions on recalibrating your notebook. Power Your notebook is not working...
8512568 - Gateway Notebook Reference Guide R0
Page 142
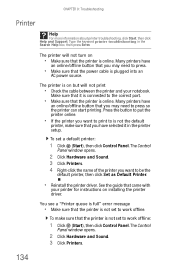
... printer troubleshooting, click Start, then click Help and Support. To set to work offline. Many printers have selected it is connected to press so the printer can start printing. The Control Panel window opens. 2 Click Hardware and Sound. 3 Click Printers. 4 Right-click the name of the printer you may need to the correct port. • Make sure that the printer is plugged into an AC power source...
... printer troubleshooting, click Start, then click Help and Support. To set to work offline. Many printers have selected it is connected to press so the printer can start printing. The Control Panel window opens. 2 Click Hardware and Sound. 3 Click Printers. 4 Right-click the name of the printer you may need to the correct port. • Make sure that the printer is plugged into an AC power source...
8512568 - Gateway Notebook Reference Guide R0
Page 160
...slot 59 troubleshooting 117 external monitor 9, 26 EZ Pad touchpad See touchpad F fan 7, 9 faxes troubleshooting 127 files opening 36 transferring 79 troubleshooting 117 fingerprint enrolling 30 fingerprint reader control center 32 locating 12 password bank 33 troubleshooting 118 tutorial 29 using 29 Firewire port 8 Fn key 25 152 folders opening 36 function keys 24 G Gateway contact information 3 model number 3 serial number 3 Support 4 Gateway Recovery Center re-installing drivers 91 re-installing programs 91 re-installing software 91 H hard drive bay 10 indicator 23 installing 106 replacing...
...slot 59 troubleshooting 117 external monitor 9, 26 EZ Pad touchpad See touchpad F fan 7, 9 faxes troubleshooting 127 files opening 36 transferring 79 troubleshooting 117 fingerprint enrolling 30 fingerprint reader control center 32 locating 12 password bank 33 troubleshooting 118 tutorial 29 using 29 Firewire port 8 Fn key 25 152 folders opening 36 function keys 24 G Gateway contact information 3 model number 3 serial number 3 Support 4 Gateway Recovery Center re-installing drivers 91 re-installing programs 91 re-installing software 91 H hard drive bay 10 indicator 23 installing 106 replacing...
8512568 - Gateway Notebook Reference Guide R0
Page 161
... 25 toggle display 26 Windows 25 wireless Ethernet 26 L labels Microsoft Certificate of Authenticity 3 model number 3 serial number 3 latch battery 10 LCD panel release 6 LCD panel cleaning 85 release latch 6 switching display 26 troubleshooting 114 LCD/CRT system key 26 line protector 78 line tester 78 lock cable 80 Kensington cable 7 M maintenance cleaning 84, 87 Media Center 38 troubleshooting 121 media reader See memory card reader memory bay 10 installing 103 removing 103 replacing 103 troubleshooting 124 memory card reader inserting card 58 locating 8 memory cards supported 153
... 25 toggle display 26 Windows 25 wireless Ethernet 26 L labels Microsoft Certificate of Authenticity 3 model number 3 serial number 3 latch battery 10 LCD panel release 6 LCD panel cleaning 85 release latch 6 switching display 26 troubleshooting 114 LCD/CRT system key 26 line protector 78 line tester 78 lock cable 80 Kensington cable 7 M maintenance cleaning 84, 87 Media Center 38 troubleshooting 121 media reader See memory card reader memory bay 10 installing 103 removing 103 replacing 103 troubleshooting 124 memory card reader inserting card 58 locating 8 memory cards supported 153

8512568 - Gateway Notebook Reference Guide R0
Page 166
... device 61 port 60 USB port 7, 8 user password 80 adjusting modem 128 controls 42 muting 28, 38, 42 system keys 28 troubleshooting 135 W waking up notebook 21 webcam 12, 39 Webcam status indicator 12 Windows key 25 Product Key Code 3 Windows Hotstart 38 Windows Media Player 38 Windows System Restore 88 creating restore point 96 wired Ethernet troubleshooting 129 wireless Ethernet button 26 status indicator 23 troubleshooting 131 turning off 44 turning on 44 using while traveling 79 wireless network switch 6 troubleshooting 131 working safely 14 V VGA port 9, 63 video HDMI out jack 9 monitor...
... device 61 port 60 USB port 7, 8 user password 80 adjusting modem 128 controls 42 muting 28, 38, 42 system keys 28 troubleshooting 135 W waking up notebook 21 webcam 12, 39 Webcam status indicator 12 Windows key 25 Product Key Code 3 Windows Hotstart 38 Windows Media Player 38 Windows System Restore 88 creating restore point 96 wired Ethernet troubleshooting 129 wireless Ethernet button 26 status indicator 23 troubleshooting 131 turning off 44 turning on 44 using while traveling 79 wireless network switch 6 troubleshooting 131 working safely 14 V VGA port 9, 63 video HDMI out jack 9 monitor...

8513072 - Gateway Notebook Reference Guide R1
Page 88
... BIOS Setup utility opens. 2 Open the Security menu, highlight Set Supervisor Password, then press ENTER and follow the instructions. You do not need to enter the User Password if your notebook if it passes through the X-ray machine in security checkpoints. • Write down your notebook model number and serial number (located on boot, then press ENTER. 80 This is difficult for someone else to recover a forgotten password. CHAPTER 6: Traveling with Your Notebook Security • Get a locking cable...
... BIOS Setup utility opens. 2 Open the Security menu, highlight Set Supervisor Password, then press ENTER and follow the instructions. You do not need to enter the User Password if your notebook if it passes through the X-ray machine in security checkpoints. • Write down your notebook model number and serial number (located on boot, then press ENTER. 80 This is difficult for someone else to recover a forgotten password. CHAPTER 6: Traveling with Your Notebook Security • Get a locking cable...
8513072 - Gateway Notebook Reference Guide R1
Page 118
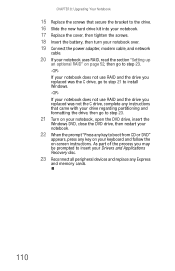
.... -ORIf your notebook does not use RAID and the drive you replaced was the C drive, go to step 23. 21 Turn on your notebook, open the DVD drive, insert the Windows DVD, close the DVD drive, then restart your notebook. 22 When the prompt "Press any key to insert your keyboard and follow the on your Drivers and Applications Recovery disc. 23 Reconnect all peripheral devices and replace any Express and memory cards. 110
.... -ORIf your notebook does not use RAID and the drive you replaced was the C drive, go to step 23. 21 Turn on your notebook, open the DVD drive, insert the Windows DVD, close the DVD drive, then restart your notebook. 22 When the prompt "Press any key to insert your keyboard and follow the on your Drivers and Applications Recovery disc. 23 Reconnect all peripheral devices and replace any Express and memory cards. 110

8513072 - Gateway Notebook Reference Guide R1
Page 142
... the power cable is on but will not turn on installing the printer driver. The printer is plugged into an AC power source. To set to work offline: 1 Click (Start), then click Control Panel. To make sure that came with your notebook. CHAPTER 9: Troubleshooting Printer Help For more information about printer troubleshooting, click Start, then click Help and Support. Type the keyword printer troubleshooting in the printer setup. Press the button...
... the power cable is on but will not turn on installing the printer driver. The printer is plugged into an AC power source. To set to work offline: 1 Click (Start), then click Control Panel. To make sure that came with your notebook. CHAPTER 9: Troubleshooting Printer Help For more information about printer troubleshooting, click Start, then click Help and Support. Type the keyword printer troubleshooting in the printer setup. Press the button...

8513072 - Gateway Notebook Reference Guide R1
Page 161
... 25 toggle display 26 Windows 25 wireless Ethernet 26 L labels Microsoft Certificate of Authenticity 3 model number 2 serial number 2 latch battery 10 LCD panel release 6 LCD panel cleaning 85 release latch 6 switching display 26 troubleshooting 114 LCD/CRT system key 26 line protector 78 line tester 78 lock cable 80 Kensington cable 7 M maintenance cleaning 84, 87 Media Center 38 troubleshooting 121 media reader See memory card reader memory bay 10 installing 103 removing 103 replacing 103 troubleshooting 124 memory card reader inserting card 58 locating 8 memory cards supported 153
... 25 toggle display 26 Windows 25 wireless Ethernet 26 L labels Microsoft Certificate of Authenticity 3 model number 2 serial number 2 latch battery 10 LCD panel release 6 LCD panel cleaning 85 release latch 6 switching display 26 troubleshooting 114 LCD/CRT system key 26 line protector 78 line tester 78 lock cable 80 Kensington cable 7 M maintenance cleaning 84, 87 Media Center 38 troubleshooting 121 media reader See memory card reader memory bay 10 installing 103 removing 103 replacing 103 troubleshooting 124 memory card reader inserting card 58 locating 8 memory cards supported 153

8513072 - Gateway Notebook Reference Guide R1
Page 166
... device 61 port 60 USB port 7, 8 user password 80 adjusting modem 128 controls 42 muting 28, 38, 42 system keys 28 troubleshooting 135 W waking up notebook 21 webcam 12, 39 Webcam status indicator 12 Windows key 25 Product Key Code 3 Windows Hotstart 38 Windows Media Player 38 Windows System Restore 88 creating restore point 96 wired Ethernet troubleshooting 129 wireless Ethernet button 26 status indicator 23 troubleshooting 131 turning off 44 turning on 44 using while traveling 79 wireless network switch 6 troubleshooting 131 working safely 14 V VGA port 9, 63 video HDMI out jack 9 monitor...
... device 61 port 60 USB port 7, 8 user password 80 adjusting modem 128 controls 42 muting 28, 38, 42 system keys 28 troubleshooting 135 W waking up notebook 21 webcam 12, 39 Webcam status indicator 12 Windows key 25 Product Key Code 3 Windows Hotstart 38 Windows Media Player 38 Windows System Restore 88 creating restore point 96 wired Ethernet troubleshooting 129 wireless Ethernet button 26 status indicator 23 troubleshooting 131 turning off 44 turning on 44 using while traveling 79 wireless network switch 6 troubleshooting 131 working safely 14 V VGA port 9, 63 video HDMI out jack 9 monitor...


