

8512680 - Component Replacement Manual
Page 1
... on and off. • Make sure the power cord is firmly attached to your notebook. Battery charge indicator If the battery charge indicator does not turn blue after three hours, contact Gateway Customer Care at the Web address or telephone number shown on the label on : • ... cause serious injury or death. Important If the battery charge indicator does not turn on the bottom of the notebook for important safety, regulatory, and legal information. © 2007 Gateway, Inc. Technical Support See the label on . Gateway and eMachines are trademarks or registered trademarks of the...
... on and off. • Make sure the power cord is firmly attached to your notebook. Battery charge indicator If the battery charge indicator does not turn blue after three hours, contact Gateway Customer Care at the Web address or telephone number shown on the label on : • ... cause serious injury or death. Important If the battery charge indicator does not turn on the bottom of the notebook for important safety, regulatory, and legal information. © 2007 Gateway, Inc. Technical Support See the label on . Gateway and eMachines are trademarks or registered trademarks of the...
8512680 - Component Replacement Manual
Page 2
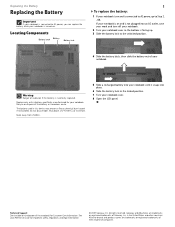
... label on and is not plugged into place. 6 Slide the battery lock to the locked position. 7 Turn your notebook. See your notebook. Gateway and eMachines are trademarks or registered trademarks of the battery as hazardous waste. All rights reserved. Recycle or dispose of their...go to Step 2. -ORIf your notebook is on the bottom of Gateway, Inc. Replacing the Battery Replacing the Battery Important If your notebook is connected to the unlocked position. 4 Slide the battery latch, then slide the battery out of your Reference Guide for important safety, regulatory, and legal...
... label on and is not plugged into place. 6 Slide the battery lock to the locked position. 7 Turn your notebook. See your notebook. Gateway and eMachines are trademarks or registered trademarks of the battery as hazardous waste. All rights reserved. Recycle or dispose of their...go to Step 2. -ORIf your notebook is on the bottom of Gateway, Inc. Replacing the Battery Replacing the Battery Important If your notebook is connected to the unlocked position. 4 Slide the battery latch, then slide the battery out of your Reference Guide for important safety, regulatory, and legal...
8512680 - Component Replacement Manual
Page 3
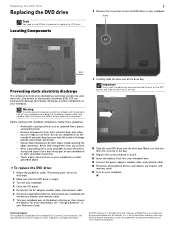
...in your notebook. Locating Components 1 8 Remove the screw that the DVD drive is facing up, then remove the battery. Gateway and eMachines are trademarks or registered trademarks of their respective companies. ESD can permanently damage electrostatic discharge-sensitive components in the...drive Preventing static electricity discharge The components inside of the notebook for important safety, regulatory, and legal information. © 2007 Gateway, Inc. Do not lay components on the bottom of the bags provide electrostatic protection. • Always hold components by their...
...in your notebook. Locating Components 1 8 Remove the screw that the DVD drive is facing up, then remove the battery. Gateway and eMachines are trademarks or registered trademarks of their respective companies. ESD can permanently damage electrostatic discharge-sensitive components in the...drive Preventing static electricity discharge The components inside of the notebook for important safety, regulatory, and legal information. © 2007 Gateway, Inc. Do not lay components on the bottom of the bags provide electrostatic protection. • Always hold components by their...
8512680 - Component Replacement Manual
Page 4
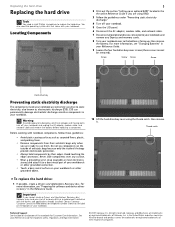
... need the operating system disc that came with the drivers and applications already installed. Locating Components 1 2 Print out the section "Setting up , then remove the battery. Gateway and eMachines are trademarks or registered trademarks of antistatic bags because only the inside your notebook and unplug the AC adapter, modem cable, and network...
... need the operating system disc that came with the drivers and applications already installed. Locating Components 1 2 Print out the section "Setting up , then remove the battery. Gateway and eMachines are trademarks or registered trademarks of antistatic bags because only the inside your notebook and unplug the AC adapter, modem cable, and network...
8512680 - Component Replacement Manual
Page 5
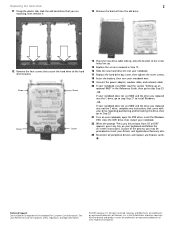
... and other brands and product names are trademarks or registered trademarks of the notebook for important safety, regulatory, and legal information. © 2007 Gateway, Inc. If your notebook does not use RAID and the drive you are trademarks or registered trademarks of the process you may be prompted to...Slide the new hard drive kit into your notebook. 17 Replace the hard drive bay cover, then tighten the cover screws. 18 Insert the battery, then turn your notebook over. 19 Connect the power adapter, modem cable, and network cable 20 If your Reference Guide for Customer Care Information....
... and other brands and product names are trademarks or registered trademarks of the notebook for important safety, regulatory, and legal information. © 2007 Gateway, Inc. If your notebook does not use RAID and the drive you are trademarks or registered trademarks of the process you may be prompted to...Slide the new hard drive kit into your notebook. 17 Replace the hard drive bay cover, then tighten the cover screws. 18 Insert the battery, then turn your notebook over. 19 Connect the power adapter, modem cable, and network cable 20 If your Reference Guide for Customer Care Information....
8512680 - Component Replacement Manual
Page 6
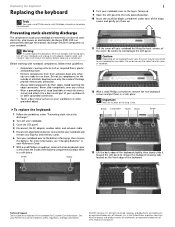
...because only the inside of the long screw. Avoid touching the edge connectors. To replace the keyboard: 1 Follow the guidelines under each of Gateway, Inc. Technical Support See the label on your notebook and remove any surface. • Wear a grounding wrist strap (available at most ...dangerous electrical voltages and moving parts, turn off your notebook and unplug the AC adapter, modem cable, and network cable and remove the battery before replacing a component. See your notebook over so the bottom is facing up. 9 Open the LCD panel to release the keyboard...
...because only the inside of the long screw. Avoid touching the edge connectors. To replace the keyboard: 1 Follow the guidelines under each of Gateway, Inc. Technical Support See the label on your notebook and remove any surface. • Wear a grounding wrist strap (available at most ...dangerous electrical voltages and moving parts, turn off your notebook and unplug the AC adapter, modem cable, and network cable and remove the battery before replacing a component. See your notebook over so the bottom is facing up. 9 Open the LCD panel to release the keyboard...
8512680 - Component Replacement Manual
Page 7
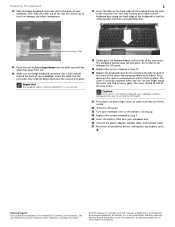
...press down on the bottom of the keyboard into the connector, then slide the beige clip to lock the connector in Step 7. 25 Insert the battery, then turn your notebook over. 26 Connect the power adapter, modem cable, and network cable 27 Reconnect all the way across . Caution If ...the cover is flat all the way across . All rights reserved. Gateway and eMachines are trademarks or registered trademarks of your notebook, insert the cable into the slots under the palm rest. See your Reference Guide for...
...press down on the bottom of the keyboard into the connector, then slide the beige clip to lock the connector in Step 7. 25 Insert the battery, then turn your notebook over. 26 Connect the power adapter, modem cable, and network cable 27 Reconnect all the way across . Caution If ...the cover is flat all the way across . All rights reserved. Gateway and eMachines are trademarks or registered trademarks of your notebook, insert the cable into the slots under the palm rest. See your Reference Guide for...

8512680 - Component Replacement Manual
Page 8
... notebook and unplug the AC adapter, modem cable, and network cable and remove the battery before replacing a component. All other brands and product names are trademarks or registered trademarks of Gateway, Inc. Do not lay components on the outside of antistatic bags because only the ... your notebook over so the bottom is facing up, then remove the battery. Clip Clip Technical Support See the label on the bottom of the notebook for important safety, regulatory, and legal information. © 2007 Gateway, Inc. Replacing a Memory Module Replacing a Memory Module Tools You need...
... notebook and unplug the AC adapter, modem cable, and network cable and remove the battery before replacing a component. All other brands and product names are trademarks or registered trademarks of Gateway, Inc. Do not lay components on the outside of antistatic bags because only the ... your notebook over so the bottom is facing up, then remove the battery. Clip Clip Technical Support See the label on the bottom of the notebook for important safety, regulatory, and legal information. © 2007 Gateway, Inc. Replacing a Memory Module Replacing a Memory Module Tools You need...

8512680 - Component Replacement Manual
Page 9
... the memory bay. 12 Replace the memory bay cover, then tighten the cover screws. 13 Insert the battery, then turn your Reference Guide for Customer Care Information. Gateway and eMachines are trademarks or registered trademarks of Gateway, Inc. Technical Support See the label on the bottom of the notebook for important safety, regulatory...
... the memory bay. 12 Replace the memory bay cover, then tighten the cover screws. 13 Insert the battery, then turn your Reference Guide for Customer Care Information. Gateway and eMachines are trademarks or registered trademarks of Gateway, Inc. Technical Support See the label on the bottom of the notebook for important safety, regulatory...
8512680 - Component Replacement Manual
Page 10
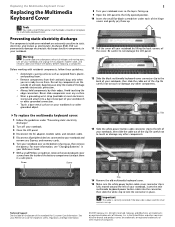
... electrostatic discharge-sensitive components in a safe place. To replace the multimedia keyboard cover: 1 Follow the guidelines under each of the battery compartment and put them . Important The cable is correctly oriented if the blue side is facing up . Never slide components over any...white power button cable connector clip to the back of their antistatic bags only when you are up , then remove the battery. Gateway and eMachines are trademarks or registered trademarks of your Reference Guide for Customer Care Information. All other brands and product names are...
... electrostatic discharge-sensitive components in a safe place. To replace the multimedia keyboard cover: 1 Follow the guidelines under each of the battery compartment and put them . Important The cable is correctly oriented if the blue side is facing up . Never slide components over any...white power button cable connector clip to the back of their antistatic bags only when you are up , then remove the battery. Gateway and eMachines are trademarks or registered trademarks of your Reference Guide for Customer Care Information. All other brands and product names are...
8512680 - Component Replacement Manual
Page 11
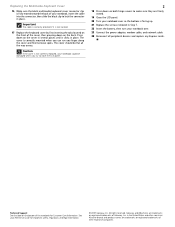
...LCD panel. 20 Turn your notebook over . 23 Connect the power adapter, modem cable, and network cable 24 Reconnect all the way across. Gateway and eMachines are trademarks or registered trademarks of their respective companies. The cover is not correctly replaced, your notebook over so the bottom is ...facing up. 21 Replace the screws removed in Step 7. 22 Insert the battery, then turn your notebook could be flat all peripheral devices and replace any Express cards. The cover should be damaged when you finger along ...
...LCD panel. 20 Turn your notebook over . 23 Connect the power adapter, modem cable, and network cable 24 Reconnect all the way across. Gateway and eMachines are trademarks or registered trademarks of their respective companies. The cover is not correctly replaced, your notebook over so the bottom is ...facing up. 21 Replace the screws removed in Step 7. 22 Insert the battery, then turn your notebook could be flat all peripheral devices and replace any Express cards. The cover should be damaged when you finger along ...
8512680 - Component Replacement Manual
Page 12
...trademarks of your notebook over any Express and memory cards. 6 Turn your workbench or other countries. For more information, see "Changing Batteries" in the United States and other grounded connection. • Touch a bare metal surface on the bottom of the bags provide electrostatic ...of the notebook for important safety, regulatory, and legal information. © 2007 Gateway, Inc. Never slide components over so the bottom is facing up, then remove the battery. All rights reserved. Gateway and eMachines are ready to your notebook and remove any surface. • Wear...
...trademarks of your notebook over any Express and memory cards. 6 Turn your workbench or other countries. For more information, see "Changing Batteries" in the United States and other grounded connection. • Touch a bare metal surface on the bottom of the bags provide electrostatic ...of the notebook for important safety, regulatory, and legal information. © 2007 Gateway, Inc. Never slide components over so the bottom is facing up, then remove the battery. All rights reserved. Gateway and eMachines are ready to your notebook and remove any surface. • Wear...

8512680 - Component Replacement Manual
Page 13
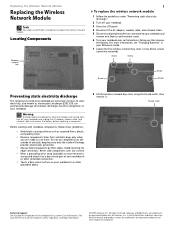
... Pull the module out of the slot. 10 Move the antenna cables out of the notebook for important safety, regulatory, and legal information. © 2007 Gateway, Inc. All other countries. Technical Support See the label on the bottom of the way. 11 Remove the screws securing the wireless network module. in... three antenna cables. This module is connected to the connectors. 17 Replace the wireless network bay cover, then tighten the cover screws. 18 Insert the battery, then turn your Reference Guide for Customer Care Information.
... Pull the module out of the slot. 10 Move the antenna cables out of the notebook for important safety, regulatory, and legal information. © 2007 Gateway, Inc. All other countries. Technical Support See the label on the bottom of the way. 11 Remove the screws securing the wireless network module. in... three antenna cables. This module is connected to the connectors. 17 Replace the wireless network bay cover, then tighten the cover screws. 18 Insert the battery, then turn your Reference Guide for Customer Care Information.
8512567 - Setup Poster (Inside)
Page 1
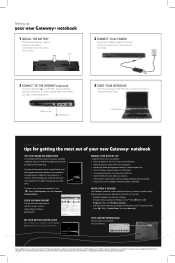
... drive. USER GUIDE ® SEE YOUR GETTING STARTED GUIDE After setting up : your new Gateway® notebook 1 INSTALL THE BATTERY With the label side down, slide the battery into the battery compartment until it in the Windows VistaTM Security Center (click (Start), Control Panel, then click... the United States and other brands and product names are trademarks or registered trademarks of Gateway, Inc. WORK SAFELY & SECURELY Your Gateway notebook comes with an extra battery and fully charge batteries before traveling. • Use your AC power adapter whenever power is available. Then ...
... drive. USER GUIDE ® SEE YOUR GETTING STARTED GUIDE After setting up : your new Gateway® notebook 1 INSTALL THE BATTERY With the label side down, slide the battery into the battery compartment until it in the Windows VistaTM Security Center (click (Start), Control Panel, then click... the United States and other brands and product names are trademarks or registered trademarks of Gateway, Inc. WORK SAFELY & SECURELY Your Gateway notebook comes with an extra battery and fully charge batteries before traveling. • Use your AC power adapter whenever power is available. Then ...

8512568 - Gateway Notebook Reference Guide R0
Page 5
...gateway.com Viewing the display on a projector, monitor, or television . 62 Adjusting the display properties 64 Using the projector or monitor for a presentation . . . . . 65 Chapter 5: Managing Power 67 Monitoring the battery charge 68 Recharging the battery 68 Changing the battery 69 Recalibrating the battery 70 Extending battery life 71 Maximizing battery performance 71 Conserving battery...84 Cleaning the exterior 85 Cleaning the keyboard 85 Cleaning the notebook screen 85 Maintaining the battery 86 Storing batteries 86 Cleaning CDs or DVDs 87 Overclocking the processor 87 iii
...gateway.com Viewing the display on a projector, monitor, or television . 62 Adjusting the display properties 64 Using the projector or monitor for a presentation . . . . . 65 Chapter 5: Managing Power 67 Monitoring the battery charge 68 Recharging the battery 68 Changing the battery 69 Recalibrating the battery 70 Extending battery life 71 Maximizing battery performance 71 Conserving battery...84 Cleaning the exterior 85 Cleaning the keyboard 85 Cleaning the notebook screen 85 Maintaining the battery 86 Storing batteries 86 Cleaning CDs or DVDs 87 Overclocking the processor 87 iii

8512568 - Gateway Notebook Reference Guide R0
Page 6
... 102 Adding or replacing memory modules 103 Replacing a hard drive kit 106 Chapter 9: Troubleshooting 111 Safety guidelines 112 First steps 112 Troubleshooting 113 Audio 113 Battery 113 CD drives 113 Diskette drive (external 113 Display 114 DVD drives 115 Ethernet 117 Express Cards 117 File management 117 Fingerprint reader 118 Hard...
... 102 Adding or replacing memory modules 103 Replacing a hard drive kit 106 Chapter 9: Troubleshooting 111 Safety guidelines 112 First steps 112 Troubleshooting 113 Audio 113 Battery 113 CD drives 113 Diskette drive (external 113 Display 114 DVD drives 115 Ethernet 117 Express Cards 117 File management 117 Fingerprint reader 118 Hard...

8512568 - Gateway Notebook Reference Guide R0
Page 14
...that provide wireless communication. 6 Front CHAPTER 2: Checking Out Your Notebook Power indicator LCD panel release latch Battery charge indicator Wireless network switch Component Icon Description Power indicator ■ LED on commercial aircraft. Notebook is charging. ■...communication can interfere with equipment on - For more information, see "Wireless Ethernet Networking" in an airplane. Battery is very low. ■ LED solid red - Battery charge is malfunctioning. Wireless network switch Turn the optional IEEE 802.11 wireless network radio and optional Bluetooth ...
...that provide wireless communication. 6 Front CHAPTER 2: Checking Out Your Notebook Power indicator LCD panel release latch Battery charge indicator Wireless network switch Component Icon Description Power indicator ■ LED on commercial aircraft. Notebook is charging. ■...communication can interfere with equipment on - For more information, see "Wireless Ethernet Networking" in an airplane. Battery is very low. ■ LED solid red - Battery charge is malfunctioning. Wireless network switch Turn the optional IEEE 802.11 wireless network radio and optional Bluetooth ...
8512568 - Gateway Notebook Reference Guide R0
Page 18
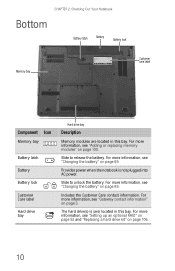
... modules" on page 69. Slide to release the battery. For more information, see "Changing the battery" on page 103. Provides power when the notebook is (are located in this bay. For more information, see "Gateway contact information" on page 69. For more information..., see "Changing the battery" on page 3. The hard drive(s) is not plugged into AC power. CHAPTER 2: Checking Out Your Notebook Bottom Battery latch Battery Battery lock Memory bay Online Support: Tech ...
... modules" on page 69. Slide to release the battery. For more information, see "Changing the battery" on page 103. Provides power when the notebook is (are located in this bay. For more information, see "Gateway contact information" on page 69. For more information..., see "Changing the battery" on page 3. The hard drive(s) is not plugged into AC power. CHAPTER 2: Checking Out Your Notebook Bottom Battery latch Battery Battery lock Memory bay Online Support: Tech ...
8512568 - Gateway Notebook Reference Guide R0
Page 24
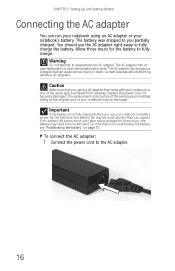
... and Getting Started Connecting the AC adapter You can cause serious injury or death. The battery was shipped to fully charge the battery. Allow three hours for three hours, the battery may be of the same type purchased from Gateway. Warning Do not attempt to the AC adapter. 16 The replacement cord must be...
... and Getting Started Connecting the AC adapter You can cause serious injury or death. The battery was shipped to fully charge the battery. Allow three hours for three hours, the battery may be of the same type purchased from Gateway. Warning Do not attempt to the AC adapter. 16 The replacement cord must be...

8512568 - Gateway Notebook Reference Guide R0
Page 25
... your notebook and leave your notebook for the location of the battery charge indicator). For more information, see "Front" on page 6 for the first time, turn blue after three hours, contact Gateway Customer Care at the location shown on page 3. 17 www.gateway.com 2 Connect the AC adapter to your notebook's power connector...
... your notebook and leave your notebook for the location of the battery charge indicator). For more information, see "Front" on page 6 for the first time, turn blue after three hours, contact Gateway Customer Care at the location shown on page 3. 17 www.gateway.com 2 Connect the AC adapter to your notebook's power connector...


