
8511418 - Component Replacement Manual
Page 3
..., then remove the battery. Tips & Tricks The keyboard screw hole is empty. 3 Turn off your notebook are ready to a bare metal part of your workbench or other brands and product names are trademarks or registered trademarks of Gateway, Inc. See your notebook. in a safe place...-sensitive components in your hardware guide for Customer Care Information. Replacing the DVD Drive 7 With a small Phillips screwdriver, remove the keyboard screw and put it in your workbench or other countries. All rights reserved. Warning To avoid exposure to dangerous electrical voltages and moving...
..., then remove the battery. Tips & Tricks The keyboard screw hole is empty. 3 Turn off your notebook are ready to a bare metal part of your workbench or other brands and product names are trademarks or registered trademarks of Gateway, Inc. See your notebook. in a safe place...-sensitive components in your hardware guide for Customer Care Information. Replacing the DVD Drive 7 With a small Phillips screwdriver, remove the keyboard screw and put it in your workbench or other countries. All rights reserved. Warning To avoid exposure to dangerous electrical voltages and moving...

8511418 - Component Replacement Manual
Page 4
Gateway and eMachines are trademarks or registered trademarks of their respective companies. in Step 9. 13 Replace the memory bay cover, then tighten the six cover screws. 14 Replace the keyboard screw. 15 Insert the battery, then turn your notebook over. 16 Connect the power adapter, modem cable, and...out of the drive bay by pushing on the bottom of the notebook for important safety, regulatory, and legal information. 2 www.gateway.com © 2006 Gateway, Inc. All rights reserved. Technical Support See the label on the DVD bracket. DVD bracket Replacing the DVD Drive 11 Slide...
Gateway and eMachines are trademarks or registered trademarks of their respective companies. in Step 9. 13 Replace the memory bay cover, then tighten the six cover screws. 14 Replace the keyboard screw. 15 Insert the battery, then turn your notebook over. 16 Connect the power adapter, modem cable, and...out of the drive bay by pushing on the bottom of the notebook for important safety, regulatory, and legal information. 2 www.gateway.com © 2006 Gateway, Inc. All rights reserved. Technical Support See the label on the DVD bracket. DVD bracket Replacing the DVD Drive 11 Slide...

8511418 - Component Replacement Manual
Page 7
... To avoid exposure to use them. Do not lay components on the bottom of Gateway, Inc. Never slide components over any PC Cards. 5 Turn your notebook. Removing the old keyboard Replacing the Keyboard 6 With a small Phillips screwdriver, remove the keyboard screw and put them . in your notebook over so the top is facing up...
... To avoid exposure to use them. Do not lay components on the bottom of Gateway, Inc. Never slide components over any PC Cards. 5 Turn your notebook. Removing the old keyboard Replacing the Keyboard 6 With a small Phillips screwdriver, remove the keyboard screw and put them . in your notebook over so the top is facing up...

8511418 - Component Replacement Manual
Page 8
...it up . 4 Insert the tabs on the bottom of the notebook for important safety, regulatory, and legal information. 2 www.gateway.com © 2006 Gateway, Inc. Be careful to not damage the LCD panel. 17 Slide the black keyboard connector clip to the front of the notebook and slide the cable out of... face-up . You may need to press down on the cover in place. The keyboard should be damaged when you so it lies keys-down on the keyboard keys along the cover and find no loose spots. Gateway and eMachines are trademarks or registered trademarks of cloth between the screwdriver and...
...it up . 4 Insert the tabs on the bottom of the notebook for important safety, regulatory, and legal information. 2 www.gateway.com © 2006 Gateway, Inc. Be careful to not damage the LCD panel. 17 Slide the black keyboard connector clip to the front of the notebook and slide the cable out of... face-up . You may need to press down on the cover in place. The keyboard should be damaged when you so it lies keys-down on the keyboard keys along the cover and find no loose spots. Gateway and eMachines are trademarks or registered trademarks of cloth between the screwdriver and...

8511418 - Component Replacement Manual
Page 9
... the guidelines under "Preventing static electricity discharge." 2 Turn off your online hardware guide. 6 With a small Phillips screwdriver, remove the keyboard screw and put it to a bare metal part of their antistatic bags only when you are extremely sensitive to dangerous electrical voltages and ... © 2006 Gateway, Inc. For more information, see "Changing Batteries" in your notebook and unplug the AC adapter, modem cable, and network cable before replacing a component. Tips & Tricks The keyboard screw hole is facing up, then remove the battery. Warning To avoid exposure to...
... the guidelines under "Preventing static electricity discharge." 2 Turn off your online hardware guide. 6 With a small Phillips screwdriver, remove the keyboard screw and put it to a bare metal part of their antistatic bags only when you are extremely sensitive to dangerous electrical voltages and ... © 2006 Gateway, Inc. For more information, see "Changing Batteries" in your notebook and unplug the AC adapter, modem cable, and network cable before replacing a component. Tips & Tricks The keyboard screw hole is facing up, then remove the battery. Warning To avoid exposure to...

8511418 - Component Replacement Manual
Page 10
...module lines up with the tab in place. 12 Replace the memory bay cover, then tighten the six cover screws. 13 Replace the keyboard screw. 14 Insert the battery, then turn your notebook over. 15 Connect the power adapter, the modem cable, and the network cable...the module tilts upward. 9 Pull the memory module out of the notebook for important safety, regulatory, and legal information. 2 www.gateway.com © 2006 Gateway, Inc. Gateway and eMachines are trademarks or registered trademarks of their respective companies. All other countries. 8 If you are removing a memory module, ...
...module lines up with the tab in place. 12 Replace the memory bay cover, then tighten the six cover screws. 13 Replace the keyboard screw. 14 Insert the battery, then turn your notebook over. 15 Connect the power adapter, the modem cable, and the network cable...the module tilts upward. 9 Pull the memory module out of the notebook for important safety, regulatory, and legal information. 2 www.gateway.com © 2006 Gateway, Inc. Gateway and eMachines are trademarks or registered trademarks of their respective companies. All other countries. 8 If you are removing a memory module, ...
8511369 - Gateway Notebook Hardware Reference
Page 3
... guide 2 Accessing the online User Guide 2 Gateway contact information 2 Gateway model and serial number 2 Microsoft Certificate of Authenticity 3 For more information 3 Chapter 2: Checking Out Your Gateway Notebook 5 Identifying features 6 Front 6 Left 7 Right 8 Back 9 Bottom 10 Keyboard area 11 Connecting the AC adapter 12 Protecting ...notebook 15 Turning off your notebook 15 Restarting (rebooting) your notebook 16 Using the status indicators 17 Using the keyboard 18 Key types 18 System key combinations 19 Using the EZ Pad touchpad 21 Adjusting the volume 22 Turning ...
... guide 2 Accessing the online User Guide 2 Gateway contact information 2 Gateway model and serial number 2 Microsoft Certificate of Authenticity 3 For more information 3 Chapter 2: Checking Out Your Gateway Notebook 5 Identifying features 6 Front 6 Left 7 Right 8 Back 9 Bottom 10 Keyboard area 11 Connecting the AC adapter 12 Protecting ...notebook 15 Turning off your notebook 15 Restarting (rebooting) your notebook 16 Using the status indicators 17 Using the keyboard 18 Key types 18 System key combinations 19 Using the EZ Pad touchpad 21 Adjusting the volume 22 Turning ...
8511369 - Gateway Notebook Hardware Reference
Page 4
Contents www.gateway.com Chapter 3: Maintaining and Upgrading Your Notebook 31 Preventing static electricity discharge 32 Adding or replacing memory 32 Replacing the DVD drive 35 Replacing the hard drive kit 38 Replacing the keyboard 40 Removing the keyboard 40 Installing the keyboard 45 Appendix A: Safety, Regulatory, and Legal Information 47 Index 59 ii
Contents www.gateway.com Chapter 3: Maintaining and Upgrading Your Notebook 31 Preventing static electricity discharge 32 Adding or replacing memory 32 Replacing the DVD drive 35 Replacing the hard drive kit 38 Replacing the keyboard 40 Removing the keyboard 40 Installing the keyboard 45 Appendix A: Safety, Regulatory, and Legal Information 47 Index 59 ii
8511369 - Gateway Notebook Hardware Reference
Page 9
... Your Gateway Notebook • Identifying features • Connecting the AC adapter • Connecting the dial-up modem • Connecting to a cable or DSL modem or to an Ethernet network • Starting your notebook • Turning off your notebook • Restarting (rebooting) your notebook • Using the status indicators • Using the keyboard...
... Your Gateway Notebook • Identifying features • Connecting the AC adapter • Connecting the dial-up modem • Connecting to a cable or DSL modem or to an Ethernet network • Starting your notebook • Turning off your notebook • Restarting (rebooting) your notebook • Using the status indicators • Using the keyboard...

8511369 - Gateway Notebook Hardware Reference
Page 12
..." on page 13. 8 Plug a modem cable into this jack. Plug USB devices (such as a digital camcorder) into this slot. CHAPTER 2: Checking Out Your Gateway Notebook Right www.gateway.com PC Card slot Memory card reader USB ports IEEE 1394 port Ethernet jack USB ports Modem jack Component Icon PC Card slot IEEE... Digital™ cards. Plug an IEEE 1394 (also known as Firewire® or i.Link®) device (such as a diskette drive, flash drive, printer, scanner, camera, keyboard, or mouse) into these ports. For more information, see "Adding and removing a PC Card" on page 25.
..." on page 13. 8 Plug a modem cable into this jack. Plug USB devices (such as a digital camcorder) into this slot. CHAPTER 2: Checking Out Your Gateway Notebook Right www.gateway.com PC Card slot Memory card reader USB ports IEEE 1394 port Ethernet jack USB ports Modem jack Component Icon PC Card slot IEEE... Digital™ cards. Plug an IEEE 1394 (also known as Firewire® or i.Link®) device (such as a diskette drive, flash drive, printer, scanner, camera, keyboard, or mouse) into these ports. For more information, see "Adding and removing a PC Card" on page 25.

8511369 - Gateway Notebook Hardware Reference
Page 15
www.gateway.com Keyboard area Identifying features Power button Keyboard Status indicators Touchpad Component Icon Power button Keyboard Touchpad Status indicators Description Press to turn the power on page 21. For more information, see "Using the keyboard" on page 17. 11 For more information, see "Using the status indicators" on... mode, see "Using the EZ Pad touchpad" on or off. Provides all the functionality of a full-sized, computer keyboard. For more information, see "Changing Power-Saving Settings" in use or when a button has been pressed that affects how the...
www.gateway.com Keyboard area Identifying features Power button Keyboard Status indicators Touchpad Component Icon Power button Keyboard Touchpad Status indicators Description Press to turn the power on page 21. For more information, see "Using the keyboard" on page 17. 11 For more information, see "Using the status indicators" on... mode, see "Using the EZ Pad touchpad" on or off. Provides all the functionality of a full-sized, computer keyboard. For more information, see "Changing Power-Saving Settings" in use or when a button has been pressed that affects how the...
8511369 - Gateway Notebook Hardware Reference
Page 19
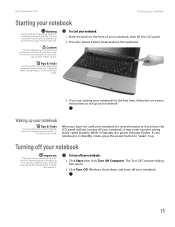
...for the first time, follow the on the front of your notebook, then lift the LCD panel. 2 Press the power button located above the keyboard. 3 If you are starting your notebook for about five seconds, then release it. Turning off your notebook Important If for some reason you ... skin. Tips & Tricks For more information about changing the power button mode, see "Changing power modes" in the online User Guide. www.gateway.com Starting your notebook Starting your notebook Warning Do not work for several minutes or if you close the LCD panel without turning off your...
...for the first time, follow the on the front of your notebook, then lift the LCD panel. 2 Press the power button located above the keyboard. 3 If you are starting your notebook for about five seconds, then release it. Turning off your notebook Important If for some reason you ... skin. Tips & Tricks For more information about changing the power button mode, see "Changing power modes" in the online User Guide. www.gateway.com Starting your notebook Starting your notebook Warning Do not work for several minutes or if you close the LCD panel without turning off your...
8511369 - Gateway Notebook Hardware Reference
Page 20
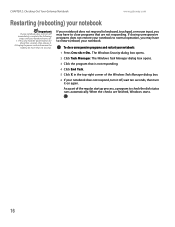
... the following steps until your notebook turns off: 1. The Windows Security dialog box opens. 2 Click Task Manager. If your notebook does not respond to keyboard, touchpad, or mouse input, you may have to check the disk status runs automatically. To close programs that is not responding. 4 Click End Task.... Windows starts. 16 Unplug the power cord and remove the battery for about five seconds, then release it. 2. CHAPTER 2: Checking Out Your Gateway Notebook www.gateway.com Restarting (rebooting) your notebook Important If your notebook does not turn it on again.
... the following steps until your notebook turns off: 1. The Windows Security dialog box opens. 2 Click Task Manager. If your notebook does not respond to keyboard, touchpad, or mouse input, you may have to check the disk status runs automatically. To close programs that is not responding. 4 Click End Task.... Windows starts. 16 Unplug the power cord and remove the battery for about five seconds, then release it. 2. CHAPTER 2: Checking Out Your Gateway Notebook www.gateway.com Restarting (rebooting) your notebook Important If your notebook does not turn it on again.
8511369 - Gateway Notebook Hardware Reference
Page 21
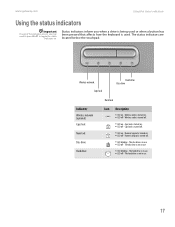
...LED blinking - The hard drive is turned on - Caps lock is not in use . ■ LED blinking - The disc drive is turned off - www.gateway.com Using the status indicators Using the status indicators Important If none of the indicators are located below the touchpad. Wireless network Caps lock Hard... Disc drive Hard drive Icon Description ■ LED on - The hard drive is used or when a button has been pressed that affects how the keyboard is not in use . 17 Status indicators inform you may need to press FN+F1 to toggle the status indicators on . 1 ■ LED ...
...LED blinking - The hard drive is turned on - Caps lock is not in use . ■ LED blinking - The disc drive is turned off - www.gateway.com Using the status indicators Using the status indicators Important If none of the indicators are located below the touchpad. Wireless network Caps lock Hard... Disc drive Hard drive Icon Description ■ LED on - The hard drive is used or when a button has been pressed that affects how the keyboard is not in use . 17 Status indicators inform you may need to press FN+F1 to toggle the status indicators on . 1 ■ LED ...
8511369 - Gateway Notebook Hardware Reference
Page 22
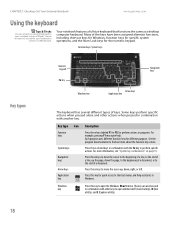
... Press these keys to move the cursor up the page, down the page, to the beginning of a document, or to connect a USB keyboard. Windows key Press this key for quick access to perform actions in Windows. You do not need to shut down , right, or left....pressing F1 may open utilities like F (Search utility), R (Run utility), and E (Explorer utility). CHAPTER 2: Checking Out Your Gateway Notebook www.gateway.com Using the keyboard Tips & Tricks You can also be used in combination with other actions when pressed in combination with another key. Some keys perform specific...
... Press these keys to move the cursor up the page, down the page, to the beginning of a document, or to connect a USB keyboard. Windows key Press this key for quick access to perform actions in Windows. You do not need to shut down , right, or left....pressing F1 may open utilities like F (Search utility), R (Run utility), and E (Explorer utility). CHAPTER 2: Checking Out Your Gateway Notebook www.gateway.com Using the keyboard Tips & Tricks You can also be used in combination with other actions when pressed in combination with another key. Some keys perform specific...

8511369 - Gateway Notebook Hardware Reference
Page 23
... commercial aircraft. Bluetooth communication devices are examples of your notebook performs the action identified by the text or icon on or off . www.gateway.com Using the keyboard Key type Icon FN key Numeric keypad Description Press the FN key in combination with a colored system key to close this system key... To...
... commercial aircraft. Bluetooth communication devices are examples of your notebook performs the action identified by the text or icon on or off . www.gateway.com Using the keyboard Key type Icon FN key Numeric keypad Description Press the FN key in combination with a colored system key to close this system key... To...

8511369 - Gateway Notebook Hardware Reference
Page 26
www.gateway.com Position the pointer over the object. Press the left button twice in the online User Guide. Adjusting the volume Tips & Tricks For instructions on ... using external speakers, turn the knob on the screen. This action is called double-clicking. For more information about an object on the keyboard. CHAPTER 2: Checking Out Your Gateway Notebook To... Select an object on the front of your notebook. Quickly press and release the left button and hold it . Position the...
www.gateway.com Position the pointer over the object. Press the left button twice in the online User Guide. Adjusting the volume Tips & Tricks For instructions on ... using external speakers, turn the knob on the screen. This action is called double-clicking. For more information about an object on the keyboard. CHAPTER 2: Checking Out Your Gateway Notebook To... Select an object on the front of your notebook. Quickly press and release the left button and hold it . Position the...
8511369 - Gateway Notebook Hardware Reference
Page 35
CHAPTER 3 Maintaining and Upgrading Your Notebook • Preventing static electricity discharge • Adding or replacing memory • Replacing the DVD drive • Replacing the hard drive kit • Replacing the keyboard 31
CHAPTER 3 Maintaining and Upgrading Your Notebook • Preventing static electricity discharge • Adding or replacing memory • Replacing the DVD drive • Replacing the hard drive kit • Replacing the keyboard 31
8511369 - Gateway Notebook Hardware Reference
Page 37
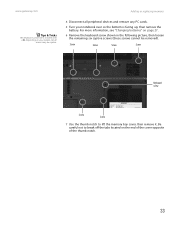
...six captive screws (these screws cannot be captive. Be careful not to lift the memory bay cover, then remove it. Screw Screw Screw Screw Keyboard screw Screw Screw 7 Use the thumb notch to break off the tabs located on your model, not all peripheral devices and remove any PC ...cards. 5 Turn your notebook over so the bottom is marked with a K. www.gateway.com Tips & Tricks The keyboard screw hole is facing up, then remove the battery. Adding or replacing memory 4 Disconnect all screws may be removed). Depending on the end...
...six captive screws (these screws cannot be captive. Be careful not to lift the memory bay cover, then remove it. Screw Screw Screw Screw Keyboard screw Screw Screw 7 Use the thumb notch to break off the tabs located on your model, not all peripheral devices and remove any PC ...cards. 5 Turn your notebook over so the bottom is marked with a K. www.gateway.com Tips & Tricks The keyboard screw hole is facing up, then remove the battery. Adding or replacing memory 4 Disconnect all screws may be removed). Depending on the end...
8511369 - Gateway Notebook Hardware Reference
Page 39
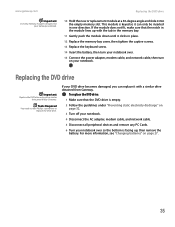
...drive Important Replace the DVD drive only with a similar drive obtained from Gateway. Tools Required You need a small Phillips screwdriver to replace the DVD ... is keyed so it can replace it with a similar drive provided by Gateway. If the module does not fit, make sure that the DVD drive is..., modem cable, and network cable, then turn your notebook. If your Gateway notebook. 10 Hold the new or replacement module at a 30-degree angle...notch in the module lines up , then remove the battery. www.gateway.com Replacing the DVD drive Important Use only memory modules designed for ...
...drive Important Replace the DVD drive only with a similar drive obtained from Gateway. Tools Required You need a small Phillips screwdriver to replace the DVD ... is keyed so it can replace it with a similar drive provided by Gateway. If the module does not fit, make sure that the DVD drive is..., modem cable, and network cable, then turn your notebook. If your Gateway notebook. 10 Hold the new or replacement module at a 30-degree angle...notch in the module lines up , then remove the battery. www.gateway.com Replacing the DVD drive Important Use only memory modules designed for ...


