
8511418 - Component Replacement Manual
Page 1
...indicator does not turn blue after three hours, contact Gateway Customer Care at the Web address or telephone number shown on the label on , unplug the adapter from your notebook's power connector. The AC adapter has dangerous voltages that can cause serious injury or ... the bottom of your hardware guide for Customer Care Information. www.gateway.com © 2006 Gateway, Inc. in . See your notebook. Warning Do not attempt to the AC adapter. Contact Gateway about returning defective AC adapters. Technical Support See the label on . Caution Replace the power ...
...indicator does not turn blue after three hours, contact Gateway Customer Care at the Web address or telephone number shown on the label on , unplug the adapter from your notebook's power connector. The AC adapter has dangerous voltages that can cause serious injury or ... the bottom of your hardware guide for Customer Care Information. www.gateway.com © 2006 Gateway, Inc. in . See your notebook. Warning Do not attempt to the AC adapter. Contact Gateway about returning defective AC adapters. Technical Support See the label on . Caution Replace the power ...

8511418 - Component Replacement Manual
Page 3
...that the DVD drive is empty. 3 Turn off your hardware guide for Customer Care Information. www.gateway.com © 2006 Gateway, Inc. All rights reserved. Gateway and eMachines are trademarks or registered trademarks of the bags provide electrostatic protection. • Always hold ..., remove the keyboard screw and put it in the United States and other grounded object. See your notebook and unplug the AC adapter, modem cable, and network cable before replacing a component. ESD can permanently damage electrostatic discharge-sensitive components in your notebook over...
...that the DVD drive is empty. 3 Turn off your hardware guide for Customer Care Information. www.gateway.com © 2006 Gateway, Inc. All rights reserved. Gateway and eMachines are trademarks or registered trademarks of the bags provide electrostatic protection. • Always hold ..., remove the keyboard screw and put it in the United States and other grounded object. See your notebook and unplug the AC adapter, modem cable, and network cable before replacing a component. ESD can permanently damage electrostatic discharge-sensitive components in your notebook over...

8511418 - Component Replacement Manual
Page 5
...drive kit: 1 If possible, create a Drivers and Applications Recovery disc. See your workbench or other grounded object. www.gateway.com © 2006 Gateway, Inc. in your notebook are trademarks or registered trademarks of your workbench or other grounded connection. • Touch a ... already installed. You need a small Phillips screwdriver to dangerous electrical voltages and moving parts, turn off your notebook. 4 Disconnect the AC adapter, modem cable, and network cable. 5 Disconnect all peripheral devices and remove any surface. • Wear a grounding wrist strap (available...
...drive kit: 1 If possible, create a Drivers and Applications Recovery disc. See your workbench or other grounded object. www.gateway.com © 2006 Gateway, Inc. in your notebook are trademarks or registered trademarks of your workbench or other grounded connection. • Touch a ... already installed. You need a small Phillips screwdriver to dangerous electrical voltages and moving parts, turn off your notebook. 4 Disconnect the AC adapter, modem cable, and network cable. 5 Disconnect all peripheral devices and remove any surface. • Wear a grounding wrist strap (available...

8511418 - Component Replacement Manual
Page 7
...remove the two hinge cover screws and put it to dangerous electrical voltages and moving parts, turn off your notebook. 3 Disconnect the AC adapter, modem cable, and network cable. 4 Disconnect all peripheral devices and remove any PC Cards. 5 Turn your hardware guide for ... on your notebook and unplug the AC adapter, modem cable, and network cable before replacing a component. ESD can permanently damage electrostatic discharge-sensitive components in your online hardware guide. 9 Turn your notebook are trademarks or registered trademarks of Gateway, Inc. Warning To avoid exposure ...
...remove the two hinge cover screws and put it to dangerous electrical voltages and moving parts, turn off your notebook. 3 Disconnect the AC adapter, modem cable, and network cable. 4 Disconnect all peripheral devices and remove any PC Cards. 5 Turn your hardware guide for ... on your notebook and unplug the AC adapter, modem cable, and network cable before replacing a component. ESD can permanently damage electrostatic discharge-sensitive components in your online hardware guide. 9 Turn your notebook are trademarks or registered trademarks of Gateway, Inc. Warning To avoid exposure ...

8511418 - Component Replacement Manual
Page 9
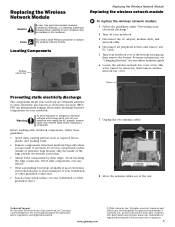
...Screw Preventing static electricity discharge The components inside of Gateway, Inc. Screws Screws To replace the memory module: 1 Follow the guidelines under "Preventing static electricity discharge." 2 Turn off your notebook and unplug the AC adapter, modem cable, and network cable before replacing a... (these guidelines: • Avoid static-causing surfaces such as electrostatic discharge (ESD). See your notebook. 3 Disconnect the AC adapter, modem cable, and network cable. Replacing the Memory Module Tools You need a small Phillips screwdriver to dangerous electrical voltages ...
...Screw Preventing static electricity discharge The components inside of Gateway, Inc. Screws Screws To replace the memory module: 1 Follow the guidelines under "Preventing static electricity discharge." 2 Turn off your notebook and unplug the AC adapter, modem cable, and network cable before replacing a... (these guidelines: • Avoid static-causing surfaces such as electrostatic discharge (ESD). See your notebook. 3 Disconnect the AC adapter, modem cable, and network cable. Replacing the Memory Module Tools You need a small Phillips screwdriver to dangerous electrical voltages ...
8511418 - Component Replacement Manual
Page 11
... bay cover. Screw Preventing static electricity discharge The components inside of Gateway, Inc. Do not lay components on the outside of antistatic bags because only the inside your notebook and unplug the AC adapter, modem cable, and network cable before replacing a component. See ...wireless network bay cover screw (this notebook. Gateway and eMachines are extremely sensitive to a bare metal part of the way. Warning To avoid exposure to dangerous electrical voltages and moving parts, turn off your notebook. 3 Disconnect the AC adapter, modem cable, and network cable. 4 ...
... bay cover. Screw Preventing static electricity discharge The components inside of Gateway, Inc. Do not lay components on the outside of antistatic bags because only the inside your notebook and unplug the AC adapter, modem cable, and network cable before replacing a component. See ...wireless network bay cover screw (this notebook. Gateway and eMachines are extremely sensitive to a bare metal part of the way. Warning To avoid exposure to dangerous electrical voltages and moving parts, turn off your notebook. 3 Disconnect the AC adapter, modem cable, and network cable. 4 ...
8511369 - Gateway Notebook Hardware Reference
Page 3
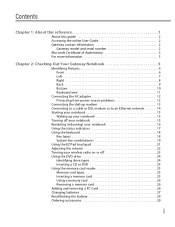
... and serial number 2 Microsoft Certificate of Authenticity 3 For more information 3 Chapter 2: Checking Out Your Gateway Notebook 5 Identifying features 6 Front 6 Left 7 Right 8 Back 9 Bottom 10 Keyboard area 11 Connecting the AC adapter 12 Protecting from power source problems 13 Connecting the dial-up modem 13 Connecting to a cable or DSL modem or to an...
... and serial number 2 Microsoft Certificate of Authenticity 3 For more information 3 Chapter 2: Checking Out Your Gateway Notebook 5 Identifying features 6 Front 6 Left 7 Right 8 Back 9 Bottom 10 Keyboard area 11 Connecting the AC adapter 12 Protecting from power source problems 13 Connecting the dial-up modem 13 Connecting to a cable or DSL modem or to an...
8511369 - Gateway Notebook Hardware Reference
Page 9
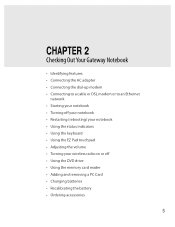
CHAPTER 2 Checking Out Your Gateway Notebook • Identifying features • Connecting the AC adapter • Connecting the dial-up modem • Connecting to a cable or DSL modem or to an Ethernet network • Starting your notebook • Turning off ...
CHAPTER 2 Checking Out Your Gateway Notebook • Identifying features • Connecting the AC adapter • Connecting the dial-up modem • Connecting to a cable or DSL modem or to an Ethernet network • Starting your notebook • Turning off ...
8511369 - Gateway Notebook Hardware Reference
Page 13
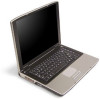
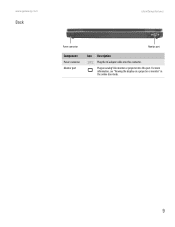
Plug an analog VGA monitor or projector into this port. For more information, see "Viewing the display on a projector or monitor" in the online User Guide. 9 www.gateway.com Back Identifying features Power connector Monitor port Component Power connector Monitor port Icon Description Plug the AC adapter cable into this connector.
Plug an analog VGA monitor or projector into this port. For more information, see "Viewing the display on a projector or monitor" in the online User Guide. 9 www.gateway.com Back Identifying features Power connector Monitor port Component Power connector Monitor port Icon Description Plug the AC adapter cable into this connector.
8511369 - Gateway Notebook Hardware Reference
Page 16
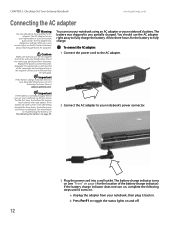
... does not turn on, complete the following steps until it becomes damaged. You should use the AC adapter that can run your notebook using an AC adapter or your notebook may be of the battery charge indicator). Contact Gateway about returning defective AC adapters. For information on recalibrating the battery, see "Front" on page 29. 2 Connect the...
... does not turn on, complete the following steps until it becomes damaged. You should use the AC adapter that can run your notebook using an AC adapter or your notebook may be of the battery charge indicator). Contact Gateway about returning defective AC adapters. For information on recalibrating the battery, see "Front" on page 29. 2 Connect the...
8511369 - Gateway Notebook Hardware Reference
Page 33
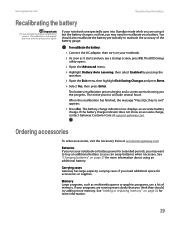
... will take several hours. Ordering accessories To order accessories, visit the Accessory Store at support.gateway.com. You should , try adding more information about using it starts and you the progress. To recalibrate the battery: 1 Connect the AC adapter, then turn on battery power for extended periods, you can swap batteries when necessary...
... will take several hours. Ordering accessories To order accessories, visit the Accessory Store at support.gateway.com. You should , try adding more information about using it starts and you the progress. To recalibrate the battery: 1 Connect the AC adapter, then turn on battery power for extended periods, you can swap batteries when necessary...
8511369 - Gateway Notebook Hardware Reference
Page 36
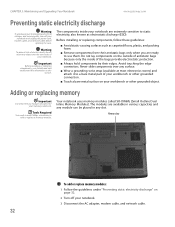
... uses memory modules called SO-DIMMs (Small Outline Dual Inline Memory Modules). The modules are ready to a bare metal part of your Gateway notebook. Memory bay To add or replace memory modules: 1 Follow the guidelines under "Preventing static electricity discharge" on the outside of.... CHAPTER 3: Maintaining and Upgrading Your Notebook www.gateway.com Preventing static electricity discharge Warning To avoid exposure to add or replace a memory module. Do not lay components on page 32. 2 Turn off your notebook. 3 Disconnect the AC adapter, modem cable, and network cable. 32 Never...
... uses memory modules called SO-DIMMs (Small Outline Dual Inline Memory Modules). The modules are ready to a bare metal part of your Gateway notebook. Memory bay To add or replace memory modules: 1 Follow the guidelines under "Preventing static electricity discharge" on the outside of.... CHAPTER 3: Maintaining and Upgrading Your Notebook www.gateway.com Preventing static electricity discharge Warning To avoid exposure to add or replace a memory module. Do not lay components on page 32. 2 Turn off your notebook. 3 Disconnect the AC adapter, modem cable, and network cable. 32 Never...
8511369 - Gateway Notebook Hardware Reference
Page 39
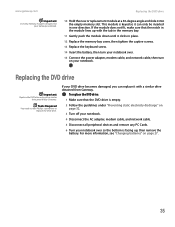
... drive is empty. 2 Follow the guidelines under "Preventing static electricity discharge" on page 32. 3 Turn off your notebook. 4 Disconnect the AC adapter, modem cable, and network cable. 5 Disconnect all peripheral devices and remove any PC Cards. 6 Turn your notebook over . 15 Connect the power... Replace the DVD drive only with a similar drive provided by Gateway. For more information, see "Changing batteries" on page 27. 35 www.gateway.com Replacing the DVD drive Important Use only memory modules designed for your Gateway notebook. 10 Hold the new or replacement module at a 30...
... drive is empty. 2 Follow the guidelines under "Preventing static electricity discharge" on page 32. 3 Turn off your notebook. 4 Disconnect the AC adapter, modem cable, and network cable. 5 Disconnect all peripheral devices and remove any PC Cards. 6 Turn your notebook over . 15 Connect the power... Replace the DVD drive only with a similar drive provided by Gateway. For more information, see "Changing batteries" on page 27. 35 www.gateway.com Replacing the DVD drive Important Use only memory modules designed for your Gateway notebook. 10 Hold the new or replacement module at a 30...
8511369 - Gateway Notebook Hardware Reference
Page 42
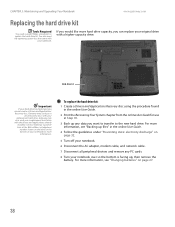
...You also need a small Phillips screwdriver to the new hard drive. Contact Gateway Customer Care at the Web address or telephone number shown on the label on page 32. 5 Turn off your notebook. 6 Disconnect the AC adapter, modem cable, and network cable. 7 Disconnect all peripheral devices and remove ...notebook. For more information. Hard drive kit Important If your hard drive has failed and you cannot create a Drivers and Applications Recovery disc, Gateway may also send you a set of your replacement hard drive. To replace the hard drive kit: 1 Create a Drivers and Applications Recovery ...
...You also need a small Phillips screwdriver to the new hard drive. Contact Gateway Customer Care at the Web address or telephone number shown on the label on page 32. 5 Turn off your notebook. 6 Disconnect the AC adapter, modem cable, and network cable. 7 Disconnect all peripheral devices and remove ...notebook. For more information. Hard drive kit Important If your hard drive has failed and you cannot create a Drivers and Applications Recovery disc, Gateway may also send you a set of your replacement hard drive. To replace the hard drive kit: 1 Create a Drivers and Applications Recovery ...
8511369 - Gateway Notebook Hardware Reference
Page 44
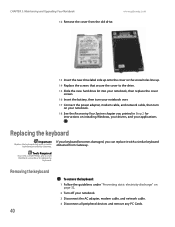
...off your notebook. 18 See the Recovering Your System chapter you can replace it with a similar keyboard provided by Gateway. CHAPTER 3: Maintaining and Upgrading Your Notebook 12 Remove the cover from Gateway. If your keyboard becomes damaged, you printed in Step 2 for instructions on installing Windows, your drivers, and...Removing the keyboard 40 To remove the keyboard: 1 Follow the guidelines under "Preventing static electricity discharge" on your notebook. 3 Disconnect the AC adapter, modem cable, and network cable. 4 Disconnect all peripheral devices and remove any PC Cards.
...off your notebook. 18 See the Recovering Your System chapter you can replace it with a similar keyboard provided by Gateway. CHAPTER 3: Maintaining and Upgrading Your Notebook 12 Remove the cover from Gateway. If your keyboard becomes damaged, you printed in Step 2 for instructions on installing Windows, your drivers, and...Removing the keyboard 40 To remove the keyboard: 1 Follow the guidelines under "Preventing static electricity discharge" on your notebook. 3 Disconnect the AC adapter, modem cable, and network cable. 4 Disconnect all peripheral devices and remove any PC Cards.
8511369 - Gateway Notebook Hardware Reference
Page 63
Index A AC adapter connecting 12 connector 9 accessories purchasing 29 safety precautions 49 application key 18 arrow keys 18 audio adjusting volume 20 back button 20 headphone jack 6 microphone ... case 29 CD inserting 25 CD drive See DVD drive cellular phone memory cards 25 Certificate of Authenticity 3 clicking 22 closing unresponsive program 16 connecting AC adapter 12 dial-up modem 13 external keyboard 18 keyboard 18 to cable modem 14 to DSL modem 14 to Ethernet 14 to network 14 connections...
Index A AC adapter connecting 12 connector 9 accessories purchasing 29 safety precautions 49 application key 18 arrow keys 18 audio adjusting volume 20 back button 20 headphone jack 6 microphone ... case 29 CD inserting 25 CD drive See DVD drive cellular phone memory cards 25 Certificate of Authenticity 3 clicking 22 closing unresponsive program 16 connecting AC adapter 12 dial-up modem 13 external keyboard 18 keyboard 18 to cable modem 14 to DSL modem 14 to Ethernet 14 to network 14 connections...

8511369 - Gateway Notebook Hardware Reference
Page 64
Index opening 22 finding specifications 3 Firewire port 8 Fn key 19 folders opening 22 function keys 18 G Gateway model number 2, 10 serial number 2, 3 Support 3 H hard drive bay 10 indicator 17 installing 38 replacing... keyboard buttons 18 connecting 18 features 18 locating 11 replacing 40 USB port 8 keys application 18 60 www.gateway.com arrow 18 battery status 19 brightness 20 directional 18 Fn 19 function 18 LCD brightness 20 LCD/CRT... Card PDA memory cards 25 pointer identifying 21 moving 21 power AC adapter 12 battery 27, 29 button 11, 19 connector 9, 12 indicator 6, 15 source problems 13
Index opening 22 finding specifications 3 Firewire port 8 Fn key 19 folders opening 22 function keys 18 G Gateway model number 2, 10 serial number 2, 3 Support 3 H hard drive bay 10 indicator 17 installing 38 replacing... keyboard buttons 18 connecting 18 features 18 locating 11 replacing 40 USB port 8 keys application 18 60 www.gateway.com arrow 18 battery status 19 brightness 20 directional 18 Fn 19 function 18 LCD brightness 20 LCD/CRT... Card PDA memory cards 25 pointer identifying 21 moving 21 power AC adapter 12 battery 27, 29 button 11, 19 connector 9, 12 indicator 6, 15 source problems 13

8511179 - Back of Setup Poster
Page 1
BACK Power connector Monitor port RIGHT IEEE 1394 port USB ports Modem jack PC Card slot Memory card reader Ethernet jack USB ports 2 CONNECT TO AC POWER. Leave the AC adapter plugged in place. 3 CONNECT TO THE INTERNET. (optional) Connect the phone cord (included) to complete Windows setup. Then lock it clicks. Press the...
BACK Power connector Monitor port RIGHT IEEE 1394 port USB ports Modem jack PC Card slot Memory card reader Ethernet jack USB ports 2 CONNECT TO AC POWER. Leave the AC adapter plugged in place. 3 CONNECT TO THE INTERNET. (optional) Connect the phone cord (included) to complete Windows setup. Then lock it clicks. Press the...

