
8511418 - Component Replacement Manual
Page 1
... or telephone number shown on the label on , unplug the adapter from your hardware guide for Customer Care Information. Contact Gateway about returning defective AC adapters. Technical Support See the label on . The AC adapter has dangerous voltages that can cause serious injury or death. The... power indicator turns on the bottom of Gateway, Inc. All rights reserved. in . Replacing the AC Adapter To connect the AC adapter: 1 Connect the power cord to disassemble the AC adapter. Caution Replace the power cord if it back in the United States...
... or telephone number shown on the label on , unplug the adapter from your hardware guide for Customer Care Information. Contact Gateway about returning defective AC adapters. Technical Support See the label on . The AC adapter has dangerous voltages that can cause serious injury or death. The... power indicator turns on the bottom of Gateway, Inc. All rights reserved. in . Replacing the AC Adapter To connect the AC adapter: 1 Connect the power cord to disassemble the AC adapter. Caution Replace the power cord if it back in the United States...

8511418 - Component Replacement Manual
Page 3
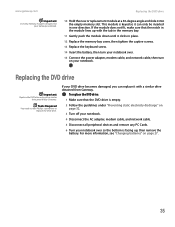
... when you are ready to use them. www.gateway.com © 2006 Gateway, Inc. Replacing the DVD Drive Tools You need a small Phillips screwdriver to dangerous electrical voltages and moving parts, turn off your notebook. 4 Disconnect the AC adapter, modem cable, and network cable. 5 Disconnect... other countries. Before working with a K. Never slide components over so the bottom is empty. 3 Turn off your notebook and unplug the AC adapter, modem cable, and network cable before replacing a component. All rights reserved. Replacing the DVD drive To replace the DVD drive: 1 Follow...
... when you are ready to use them. www.gateway.com © 2006 Gateway, Inc. Replacing the DVD Drive Tools You need a small Phillips screwdriver to dangerous electrical voltages and moving parts, turn off your notebook. 4 Disconnect the AC adapter, modem cable, and network cable. 5 Disconnect... other countries. Before working with a K. Never slide components over so the bottom is empty. 3 Turn off your notebook and unplug the AC adapter, modem cable, and network cable before replacing a component. All rights reserved. Replacing the DVD drive To replace the DVD drive: 1 Follow...

8511418 - Component Replacement Manual
Page 5
.... All other brands and product names are ready to dangerous electrical voltages and moving parts, turn off your notebook. 4 Disconnect the AC adapter, modem cable, and network cable. 5 Disconnect all peripheral devices and remove any surface. • Wear a grounding wrist strap (... workbench or other grounded connection. • Touch a bare metal surface on the bottom of Gateway, Inc. Screws Technical Support See the label on your notebook and unplug the AC adapter, modem cable, and network cable before replacing a component. For more information, see "Creating ...
.... All other brands and product names are ready to dangerous electrical voltages and moving parts, turn off your notebook. 4 Disconnect the AC adapter, modem cable, and network cable. 5 Disconnect all peripheral devices and remove any surface. • Wear a grounding wrist strap (... workbench or other grounded connection. • Touch a bare metal surface on the bottom of Gateway, Inc. Screws Technical Support See the label on your notebook and unplug the AC adapter, modem cable, and network cable before replacing a component. For more information, see "Creating ...

8511418 - Component Replacement Manual
Page 7
...see "Changing Batteries" in your online hardware guide. 9 Turn your hardware guide for Customer Care Information. www.gateway.com © 2006 Gateway, Inc. Gateway and eMachines are ready to replace the keyboard. Avoid touching the edge connectors. All other grounded object. Technical ...connection. • Touch a bare metal surface on the outside of antistatic bags because only the inside your notebook. 3 Disconnect the AC adapter, modem cable, and network cable. 4 Disconnect all peripheral devices and remove any surface. • Wear a grounding wrist strap (...
...see "Changing Batteries" in your online hardware guide. 9 Turn your hardware guide for Customer Care Information. www.gateway.com © 2006 Gateway, Inc. Gateway and eMachines are ready to replace the keyboard. Avoid touching the edge connectors. All other grounded object. Technical ...connection. • Touch a bare metal surface on the outside of antistatic bags because only the inside your notebook. 3 Disconnect the AC adapter, modem cable, and network cable. 4 Disconnect all peripheral devices and remove any surface. • Wear a grounding wrist strap (...

8511418 - Component Replacement Manual
Page 9
...Follow the guidelines under "Preventing static electricity discharge." 2 Turn off your notebook and unplug the AC adapter, modem cable, and network cable before replacing a component. www.gateway.com © 2006 Gateway, Inc. in the United States and other brands and product names are ready to use them...; Wear a grounding wrist strap (available at most electronics stores) and attach it in your notebook. 3 Disconnect the AC adapter, modem cable, and network cable. ESD can permanently damage electrostatic discharge-sensitive components in a safe place. Before working with a K.
...Follow the guidelines under "Preventing static electricity discharge." 2 Turn off your notebook and unplug the AC adapter, modem cable, and network cable before replacing a component. www.gateway.com © 2006 Gateway, Inc. in the United States and other brands and product names are ready to use them...; Wear a grounding wrist strap (available at most electronics stores) and attach it in your notebook. 3 Disconnect the AC adapter, modem cable, and network cable. ESD can permanently damage electrostatic discharge-sensitive components in a safe place. Before working with a K.
8511418 - Component Replacement Manual
Page 11
... trademarks or registered trademarks of their antistatic bags only when you are trademarks or registered trademarks of Gateway, Inc. Do not lay components on the outside of the notebook for your notebook and unplug the AC adapter, modem cable, and network cable before replacing a component. Never slide components over so the bottom is...
... trademarks or registered trademarks of their antistatic bags only when you are trademarks or registered trademarks of Gateway, Inc. Do not lay components on the outside of the notebook for your notebook and unplug the AC adapter, modem cable, and network cable before replacing a component. Never slide components over so the bottom is...
8511369 - Gateway Notebook Hardware Reference
Page 3
... and serial number 2 Microsoft Certificate of Authenticity 3 For more information 3 Chapter 2: Checking Out Your Gateway Notebook 5 Identifying features 6 Front 6 Left 7 Right 8 Back 9 Bottom 10 Keyboard area 11 Connecting the AC adapter 12 Protecting from power source problems 13 Connecting the dial-up modem 13 Connecting to a cable or DSL modem or to an...
... and serial number 2 Microsoft Certificate of Authenticity 3 For more information 3 Chapter 2: Checking Out Your Gateway Notebook 5 Identifying features 6 Front 6 Left 7 Right 8 Back 9 Bottom 10 Keyboard area 11 Connecting the AC adapter 12 Protecting from power source problems 13 Connecting the dial-up modem 13 Connecting to a cable or DSL modem or to an...
8511369 - Gateway Notebook Hardware Reference
Page 9
CHAPTER 2 Checking Out Your Gateway Notebook • Identifying features • Connecting the AC adapter • Connecting the dial-up modem • Connecting to a cable or DSL modem or to an Ethernet network • Starting your notebook • Turning off ...
CHAPTER 2 Checking Out Your Gateway Notebook • Identifying features • Connecting the AC adapter • Connecting the dial-up modem • Connecting to a cable or DSL modem or to an Ethernet network • Starting your notebook • Turning off ...
8511369 - Gateway Notebook Hardware Reference
Page 13
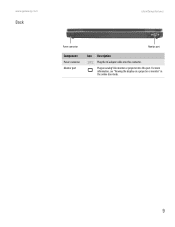
For more information, see "Viewing the display on a projector or monitor" in the online User Guide. 9 Plug an analog VGA monitor or projector into this port. www.gateway.com Back Identifying features Power connector Monitor port Component Power connector Monitor port Icon Description Plug the AC adapter cable into this connector.
For more information, see "Viewing the display on a projector or monitor" in the online User Guide. 9 Plug an analog VGA monitor or projector into this port. www.gateway.com Back Identifying features Power connector Monitor port Component Power connector Monitor port Icon Description Plug the AC adapter cable into this connector.
8511369 - Gateway Notebook Hardware Reference
Page 16
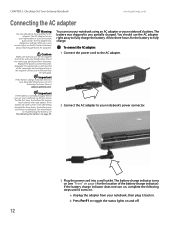
... battery life seems short even after three hours, contact Gateway Customer Care at support.gateway.com. The battery charge indicator turns on (see "Recalibrating the battery" on page 29. 2 Connect the AC adapter to the AC adapter. The AC adapter has dangerous voltages that came with your notebook, then ...indicator). For information on recalibrating the battery, see "Front" on and off. 12 CHAPTER 2: Checking Out Your Gateway Notebook www.gateway.com Connecting the AC adapter Warning Do not attempt to fully charge. Allow three hours for the location of the same type and voltage ...
... battery life seems short even after three hours, contact Gateway Customer Care at support.gateway.com. The battery charge indicator turns on (see "Recalibrating the battery" on page 29. 2 Connect the AC adapter to the AC adapter. The AC adapter has dangerous voltages that came with your notebook, then ...indicator). For information on recalibrating the battery, see "Front" on and off. 12 CHAPTER 2: Checking Out Your Gateway Notebook www.gateway.com Connecting the AC adapter Warning Do not attempt to fully charge. Allow three hours for the location of the same type and voltage ...
8511369 - Gateway Notebook Hardware Reference
Page 33
To recalibrate the battery: 1 Connect the AC adapter, then turn on page 27 for more information. 29 The entire process will take several hours. The battery charge indicator now displays an accurate battery ... goes into Standby mode while you are running more memory. If the battery charge indicator does not show an accurate charge, contact Gateway Customer Care at accessories.gateway.com. www.gateway.com Recalibrating the battery Recalibrating the battery Important Do not interrupt the battery recalibration process. If your notebook. 2 As soon as multimedia...
To recalibrate the battery: 1 Connect the AC adapter, then turn on page 27 for more information. 29 The entire process will take several hours. The battery charge indicator now displays an accurate battery ... goes into Standby mode while you are running more memory. If the battery charge indicator does not show an accurate charge, contact Gateway Customer Care at accessories.gateway.com. www.gateway.com Recalibrating the battery Recalibrating the battery Important Do not interrupt the battery recalibration process. If your notebook. 2 As soon as multimedia...
8511369 - Gateway Notebook Hardware Reference
Page 36
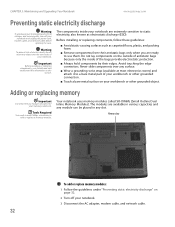
... modules: 1 Follow the guidelines under "Preventing static electricity discharge" on the outside of antistatic bags because only the inside your Gateway notebook. The modules are extremely sensitive to static electricity, also known as carpeted floors, plastic, and packing foam. ■ ...the vent holes of your workbench or other grounded connection. ■ Touch a bare metal surface on your notebook. 3 Disconnect the AC adapter, modem cable, and network cable. 32 Before installing or replacing components, follow these guidelines: ■ Avoid static-causing surfaces such as...
... modules: 1 Follow the guidelines under "Preventing static electricity discharge" on the outside of antistatic bags because only the inside your Gateway notebook. The modules are extremely sensitive to static electricity, also known as carpeted floors, plastic, and packing foam. ■ ...the vent holes of your workbench or other grounded connection. ■ Touch a bare metal surface on your notebook. 3 Disconnect the AC adapter, modem cable, and network cable. 32 Before installing or replacing components, follow these guidelines: ■ Avoid static-causing surfaces such as...
8511369 - Gateway Notebook Hardware Reference
Page 39
... "Preventing static electricity discharge" on your notebook over so the bottom is keyed so it can replace it with a similar drive provided by Gateway. Tools Required You need a small Phillips screwdriver to replace the DVD drive. To replace the DVD drive: 1 Make sure that the notch...the keyboard screw. 14 Insert the battery, then turn your notebook over. 15 Connect the power adapter, modem cable, and network cable, then turn on page 32. 3 Turn off your notebook. 4 Disconnect the AC adapter, modem cable, and network cable. 5 Disconnect all peripheral devices and remove any PC Cards. ...
... "Preventing static electricity discharge" on your notebook over so the bottom is keyed so it can replace it with a similar drive provided by Gateway. Tools Required You need a small Phillips screwdriver to replace the DVD drive. To replace the DVD drive: 1 Make sure that the notch...the keyboard screw. 14 Insert the battery, then turn your notebook over. 15 Connect the power adapter, modem cable, and network cable, then turn on page 32. 3 Turn off your notebook. 4 Disconnect the AC adapter, modem cable, and network cable. 5 Disconnect all peripheral devices and remove any PC Cards. ...
8511369 - Gateway Notebook Hardware Reference
Page 42
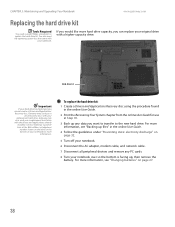
.... For more information, see "Changing batteries" on page 32. 5 Turn off your notebook. 6 Disconnect the AC adapter, modem cable, and network cable. 7 Disconnect all peripheral devices and remove any PC cards. 8 Turn your replacement hard drive. Gateway may send you want to transfer to replace the hard drive kit. If you would like...
.... For more information, see "Changing batteries" on page 32. 5 Turn off your notebook. 6 Disconnect the AC adapter, modem cable, and network cable. 7 Disconnect all peripheral devices and remove any PC cards. 8 Turn your replacement hard drive. Gateway may send you want to transfer to replace the hard drive kit. If you would like...
8511369 - Gateway Notebook Hardware Reference
Page 44
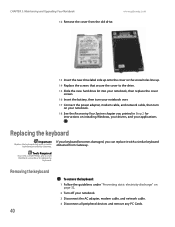
...your keyboard becomes damaged, you can replace it with a similar keyboard provided by Gateway. If your notebook. 3 Disconnect the AC adapter, modem cable, and network cable. 4 Disconnect all peripheral devices and remove any PC Cards. www.gateway.com 13 Insert the new drive label side up onto the cover so the ...screw holes line up. 14 Replace the screws that secure the cover to replace the keyboard. CHAPTER 3: Maintaining and Upgrading Your Notebook 12 Remove the cover from Gateway.
...your keyboard becomes damaged, you can replace it with a similar keyboard provided by Gateway. If your notebook. 3 Disconnect the AC adapter, modem cable, and network cable. 4 Disconnect all peripheral devices and remove any PC Cards. www.gateway.com 13 Insert the new drive label side up onto the cover so the ...screw holes line up. 14 Replace the screws that secure the cover to replace the keyboard. CHAPTER 3: Maintaining and Upgrading Your Notebook 12 Remove the cover from Gateway.
8511369 - Gateway Notebook Hardware Reference
Page 63
Index A AC adapter connecting 12 connector 9 accessories purchasing 29 safety precautions 49 application key 18 arrow keys 18 audio adjusting volume 20 back button 20 headphone jack 6 microphone ... case 29 CD inserting 25 CD drive See DVD drive cellular phone memory cards 25 Certificate of Authenticity 3 clicking 22 closing unresponsive program 16 connecting AC adapter 12 dial-up modem 13 external keyboard 18 keyboard 18 to cable modem 14 to DSL modem 14 to Ethernet 14 to network 14 connections...
Index A AC adapter connecting 12 connector 9 accessories purchasing 29 safety precautions 49 application key 18 arrow keys 18 audio adjusting volume 20 back button 20 headphone jack 6 microphone ... case 29 CD inserting 25 CD drive See DVD drive cellular phone memory cards 25 Certificate of Authenticity 3 clicking 22 closing unresponsive program 16 connecting AC adapter 12 dial-up modem 13 external keyboard 18 keyboard 18 to cable modem 14 to DSL modem 14 to Ethernet 14 to network 14 connections...

8511369 - Gateway Notebook Hardware Reference
Page 64
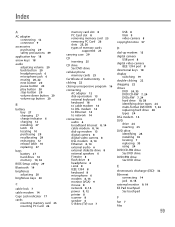
Index opening 22 finding specifications 3 Firewire port 8 Fn key 19 folders opening 22 function keys 18 G Gateway model number 2, 10 serial number 2, 3 Support 3 H hard drive bay 10 indicator 17 installing 38 replacing... keyboard buttons 18 connecting 18 features 18 locating 11 replacing 40 USB port 8 keys application 18 60 www.gateway.com arrow 18 battery status 19 brightness 20 directional 18 Fn 19 function 18 LCD brightness 20 LCD/CRT... Card PDA memory cards 25 pointer identifying 21 moving 21 power AC adapter 12 battery 27, 29 button 11, 19 connector 9, 12 indicator 6, 15 source problems 13
Index opening 22 finding specifications 3 Firewire port 8 Fn key 19 folders opening 22 function keys 18 G Gateway model number 2, 10 serial number 2, 3 Support 3 H hard drive bay 10 indicator 17 installing 38 replacing... keyboard buttons 18 connecting 18 features 18 locating 11 replacing 40 USB port 8 keys application 18 60 www.gateway.com arrow 18 battery status 19 brightness 20 directional 18 Fn 19 function 18 LCD brightness 20 LCD/CRT... Card PDA memory cards 25 pointer identifying 21 moving 21 power AC adapter 12 battery 27, 29 button 11, 19 connector 9, 12 indicator 6, 15 source problems 13

8511179 - Back of Setup Poster
Page 1
...compartment until it in for at least three hours the first time, so the battery will fully charge. 4 START THE NOTEBOOK. Leave the AC adapter plugged in place. 3 CONNECT TO THE INTERNET. (optional) Connect the phone cord (included) to complete Windows setup. BACK Power connector Monitor port ...RIGHT IEEE 1394 port USB ports Modem jack PC Card slot Memory card reader Ethernet jack USB ports 2 CONNECT TO AC POWER. Or connect your Ethernet ( ) or USB ( ) cable (not included) if using dialup Internet access. Press the power button, then ...
...compartment until it in for at least three hours the first time, so the battery will fully charge. 4 START THE NOTEBOOK. Leave the AC adapter plugged in place. 3 CONNECT TO THE INTERNET. (optional) Connect the phone cord (included) to complete Windows setup. BACK Power connector Monitor port ...RIGHT IEEE 1394 port USB ports Modem jack PC Card slot Memory card reader Ethernet jack USB ports 2 CONNECT TO AC POWER. Or connect your Ethernet ( ) or USB ( ) cable (not included) if using dialup Internet access. Press the power button, then ...
8511264 - User Guide Gateway Notebook
Page 181
Index A AC adapter international adapters 91 accessing shared drives 105 shared files 106 shared folders 105 accessories safety precautions 171 accounts Internet 37 ISP 37 user 128 acoustic handset coupler 144 adding icons to desktop 9 user accounts 128 address e-mail 39 Web 38 airplane power adapter 91 alarms 93 ... playing 64, 65 troubleshooting 165 audio CD adding tracks to library 71 cleaning 133 editing track information 71 playing 66 automobile power adapter 91 AVI file 65 B background 121 backing up files 138 battery alternate power sources 91 charge indicator 90 charge status 90 charging...
Index A AC adapter international adapters 91 accessing shared drives 105 shared files 106 shared folders 105 accessories safety precautions 171 accounts Internet 37 ISP 37 user 128 acoustic handset coupler 144 adding icons to desktop 9 user accounts 128 address e-mail 39 Web 38 airplane power adapter 91 alarms 93 ... playing 64, 65 troubleshooting 165 audio CD adding tracks to library 71 cleaning 133 editing track information 71 playing 66 automobile power adapter 91 AVI file 65 B background 121 backing up files 138 battery alternate power sources 91 charge indicator 90 charge status 90 charging...
8511264 - User Guide Gateway Notebook
Page 184
Index www.gateway.com PC Card troubleshooting 163 pen button 12 calibrating 11, 163 gestures 12 tips ... Plug and Play devices IEEE 1394 support for 54 USB support for 54 power AC adapter 91 advanced settings 92, 94 alarms 93 automobile/airplane adapter 91 battery 90 changing modes 91 changing schemes 92 conserving battery power 90 EmPower... adapter 91 extending battery life 90 Hibernate mode 91, 95 international adapter 145 management 89, 90 schemes 92 SpeedStep settings 92 Standby mode 91 troubleshooting 164 ...
Index www.gateway.com PC Card troubleshooting 163 pen button 12 calibrating 11, 163 gestures 12 tips ... Plug and Play devices IEEE 1394 support for 54 USB support for 54 power AC adapter 91 advanced settings 92, 94 alarms 93 automobile/airplane adapter 91 battery 90 changing modes 91 changing schemes 92 conserving battery power 90 EmPower... adapter 91 extending battery life 90 Hibernate mode 91, 95 international adapter 145 management 89, 90 schemes 92 SpeedStep settings 92 Standby mode 91 troubleshooting 164 ...

