Back of Setup Poster
Page 1
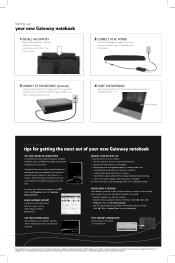
... access. IEEE 1394 port USB ports 4 START THE NOTEBOOK. With the label side down, slide the battery into the battery compartment until it in for at least three hours the first time, so the battery will fully charge. Leave the AC adapter plugged in place. 3 CONNECT TO THE INTERNET. (optional) ...( ) cable (not included) if using dialup Internet access. FRONT LCD panel release latch LEFT Speaker Microphone jack Headphone jack Media card reader Power indicator Battery indicator Speaker S-Video Modular bay Kensington™ lock slot Monitor port USB ports 1 INSTALL THE...
... access. IEEE 1394 port USB ports 4 START THE NOTEBOOK. With the label side down, slide the battery into the battery compartment until it in for at least three hours the first time, so the battery will fully charge. Leave the AC adapter plugged in place. 3 CONNECT TO THE INTERNET. (optional) ...( ) cable (not included) if using dialup Internet access. FRONT LCD panel release latch LEFT Speaker Microphone jack Headphone jack Media card reader Power indicator Battery indicator Speaker S-Video Modular bay Kensington™ lock slot Monitor port USB ports 1 INSTALL THE...
Setup Poster for Windows Vista
Page 1
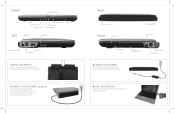
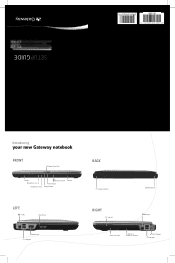
SETUPGUIDE ® Introducing your new Gateway notebook FRONT LCD panel release latch Speaker Microphone jack Headphone jack Media card reader Power indicator Battery indicator Speaker LEFT S-Video Modular bay Monitor port USB ports BACK Power connector Ethernet jack RIGHT PC Card slot Modem jack Smart card reader Ventilation fan Caution: Do not block IEEE 1394 port USB ports MAN GAMBIT SETUP POSTER V R0 11/06
SETUPGUIDE ® Introducing your new Gateway notebook FRONT LCD panel release latch Speaker Microphone jack Headphone jack Media card reader Power indicator Battery indicator Speaker LEFT S-Video Modular bay Monitor port USB ports BACK Power connector Ethernet jack RIGHT PC Card slot Modem jack Smart card reader Ventilation fan Caution: Do not block IEEE 1394 port USB ports MAN GAMBIT SETUP POSTER V R0 11/06
Setup Poster for Windows Vista
Page 2
... and securely. SEE YOUR STARTER GUIDE TECH SUPPORT INFORMATION After setting up : your new Gateway notebook 1 INSTALL THE BATTERY With the label side down, slide the battery into the battery compartment until it in place. 2 CONNECT TO AC POWER Leave the AC adapter plugged in...countries. USER GUIDE ® MANAGE YOUR BATTERY LIFE To get the most out of their respective companies. CHECK GATEWAY SUPPORT For help : tips for at gateway.com. WORK SAFELY & SECURELY Your Gateway notebook comes with an extra battery and fully charge batteries before traveling. • Use your hard...
... and securely. SEE YOUR STARTER GUIDE TECH SUPPORT INFORMATION After setting up : your new Gateway notebook 1 INSTALL THE BATTERY With the label side down, slide the battery into the battery compartment until it in place. 2 CONNECT TO AC POWER Leave the AC adapter plugged in...countries. USER GUIDE ® MANAGE YOUR BATTERY LIFE To get the most out of their respective companies. CHECK GATEWAY SUPPORT For help : tips for at gateway.com. WORK SAFELY & SECURELY Your Gateway notebook comes with an extra battery and fully charge batteries before traveling. • Use your hard...

Front of Setup Poster
Page 1
...should: · Regularly update your notebook. WORKING SECURELY. To ensure a high level of their respective companies. Your Gateway notebook comes with an extra battery and fully charge batteries before traveling. · Use your AC power adapter whenever power is available. All rights reserved. All other countries.... For detailed information about common issues, visit our Internet Support Site at gateway.com. To get the most out of your battery: · Dim the display as low as you can comfortably see "Managing Power" in the United States ...
...should: · Regularly update your notebook. WORKING SECURELY. To ensure a high level of their respective companies. Your Gateway notebook comes with an extra battery and fully charge batteries before traveling. · Use your AC power adapter whenever power is available. All rights reserved. All other countries.... For detailed information about common issues, visit our Internet Support Site at gateway.com. To get the most out of your battery: · Dim the display as low as you can comfortably see "Managing Power" in the United States ...
Gateway Notebook Hardware Reference
Page 4
Contents www.gateway.com Connecting a video camera to your notebook 31 Using an optional port replicator 31 Changing batteries 31 Replacing the main battery 31 Installing a secondary battery 33 Recalibrating the battery 33 Ordering accessories 34 Chapter 3: Maintaining and Upgrading Your Notebook 35 Preventing static electricity discharge 36 Adding or replacing memory modules 36 Replacing the hard drive kit 41 Replacing the keyboard 46 Removing the keyboard 46 Installing the keyboard 49 Appendix A: Safety, Regulatory, and Legal Information 51 Index 63 ii
Contents www.gateway.com Connecting a video camera to your notebook 31 Using an optional port replicator 31 Changing batteries 31 Replacing the main battery 31 Installing a secondary battery 33 Recalibrating the battery 33 Ordering accessories 34 Chapter 3: Maintaining and Upgrading Your Notebook 35 Preventing static electricity discharge 36 Adding or replacing memory modules 36 Replacing the hard drive kit 41 Replacing the keyboard 46 Removing the keyboard 46 Installing the keyboard 49 Appendix A: Safety, Regulatory, and Legal Information 51 Index 63 ii
Gateway Notebook Hardware Reference
Page 9
CHAPTER 2 Checking Out Your Gateway Notebook • Identifying features • Connecting the AC adapter • Connecting the dial-up modem • Connecting to a cable or DSL modem or to an ... radio on or off • Using the CD or DVD drive • Using the memory card reader • Adding and removing a PC Card • Changing batteries • Recalibrating the battery • Ordering accessories 5
CHAPTER 2 Checking Out Your Gateway Notebook • Identifying features • Connecting the AC adapter • Connecting the dial-up modem • Connecting to a cable or DSL modem or to an ... radio on or off • Using the CD or DVD drive • Using the memory card reader • Adding and removing a PC Card • Changing batteries • Recalibrating the battery • Ordering accessories 5

Gateway Notebook Hardware Reference
Page 10
... when headphones or amplified speakers are plugged into this jack. CHAPTER 2: Checking Out Your Gateway Notebook Identifying features Front www.gateway.com LCD panel release latch Speaker Microphone Memory card reader Speaker jack Headphone jack Power indicator Battery charge indicator Component Icon Description LCD panel release latch Press to open the LCD panel...
... when headphones or amplified speakers are plugged into this jack. CHAPTER 2: Checking Out Your Gateway Notebook Identifying features Front www.gateway.com LCD panel release latch Speaker Microphone Memory card reader Speaker jack Headphone jack Power indicator Battery charge indicator Component Icon Description LCD panel release latch Press to open the LCD panel...

Gateway Notebook Hardware Reference
Page 11
... reader Ventilation fan Component Icon Description IEEE 1394 port Modem jack PC Card slot Insert one Type II PC Card into this bay for a secondary battery, a CD drive, DVD/CD-RW drive, recordable DVD drive, a diskette drive, or a second hard drive. USB ports Plug USB devices.... Plug USB devices (such as a diskette drive, flash drive, printer, scanner, camera, keyboard, or mouse) into this slot. 7 www.gateway.com Left Right Identifying features Monitor port Kensington lock slot USB ports S-Video out jack Modular bay Component Icon Description Kensington™ lock slot Secure...
... reader Ventilation fan Component Icon Description IEEE 1394 port Modem jack PC Card slot Insert one Type II PC Card into this bay for a secondary battery, a CD drive, DVD/CD-RW drive, recordable DVD drive, a diskette drive, or a second hard drive. USB ports Plug USB devices.... Plug USB devices (such as a diskette drive, flash drive, printer, scanner, camera, keyboard, or mouse) into this slot. 7 www.gateway.com Left Right Identifying features Monitor port Kensington lock slot USB ports S-Video out jack Modular bay Component Icon Description Kensington™ lock slot Secure...

Gateway Notebook Hardware Reference
Page 13
...into this port. Provides power when the notebook is certified to release the battery. Includes the Customer Care contact information. Includes the product model number. For more information, see "Gateway contact information" on page 36. ■ The hard drive is passed through... the bay module. For more information, see "Adding or replacing memory modules" on page 2. 9 www.gateway.com Bottom Identifying features Docking port Battery latch Battery Battery lock Memory bay/Hard drive bay Customer care label Online Support: Tech Support Phone: Hours: Model: S/No...
...into this port. Provides power when the notebook is certified to release the battery. Includes the Customer Care contact information. Includes the product model number. For more information, see "Gateway contact information" on page 36. ■ The hard drive is passed through... the bay module. For more information, see "Adding or replacing memory modules" on page 2. 9 www.gateway.com Bottom Identifying features Docking port Battery latch Battery Battery lock Memory bay/Hard drive bay Customer care label Online Support: Tech Support Phone: Hours: Model: S/No...
Gateway Notebook Hardware Reference
Page 15
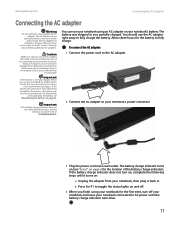
... use the AC adapter right away to disassemble the AC adapter. The battery charge indicator turns on (see "Recalibrating the battery" on : a Unplug the adapter from Gateway. If the battery charge indicator does not turn off . 4 When you partially charged. www.gateway.com Connecting the AC adapter Connecting the AC adapter Warning Do not attempt...
... use the AC adapter right away to disassemble the AC adapter. The battery charge indicator turns on (see "Recalibrating the battery" on : a Unplug the adapter from Gateway. If the battery charge indicator does not turn off . 4 When you partially charged. www.gateway.com Connecting the AC adapter Connecting the AC adapter Warning Do not attempt...
Gateway Notebook Hardware Reference
Page 19
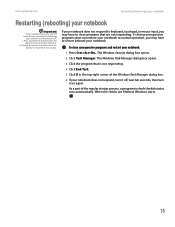
...) your notebook does not turn it on again. When the checks are not responding. www.gateway.com Restarting (rebooting) your notebook Restarting (rebooting) your notebook Important If your notebook. Unplug the power cord and remove the battery for about five seconds, then release it off, wait ten seconds, then turn off immediately...
...) your notebook does not turn it on again. When the checks are not responding. www.gateway.com Restarting (rebooting) your notebook Restarting (rebooting) your notebook Important If your notebook. Unplug the power cord and remove the battery for about five seconds, then release it off, wait ten seconds, then turn off immediately...
Gateway Notebook Hardware Reference
Page 22
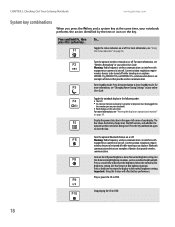
.... Current aviation regulations require wireless devices to be turned off while traveling in an airplane. The box shows the battery charge level, the BIOS version, and whether the optional wireless network is being used. Current aviation regulations require wireless devices to be... in an airplane. For more information, see "Viewing the display on a projector or monitor" on or off . CHAPTER 2: Checking Out Your Gateway Notebook www.gateway.com System key combinations When you press the FN key and a system key at the same time For more information, see "Changing Power-Saving...
.... Current aviation regulations require wireless devices to be turned off while traveling in an airplane. The box shows the battery charge level, the BIOS version, and whether the optional wireless network is being used. Current aviation regulations require wireless devices to be... in an airplane. For more information, see "Viewing the display on a projector or monitor" on or off . CHAPTER 2: Checking Out Your Gateway Notebook www.gateway.com System key combinations When you press the FN key and a system key at the same time For more information, see "Changing Power-Saving...
Gateway Notebook Hardware Reference
Page 27
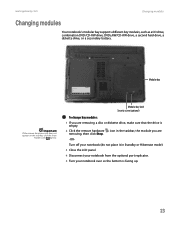
...Hours: Model: S/No: Modular bay Important If the remove hardware icon does not appear on the taskbar, click the show hidden icons button. www.gateway.com Changing modules Changing modules Your notebook's modular bay supports different bay modules, such as a CD drive, combination DVD/CD-RW drive, DVD±...RW/CD-RW drive, a second hard drive, a diskette drive, or a secondary battery. Modular bay latch Security screw (optional) To change bay modules: 1 If you are removing a disc or diskette drive, make sure that the drive is empty...
...Hours: Model: S/No: Modular bay Important If the remove hardware icon does not appear on the taskbar, click the show hidden icons button. www.gateway.com Changing modules Changing modules Your notebook's modular bay supports different bay modules, such as a CD drive, combination DVD/CD-RW drive, DVD±...RW/CD-RW drive, a second hard drive, a diskette drive, or a secondary battery. Modular bay latch Security screw (optional) To change bay modules: 1 If you are removing a disc or diskette drive, make sure that the drive is empty...
Gateway Notebook Hardware Reference
Page 35
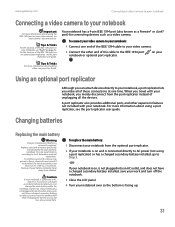
... connected directly to AC power (not using a port replicator, see your notebook from children. www.gateway.com Connecting a video camera to your notebook Connecting a video camera to local hazardous material regulations. Changing batteries Replacing the main battery Warning Danger of the IEEE 1394 port on , is not plugged into an AC outlet, and...
... connected directly to AC power (not using a port replicator, see your notebook from children. www.gateway.com Connecting a video camera to your notebook Connecting a video camera to local hazardous material regulations. Changing batteries Replacing the main battery Warning Danger of the IEEE 1394 port on , is not plugged into an AC outlet, and...
Gateway Notebook Hardware Reference
Page 36
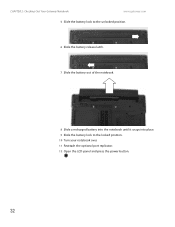
CHAPTER 2: Checking Out Your Gateway Notebook www.gateway.com 5 Slide the battery lock to the unlocked position. 6 Slide the battery release latch. 7 Slide the battery out of the notebook. 8 Slide a recharged battery into the notebook until it snaps into place. 9 Slide the battery lock to the locked position. 10 Turn your notebook over. 11 Reattach the optional port replicator. 12 Open the LCD panel and press the power button. 32
CHAPTER 2: Checking Out Your Gateway Notebook www.gateway.com 5 Slide the battery lock to the unlocked position. 6 Slide the battery release latch. 7 Slide the battery out of the notebook. 8 Slide a recharged battery into the notebook until it snaps into place. 9 Slide the battery lock to the locked position. 10 Turn your notebook over. 11 Reattach the optional port replicator. 12 Open the LCD panel and press the power button. 32
Gateway Notebook Hardware Reference
Page 37
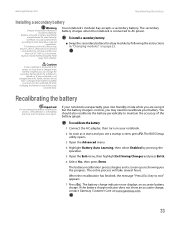
... material regulations. Recalibrating the battery Important Do not interrupt the battery recalibration process. Discard used battery promptly. The battery charge indicator now displays an accurate battery charge. Your notebook's modular bay accepts a secondary battery. The entire process will lose any unsaved data. www.gateway.com Recalibrating the battery Installing a secondary battery Warning Danger of used batteries according to exit" appears...
... material regulations. Recalibrating the battery Important Do not interrupt the battery recalibration process. Discard used battery promptly. The battery charge indicator now displays an accurate battery charge. Your notebook's modular bay accepts a secondary battery. The entire process will lose any unsaved data. www.gateway.com Recalibrating the battery Installing a secondary battery Warning Danger of used batteries according to exit" appears...
Gateway Notebook Hardware Reference
Page 38
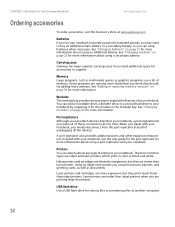
...drive, or a second hard drive to your notebook, you need additional space for more information about using a secondary battery. CHAPTER 2: Checking Out Your Gateway Notebook www.gateway.com Ordering accessories To order accessories, visit the Accessory Store at one time. You can print pictures, banners, ...are inkjet and laser printers, which print in the modular bay. See "Changing batteries" on page 31 for more information about using an additional battery. Carrying cases Gateway has large-capacity carrying cases if you merely disconnect from the port replicator instead of...
...drive, or a second hard drive to your notebook, you need additional space for more information about using a secondary battery. CHAPTER 2: Checking Out Your Gateway Notebook www.gateway.com Ordering accessories To order accessories, visit the Accessory Store at one time. You can print pictures, banners, ...are inkjet and laser printers, which print in the modular bay. See "Changing batteries" on page 31 for more information about using an additional battery. Carrying cases Gateway has large-capacity carrying cases if you merely disconnect from the port replicator instead of...

Gateway Notebook Hardware Reference
Page 40
...voltages and moving parts, turn off your notebook, unplug the power cord, modem cable, and network cable, and remove the batteries before opening the case. Important Before installing or replacing components, you are connected to replace memory modules. Memory bay Online Support...: Hours: Model: S/No: To add or replace memory modules: 1 Follow the guidelines under "Preventing static electricity discharge" on your Gateway notebook. Before installing or replacing components, follow these guidelines: ■ Avoid static-causing surfaces such as electrostatic discharge (ESD). Do not...
...voltages and moving parts, turn off your notebook, unplug the power cord, modem cable, and network cable, and remove the batteries before opening the case. Important Before installing or replacing components, you are connected to replace memory modules. Memory bay Online Support...: Hours: Model: S/No: To add or replace memory modules: 1 Follow the guidelines under "Preventing static electricity discharge" on your Gateway notebook. Before installing or replacing components, follow these guidelines: ■ Avoid static-causing surfaces such as electrostatic discharge (ESD). Do not...
Gateway Notebook Hardware Reference
Page 41
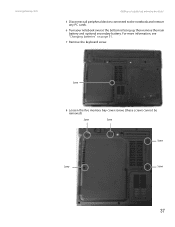
For more information, see "Changing batteries" on page 31. 7 Remove the keyboard screw. www.gateway.com Adding or replacing memory modules 5 Disconnect all peripheral devices connected to the notebook and remove any PC cards. 6 Turn your notebook over so the bottom is facing up, then remove the main battery and optional secondary battery. Screw Screw Screw Screw Screw 37 Screw 8 Loosen the five memory bay cover screws (these screws cannot be removed).
For more information, see "Changing batteries" on page 31. 7 Remove the keyboard screw. www.gateway.com Adding or replacing memory modules 5 Disconnect all peripheral devices connected to the notebook and remove any PC cards. 6 Turn your notebook over so the bottom is facing up, then remove the main battery and optional secondary battery. Screw Screw Screw Screw Screw 37 Screw 8 Loosen the five memory bay cover screws (these screws cannot be removed).
Gateway Notebook Hardware Reference
Page 44
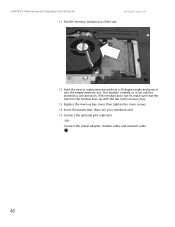
... not fit, make sure that the notch in the module lines up with the tab in one direction. CHAPTER 3: Maintaining and Upgrading Your Notebook www.gateway.com 11 Pull the memory module out of the slot. 12 Hold the new or replacement module at a 30-degree angle and press it can... only be inserted in the memory bay. 13 Replace the memory bay cover, then tighten the cover screws. 14 Insert the battery(ies), then turn your notebook over. 15 Connect the optional port replicator. -OR-
... not fit, make sure that the notch in the module lines up with the tab in one direction. CHAPTER 3: Maintaining and Upgrading Your Notebook www.gateway.com 11 Pull the memory module out of the slot. 12 Hold the new or replacement module at a 30-degree angle and press it can... only be inserted in the memory bay. 13 Replace the memory bay cover, then tighten the cover screws. 14 Insert the battery(ies), then turn your notebook over. 15 Connect the optional port replicator. -OR-


