8512936 - Gateway Notebook Reference Guide R0
Page 3
Contents Chapter 1: About This Reference 1 About this guide 2 Accessing your online User Guide 2 Gateway contact information 2 Contacting Gateway Customer Care 2 Gateway model and serial number 3 Microsoft Certificate of Authenticity 3 For more information 3 Chapter 2: Checking Out Your Notebook . . . . . 5 Front 6...Sitting at your notebook 19 Avoiding discomfort and injury from repetitive strain . . 19 Connecting the AC adapter 20 Protecting from power source problems 21 Connecting to a broadband modem or network 22 Connecting the optional dial-up modem 23 Starting your notebook ...
Contents Chapter 1: About This Reference 1 About this guide 2 Accessing your online User Guide 2 Gateway contact information 2 Contacting Gateway Customer Care 2 Gateway model and serial number 3 Microsoft Certificate of Authenticity 3 For more information 3 Chapter 2: Checking Out Your Notebook . . . . . 5 Front 6...Sitting at your notebook 19 Avoiding discomfort and injury from repetitive strain . . 19 Connecting the AC adapter 20 Protecting from power source problems 21 Connecting to a broadband modem or network 22 Connecting the optional dial-up modem 23 Starting your notebook ...

8512936 - Gateway Notebook Reference Guide R0
Page 4
... 62 Viewing the display on a projector, monitor, or television . 63 Adjusting the display properties 65 Using the projector or monitor for a presentation . . . . 66 Chapter 5: Managing Power 69 Monitoring the battery charge 70 Recharging the battery 70 Changing batteries 71 ii
... 62 Viewing the display on a projector, monitor, or television . 63 Adjusting the display properties 65 Using the projector or monitor for a presentation . . . . 66 Chapter 5: Managing Power 69 Monitoring the battery charge 70 Recharging the battery 70 Changing batteries 71 ii
8512936 - Gateway Notebook Reference Guide R0
Page 5
www.gateway.com Recalibrating the battery 72 Extending battery life 73 Maximizing battery performance 73 Conserving battery power 73 Using alternate power sources 74 Changing power modes 75 Changing notebook power settings 76 Changing the power plan 76 Changing advanced settings 78 Chapter 6: Traveling with Your Notebook ... . 81 Packing your notebook 82 Traveling by air 82 Dial-up modem 82 Radio frequency wireless connections 83 Files 83 Security 84 Power 85 Additional tips 85 Chapter 7: Maintaining Your Notebook . . . . . 87 Caring for your notebook 88 Cleaning your notebook ...
www.gateway.com Recalibrating the battery 72 Extending battery life 73 Maximizing battery performance 73 Conserving battery power 73 Using alternate power sources 74 Changing power modes 75 Changing notebook power settings 76 Changing the power plan 76 Changing advanced settings 78 Chapter 6: Traveling with Your Notebook ... . 81 Packing your notebook 82 Traveling by air 82 Dial-up modem 82 Radio frequency wireless connections 83 Files 83 Security 84 Power 85 Additional tips 85 Chapter 7: Maintaining Your Notebook . . . . . 87 Caring for your notebook 88 Cleaning your notebook ...
8512936 - Gateway Notebook Reference Guide R0
Page 6
... Memory 128 Memory card reader 129 Modem (cable or DSL 129 Modem (dial-up 129 Mouse 132 Networks (wired 133 Networks (wireless 135 Passwords 137 Power 137 Printer 138 Sound 139 Status indicators 139 Touchpad 140 Video 140 Telephone support 140 Before calling...
... Memory 128 Memory card reader 129 Modem (cable or DSL 129 Modem (dial-up 129 Mouse 132 Networks (wired 133 Networks (wireless 135 Passwords 137 Power 137 Printer 138 Sound 139 Status indicators 139 Touchpad 140 Video 140 Telephone support 140 Before calling...
8512936 - Gateway Notebook Reference Guide R0
Page 14
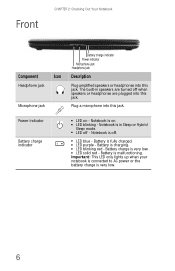
... off . ■ LED blue - Front CHAPTER 2: Checking Out Your Notebook Component Icon Headphone jack Microphone jack Battery charge indicator Power indicator Microphone jack Headphone jack Description Plug amplified speakers or headphones into this jack. Plug a microphone into this jack. Battery charge ...is very low. 6 Important: This LED only lights up when your notebook is connected to AC power or the battery charge is very low. ■ LED solid red - Power indicator Battery charge indicator ■ LED on . ■ LED blinking - Battery is malfunctioning. Battery...
... off . ■ LED blue - Front CHAPTER 2: Checking Out Your Notebook Component Icon Headphone jack Microphone jack Battery charge indicator Power indicator Microphone jack Headphone jack Description Plug amplified speakers or headphones into this jack. Plug a microphone into this jack. Battery charge ...is very low. 6 Important: This LED only lights up when your notebook is connected to AC power or the battery charge is very low. ■ LED solid red - Power indicator Battery charge indicator ■ LED on . ■ LED blinking - Battery is malfunctioning. Battery...
8512936 - Gateway Notebook Reference Guide R0
Page 18
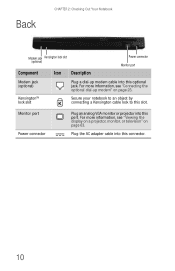
... the optional dial-up modem cable into this connector. 10 Back CHAPTER 2: Checking Out Your Notebook Modem jack Kensington lock slot (optional) Component Icon Description Power connector Monitor port Modem jack (optional) Plug a dial-up modem" on page 63. Plug the AC adapter cable into this optional jack. Kensington™ lock... slot Secure your notebook to an object by connecting a Kensington cable lock to this port. Monitor port Power connector Plug an analog VGA monitor or projector into this slot.
... the optional dial-up modem cable into this connector. 10 Back CHAPTER 2: Checking Out Your Notebook Modem jack Kensington lock slot (optional) Component Icon Description Power connector Monitor port Modem jack (optional) Plug a dial-up modem" on page 63. Plug the AC adapter cable into this optional jack. Kensington™ lock... slot Secure your notebook to an object by connecting a Kensington cable lock to this port. Monitor port Power connector Plug an analog VGA monitor or projector into this slot.
8512936 - Gateway Notebook Reference Guide R0
Page 19
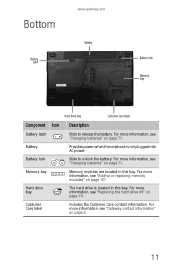
...Hard drive bay The hard drive is not plugged into AC power. Battery Provides power when the notebook is located in this bay. Customer Care label Includes the Customer Care contact information. Bottom Battery latch www.gateway.com Battery Battery lock Memory bay Hard drive bay Customer ... Memory bay Memory modules are located in this bay. For more information, see "Changing batteries" on page 71. For more information, see "Gateway contact information" on page 111. For more information, see "Replacing the hard drive kit" on page 2. 11 For more information, see "...
...Hard drive bay The hard drive is not plugged into AC power. Battery Provides power when the notebook is located in this bay. Customer Care label Includes the Customer Care contact information. Bottom Battery latch www.gateway.com Battery Battery lock Memory bay Hard drive bay Customer ... Memory bay Memory modules are located in this bay. For more information, see "Changing batteries" on page 71. For more information, see "Gateway contact information" on page 111. For more information, see "Replacing the hard drive kit" on page 2. 11 For more information, see "...
8512936 - Gateway Notebook Reference Guide R0
Page 20
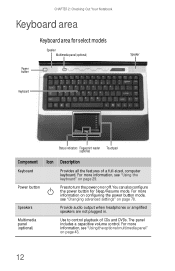
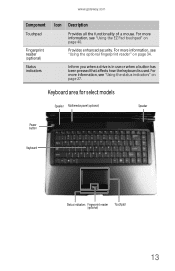
...For more information, see "Using the keyboard" on or off. You can also configure the power button for select models Speaker Multimedia panel (optional) Speaker Power button Keyboard Status indicators Fingerprint reader Touchpad (optional) Component Icon Description Keyboard Provides all the features ... 43. 12 Speakers Provide audio output when headphones or amplified speakers are not plugged in. For more information on configuring the power button mode, see "Using the optional multimedia panel" on page 78. The panel includes a capacitive volume control. CHAPTER 2:...
...For more information, see "Using the keyboard" on or off. You can also configure the power button for select models Speaker Multimedia panel (optional) Speaker Power button Keyboard Status indicators Fingerprint reader Touchpad (optional) Component Icon Description Keyboard Provides all the features ... 43. 12 Speakers Provide audio output when headphones or amplified speakers are not plugged in. For more information on configuring the power button mode, see "Using the optional multimedia panel" on page 78. The panel includes a capacitive volume control. CHAPTER 2:...
8512936 - Gateway Notebook Reference Guide R0
Page 21
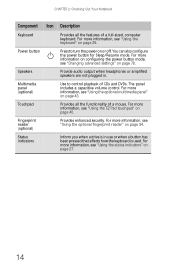
... For more information, see "Using the optional fingerprint reader" on page 34. Keyboard area for select models Speaker Multimedia panel (optional) Speaker Power button Keyboard Status indicators Fingerprint reader Touchpad (optional) 13 Provides enhanced security. For more information, see "Using the EZ Pad touchpad" on ...page 27. For more information, see "Using the status indicators" on page 40. www.gateway.com Component Touchpad Fingerprint reader (optional) Status indicators Icon Description Provides all the functionality of a mouse.
... For more information, see "Using the optional fingerprint reader" on page 34. Keyboard area for select models Speaker Multimedia panel (optional) Speaker Power button Keyboard Status indicators Fingerprint reader Touchpad (optional) 13 Provides enhanced security. For more information, see "Using the EZ Pad touchpad" on ...page 27. For more information, see "Using the status indicators" on page 40. www.gateway.com Component Touchpad Fingerprint reader (optional) Status indicators Icon Description Provides all the functionality of a mouse.
8512936 - Gateway Notebook Reference Guide R0
Page 22
...a full-sized, computer keyboard. For more information, see "Using the optional fingerprint reader" on page 43. You can also configure the power button for Sleep/Resume mode. For more information, see "Using the optional multimedia panel" on page 34. Status indicators Inform you when a... drive is used. CHAPTER 2: Checking Out Your Notebook Component Icon Description Keyboard Provides all the functionality of a mouse. Power button Press to control playback of CDs and DVDs. For more information, see "Using the keyboard" on or off. For more information, ...
...a full-sized, computer keyboard. For more information, see "Using the optional fingerprint reader" on page 43. You can also configure the power button for Sleep/Resume mode. For more information, see "Using the optional multimedia panel" on page 34. Status indicators Inform you when a... drive is used. CHAPTER 2: Checking Out Your Notebook Component Icon Description Keyboard Provides all the functionality of a mouse. Power button Press to control playback of CDs and DVDs. For more information, see "Using the keyboard" on or off. For more information, ...
8512936 - Gateway Notebook Reference Guide R0
Page 28
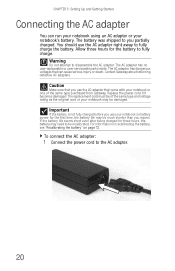
...replacement cord must be recalibrated. For information on recalibrating the battery, see "Recalibrating the battery" on battery power for the battery to be of the same type purchased from Gateway. The AC adapter has dangerous voltages that came with your notebook or one of the same type and ...three hours, the battery may be damaged. Allow three hours for the first time, the battery life may need to fully charge. Contact Gateway about returning defective AC adapters. Caution Make sure that you expect. CHAPTER 3: Setting Up and Getting Started Connecting the AC adapter You ...
...replacement cord must be recalibrated. For information on recalibrating the battery, see "Recalibrating the battery" on battery power for the battery to be of the same type purchased from Gateway. The AC adapter has dangerous voltages that came with your notebook or one of the same type and ...three hours, the battery may be damaged. Allow three hours for the first time, the battery life may need to fully charge. Contact Gateway about returning defective AC adapters. Caution Make sure that you expect. CHAPTER 3: Setting Up and Getting Started Connecting the AC adapter You ...
8512936 - Gateway Notebook Reference Guide R0
Page 29
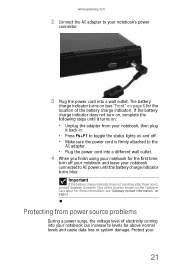
Protect your notebook's power connector. 3 Plug the power cord into a wall outlet. www.gateway.com 2 Connect the AC adapter to your 21 Important If the battery charge indicator does not turn blue after three hours, contact Gateway Customer Care at the location shown on page 2. For more information, see "Front" ...on and off. • Make sure the power cord is firmly attached to the AC adapter. • Plug the power cord into your notebook connected to levels...
Protect your notebook's power connector. 3 Plug the power cord into a wall outlet. www.gateway.com 2 Connect the AC adapter to your 21 Important If the battery charge indicator does not turn blue after three hours, contact Gateway Customer Care at the location shown on page 2. For more information, see "Front" ...on and off. • Make sure the power cord is firmly attached to the AC adapter. • Plug the power cord into your notebook connected to levels...
8512936 - Gateway Notebook Reference Guide R0
Page 30
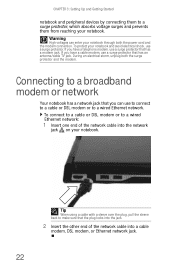
Warning High voltages can use to connect to a cable or DSL modem or to a wired Ethernet network. During an electrical storm, unplug both the power cord and the modem connection. To connect to a cable or DSL modem or to a wired Ethernet network: 1 Insert one end of the network cable into ...
Warning High voltages can use to connect to a cable or DSL modem or to a wired Ethernet network. During an electrical storm, unplug both the power cord and the modem connection. To connect to a cable or DSL modem or to a wired Ethernet network: 1 Insert one end of the network cable into ...

8512936 - Gateway Notebook Reference Guide R0
Page 32
... air vents are not obstructed. Do not use the notebook on a bed, sofa, rug, or other similar surface. Tip For more information about changing the power button mode, see "Changing advanced settings" on page 78. 3 If you are starting your notebook for the first time, follow the on-screen instructions to... 3: Setting Up and Getting Started Starting your notebook Warning Do not work with the notebook resting on your notebook: 1 Lift the LCD panel. 2 Press the power button located above the keyboard. Caution Provide adequate space around your skin.
... air vents are not obstructed. Do not use the notebook on a bed, sofa, rug, or other similar surface. Tip For more information about changing the power button mode, see "Changing advanced settings" on page 78. 3 If you are starting your notebook for the first time, follow the on-screen instructions to... 3: Setting Up and Getting Started Starting your notebook Warning Do not work with the notebook resting on your notebook: 1 Lift the LCD panel. 2 Press the power button located above the keyboard. Caution Provide adequate space around your skin.
8512936 - Gateway Notebook Reference Guide R0
Page 33
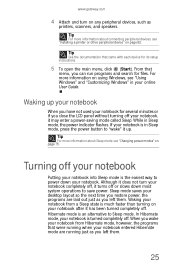
...power down most system operations to save power. Turning off your notebook Putting your notebook into Sleep mode is an alternative to "wake" it has been turned completely off , it may enter a power... desktop layout so the next time you restore power, the programs are running just as you can... Sleep mode, press the power button to Sleep mode. Although it does not ...more information about Sleep mode, see "Changing power modes" on using Windows, see "Installing a...Windows" and "Customizing Windows" in Sleep mode, the power indicator flashes. If your notebook is much faster than turning ...
...power down most system operations to save power. Turning off your notebook Putting your notebook into Sleep mode is an alternative to "wake" it has been turned completely off , it may enter a power... desktop layout so the next time you restore power, the programs are running just as you can... Sleep mode, press the power button to Sleep mode. Although it does not ...more information about Sleep mode, see "Changing power modes" on using Windows, see "Installing a...Windows" and "Customizing Windows" in Sleep mode, the power indicator flashes. If your notebook is much faster than turning ...

8512936 - Gateway Notebook Reference Guide R0
Page 34
...- Tip You can change the Sleep mode from the standard Sleep mode (default) to save power. To put your notebook to sleep: • Click (Start), then click (power). Important If for about Sleep mode, see "Changing power modes" on your notebook: 1 Press CTRL+ALT+DEL. 2 Click Start Task Manager. The ...turn off . Press FN+F3. For more information about five seconds, then release it. To turn off your notebook, press and hold the power button for some reason you may have to close unresponsive programs on page 75. The notebook saves your session and shuts down to Hybrid Sleep...
...- Tip You can change the Sleep mode from the standard Sleep mode (default) to save power. To put your notebook to sleep: • Click (Start), then click (power). Important If for about Sleep mode, see "Changing power modes" on your notebook: 1 Press CTRL+ALT+DEL. 2 Click Start Task Manager. The ...turn off . Press FN+F3. For more information about five seconds, then release it. To turn off your notebook, press and hold the power button for some reason you may have to close unresponsive programs on page 75. The notebook saves your session and shuts down to Hybrid Sleep...
8512936 - Gateway Notebook Reference Guide R0
Page 35
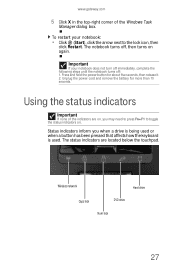
...Status indicators inform you may need to press FN+F1 to the lock icon, then click Restart. Unplug the power cord and remove the battery for about five seconds, then release it. 2. www.gateway.com 5 Click X in the top-right corner of the indicators are located below the touchpad. The status ...affects how the keyboard is used. Using the status indicators Important If none of the Windows Task Manager dialog box. Press and hold the power button for more than 10 seconds. Wireless network Hard drive Caps lock DVD drive Num lock 27 To restart your notebook does not turn ...
...Status indicators inform you may need to press FN+F1 to the lock icon, then click Restart. Unplug the power cord and remove the battery for about five seconds, then release it. 2. www.gateway.com 5 Click X in the top-right corner of the indicators are located below the touchpad. The status ...affects how the keyboard is used. Using the status indicators Important If none of the Windows Task Manager dialog box. Press and hold the power button for more than 10 seconds. Wireless network Hard drive Caps lock DVD drive Num lock 27 To restart your notebook does not turn ...
8512936 - Gateway Notebook Reference Guide R0
Page 39
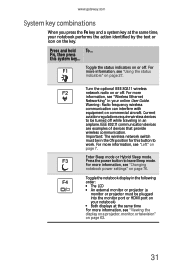
... identified by the text or icon on the key. IEEE 802.11 communication devices are examples of devices that provide wireless communication. www.gateway.com System key combinations When you press the FN key and a system key at the same time, your notebook) ■ Both... or Hybrid Sleep mode. Warning: Radio frequency wireless communication can interfere with equipment on page 27. Press the power button to work. For more information, see "Changing notebook power settings" on page 76. For more information, see "Using the status indicators" on commercial aircraft. Toggle the...
... identified by the text or icon on the key. IEEE 802.11 communication devices are examples of devices that provide wireless communication. www.gateway.com System key combinations When you press the FN key and a system key at the same time, your notebook) ■ Both... or Hybrid Sleep mode. Warning: Radio frequency wireless communication can interfere with equipment on page 27. Press the power button to work. For more information, see "Changing notebook power settings" on page 76. For more information, see "Using the status indicators" on commercial aircraft. Toggle the...

8512936 - Gateway Notebook Reference Guide R0
Page 72
CHAPTER 4: Using Drives and Accessories 3 Plug the other end of the VGA cable into the monitor port on your notebook. -ORPlug the other end of the HDMI cable into the optional HDMI port on your notebook. 4 Turn on your notebook. 5 Plug the projector's, monitor's, or television's power cord into an AC power source and turn it on. Windows recognizes the new hardware and the New Display Detected dialog box opens. 6 Select the options for the projector, monitor, or television, then click OK. 64
CHAPTER 4: Using Drives and Accessories 3 Plug the other end of the VGA cable into the monitor port on your notebook. -ORPlug the other end of the HDMI cable into the optional HDMI port on your notebook. 4 Turn on your notebook. 5 Plug the projector's, monitor's, or television's power cord into an AC power source and turn it on. Windows recognizes the new hardware and the New Display Detected dialog box opens. 6 Select the options for the projector, monitor, or television, then click OK. 64
8512936 - Gateway Notebook Reference Guide R0
Page 77
CHAPTER5 Managing Power • Monitoring the battery charge • Recharging the battery • Recalibrating the battery • Extending battery life • Changing notebook power settings 69
CHAPTER5 Managing Power • Monitoring the battery charge • Recharging the battery • Recalibrating the battery • Extending battery life • Changing notebook power settings 69


