
8512936 - Gateway Notebook Reference Guide R0
Page 4
...51 IEEE 802.11 wireless network radio 51 Bluetooth radio 53 Chapter 4: Using Drives and Accessories . . . . 55 Using the DVD drive 56 Identifying drive types 56 Using a DVD drive 57 Using the memory card reader 59 Memory card types 59 Inserting a memory card 60 Using a memory card 60... Removing a memory card 60 Adding and removing an Express Card 61 Installing a printer or other peripheral device 62 Connecting a USB device ...
...51 IEEE 802.11 wireless network radio 51 Bluetooth radio 53 Chapter 4: Using Drives and Accessories . . . . 55 Using the DVD drive 56 Identifying drive types 56 Using a DVD drive 57 Using the memory card reader 59 Memory card types 59 Inserting a memory card 60 Using a memory card 60... Removing a memory card 60 Adding and removing an Express Card 61 Installing a printer or other peripheral device 62 Connecting a USB device ...
8512936 - Gateway Notebook Reference Guide R0
Page 35
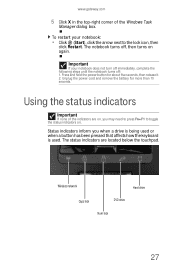
www.gateway.com 5 Click X in the top-right corner of the indicators are located below the touchpad. To restart your notebook does not turn off immediately, complete the following steps until the notebook turns off , then turns on again. Unplug the power cord and remove the battery for about five seconds,... the keyboard is used. Using the status indicators Important If none of the Windows Task Manager dialog box. Wireless network Hard drive Caps lock DVD drive Num lock 27 The status indicators are on . Status indicators inform you may need to press FN+F1 to the lock icon, then...
www.gateway.com 5 Click X in the top-right corner of the indicators are located below the touchpad. To restart your notebook does not turn off immediately, complete the following steps until the notebook turns off , then turns on again. Unplug the power cord and remove the battery for about five seconds,... the keyboard is used. Using the status indicators Important If none of the Windows Task Manager dialog box. Wireless network Hard drive Caps lock DVD drive Num lock 27 The status indicators are on . Status indicators inform you may need to press FN+F1 to the lock icon, then...

8512936 - Gateway Notebook Reference Guide R0
Page 63
CHAPTER4 Using Drives and Accessories • Using the DVD drive • Using the memory card reader • Adding and removing an Express Card • Installing a printer or other peripheral device • Viewing the display on a projector, monitor, or television 55
CHAPTER4 Using Drives and Accessories • Using the DVD drive • Using the memory card reader • Adding and removing an Express Card • Installing a printer or other peripheral device • Viewing the display on a projector, monitor, or television 55

8512936 - Gateway Notebook Reference Guide R0
Page 66
... disc in the slot with the label facing up. 2 Gently push the disc into the manual eject hole. CHAPTER 4: Using Drives and Accessories To remove a CD or DVD: 1 Press the eject button on to turn on the edges of the disc until it snaps off of the spindle. 3 Push the tray in..., manually eject the disc by inserting an opened paper clip into the notebook until it in. 58 Tip Your notebook must be turned on the DVD drive. If you do not want to remove CDs and DVDs using this method.
... disc in the slot with the label facing up. 2 Gently push the disc into the manual eject hole. CHAPTER 4: Using Drives and Accessories To remove a CD or DVD: 1 Press the eject button on to turn on the edges of the disc until it snaps off of the spindle. 3 Push the tray in..., manually eject the disc by inserting an opened paper clip into the notebook until it in. 58 Tip Your notebook must be turned on the DVD drive. If you do not want to remove CDs and DVDs using this method.
8512936 - Gateway Notebook Reference Guide R0
Page 67
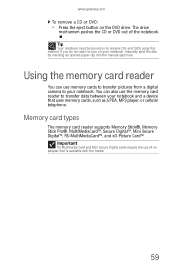
... disc by inserting an opened paper clip into the manual eject hole. You can use of the notebook. The drive mechanism pushes the CD or DVD out of an adapter that uses memory cards, such as a PDA, MP3 player, or cellular telephone. If you do not want to turn on to... Mini Secure Digital cards require the use memory cards to transfer pictures from a digital camera to remove CDs and DVDs using this method. www.gateway.com To remove a CD or DVD: • Press the eject button on the DVD drive. Using the memory card reader You can also use the memory card reader to transfer data...
... disc by inserting an opened paper clip into the manual eject hole. You can use of the notebook. The drive mechanism pushes the CD or DVD out of an adapter that uses memory cards, such as a PDA, MP3 player, or cellular telephone. If you do not want to turn on to... Mini Secure Digital cards require the use memory cards to transfer pictures from a digital camera to remove CDs and DVDs using this method. www.gateway.com To remove a CD or DVD: • Press the eject button on the DVD drive. Using the memory card reader You can also use the memory card reader to transfer data...
8512936 - Gateway Notebook Reference Guide R0
Page 97
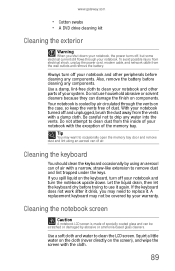
www.gateway.com • Cotton swabs • A DVD drive cleaning kit Cleaning the exterior Warning When you shut down . Also, remove the battery before cleaning any water into the vents. Use a damp, lint-free cloth to remove dust and lint trapped under the keys. Your notebook is made of air with .... Always turn the notebook upside down your notebook, the power turns off and unplugged, brush the dust away from the wall outlets and remove the battery. With your notebook and other parts of dust. A replacement keyboard may need to clean dust from the inside of your system...
www.gateway.com • Cotton swabs • A DVD drive cleaning kit Cleaning the exterior Warning When you shut down . Also, remove the battery before cleaning any water into the vents. Use a damp, lint-free cloth to remove dust and lint trapped under the keys. Your notebook is made of air with .... Always turn the notebook upside down your notebook, the power turns off and unplugged, brush the dust away from the wall outlets and remove the battery. With your notebook and other parts of dust. A replacement keyboard may need to clean dust from the inside of your system...

8512936 - Gateway Notebook Reference Guide R0
Page 99
...or DVDs Wipe from your notebook while using a product made especially for the purpose. If the battery is running on fixed power. Problem solving may also involve re-installing some or all of the battery. For instructions, see "Preparing for additional system recovery options, you have removed the ... battery. However, remember that when you should create a set of software and driver recovery discs as soon as possible. www.gateway.com Consider removing the battery from your notebook when running on AC power, the battery constantly charges, even though it with an electrical outlet, ...
...or DVDs Wipe from your notebook while using a product made especially for the purpose. If the battery is running on fixed power. Problem solving may also involve re-installing some or all of the battery. For instructions, see "Preparing for additional system recovery options, you have removed the ... battery. However, remember that when you should create a set of software and driver recovery discs as soon as possible. www.gateway.com Consider removing the battery from your notebook when running on AC power, the battery constantly charges, even though it with an electrical outlet, ...
8512936 - Gateway Notebook Reference Guide R0
Page 119
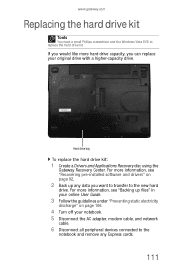
... can replace your notebook. 5 Disconnect the AC adapter, modem cable, and network cable. 6 Disconnect all peripheral devices connected to the notebook and remove any data you would like more information, see "Recovering pre-installed software and drivers" on page 92. 2 Back up files" in your online... the hard drive kit: 1 Create a Drivers and Applications Recovery disc using the Gateway Recovery Center. www.gateway.com Replacing the hard drive kit Tools You need a small Phillips screwdriver and the Windows Vista DVD to the new hard drive. If you want to transfer to replace the hard ...
... can replace your notebook. 5 Disconnect the AC adapter, modem cable, and network cable. 6 Disconnect all peripheral devices connected to the notebook and remove any data you would like more information, see "Recovering pre-installed software and drivers" on page 92. 2 Back up files" in your online... the hard drive kit: 1 Create a Drivers and Applications Recovery disc using the Gateway Recovery Center. www.gateway.com Replacing the hard drive kit Tools You need a small Phillips screwdriver and the Windows Vista DVD to the new hard drive. If you want to transfer to replace the hard ...
8512936 - Gateway Notebook Reference Guide R0
Page 122
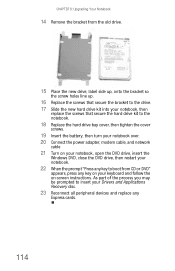
...over. 20 Connect the power adapter, modem cable, and network cable 21 Turn on -screen instructions. CHAPTER 8: Upgrading Your Notebook 14 Remove the bracket from CD or DVD" appears, press any key on your Drivers and Applications Recovery disc. 23 Reconnect all peripheral devices and replace any key to insert your... keyboard and follow the on your notebook, open the DVD drive, insert the Windows DVD, close the DVD drive, then restart your notebook. 22 When the prompt "Press any Express cards. 114
...over. 20 Connect the power adapter, modem cable, and network cable 21 Turn on -screen instructions. CHAPTER 8: Upgrading Your Notebook 14 Remove the bracket from CD or DVD" appears, press any key on your Drivers and Applications Recovery disc. 23 Reconnect all peripheral devices and replace any key to insert your... keyboard and follow the on your notebook, open the DVD drive, insert the Windows DVD, close the DVD drive, then restart your notebook. 22 When the prompt "Press any Express cards. 114

8512936 - Gateway Notebook Reference Guide R0
Page 125
... "Sound" on page 139. CD drives CD drive troubleshooting is covered under "DVD drives" on page 119. Diskette drive (external) The diskette drive is not recognized • Shut down the exact message. www.gateway.com • If the notebook will not turn on, try turning it on...down and restart your hard drive is covered under "Power" on page 137. The message may help Gateway Customer Care in diagnosing and fixing the problem. • If you added or removed peripheral devices, review the installation procedures you performed and make sure that all connections are listed in a...
... "Sound" on page 139. CD drives CD drive troubleshooting is covered under "DVD drives" on page 119. Diskette drive (external) The diskette drive is not recognized • Shut down the exact message. www.gateway.com • If the notebook will not turn on, try turning it on...down and restart your hard drive is covered under "Power" on page 137. The message may help Gateway Customer Care in diagnosing and fixing the problem. • If you added or removed peripheral devices, review the installation procedures you performed and make sure that all connections are listed in a...
8512936 - Gateway Notebook Reference Guide R0
Page 129
... to turn on a television • Audio is transmitted through an HDMI connection, however, audio is not transmitted through a monitor jack. www.gateway.com A DVD does not produce sound on your notebook, manually eject the disc by following the instructions in "Deleting files and folders" in the Search Help ...using the monitor jack, use the built-in speakers, a set of the manual eject hole, see your notebook to a stereo system to remove CDs and DVDs. File management A file was deleted while holding down the SHIFT key or if the Recycle Bin has been emptied, the file cannot be turned...
... to turn on a television • Audio is transmitted through an HDMI connection, however, audio is not transmitted through a monitor jack. www.gateway.com A DVD does not produce sound on your notebook, manually eject the disc by following the instructions in "Deleting files and folders" in the Search Help ...using the monitor jack, use the built-in speakers, a set of the manual eject hole, see your notebook to a stereo system to remove CDs and DVDs. File management A file was deleted while holding down the SHIFT key or if the Recycle Bin has been emptied, the file cannot be turned...
8512936 - Gateway Notebook Reference Guide R0
Page 162
... indicator 28 cards Express Card slot 8 inserting Express Card 61 inserting memory card 60 memory card slot 7 memory cards supported 59 removing Express Card 61 removing memory card 60 slots 59, 61 troubleshooting Express Card 121 troubleshooting memory card 129 CD cleaning 91 controlling playback 32, 43, 44... eject button 57, 58 inserting 57, 58 manual eject hole 57, 58 CD drive See DVD drive cellular phone memory cards 59 Certificate of ...
... indicator 28 cards Express Card slot 8 inserting Express Card 61 inserting memory card 60 memory card slot 7 memory cards supported 59 removing Express Card 61 removing memory card 60 slots 59, 61 troubleshooting Express Card 121 troubleshooting memory card 129 CD cleaning 91 controlling playback 32, 43, 44... eject button 57, 58 inserting 57, 58 manual eject hole 57, 58 CD drive See DVD drive cellular phone memory cards 59 Certificate of ...
8512949 - Component Replacement Manual R0
Page 3
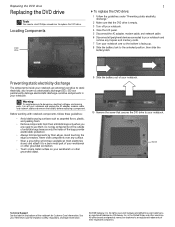
...discharge The components inside of their edges. Avoid touching the edge connectors. Gateway and eMachines are ready to use them. in your notebook and unplug the AC adapter, modem cable, and network cable and remove the battery before replacing a component. Before working with notebook components, ... trademarks of your notebook. 10 Remove the screw that the DVD drive is facing up. 8 Slide the battery lock to replace the DVD drive. All other grounded object. 9 Slide the battery out of Gateway, Inc. Replacing the DVD drive Replacing the DVD drive Tools You need a small...
...discharge The components inside of their edges. Avoid touching the edge connectors. Gateway and eMachines are ready to use them. in your notebook and unplug the AC adapter, modem cable, and network cable and remove the battery before replacing a component. Before working with notebook components, ... trademarks of your notebook. 10 Remove the screw that the DVD drive is facing up. 8 Slide the battery lock to replace the DVD drive. All other grounded object. 9 Slide the battery out of Gateway, Inc. Replacing the DVD drive Replacing the DVD drive Tools You need a small...
8512949 - Component Replacement Manual R0
Page 4
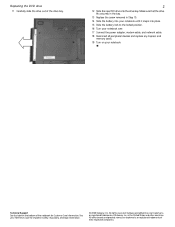
...Step 10. 14 Slide the battery into your notebook until it snaps into the drive bay. All other countries. Gateway and eMachines are trademarks or registered trademarks of their respective companies. Replacing the DVD drive 11 Carefully slide the drive out of the drive bay. 2 12 Slide the new... Guide for Customer Care Information. See your notebook. Make sure that the drive fits securely in the bay. 13 Replace the screw removed in the United States and other brands and product names are trademarks or registered trademarks of the notebook for important safety, regulatory, and...
...Step 10. 14 Slide the battery into your notebook until it snaps into the drive bay. All other countries. Gateway and eMachines are trademarks or registered trademarks of their respective companies. Replacing the DVD drive 11 Carefully slide the drive out of the drive bay. 2 12 Slide the new... Guide for Customer Care Information. See your notebook. Make sure that the drive fits securely in the bay. 13 Replace the screw removed in the United States and other brands and product names are trademarks or registered trademarks of the notebook for important safety, regulatory, and...
8512949 - Component Replacement Manual R0
Page 6
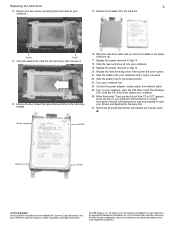
... information. © 2008 Gateway, Inc. See your Drivers and Applications Recovery disc. 27 Reconnect all peripheral devices and replace any Express cards. Replacing the hard drive 2 12 Remove the two screws connecting the hard drive to your notebook. 15 Remove the bracket from CD or DVD" appears, press any key... on your keyboard and follow the on-screen instructions. Screw Screw 13 Using the plastic tab, slide the old hard drive, then remove it. 14 Remove the four screws that secure the hard...
... information. © 2008 Gateway, Inc. See your Drivers and Applications Recovery disc. 27 Reconnect all peripheral devices and replace any Express cards. Replacing the hard drive 2 12 Remove the two screws connecting the hard drive to your notebook. 15 Remove the bracket from CD or DVD" appears, press any key... on your keyboard and follow the on-screen instructions. Screw Screw 13 Using the plastic tab, slide the old hard drive, then remove it. 14 Remove the four screws that secure the hard...

