8512149 - Gateway Notebook User Guide for Windows Vista
Page 5
... Adjusting tablet, digital pen, and input panel settings 80 Adding and modifying user accounts 81 Changing accessibility settings 82 Using the Ease of Access Center 82 Using voice recognition 83 Using the Windows Mobility Center 84 Setting up parental controls 86 Filtering Internet access 86 Scheduling notebook and Internet use 87 Restricting game access 87 Restricting specific programs 89 Creating activity reports 89 Chapter 8: Maintaining Your Notebook 91 Setting up a maintenance schedule 92 Updating Windows 92 Using BigFix 92 Managing hard drive...
... Adjusting tablet, digital pen, and input panel settings 80 Adding and modifying user accounts 81 Changing accessibility settings 82 Using the Ease of Access Center 82 Using voice recognition 83 Using the Windows Mobility Center 84 Setting up parental controls 86 Filtering Internet access 86 Scheduling notebook and Internet use 87 Restricting game access 87 Restricting specific programs 89 Creating activity reports 89 Chapter 8: Maintaining Your Notebook 91 Setting up a maintenance schedule 92 Updating Windows 92 Using BigFix 92 Managing hard drive...
8512149 - Gateway Notebook User Guide for Windows Vista
Page 52
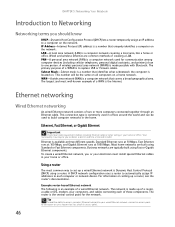
... to set up of creating a LAN. To create a wired Ethernet network, you or your wired Ethernet network, connect an access point to the router or use a router that covers a broad geographical area. The primary purpose of a WAN is to replace USB or Firewire cables. CHAPTER 5: Networking Your Notebook Introduction to Networking Networking terms you to obtain a permit and hire a licensed installer. LAN-A local area network (LAN) is Dynamic Host Control Protocol (DHCP) using...
... to set up of creating a LAN. To create a wired Ethernet network, you or your wired Ethernet network, connect an access point to the router or use a router that covers a broad geographical area. The primary purpose of a WAN is to replace USB or Firewire cables. CHAPTER 5: Networking Your Notebook Introduction to Networking Networking terms you to obtain a permit and hire a licensed installer. LAN-A local area network (LAN) is Dynamic Host Control Protocol (DHCP) using...
8512149 - Gateway Notebook User Guide for Windows Vista
Page 60
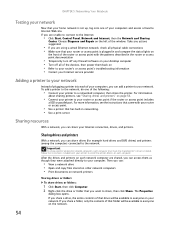
... port. Take any firewall software on your desktop computer • Turn off all physical cable connections • Make sure that you want to your computer. Sharing drives and printers With a network, you can share your Internet connection, drives, and printers. Then you can share drives (for example hard drives and DVD drives) and printers among the network computers, each network computer are unable to connect to your network. CHAPTER 5: Networking Your Notebook...
... port. Take any firewall software on your desktop computer • Turn off all physical cable connections • Make sure that you want to your computer. Sharing drives and printers With a network, you can share your Internet connection, drives, and printers. Then you can share drives (for example hard drives and DVD drives) and printers among the network computers, each network computer are unable to connect to your network. CHAPTER 5: Networking Your Notebook...
8512149 - Gateway Notebook User Guide for Windows Vista
Page 84
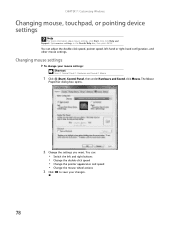
...; Change the pointer appearance and speed • Change the mouse wheel actions 3 Click OK to save your mouse settings: Shortcut Start Ö Control Panel Ö Hardware and Sound Ö Mouse 1 Click (Start), Control Panel, then under Hardware and Sound, click Mouse. CHAPTER 7: Customizing Windows Changing mouse, touchpad, or pointing device settings Help For more information about mouse settings, click Start, then click Help and Support. Type mouse settings in the Search Help box, then press ENTER. The Mouse Properties dialog box opens. 2 Change the settings...
...; Change the pointer appearance and speed • Change the mouse wheel actions 3 Click OK to save your mouse settings: Shortcut Start Ö Control Panel Ö Hardware and Sound Ö Mouse 1 Click (Start), Control Panel, then under Hardware and Sound, click Mouse. CHAPTER 7: Customizing Windows Changing mouse, touchpad, or pointing device settings Help For more information about mouse settings, click Start, then click Help and Support. Type mouse settings in the Search Help box, then press ENTER. The Mouse Properties dialog box opens. 2 Change the settings...
8512936 - Gateway Notebook Reference Guide R0
Page 5
... your notebook 88 Cleaning the exterior 89 Cleaning the keyboard 89 Cleaning the notebook screen 89 Maintaining the battery 90 Storing batteries 90 Cleaning CDs or DVDs 91 Recovering your system 91 Recovering pre-installed software and drivers 92 Using Microsoft System Restore 99 Recovering your system to its factory condition . . . . . .102 Recovering your system using the Windows DVD . . . . .103 Chapter 8: Upgrading Your Notebook . . . . . 105 Preventing static electricity discharge 106 Adding or replacing memory modules...
... your notebook 88 Cleaning the exterior 89 Cleaning the keyboard 89 Cleaning the notebook screen 89 Maintaining the battery 90 Storing batteries 90 Cleaning CDs or DVDs 91 Recovering your system 91 Recovering pre-installed software and drivers 92 Using Microsoft System Restore 99 Recovering your system to its factory condition . . . . . .102 Recovering your system using the Windows DVD . . . . .103 Chapter 8: Upgrading Your Notebook . . . . . 105 Preventing static electricity discharge 106 Adding or replacing memory modules...
8512936 - Gateway Notebook Reference Guide R0
Page 15
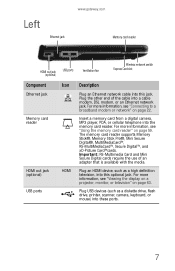
...;cards. Plug USB devices (such as a high definition television, into these ports. 7 Plug the other end of an adapter that is available with the media. Plug an HDMI device, such as a diskette drive, flash drive, printer, scanner, camera, keyboard, or mouse) into this jack. Important: RS-Multimedia Card and Mini Secure Digital cards require the use of the cable into the memory card reader. For more information, see "Viewing the display on a projector, monitor...
...;cards. Plug USB devices (such as a high definition television, into these ports. 7 Plug the other end of an adapter that is available with the media. Plug an HDMI device, such as a diskette drive, flash drive, printer, scanner, camera, keyboard, or mouse) into this jack. Important: RS-Multimedia Card and Mini Secure Digital cards require the use of the cable into the memory card reader. For more information, see "Viewing the display on a projector, monitor...

8512936 - Gateway Notebook Reference Guide R0
Page 92
...; Write down your notebook model number and serial number (located on boot, then press ENTER. 84 You must enter the Supervisor Password each time you use the BIOS Setup utility. 3 Highlight Set User Password, then press ENTER and follow the instructions. Be ready to claim your notebook was turned off or put in hibernate mode. Caution Use a password that you see your notebook. As soon as it was put in Sleep mode. 4 Highlight Password on the bottom of...
...; Write down your notebook model number and serial number (located on boot, then press ENTER. 84 You must enter the Supervisor Password each time you use the BIOS Setup utility. 3 Highlight Set User Password, then press ENTER and follow the instructions. Be ready to claim your notebook was turned off or put in hibernate mode. Caution Use a password that you see your notebook. As soon as it was put in Sleep mode. 4 Highlight Password on the bottom of...
8512936 - Gateway Notebook Reference Guide R0
Page 100
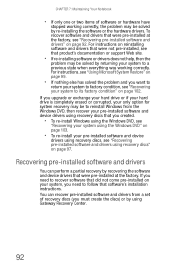
... state when everything was working correctly, the problem may be to reinstall Windows from a set of software or hardware have stopped working correctly. CHAPTER 7: Maintaining Your Notebook • If only one or two items of recovery discs (you created. • To re-install Windows using the Windows DVD, see "Recovering your system using the Windows DVD" on your system, you upgrade or exchange your hard drive or if your hard drive is completely erased or...
... state when everything was working correctly, the problem may be to reinstall Windows from a set of software or hardware have stopped working correctly. CHAPTER 7: Maintaining Your Notebook • If only one or two items of recovery discs (you created. • To re-install Windows using the Windows DVD, see "Recovering your system using the Windows DVD" on your system, you upgrade or exchange your hard drive or if your hard drive is completely erased or...
8512936 - Gateway Notebook Reference Guide R0
Page 101
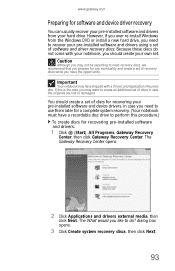
... have shipped with your notebook, you should create a set of discs for recovering your hard drive. The Gateway Recovery Center opens. 2 Click Applications and drivers external media, then click Next. www.gateway.com Preparing for any eventuality and create a set of recovery discs while you have the opportunity. Caution Although you prepare for software and device driver recovery You can usually recover your pre-installed software and drivers from the Windows DVD or install a new hard drive, you need recovery discs, we recommend that you...
... have shipped with your notebook, you should create a set of discs for recovering your hard drive. The Gateway Recovery Center opens. 2 Click Applications and drivers external media, then click Next. www.gateway.com Preparing for any eventuality and create a set of recovery discs while you have the opportunity. Caution Although you prepare for software and device driver recovery You can usually recover your pre-installed software and drivers from the Windows DVD or install a new hard drive, you need recovery discs, we recommend that you...
8512936 - Gateway Notebook Reference Guide R0
Page 111
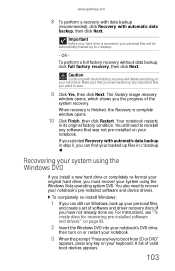
... notebook's DVD drive, then turn on or restart your notebook. 3 When the prompt "Press any key to c:\backup. - To perform a full factory recovery without data backup, click Full factory recovery, then click Next. OR - The Factory image recovery window opens, which shows you want to recover your notebook's pre-installed software and device drivers. If you selected Recovery with automatic data backup in step 8, you must recover your keyboard. Recovering your system using the Windows Vista operating system DVD. Important Before your hard drive...
... notebook's DVD drive, then turn on or restart your notebook. 3 When the prompt "Press any key to c:\backup. - To perform a full factory recovery without data backup, click Full factory recovery, then click Next. OR - The Factory image recovery window opens, which shows you want to recover your notebook's pre-installed software and device drivers. If you selected Recovery with automatic data backup in step 8, you must recover your keyboard. Recovering your system using the Windows Vista operating system DVD. Important Before your hard drive...
8512936 - Gateway Notebook Reference Guide R0
Page 128
... User Guide. An audio CD does not produce sound • Make sure that a DVD player program has been installed on your notebook. • Make sure that Mute controls are turned off. • If you are plugged in Windows, see "Adjusting the volume" on page 49. • Make sure that the volume control on your notebook. • Your notebook may be experiencing some temporary memory problems. Shut down and restart your DVD drive's regional code...
... User Guide. An audio CD does not produce sound • Make sure that a DVD player program has been installed on your notebook. • Make sure that Mute controls are turned off. • If you are plugged in Windows, see "Adjusting the volume" on page 49. • Make sure that the volume control on your notebook. • Your notebook may be experiencing some temporary memory problems. Shut down and restart your DVD drive's regional code...
8512936 - Gateway Notebook Reference Guide R0
Page 131
...; If your notebook. You see an "Unable to the Internet • If you are using a cable or DSL modem, make sure that your account with your network jack, see "Replacing the hard drive kit" on page 10. -OR- For more information about removing your hard drive, see "Left" on page 129. • Make sure that the modem cable is installed correctly. Type the keyword troubleshooting connections in the Search...
...; If your notebook. You see an "Unable to the Internet • If you are using a cable or DSL modem, make sure that your account with your network jack, see "Replacing the hard drive kit" on page 10. -OR- For more information about removing your hard drive, see "Left" on page 129. • Make sure that the modem cable is installed correctly. Type the keyword troubleshooting connections in the Search...
8512936 - Gateway Notebook Reference Guide R0
Page 136
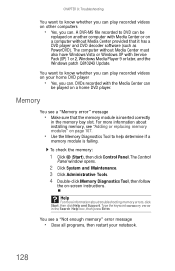
... have Windows Vista or Windows XP with Service Pack (SP) 1 or 2, Windows Media Player 9 or later, and the Windows patch Q810243 Update. Help For more information about troubleshooting memory errors, click Start, then click Help and Support. You see "Adding or replacing memory modules" on page 107. • Use the Memory Diagnostics Tool to help determine if a memory module is inserted correctly in the Search Help box, then press ENTER. A DVR...
... have Windows Vista or Windows XP with Service Pack (SP) 1 or 2, Windows Media Player 9 or later, and the Windows patch Q810243 Update. Help For more information about troubleshooting memory errors, click Start, then click Help and Support. You see "Adding or replacing memory modules" on page 107. • Use the Memory Diagnostics Tool to help determine if a memory module is inserted correctly in the Search Help box, then press ENTER. A DVR...
8512936 - Gateway Notebook Reference Guide R0
Page 145
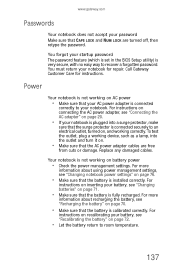
... BIOS Setup utility) is connected securely to an electrical outlet, turned on . • Make sure that the AC power adapter cables are turned off, then retype the password. Replace any damaged cables. You forgot your notebook is plugged into the outlet and turn it on , and working correctly. For more information about using power management settings, see "Recalibrating the battery" on AC power • Make sure that your password Make sure that CAPS LOCK and NUM LOCK...
... BIOS Setup utility) is connected securely to an electrical outlet, turned on . • Make sure that the AC power adapter cables are turned off, then retype the password. Replace any damaged cables. You forgot your notebook is plugged into the outlet and turn it on , and working correctly. For more information about using power management settings, see "Recalibrating the battery" on AC power • Make sure that your password Make sure that CAPS LOCK and NUM LOCK...
8512936 - Gateway Notebook Reference Guide R0
Page 146
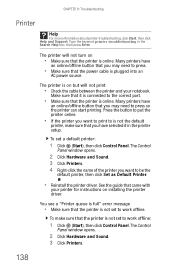
... Support. The Control Panel window opens. 2 Click Hardware and Sound. 3 Click Printers. 138 Make sure that the printer is not set a default printer: 1 Click (Start), then click Control Panel. See the guide that the printer is connected to work offline: 1 Click (Start), then click Control Panel. Type the keyword printer troubleshooting in the printer setup. The Control Panel window opens. 2 Click Hardware and Sound. 3 Click Printers. 4 Right-click the name of the printer you may need to work offline. To set...
... Support. The Control Panel window opens. 2 Click Hardware and Sound. 3 Click Printers. 138 Make sure that the printer is not set a default printer: 1 Click (Start), then click Control Panel. See the guide that the printer is connected to work offline: 1 Click (Start), then click Control Panel. Type the keyword printer troubleshooting in the printer setup. The Control Panel window opens. 2 Click Hardware and Sound. 3 Click Printers. 4 Right-click the name of the printer you may need to work offline. To set...
8512936 - Gateway Notebook Reference Guide R0
Page 161
... managing power 73 maximizing performance 73 monitoring charge 70 recalibrating 72 recharging 20, 70 release latch 11 replacing 71 storing 90 troubleshooting 137 bays battery 71 hard drive 11 memory 11, 107 BIOS Setup utility 72 Bluetooth system key 32 turning off 32, 53 turning on 32, 53 brightness adjusting 32, 33, 48 system keys 33 broadband modem connecting 22 button Effects 46 Help 46 Properties 46 settings 46 Snapshot 47 Start camera 46 buttons multimedia panel...
... managing power 73 maximizing performance 73 monitoring charge 70 recalibrating 72 recharging 20, 70 release latch 11 replacing 71 storing 90 troubleshooting 137 bays battery 71 hard drive 11 memory 11, 107 BIOS Setup utility 72 Bluetooth system key 32 turning off 32, 53 turning on 32, 53 brightness adjusting 32, 33, 48 system keys 33 broadband modem connecting 22 button Effects 46 Help 46 Properties 46 settings 46 Snapshot 47 Start camera 46 buttons multimedia panel...

8512936 - Gateway Notebook Reference Guide R0
Page 165
...wireless Ethernet 31 L labels Customer Care 11 Microsoft Certificate of Authenticity 3 model number 2 serial number 2 latch battery 11 LCD panel cleaning 89 switching display 31 troubleshooting 118 LCD/CRT system key 31 line protector 82 line tester 82 lock cable 84 Kensington cable 10 M maintenance cleaning 88, 91 Media Center 43, 44 troubleshooting 125 media reader See memory card reader memory bay 11 installing 107 removing 107 replacing 107 troubleshooting 128 memory card reader inserting card 60 locating 7 memory cards supported 59 removing card 60 troubleshooting 129 using 59 microphone...
...wireless Ethernet 31 L labels Customer Care 11 Microsoft Certificate of Authenticity 3 model number 2 serial number 2 latch battery 11 LCD panel cleaning 89 switching display 31 troubleshooting 118 LCD/CRT system key 31 line protector 82 line tester 82 lock cable 84 Kensington cable 10 M maintenance cleaning 88, 91 Media Center 43, 44 troubleshooting 125 media reader See memory card reader memory bay 11 installing 107 removing 107 replacing 107 troubleshooting 128 memory card reader inserting card 60 locating 7 memory cards supported 59 removing card 60 troubleshooting 129 using 59 microphone...
8512936 - Gateway Notebook Reference Guide R0
Page 167
... notebook 25 turning on notebook 24 printer default 138 installing 62 troubleshooting 138 USB port 7, 9 programs closing unresponsive 26 opening 41 recovery discs 93, 97 re-installing 92 projector adding 63 color quality 66 port 10 screen resolution 66 troubleshooting 140 using 31, 66 Properties button 46 R radio approval authorities 83 radio frequency wireless connections 83 RAM See memory rebooting notebook 26 recalibrating battery 72 recharging battery 70 recovering defaults 102 drivers 92 programs 92 software 92 system 91 Windows...
... notebook 25 turning on notebook 24 printer default 138 installing 62 troubleshooting 138 USB port 7, 9 programs closing unresponsive 26 opening 41 recovery discs 93, 97 re-installing 92 projector adding 63 color quality 66 port 10 screen resolution 66 troubleshooting 140 using 31, 66 Properties button 46 R radio approval authorities 83 radio frequency wireless connections 83 RAM See memory rebooting notebook 26 recalibrating battery 72 recharging battery 70 recovering defaults 102 drivers 92 programs 92 software 92 system 91 Windows...
8512936 - Gateway Notebook Reference Guide R0
Page 168
... Sleep mode 25, 31, 75 system key 31 Snapshot button 47 160 SO-DIMM See memory software recovery discs 93, 97 re-installing 92 sound adjusting 33, 49 controls 49 muting 33, 44, 45, 49 troubleshooting 139 speakers built-in 12, 14 jack 6 SpeedStep technology 76 Start camera button 46 starting notebook 24 programs 41 startup password 84 static electricity 106 status indicator wireless Ethernet 28 status indicators battery charge 6, 70 Caps Lock 28 CD drive 28 disc drive 28 drive activity...
... Sleep mode 25, 31, 75 system key 31 Snapshot button 47 160 SO-DIMM See memory software recovery discs 93, 97 re-installing 92 sound adjusting 33, 49 controls 49 muting 33, 44, 45, 49 troubleshooting 139 speakers built-in 12, 14 jack 6 SpeedStep technology 76 Start camera button 46 starting notebook 24 programs 41 startup password 84 static electricity 106 status indicator wireless Ethernet 28 status indicators battery charge 6, 70 Caps Lock 28 CD drive 28 disc drive 28 drive activity...
8512949 - Component Replacement Manual R0
Page 6
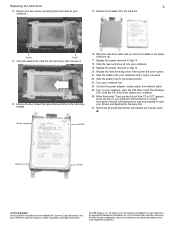
... Replace the hard drive bay cover, then tighten the cover screws. 21 Slide the battery into your notebook until it snaps into place. 22 Slide the battery lock to the locked position. 23 Turn your notebook over. 24 Connect the power adapter, modem cable, and network cable 25 Turn on your notebook, open the DVD drive, insert the Windows DVD, close the DVD drive, then restart your notebook. 26 When the prompt "Press any key to insert your notebook. 15 Remove...
... Replace the hard drive bay cover, then tighten the cover screws. 21 Slide the battery into your notebook until it snaps into place. 22 Slide the battery lock to the locked position. 23 Turn your notebook over. 24 Connect the power adapter, modem cable, and network cable 25 Turn on your notebook, open the DVD drive, insert the Windows DVD, close the DVD drive, then restart your notebook. 26 When the prompt "Press any key to insert your notebook. 15 Remove...


