8512565 - Component Replacement Manual R1
Page 5
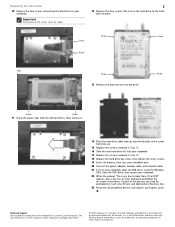
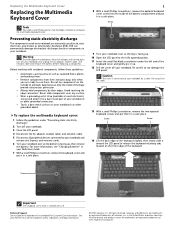
...key to the hard drive bracket. As part of Gateway, Inc. Screw Screw 13 Remove the bracket from CD or DVD" appears, press any key on -screen instructions. Gateway and eMachines are trademarks or registered trademarks of the ...notebook for important safety, regulatory, and legal information. © 2007 Gateway, Inc. Important The location of the screws varies by model. 2 12 Remove the four ...drive, insert the Windows DVD, close the DVD drive, then restart your keyboard and follow the on your notebook. 22 When the prompt "Press any Express cards.
...key to the hard drive bracket. As part of Gateway, Inc. Screw Screw 13 Remove the bracket from CD or DVD" appears, press any key on -screen instructions. Gateway and eMachines are trademarks or registered trademarks of the ...notebook for important safety, regulatory, and legal information. © 2007 Gateway, Inc. Important The location of the screws varies by model. 2 12 Remove the four ...drive, insert the Windows DVD, close the DVD drive, then restart your keyboard and follow the on your notebook. 22 When the prompt "Press any Express cards.
8512565 - Component Replacement Manual R1
Page 6
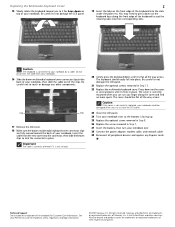
.... Gateway and eMachines are trademarks or registered trademarks of the bags provide electrostatic protection. • Always hold components by a cable. Caution Depending on the outside of antistatic bags because only the inside of the keyboard. For more information, see "Changing Batteries" in your notebook. ... your notebook. in a safe place. Screw Screw 14 Lift the back edge of the keyboard slightly, then slowly slide it to release the keyboard retaining tabs located on the bottom of Gateway, Inc. Never slide components over so the top is facing up. 10 Open the LCD...
.... Gateway and eMachines are trademarks or registered trademarks of the bags provide electrostatic protection. • Always hold components by a cable. Caution Depending on the outside of antistatic bags because only the inside of the keyboard. For more information, see "Changing Batteries" in your notebook. ... your notebook. in a safe place. Screw Screw 14 Lift the back edge of the keyboard slightly, then slowly slide it to release the keyboard retaining tabs located on the bottom of Gateway, Inc. Never slide components over so the top is facing up. 10 Open the LCD...
8512565 - Component Replacement Manual R1
Page 7
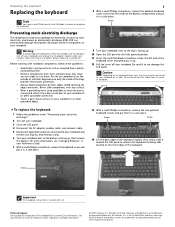
... Place the new keyboard keys-up . 25 Replace the optional screw removed in Step 8. 26 Replace the screw removed in the United States and other brands and product names are trademarks or registered trademarks of Gateway, Inc. Press down until it is correctly mounted when you can.... Technical Support See the label on the cover in several places until it clicks in Step 13. 22 Replace the keyboard cover. All other countries. Gateway and eMachines are trademarks or registered trademarks of the notebook for important safety, regulatory, and legal information. © 2007...
... Place the new keyboard keys-up . 25 Replace the optional screw removed in Step 8. 26 Replace the screw removed in the United States and other brands and product names are trademarks or registered trademarks of Gateway, Inc. Press down until it is correctly mounted when you can.... Technical Support See the label on the cover in several places until it clicks in Step 13. 22 Replace the keyboard cover. All other countries. Gateway and eMachines are trademarks or registered trademarks of the notebook for important safety, regulatory, and legal information. © 2007...
8512565 - Component Replacement Manual R1
Page 10
...Be careful to a bare metal part of the battery compartment and put it to not damage the LCD panel. Replacing the Multimedia Keyboard Cover Replacing the Multimedia Keyboard Cover Tools You need a small Phillips and a small flat-blade screwdriver to static electricity, also known as carpeted floors, plastic...and unplug the AC adapter, modem cable, and network cable and remove the battery before replacing a component. All rights reserved. Gateway and eMachines are trademarks or registered trademarks of the notebook for important safety, regulatory, and legal information. © 2007...
...Be careful to a bare metal part of the battery compartment and put it to not damage the LCD panel. Replacing the Multimedia Keyboard Cover Replacing the Multimedia Keyboard Cover Tools You need a small Phillips and a small flat-blade screwdriver to static electricity, also known as carpeted floors, plastic...and unplug the AC adapter, modem cable, and network cable and remove the battery before replacing a component. All rights reserved. Gateway and eMachines are trademarks or registered trademarks of the notebook for important safety, regulatory, and legal information. © 2007...
8512565 - Component Replacement Manual R1
Page 11
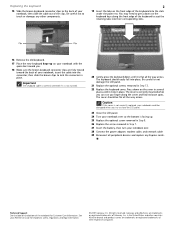
.... 23 Close the LCD panel. 24 Turn your notebook over so the bottom is not twisted. 20 Gently press the keyboard down until it lies keys-down on the bottom of Gateway, Inc. Important The cable is correctly oriented if it is facing up. 25 Replace the optional screw removed in Step... could be flat all the way across . Press down on the front edge of the keyboard into the slots under the palm rest. Gateway and eMachines are fully moved toward you finger along the front edge of the keyboard to not damage the LCD panel. 2 19 Insert the tabs on top of your...
.... 23 Close the LCD panel. 24 Turn your notebook over so the bottom is not twisted. 20 Gently press the keyboard down until it lies keys-down on the bottom of Gateway, Inc. Important The cable is correctly oriented if it is facing up. 25 Replace the optional screw removed in Step... could be flat all the way across . Press down on the front edge of the keyboard into the slots under the palm rest. Gateway and eMachines are fully moved toward you finger along the front edge of the keyboard to not damage the LCD panel. 2 19 Insert the tabs on top of your...
8512919 - Gateway Notebook Reference Guide R2
Page 3
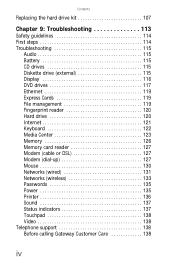
... 1: About This Reference 1 About this guide 2 Accessing your online User Guide 2 Gateway contact information 2 Contacting Gateway Customer Care 2 Gateway model and serial number 3 Microsoft Certificate of Authenticity 3 For more information 3 Chapter 2: Checking Out Your Notebook . . . . . 5 Front 6 Left 7 Right 9 Back 10 Bottom 11 Keyboard area 12 LCD panel 14 Chapter 3: Setting Up and Getting Started... your notebook 21 Waking up your notebook 23 Turning off your notebook 23 Restarting (rebooting) your notebook 24 Using the status indicators 25 Using the keyboard 26 i
... 1: About This Reference 1 About this guide 2 Accessing your online User Guide 2 Gateway contact information 2 Contacting Gateway Customer Care 2 Gateway model and serial number 3 Microsoft Certificate of Authenticity 3 For more information 3 Chapter 2: Checking Out Your Notebook . . . . . 5 Front 6 Left 7 Right 9 Back 10 Bottom 11 Keyboard area 12 LCD panel 14 Chapter 3: Setting Up and Getting Started... your notebook 21 Waking up your notebook 23 Turning off your notebook 23 Restarting (rebooting) your notebook 24 Using the status indicators 25 Using the keyboard 26 i
8512919 - Gateway Notebook Reference Guide R2
Page 5
www.gateway.com Recalibrating the battery 68 Extending battery life 69 Maximizing battery performance 69 Conserving battery power 69 Using alternate power sources 70 Changing power modes ... Power 81 Additional tips 81 Chapter 7: Maintaining Your Notebook . . . . . 83 Caring for your notebook 84 Cleaning your notebook 84 Cleaning the exterior 85 Cleaning the keyboard 85 Cleaning the notebook screen 85 Maintaining the battery 86 Storing batteries 86 Cleaning CDs or DVDs 87 Recovering your system 87 Recovering pre-installed...
www.gateway.com Recalibrating the battery 68 Extending battery life 69 Maximizing battery performance 69 Conserving battery power 69 Using alternate power sources 70 Changing power modes ... Power 81 Additional tips 81 Chapter 7: Maintaining Your Notebook . . . . . 83 Caring for your notebook 84 Cleaning your notebook 84 Cleaning the exterior 85 Cleaning the keyboard 85 Cleaning the notebook screen 85 Maintaining the battery 86 Storing batteries 86 Cleaning CDs or DVDs 87 Recovering your system 87 Recovering pre-installed...
8512919 - Gateway Notebook Reference Guide R2
Page 6
... Diskette drive (external 115 Display 116 DVD drives 117 Ethernet 119 Express Cards 119 File management 119 Fingerprint reader 120 Hard drive 120 Internet 121 Keyboard 122 Media Center 123 Memory 126 Memory card reader 127 Modem (cable or DSL 127 Modem (dial-up 127 Mouse 130 Networks (wired 131 Networks... (wireless 133 Passwords 135 Power 135 Printer 136 Sound 137 Status indicators 137 Touchpad 138 Video 138 Telephone support 138 Before calling Gateway Customer Care 138 iv
... Diskette drive (external 115 Display 116 DVD drives 117 Ethernet 119 Express Cards 119 File management 119 Fingerprint reader 120 Hard drive 120 Internet 121 Keyboard 122 Media Center 123 Memory 126 Memory card reader 127 Modem (cable or DSL 127 Modem (dial-up 127 Mouse 130 Networks (wired 131 Networks... (wireless 133 Passwords 135 Power 135 Printer 136 Sound 137 Status indicators 137 Touchpad 138 Video 138 Telephone support 138 Before calling Gateway Customer Care 138 iv
8512919 - Gateway Notebook Reference Guide R2
Page 15
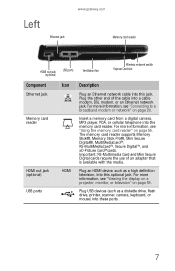
... display on a projector, monitor, or television" on page 59. Plug an HDMI device, such as a diskette drive, flash drive, printer, scanner, camera, keyboard, or mouse) into this jack. For more information, see "Connecting to a broadband modem or network" on page 55. Plug USB devices (such as a ... xD-Picture Card™cards. Plug the other end of an adapter that is available with the media. Left Ethernet jack www.gateway.com Memory card reader HDMI out jack (optional) USB ports Ventilation fan Wireless network switch Express Card slot Component Ethernet jack Memory card...
... display on a projector, monitor, or television" on page 59. Plug an HDMI device, such as a diskette drive, flash drive, printer, scanner, camera, keyboard, or mouse) into this jack. For more information, see "Connecting to a broadband modem or network" on page 55. Plug USB devices (such as a ... xD-Picture Card™cards. Plug the other end of an adapter that is available with the media. Left Ethernet jack www.gateway.com Memory card reader HDMI out jack (optional) USB ports Ventilation fan Wireless network switch Express Card slot Component Ethernet jack Memory card...

8512919 - Gateway Notebook Reference Guide R2
Page 17
Plug a USB device (such as a diskette drive, flash drive, printer, scanner, camera, keyboard, or mouse) into this port. 9 To determine the type of drive in your notebook, examine the drive tray's plastic cover and compare the logo to those listed in "Identifying drive types" on page 52. Right www.gateway.com Component DVD drive USB port DVD drive Icon Description USB port Insert CDs or DVDs into this drive. For more information, see "Using the DVD drive" on page 52.
Plug a USB device (such as a diskette drive, flash drive, printer, scanner, camera, keyboard, or mouse) into this port. 9 To determine the type of drive in your notebook, examine the drive tray's plastic cover and compare the logo to those listed in "Identifying drive types" on page 52. Right www.gateway.com Component DVD drive USB port DVD drive Icon Description USB port Insert CDs or DVDs into this drive. For more information, see "Using the DVD drive" on page 52.

8512919 - Gateway Notebook Reference Guide R2
Page 20
...the EZ Pad touchpad" on page 74. CHAPTER 2: Checking Out Your Notebook Keyboard area Speaker Multimedia panel (optional) Power button Keyboard Speaker Status indicators Fingerprint reader Touchpad (optional) Component Icon Description Keyboard Provides all the functionality of a mouse. You can also configure the power ...button for Sleep/Resume mode. Power button Press to control playback of CDs and DVDs. For more information, see "Using the keyboard" on page 26. For more information on configuring the power button mode, see "Using the optional multimedia panel" on or off...
...the EZ Pad touchpad" on page 74. CHAPTER 2: Checking Out Your Notebook Keyboard area Speaker Multimedia panel (optional) Power button Keyboard Speaker Status indicators Fingerprint reader Touchpad (optional) Component Icon Description Keyboard Provides all the functionality of a mouse. You can also configure the power ...button for Sleep/Resume mode. Power button Press to control playback of CDs and DVDs. For more information, see "Using the keyboard" on page 26. For more information on configuring the power button mode, see "Using the optional multimedia panel" on or off...

8512919 - Gateway Notebook Reference Guide R2
Page 21
For more information, see "Using the status indicators" on page 31. www.gateway.com Component Fingerprint reader (optional) Status indicators Icon Description Provides enhanced security. Inform you when a drive is in use or when a button has been pressed that affects how the keyboard is used. For more information, see "Using the optional fingerprint reader" on page 25. 13
For more information, see "Using the status indicators" on page 31. www.gateway.com Component Fingerprint reader (optional) Status indicators Icon Description Provides enhanced security. Inform you when a drive is in use or when a button has been pressed that affects how the keyboard is used. For more information, see "Using the optional fingerprint reader" on page 25. 13

8512919 - Gateway Notebook Reference Guide R2
Page 23
... dial-up modem • Starting your notebook • Turning off your notebook • Restarting (rebooting) your notebook • Using the status indicators • Using the keyboard • Using the optional fingerprint reader • Using the EZ Pad touchpad • Using the optional multimedia panel • Using the optional webcam • Adjusting...
... dial-up modem • Starting your notebook • Turning off your notebook • Restarting (rebooting) your notebook • Using the status indicators • Using the keyboard • Using the optional fingerprint reader • Using the EZ Pad touchpad • Using the optional multimedia panel • Using the optional webcam • Adjusting...
8512919 - Gateway Notebook Reference Guide R2
Page 24
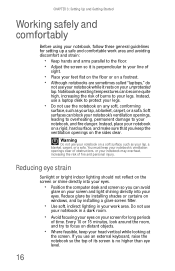
... your notebook, and fire danger. Notebook operating temperatures can avoid glare on a footrest. • Although notebooks are sometimes called "laptops," do not use an external keyboard, raise the notebook so the top of burns to your eyes. CHAPTER 3: Setting Up and Getting Started Working safely and comfortably Before using your notebook...
... your notebook, and fire danger. Notebook operating temperatures can avoid glare on a footrest. • Although notebooks are sometimes called "laptops," do not use an external keyboard, raise the notebook so the top of burns to your eyes. CHAPTER 3: Setting Up and Getting Started Working safely and comfortably Before using your notebook...

8512919 - Gateway Notebook Reference Guide R2
Page 25
... up your computer desk and chair, make sure that the desk is at your notebook • Avoid bending, arching, or angling your wrists. www.gateway.com Setting up your computer desk and chair When you are setting up the work . • Take breaks to stand and stretch your legs. ...twisting your torso or neck. Make sure that is comfortable, distributes your weight evenly, and keeps your body relaxed. • Position your chair so the keyboard is the appropriate height and the chair helps you maintain good posture. • Select a flat surface for your computer desk. • Adjust the ...
... up your computer desk and chair, make sure that the desk is at your notebook • Avoid bending, arching, or angling your wrists. www.gateway.com Setting up your computer desk and chair When you are setting up the work . • Take breaks to stand and stretch your legs. ...twisting your torso or neck. Make sure that is comfortable, distributes your weight evenly, and keeps your body relaxed. • Position your chair so the keyboard is the appropriate height and the chair helps you maintain good posture. • Select a flat surface for your computer desk. • Adjust the ...

8512919 - Gateway Notebook Reference Guide R2
Page 30
...-screen instructions to select the language and time zone and to create your notebook: 1 Lift the LCD panel. 2 Press the power button located above the keyboard. CHAPTER 3: Setting Up and Getting Started To start your first user account. 4 Attach and turn on page 58. Tip See the documentation that menu, you...
...-screen instructions to select the language and time zone and to create your notebook: 1 Lift the LCD panel. 2 Press the power button located above the keyboard. CHAPTER 3: Setting Up and Getting Started To start your first user account. 4 Attach and turn on page 58. Tip See the documentation that menu, you...
8512919 - Gateway Notebook Reference Guide R2
Page 32
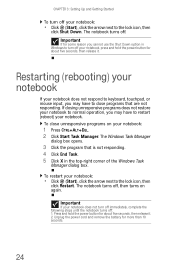
... Windows Task Manager dialog box. Important If for about five seconds, then release it . Restarting (rebooting) your notebook If your notebook does not respond to keyboard, touchpad, or mouse input, you may have to close unresponsive programs on again. Unplug the power cord and remove the battery for about five seconds...
... Windows Task Manager dialog box. Important If for about five seconds, then release it . Restarting (rebooting) your notebook If your notebook does not respond to keyboard, touchpad, or mouse input, you may have to close unresponsive programs on again. Unplug the power cord and remove the battery for about five seconds...
8512919 - Gateway Notebook Reference Guide R2
Page 33
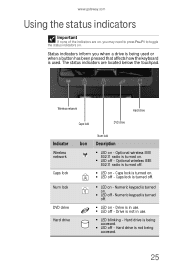
www.gateway.com Using the status indicators Important If none of the indicators are located below the touchpad. The status indicators are on, you when a drive is ... FN+F1 to toggle the status indicators on . ■ LED off - Hard drive is used or when a button has been pressed that affects how the keyboard is not being accessed. ■ LED off . ■ LED on . Wireless network Hard drive Caps lock DVD drive Indicator Wireless network Caps lock Num lock...
www.gateway.com Using the status indicators Important If none of the indicators are located below the touchpad. The status indicators are on, you when a drive is ... FN+F1 to toggle the status indicators on . ■ LED off - Hard drive is used or when a button has been pressed that affects how the keyboard is not being accessed. ■ LED off . ■ LED on . Wireless network Hard drive Caps lock DVD drive Indicator Wireless network Caps lock Num lock...
8512919 - Gateway Notebook Reference Guide R2
Page 34
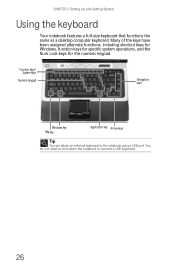
Function keys/ System keys Numeric keypad Navigation keys Windows key FN key Application key Arrow keys Tip You can attach an external keyboard to connect a USB keyboard. 26 Many of the keys have been assigned alternate functions, including shortcut keys for Windows, function keys for specific system operations, and the Num Lock ... numeric keypad. You do not need to shut down the notebook to the notebook using a USB port. CHAPTER 3: Setting Up and Getting Started Using the keyboard Your notebook features a full-size keyboard that functions the same as a desktop computer...
Function keys/ System keys Numeric keypad Navigation keys Windows key FN key Application key Arrow keys Tip You can attach an external keyboard to connect a USB keyboard. 26 Many of the keys have been assigned alternate functions, including shortcut keys for Windows, function keys for specific system operations, and the Num Lock ... numeric keypad. You do not need to shut down the notebook to the notebook using a USB port. CHAPTER 3: Setting Up and Getting Started Using the keyboard Your notebook features a full-size keyboard that functions the same as a desktop computer...
8512919 - Gateway Notebook Reference Guide R2
Page 35
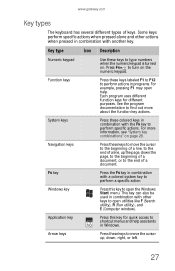
... combinations" on the numeric keypad. See the program documentation to perform actions in Windows. Function keys Press these keys to turn on page 28. www.gateway.com Key types The keyboard has several different types of a document.
... combinations" on the numeric keypad. See the program documentation to perform actions in Windows. Function keys Press these keys to turn on page 28. www.gateway.com Key types The keyboard has several different types of a document.


