Gateway Quick Start Guide for Windows 7
Page 11
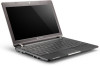
... your connection cables; However, this battery. However, certain devices must be removed from the computer (for example: keyboard, printer, scanner). Modem - The network port is incorrectly replaced. An IEEE 1394 port (aka FireWire™ or i.LINK) allows you attach any network cable. Do not ...should be detected and installed automatically. unplug the modem from the telephone line, the TV port from an External Card Reader on Gateway computers. Computer Basics - 11 Ultimate disposal of the battery, put adhesive tape over a dial-up connection. An internal fax/data...
... your connection cables; However, this battery. However, certain devices must be removed from the computer (for example: keyboard, printer, scanner). Modem - The network port is incorrectly replaced. An IEEE 1394 port (aka FireWire™ or i.LINK) allows you attach any network cable. Do not ...should be detected and installed automatically. unplug the modem from the telephone line, the TV port from an External Card Reader on Gateway computers. Computer Basics - 11 Ultimate disposal of the battery, put adhesive tape over a dial-up connection. An internal fax/data...
Gateway Quick Start Guide for Windows 7
Page 53
... guidelines for energy efficiency. European law states that all regulations. Dispose of explosion if battery is given to electronic components in Gateway products are replacing it. Caution: Risk of your local authority, or by clips. Environment - 53 Do not throw your distributor or local ...been taken to your energy bill and contribute to local, state or federal laws. As far as keyboard, mouse, speakers, remote control, etc. These rules concern all Gateway products and also all accessories, such as end-of the material and eases its products during product ...
... guidelines for energy efficiency. European law states that all regulations. Dispose of explosion if battery is given to electronic components in Gateway products are replacing it. Caution: Risk of your local authority, or by clips. Environment - 53 Do not throw your distributor or local ...been taken to your energy bill and contribute to local, state or federal laws. As far as keyboard, mouse, speakers, remote control, etc. These rules concern all Gateway products and also all accessories, such as end-of the material and eases its products during product ...
Gateway Quick Start Guide for Windows 7
Page 55
...12 Aerial 12 Audio CDs 18, 40 Audio ports 12 Autoplay 19 B Backups 14 Batteries 10, 53 Battery disposal 11, 53 Battery life 10 Replacing batteries 11 BIOS 36 Blu-ray 9, 19 Browser 23 C Cable modem 41 Cables 4, 51 Cleaning your computer 4 Codec 19 Computer environment 4...Infrared receiver 8, 12 Interference 39, 51 Internal hardware 35 Internet Connection 20 Firewall 29, 32 Internet Explorer 23 Internet Service Provider (ISP 20 K Keyboard 6, 38 L LAN (Local Area Network 21 Last Known Good Configuration 28, 36 Line-Out 12 M Maintenance HDD management 26 System tools 26...
...12 Aerial 12 Audio CDs 18, 40 Audio ports 12 Autoplay 19 B Backups 14 Batteries 10, 53 Battery disposal 11, 53 Battery life 10 Replacing batteries 11 BIOS 36 Blu-ray 9, 19 Browser 23 C Cable modem 41 Cables 4, 51 Cleaning your computer 4 Codec 19 Computer environment 4...Infrared receiver 8, 12 Interference 39, 51 Internal hardware 35 Internet Connection 20 Firewall 29, 32 Internet Explorer 23 Internet Service Provider (ISP 20 K Keyboard 6, 38 L LAN (Local Area Network 21 Last Known Good Configuration 28, 36 Line-Out 12 M Maintenance HDD management 26 System tools 26...
Service Guide
Page 7
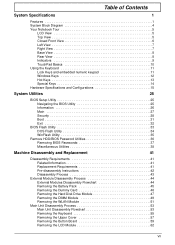
... Closed Front View 6 Left View 7 Right View 7 Base View 8 Rear View 8 Indicators 9 TouchPad Basics 10 Using the Keyboard 11 Lock Keys and embedded numeric keypad 11 Windows Keys 12 Hot Keys 13 Special Keys 14 Hardware Specifications and Configurations 15 System ... HDD/BIOS Password Utilities 36 Removing BIOS Passwords 37 Miscellaneous Utilities 38 Machine Disassembly and Replacement 41 Disassembly Requirements 41 Related Information 41 Replacement Requirements 41 Pre-disassembly Instructions 42 Disassembly Process 43 External Module Disassembly Process 44 External...
... Closed Front View 6 Left View 7 Right View 7 Base View 8 Rear View 8 Indicators 9 TouchPad Basics 10 Using the Keyboard 11 Lock Keys and embedded numeric keypad 11 Windows Keys 12 Hot Keys 13 Special Keys 14 Hardware Specifications and Configurations 15 System ... HDD/BIOS Password Utilities 36 Removing BIOS Passwords 37 Miscellaneous Utilities 38 Machine Disassembly and Replacement 41 Disassembly Requirements 41 Related Information 41 Replacement Requirements 41 Pre-disassembly Instructions 42 Disassembly Process 43 External Module Disassembly Process 44 External...
Service Guide
Page 8
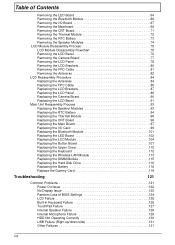
... Replacing the Speaker Modules 93 Replacing the RTC Battery 94 Replacing the Thermal Module 95 Replacing the CRT Board 96 Replacing the Main Board 97 Replacing the I/O Card 99 Replacing the Bluetooth Module 101 Replacing the LED Board 102 Replacing the LCD Module 104 Replacing the Button Board 107 Replacing the Upper Cover 110 Replacing the Keyboard 112 Replacing the Wireless LAN Module 113 Replacing...
... Replacing the Speaker Modules 93 Replacing the RTC Battery 94 Replacing the Thermal Module 95 Replacing the CRT Board 96 Replacing the Main Board 97 Replacing the I/O Card 99 Replacing the Bluetooth Module 101 Replacing the LED Board 102 Replacing the LCD Module 104 Replacing the Button Board 107 Replacing the Upper Cover 110 Replacing the Keyboard 112 Replacing the Wireless LAN Module 113 Replacing...

Service Guide
Page 63
... cable channels and clips are used and that the cables are replaced in the disassembly procedures may not represent the actual model. NOTE: The product previews seen in the same position. Main Unit Disassembly Flowchart Remove External Modules before proceeding Remove Keyboard Remove Upper Cover Remove Button Board Remove LCD Module Remove...
... cable channels and clips are used and that the cables are replaced in the disassembly procedures may not represent the actual model. NOTE: The product previews seen in the same position. Main Unit Disassembly Flowchart Remove External Modules before proceeding Remove Keyboard Remove Upper Cover Remove Button Board Remove LCD Module Remove...

Service Guide
Page 122
Turn the keyboard over and insert the bottom edge in push down ensure the four latches across the top are fully secured. 112 Chapter 3 Connect the FCC to the mainboard. 2. Replacing the Keyboard 1.
Turn the keyboard over and insert the bottom edge in push down ensure the four latches across the top are fully secured. 112 Chapter 3 Connect the FCC to the mainboard. 2. Replacing the Keyboard 1.

Service Guide
Page 136
Built-In Keyboard Failure If the built-in Keyboard fails, perform the following actions one at a time to correct the problem. Do not replace non-defective FRUs: Start Keyboard properly connected? No Replace Keyboard Replace mainboard 126 Chapter 4 No Disconnect and reconnect Keyboard functioning?
Built-In Keyboard Failure If the built-in Keyboard fails, perform the following actions one at a time to correct the problem. Do not replace non-defective FRUs: Start Keyboard properly connected? No Replace Keyboard Replace mainboard 126 Chapter 4 No Disconnect and reconnect Keyboard functioning?

Service Guide
Page 172
Flowchart 44 F Features 1 FLASH Utility 33 Flash Utility 33 FRU (Field Replaceable Unit) List 141 H Hard Disk Drive Module Removing 47 Hibernation mode hotkey 13 Hot Keys 11 I Indicators 9 Intermittent Problems 132 Internal Microphone Failure 129 Internal Speaker Failure 128 J Jumper and Connector Locations 137 K Keyboard Removing 55 Keyboard Failure 126 L LCD Bezel Removing 76, 91 LCD Brackets Removing 81 LCD Cable Removing 81 LCD Failure 125 LCD Module Removing 104 LCD Module Disassembly Flowchart 75 LCD Panel Removing 78, 88 162
Flowchart 44 F Features 1 FLASH Utility 33 Flash Utility 33 FRU (Field Replaceable Unit) List 141 H Hard Disk Drive Module Removing 47 Hibernation mode hotkey 13 Hot Keys 11 I Indicators 9 Intermittent Problems 132 Internal Microphone Failure 129 Internal Speaker Failure 128 J Jumper and Connector Locations 137 K Keyboard Removing 55 Keyboard Failure 126 L LCD Bezel Removing 76, 91 LCD Brackets Removing 81 LCD Cable Removing 81 LCD Failure 125 LCD Module Removing 104 LCD Module Disassembly Flowchart 75 LCD Panel Removing 78, 88 162


