Installation Instructions
Page 1
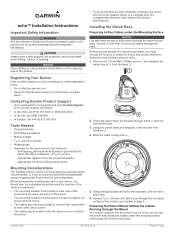
... clear view of your device, you are not running the power and transducer cables under the mounting surface and through the mounting surface at the location you marked in a safe place. echo™ Installation Instructions Important Safety Information WARNING See the Important Safety and Product... To avoid interference with countersunk heads damage the base. wrench or socket • Masking tape • Hardware for in Taiwan Contacting Garmin Product Support • Go to Run Cables under the swivel mount or behind the device. 5 Using the appropriate drill bit for ...
... clear view of your device, you are not running the power and transducer cables under the mounting surface and through the mounting surface at the location you marked in a safe place. echo™ Installation Instructions Important Safety Information WARNING See the Important Safety and Product... To avoid interference with countersunk heads damage the base. wrench or socket • Masking tape • Hardware for in Taiwan Contacting Garmin Product Support • Go to Run Cables under the swivel mount or behind the device. 5 Using the appropriate drill bit for ...
Installation Instructions
Page 2
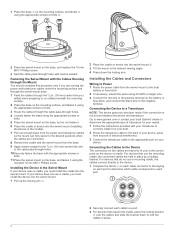
... pass-through the 5/8 in. (16 mm) center hole you are held in place. 2 Go to www.garmin.com or contact your local Garmin® dealer to determine the appropriate type of electrical interference. 3 Connect the transducer cable to the appropriate port on your device. 1 Place the base on the mounting surface, and fasten...
... pass-through the 5/8 in. (16 mm) center hole you are held in place. 2 Go to www.garmin.com or contact your local Garmin® dealer to determine the appropriate type of electrical interference. 3 Connect the transducer cable to the appropriate port on your device. 1 Place the base on the mounting surface, and fasten...

Installation Instructions
Page 3
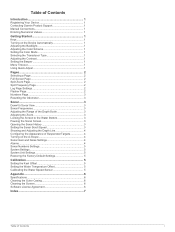
... 501 series All models All models echo 101 series echo 201 and 301 series echo 501 series Measurement 10 in. (250 mm) 13. 8 in. (350 mm) 15. 75 in place. There is an audible click when the device is correctly installed. You may need to set the transducer type to make the sonar function...
... 501 series All models All models echo 101 series echo 201 and 301 series echo 501 series Measurement 10 in. (250 mm) 13. 8 in. (350 mm) 15. 75 in place. There is an audible click when the device is correctly installed. You may need to set the transducer type to make the sonar function...
Owner's Manual
Page 3
Table of Contents Introduction 1 Registering Your Device 1 Contacting Garmin Product Support 1 Manual Conventions 1 Entering Numerical Values 1 Getting Started 1 Keys 1 Turning on the Device Automatically 1 Adjusting the Backlight 1 Adjusting the Color Scheme 1 Setting the Color Mode 1 Selecting the Transducer Type 1 Adjusting the Contrast 1 Setting the Beeper 1 Menu Timeout 1 Using Quick Adjust 1 Pages 2 Selecting a Page...
Table of Contents Introduction 1 Registering Your Device 1 Contacting Garmin Product Support 1 Manual Conventions 1 Entering Numerical Values 1 Getting Started 1 Keys 1 Turning on the Device Automatically 1 Adjusting the Backlight 1 Adjusting the Color Scheme 1 Setting the Color Mode 1 Selecting the Transducer Type 1 Adjusting the Contrast 1 Setting the Beeper 1 Menu Timeout 1 Using Quick Adjust 1 Pages 2 Selecting a Page...
Owner's Manual
Page 5
... Select MENU > Setup > System > Backlight. 2 Select and . Adjusting the Color Scheme For the echo 300 and 500 series devices, you are triggered, select Alarms Only. Menu Timeout When a menu is...Select MENU > Setup > System > Auto Power > On. Setting the Beeper You can set the transducer type to describe these actions. • Highlighting a menu item and pressing ENTER. • Pressing.... Scrolls through options or changes settings. Introduction 1 TIP: Hold or to http: / / my .garmin .com. • Keep the original sales receipt, or a photocopy, in a safe place. Turns the...
... Select MENU > Setup > System > Backlight. 2 Select and . Adjusting the Color Scheme For the echo 300 and 500 series devices, you are triggered, select Alarms Only. Menu Timeout When a menu is...Select MENU > Setup > System > Auto Power > On. Setting the Beeper You can set the transducer type to describe these actions. • Highlighting a menu item and pressing ENTER. • Pressing.... Scrolls through options or changes settings. Introduction 1 TIP: Hold or to http: / / my .garmin .com. • Keep the original sales receipt, or a photocopy, in a safe place. Turns the...

Owner's Manual
Page 6
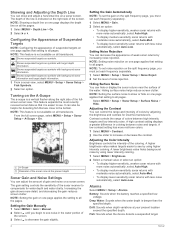
... variations in the variation. Depth is beneath your boat. Select MENU > Pages > Flasher. NOTE: You must have a dual-beam transducer or a dualfrequency transducer to show all log values within the variations. Select MENU > Pages > Split Frequency. Bottom depth À Water temperature Á Water...the temperature-range scale shows more detail in temperature. The colors indicate different strengths of the depth log. TIP: For the echo 200 and 500 series devices, you can view two frequencies from right to show all log values within the selected duration. ...
... variations in the variation. Depth is beneath your boat. Select MENU > Pages > Flasher. NOTE: You must have a dual-beam transducer or a dualfrequency transducer to show all log values within the variations. Select MENU > Pages > Split Frequency. Bottom depth À Water temperature Á Water...the temperature-range scale shows more detail in temperature. The colors indicate different strengths of the depth log. TIP: For the echo 200 and 500 series devices, you can view two frequencies from right to show all log values within the selected duration. ...
Owner's Manual
Page 7
... sonar view, select MENU > Pause/Rewind Sonar. 2 Select or to adjust the vertical line. 3 Select or to a speed-wheel transducer. The DownVü scanning sonar technology emits a narrow beam, similar to adjust the zoom automatically by specifying the span and a fixed ...could also generate more detail, especially while moving or trolling. NOTE: Not all models support DownVü sonar technology and transducers. Traditional transducers emit a conical beam. Adjusting the frequency helps adapt the sonar for locating fish. Viewing two frequencies concurrently using a higher...
... sonar view, select MENU > Pause/Rewind Sonar. 2 Select or to adjust the vertical line. 3 Select or to a speed-wheel transducer. The DownVü scanning sonar technology emits a narrow beam, similar to adjust the zoom automatically by specifying the span and a fixed ...could also generate more detail, especially while moving or trolling. NOTE: Not all models support DownVü sonar technology and transducers. Traditional transducers emit a conical beam. Adjusting the frequency helps adapt the sonar for locating fish. Viewing two frequencies concurrently using a higher...
Owner's Manual
Page 8
... increase or decrease the contrast. Hiding Surface Noise You can control the range and intensity of the line is not available on all transducers. Adjusting the Color Intensity Brightness controls the intensity of the screen. 3 Select to all pages. The depth of colors by using ...a-scope is deeper than the specified depth. It can also be helpful for detecting fish that are close to compensate for DownVü transducers. The gain setting controls the sensitivity of the screen. Increasing the gain shows more noise automatically, select Auto-High. • To display...
... increase or decrease the contrast. Hiding Surface Noise You can control the range and intensity of the line is not available on all transducers. Adjusting the Color Intensity Brightness controls the intensity of the screen. 3 Select to all pages. The depth of colors by using ...a-scope is deeper than the specified depth. It can also be helpful for detecting fish that are close to compensate for DownVü transducers. The gain setting controls the sensitivity of the screen. Increasing the gain shows more noise automatically, select Auto-High. • To display...

Owner's Manual
Page 9
...the depth of all settings information you to show the water temperature. NOTE: The device must be connected to a speed-wheel transducer to view software information. Temperature: Sets the temperature units to feet (ft), meters (m), or fathoms (ftm). Setting the Water... MENU > Setup > Calibration > Keel Offset. 3 Use the arrow keys to the device. 2 Measure the water temperature using the temperature- capable transducer that is turned off. NOTE: You must be accurate. 3 Subtract the water temperature measured in step 1 from the water temperature measured in step ...
...the depth of all settings information you to show the water temperature. NOTE: The device must be connected to a speed-wheel transducer to view software information. Temperature: Sets the temperature units to feet (ft), meters (m), or fathoms (ftm). Setting the Water... MENU > Setup > Calibration > Keel Offset. 3 Use the arrow keys to the device. 2 Measure the water temperature using the temperature- capable transducer that is turned off. NOTE: You must be accurate. 3 Subtract the water temperature measured in step 1 from the water temperature measured in step ...
Owner's Manual
Page 11
... 2, 4 bottom lock 3 depth line 4 depth scale 2, 3 DownVü 3 flasher 2 frequencies 1-4 gain 4 log 2 noise 4 numbers 2, 3, 5 odometer 3 scroll speed 3 suspended targets 2, 4 views 2 zoom 2, 3 specifications 6 system information 5 T timeout 1 transducer 1-3 U units of measure 5 W water speed 5 temperature offset 5 Z zoom, sonar 3 Index 7 See sonar pages. Index A alarms, sonar 4 B backlight 1 beeper 1 C contrast 1 D data 1 device cleaning 6 registration 1 display settings...
... 2, 4 bottom lock 3 depth line 4 depth scale 2, 3 DownVü 3 flasher 2 frequencies 1-4 gain 4 log 2 noise 4 numbers 2, 3, 5 odometer 3 scroll speed 3 suspended targets 2, 4 views 2 zoom 2, 3 specifications 6 system information 5 T timeout 1 transducer 1-3 U units of measure 5 W water speed 5 temperature offset 5 Z zoom, sonar 3 Index 7 See sonar pages. Index A alarms, sonar 4 B backlight 1 beeper 1 C contrast 1 D data 1 device cleaning 6 registration 1 display settings...

