Installation Instructions
Page 1
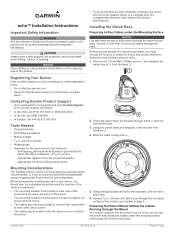
... wear safety goggles, ear protection, and a dust mask when drilling, cutting, or sanding. Contacting Garmin Product Support • Go to a compass than the compass-safe distance value listed in the product...online registration today. • Go to Run Cables under the mounting surface and through the swivel-mount base. echo™ Installation Instructions Important Safety Information WARNING ... Â Registering Your Device Help us better support you are not running the power and transducer cables under the Mounting Surface NOTICE Use pan-head screws or bolts when securing the ...
... wear safety goggles, ear protection, and a dust mask when drilling, cutting, or sanding. Contacting Garmin Product Support • Go to a compass than the compass-safe distance value listed in the product...online registration today. • Go to Run Cables under the mounting surface and through the swivel-mount base. echo™ Installation Instructions Important Safety Information WARNING ... Â Registering Your Device Help us better support you are not running the power and transducer cables under the Mounting Surface NOTICE Use pan-head screws or bolts when securing the ...
Installation Instructions
Page 2
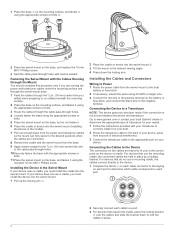
... 5/8 in. (16 mm) center hole and to the cable pass-through holes. 10Securely fasten the base with marine sealant. Installing the Cables and Connectors Wiring to Power 1 Route the power cable from sources of electrical interference. 3 Connect the transducer cable to the desired viewing angle. 4 Press down to a Transducer...mount on the base, and fasten it using the included 10 mm M6×1 Phillips screw. Go to www.garmin.com or contact your local Garmin® dealer to determine the appropriate type of transducer for your needs. 1 Follow the instructions provided with your transducer...
... 5/8 in. (16 mm) center hole and to the cable pass-through holes. 10Securely fasten the base with marine sealant. Installing the Cables and Connectors Wiring to Power 1 Route the power cable from sources of electrical interference. 3 Connect the transducer cable to the desired viewing angle. 4 Press down to a Transducer...mount on the base, and fasten it using the included 10 mm M6×1 Phillips screw. Go to www.garmin.com or contact your local Garmin® dealer to determine the appropriate type of transducer for your needs. 1 Follow the instructions provided with your transducer...

Installation Instructions
Page 3
...-topeak) Selecting the Transducer Type Before you can quickly remove the device from the Cradle If your device uses a cradle and you have connected the cables to make the sonar function properly. 1 From a sonar view, select MENU > Setup > Sonar Setup > Transducer Type. 2 Select an option: ...Frequency Power Source Voltage Range Fuse Rated Current Transmit Power Models echo 101, 151, and 201 echo 301c echo 501c and 551c echo dv models echo 101 echo 151, 201, 301, and 501 series echo 101 series echo 201, 301, and 501 series All models All models echo 101 series echo 201 and 301 series echo ...
...-topeak) Selecting the Transducer Type Before you can quickly remove the device from the Cradle If your device uses a cradle and you have connected the cables to make the sonar function properly. 1 From a sonar view, select MENU > Setup > Sonar Setup > Transducer Type. 2 Select an option: ...Frequency Power Source Voltage Range Fuse Rated Current Transmit Power Models echo 101, 151, and 201 echo 301c echo 501c and 551c echo dv models echo 101 echo 151, 201, 301, and 501 series echo 101 series echo 201, 301, and 501 series All models All models echo 101 series echo 201 and 301 series echo ...


