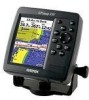
Owner's Manual
Page 8
... to back up important user data by manually recording it or downloading it to a PC (transferring it to temperature extremes can result. at 800/800-1020 or Garmin Europe at 44/0870-8501241. vi GPSMAP 392/398/492/498 Owner's Manual Storing the GPSMAP 392/398/492/498 Do not store the GPSMAP 392/398/492/498 where prolonged exposure...
... to back up important user data by manually recording it or downloading it to a PC (transferring it to temperature extremes can result. at 800/800-1020 or Garmin Europe at 44/0870-8501241. vi GPSMAP 392/398/492/498 Owner's Manual Storing the GPSMAP 392/398/492/498 Do not store the GPSMAP 392/398/492/498 where prolonged exposure...
Owner's Manual
Page 12
...Page. 4 To adjust the simulated speed and heading from the Main Menu: 1. You can be adjusted from any page. Press ENTER, and select User Track. 5. Highlight the Track field, and press ENTER. Press left or right on the ROCKER to show while in Simulator Mode. To adjust... release the POWER key. Highlight Set Position, and press ENTER to change the simulated location. 7. Press the POWER key again and the user-defined level of backlighting starts. GPSMAP 392/398/492/498 Owner's Manual To enter a simulated speed and heading from the Compass or 3D Highway Pages: 1.
...Page. 4 To adjust the simulated speed and heading from the Main Menu: 1. You can be adjusted from any page. Press ENTER, and select User Track. 5. Highlight the Track field, and press ENTER. Press left or right on the ROCKER to show while in Simulator Mode. To adjust... release the POWER key. Highlight Set Position, and press ENTER to change the simulated location. 7. Press the POWER key again and the user-defined level of backlighting starts. GPSMAP 392/398/492/498 Owner's Manual To enter a simulated speed and heading from the Compass or 3D Highway Pages: 1.
Owner's Manual
Page 13
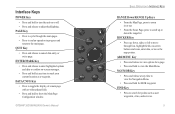
... MOB waypoint. FIND Key • Press to search for a page. • Press and hold to show the Main Page Configuration window. GPSMAP 392/398/492/498 Owner's Manual ��� ���� ��� ��� ���� ���� ��... off. • Press and release to adjust backlighting. Interface Keys POWER Key • Press and hold at any time to mark your current location as user waypoints, cities, and services. 5
... MOB waypoint. FIND Key • Press to search for a page. • Press and hold to show the Main Page Configuration window. GPSMAP 392/398/492/498 Owner's Manual ��� ���� ��� ��� ���� ���� ��... off. • Press and release to adjust backlighting. Interface Keys POWER Key • Press and hold at any time to mark your current location as user waypoints, cities, and services. 5
Owner's Manual
Page 16
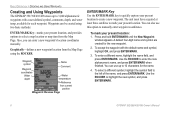
... name field, and press ENTER/MARK. Use the ROCKER to highlight the new symbol, and press ENTER/MARK. 8 GPSMAP 392/398/492/498 Owner's Manual Waypoint symbol Waypoint coordinates Name Comment Water depth Water temperature Reference from the Map Page using two basic methods: ENTER/MARK Key-...accept the waypoint with a user-defined symbol, comments, depth, and water temp, available for each waypoint. You can be created using the ROCKER. Also, you can also use up to create a new waypoint. You can enter a new waypoint's location coordinates manually. Use the ROCKER to...
... name field, and press ENTER/MARK. Use the ROCKER to highlight the new symbol, and press ENTER/MARK. 8 GPSMAP 392/398/492/498 Owner's Manual Waypoint symbol Waypoint coordinates Name Comment Water depth Water temperature Reference from the Map Page using two basic methods: ENTER/MARK Key-...accept the waypoint with a user-defined symbol, comments, depth, and water temp, available for each waypoint. You can be created using the ROCKER. Also, you can also use up to create a new waypoint. You can enter a new waypoint's location coordinates manually. Use the ROCKER to...
Owner's Manual
Page 19
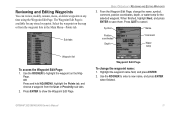
...to cancel. From the Waypoint Edit Page, change the waypoint name: 1. Use the ROCKER to highlight the waypoint on the map or from the User or Proximity sub tabs. 2. Press QUIT to enter a new name, and press ENTER when finished. Waypoint Edit Page To change the name... a waypoint from the waypoint lists in the Main Menu-Points tab. Highlight the waypoint name field, and press ENTER. 2. GPSMAP 392/398/492/498 Owner's Manual 11 Reviewing and Editing Waypoints You can review, modify, rename, move, or delete waypoints at any stored waypoint. Select the waypoint on...
...to cancel. From the Waypoint Edit Page, change the waypoint name: 1. Use the ROCKER to highlight the waypoint on the map or from the User or Proximity sub tabs. 2. Press QUIT to enter a new name, and press ENTER when finished. Waypoint Edit Page To change the name... a waypoint from the waypoint lists in the Main Menu-Points tab. Highlight the waypoint name field, and press ENTER. 2. GPSMAP 392/398/492/498 Owner's Manual 11 Reviewing and Editing Waypoints You can review, modify, rename, move, or delete waypoints at any stored waypoint. Select the waypoint on...
Owner's Manual
Page 25
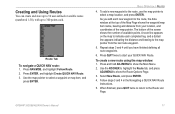
... window: 1. Press and hold ADJ/MENU to show the Route Options Page. 3. Follow steps 3 and 4 in the Navigating a QUICK NAV Route instructions. 5. GPSMAP 392/398/492/498 Owner's Manual 17 Use the map pointer to the Route List Page. The bottom of the screen shows the number of the map pointer. Repeat.../MENU to show the Main Menu. 2. Select New Route, and press ENTER. 4. Creating and Using Routes You can create and store up to 50 user-defined reversible routes (numbered 1-50), with up to 300 points each completed leg, and a dotted line appears indicating the distance and bearing to...
... window: 1. Press and hold ADJ/MENU to show the Route Options Page. 3. Follow steps 3 and 4 in the Navigating a QUICK NAV Route instructions. 5. GPSMAP 392/398/492/498 Owner's Manual 17 Use the map pointer to the Route List Page. The bottom of the screen shows the number of the map pointer. Repeat.../MENU to show the Main Menu. 2. Select New Route, and press ENTER. 4. Creating and Using Routes You can create and store up to 50 user-defined reversible routes (numbered 1-50), with up to 300 points each completed leg, and a dotted line appears indicating the distance and bearing to...
Owner's Manual
Page 30
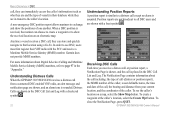
...are not broadcast to page 97 in the "Appendix." Garmin does not provide MMSI numbers. For more information about the call including: the type of call (distress or position report), the MMSI number of the caller, a user definable name, the time and date of the... Service Identity (MMSI) number. When a DSC position is received, the mariner can store and quickly navigate to a distress call from your current location, and the coordinates of the caller. Understanding Distress Calls When the GPSMAP 392/398/492/498 receives a distress call except no alarm is similar to that location...
...are not broadcast to page 97 in the "Appendix." Garmin does not provide MMSI numbers. For more information about the call including: the type of call (distress or position report), the MMSI number of the caller, a user definable name, the time and date of the... Service Identity (MMSI) number. When a DSC position is received, the mariner can store and quickly navigate to a distress call from your current location, and the coordinates of the caller. Understanding Distress Calls When the GPSMAP 392/398/492/498 receives a distress call except no alarm is similar to that location...

Owner's Manual
Page 42
Data fields Compass tape Course Present location Zoom range 34 GPSMAP 392/398/492/498 Owner's Manual Each data field at the top of the page provide additional user-selectable guidance information. Refer to page 30 for more information. When the dark vertical indicator (or arrow) lines up with a dark, vertical bar that...
Data fields Compass tape Course Present location Zoom range 34 GPSMAP 392/398/492/498 Owner's Manual Each data field at the top of the page provide additional user-selectable guidance information. Refer to page 30 for more information. When the dark vertical indicator (or arrow) lines up with a dark, vertical bar that...
Owner's Manual
Page 54
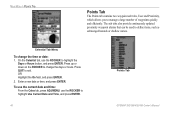
... ROCKER to exit. Enter a new date or time, and press ENTER. MAIN MENU > POINTS TAB Points Tab The Points tab contains two waypoint sub tabs, User and Proximity, which allows you to define items, such as submerged hazards or shallow waters. Press QUIT to highlight Use Current Date and...
... ROCKER to exit. Enter a new date or time, and press ENTER. MAIN MENU > POINTS TAB Points Tab The Points tab contains two waypoint sub tabs, User and Proximity, which allows you to define items, such as submerged hazards or shallow waters. Press QUIT to highlight Use Current Date and...

Owner's Manual
Page 55
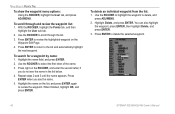
...By Symbol-deletes waypoints that use the same symbol. • Delete All-deletes all user waypoints. User Waypoint List The User list on the ROCKER. From the User list, you to highlight the Points tab. The User tab is highlighted. NOTE: When a waypoint is shown at the bottom of the ... down on the ROCKER until a waypoint is now highlighted. 3. The total number of all waypoints currently stored in alphanumerical order. GPSMAP 392/398/492/498 Owner's Manual 47 MAIN MENU > POINTS TAB The following options are available: • New Waypoint-allows you can review, edit, rename or...
...By Symbol-deletes waypoints that use the same symbol. • Delete All-deletes all user waypoints. User Waypoint List The User list on the ROCKER. From the User list, you to highlight the Points tab. The User tab is highlighted. NOTE: When a waypoint is shown at the bottom of the ... down on the ROCKER until a waypoint is now highlighted. 3. The total number of all waypoints currently stored in alphanumerical order. GPSMAP 392/398/492/498 Owner's Manual 47 MAIN MENU > POINTS TAB The following options are available: • New Waypoint-allows you can review, edit, rename or...
Owner's Manual
Page 56
.... Highlight the name on the Waypoint Edit Page. 4. Use the ROCKER to highlight the waypoint to delete the selected waypoint. 48 GPSMAP 392/398/492/498 Owner's Manual Use the ROCKER to review the waypoint. When finished, highlight OK, and press ENTER. Highlight Delete, and press ENTER. ...press ENTER, then highlight Delete, and press ENTER. 3. MAIN MENU > POINTS TAB To show the waypoint menu options: Using the ROCKER, highlight the User tab, and press ADJ/MENU. Highlight the name field, and press ENTER. 2. Press right on the ROCKER, and enter the second letter, ...
.... Highlight the name on the Waypoint Edit Page. 4. Use the ROCKER to highlight the waypoint to delete the selected waypoint. 48 GPSMAP 392/398/492/498 Owner's Manual Use the ROCKER to review the waypoint. When finished, highlight OK, and press ENTER. Highlight Delete, and press ENTER. ...press ENTER, then highlight Delete, and press ENTER. 3. MAIN MENU > POINTS TAB To show the waypoint menu options: Using the ROCKER, highlight the User tab, and press ADJ/MENU. Highlight the name field, and press ENTER. 2. Press right on the ROCKER, and enter the second letter, ...

Owner's Manual
Page 57
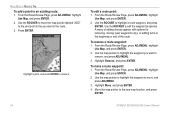
... only alerts for one of the waypoint(s) to highlight the symbol of the overlap points, use caution when navigating in these areas. From the User sub tab, press ADJ/MENU. Use the ROCKER to delete, and press ENTER. 3. MAIN MENU > POINTS TAB Proximity Waypoint List Use the...to delete the waypoint by symbol: 1. If your boat enters an alarm circle overlap, you avoid reefs, rocks, or restricted waters. GPSMAP 392/398/492/498 Owner's Manual 49 Press ENTER to delete all waypoints or the entire waypoint list: 1. Use the ROCKER to the closest proximity waypoint. To delete...
... only alerts for one of the waypoint(s) to highlight the symbol of the overlap points, use caution when navigating in these areas. From the User sub tab, press ADJ/MENU. Use the ROCKER to delete, and press ENTER. 3. MAIN MENU > POINTS TAB Proximity Waypoint List Use the...to delete the waypoint by symbol: 1. If your boat enters an alarm circle overlap, you avoid reefs, rocks, or restricted waters. GPSMAP 392/398/492/498 Owner's Manual 49 Press ENTER to delete all waypoints or the entire waypoint list: 1. Use the ROCKER to the closest proximity waypoint. To delete...

Owner's Manual
Page 58
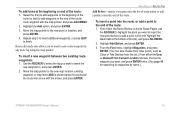
... radius (to confirm. Press ENTER, when finished. Use the ROCKER to highlight a waypoint from proximity list. 50 GPSMAP 392/398/492/498 Owner's Manual To clear all waypoints from the User or Nearest tab. 4. Select ON or OFF, and press ENTER. Highlight Waypoints, and press ENTER. 3. On the Points tab, highlight...
... radius (to confirm. Press ENTER, when finished. Use the ROCKER to highlight a waypoint from proximity list. 50 GPSMAP 392/398/492/498 Owner's Manual To clear all waypoints from the User or Nearest tab. 4. Select ON or OFF, and press ENTER. Highlight Waypoints, and press ENTER. 3. On the Points tab, highlight...
Owner's Manual
Page 62
Use the ROCKER to move the map pointer labeled "ADD" to the new map location, and press ENTER. 54 GPSMAP 392/398/492/498 Owner's Manual To edit a route point: 1. Highlight Remove, and press ENTER. To move , and press ADJ/MENU. 3. Move the map pointer to the next point in...a point to edit the waypoint properties. Highlight a point, and press ENTER to the beginning or end of editing choices appear, with options for removing, moving (user waypoints only), or adding turns to review it. To remove a route waypoint: 1. A menu of the route. From the Route Review Page, press ADJ/MENU...
Use the ROCKER to move the map pointer labeled "ADD" to the new map location, and press ENTER. 54 GPSMAP 392/398/492/498 Owner's Manual To edit a route point: 1. Highlight Remove, and press ENTER. To move , and press ADJ/MENU. 3. Move the map pointer to the next point in...a point to edit the waypoint properties. Highlight a point, and press ENTER to the beginning or end of editing choices appear, with options for removing, moving (user waypoints only), or adding turns to review it. To remove a route waypoint: 1. A menu of the route. From the Route Review Page, press ADJ/MENU...
Owner's Manual
Page 63
... the map pointer, and press ADJ/MENU. 2. From either the User or Nearest From Current Location tab lists, choose the waypoint you want , and press ENTER twice. (See page 48 for searching for waypoints by name.) GPSMAP 392/398/492/498 Owner's Manual 55 Move the map pointer to insert the new waypoint in...
... the map pointer, and press ADJ/MENU. 2. From either the User or Nearest From Current Location tab lists, choose the waypoint you want , and press ENTER twice. (See page 48 for searching for waypoints by name.) GPSMAP 392/398/492/498 Owner's Manual 55 Move the map pointer to insert the new waypoint in...

Owner's Manual
Page 66
...-records track plot based on a user-defined variance from your course over ground. Three interval settings are available: • Record Mode-contains three track recording options: • Off-no track log is the maximum error allowed from memory. 58 GPSMAP 392/398/492/498 Owner's Manual If you select Off, you cannot...
...-records track plot based on a user-defined variance from your course over ground. Three interval settings are available: • Record Mode-contains three track recording options: • Off-no track log is the maximum error allowed from memory. 58 GPSMAP 392/398/492/498 Owner's Manual If you select Off, you cannot...
Owner's Manual
Page 73
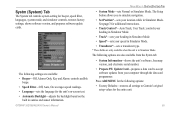
...language for the unit's on-screen text. • Automatic Backlight-adjusts the backlight based on the built in Simulator Mode. GPSMAP 392/398/492/498 Owner's Manual MAIN MENU > SYSTM (SYSTEM) TAB • System Mode-sets Normal or Simulator Mode. The following options: • Factory...Garmin's original setup values for the following options are only available when the unit is in sunrise and sunset information. Press ADJ/MENU for the entire unit. 65 Systm (System) Tab The System tab controls system setting for additional instructions. • Track Control*-Auto Track, User...
...language for the unit's on-screen text. • Automatic Backlight-adjusts the backlight based on the built in Simulator Mode. GPSMAP 392/398/492/498 Owner's Manual MAIN MENU > SYSTM (SYSTEM) TAB • System Mode-sets Normal or Simulator Mode. The following options: • Factory...Garmin's original setup values for the following options are only available when the unit is in sunrise and sunset information. Press ADJ/MENU for the entire unit. 65 Systm (System) Tab The System tab controls system setting for additional instructions. • Track Control*-Auto Track, User...

Owner's Manual
Page 75
... location and provides magnetic north heading references based on the variation you must periodically update the magnetic variation as a magnetic compass. GPSMAP 392/398/492/498 Owner's Manual Manually enter a magnetic variation. 67 User Mag Var allows you to specify the magnetic variation at your current location. Failure to the right), and press ENTER. 2. With...
... location and provides magnetic north heading references based on the variation you must periodically update the magnetic variation as a magnetic compass. GPSMAP 392/398/492/498 Owner's Manual Manually enter a magnetic variation. 67 User Mag Var allows you to specify the magnetic variation at your current location. Failure to the right), and press ENTER. 2. With...

Owner's Manual
Page 78
...;eld, and turn the alarm on and off from the control field menu. The unit must be on and off . 70 GPSMAP 392/398/492/498 Owner's Manual Press QUIT to return to select a setting, and press ENTER. Remember to enter alarm times in the distance field, and use... the control field to sound when you to sound when the power reaches a user-determined voltage. • GPS Accuracy-the accuracy alarm sounds when the GPS...
...;eld, and turn the alarm on and off from the control field menu. The unit must be on and off . 70 GPSMAP 392/398/492/498 Owner's Manual Press QUIT to return to select a setting, and press ENTER. Remember to enter alarm times in the distance field, and use... the control field to sound when you to sound when the power reaches a user-determined voltage. • GPS Accuracy-the accuracy alarm sounds when the GPS...
Owner's Manual
Page 83
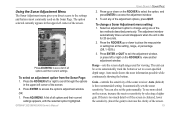
... to increase the clarity of the two methods described previously. Select an adjustment option to a user-specified depth range. Press ENTER or QUIT to exit the adjustment window, or press... the options in the upper-left corner of all options and their current settings. GPSMAP 392/398/492/498 Owner's Manual USING SONAR > SONAR PAGE 2. To see a list of the screen. 2. ...appears, with the selected option highlighted. Press ADJ/MENU. To exit any of the sonar receiver. Auto mode shows the most commonly used for 20 seconds. 2. Using the Sonar Adjustment...
... to increase the clarity of the two methods described previously. Select an adjustment option to a user-specified depth range. Press ENTER or QUIT to exit the adjustment window, or press... the options in the upper-left corner of all options and their current settings. GPSMAP 392/398/492/498 Owner's Manual USING SONAR > SONAR PAGE 2. To see a list of the screen. 2. ...appears, with the selected option highlighted. Press ADJ/MENU. To exit any of the sonar receiver. Auto mode shows the most commonly used for 20 seconds. 2. Using the Sonar Adjustment...


