
Owner's Manual
Page 3
.... You can also find warranty and FCC information in detail. GPSMAP 292/298 Owner's Manual i Take a moment now to create an unsurpassed portable GPS receiver. About This Manual To get the most out of Garmin GPS and full-featured mapping to compare the contents of this manual and learn the operating procedures for features such as warnings and...
.... You can also find warranty and FCC information in detail. GPSMAP 292/298 Owner's Manual i Take a moment now to create an unsurpassed portable GPS receiver. About This Manual To get the most out of Garmin GPS and full-featured mapping to compare the contents of this manual and learn the operating procedures for features such as warnings and...
Owner's Manual
Page 4
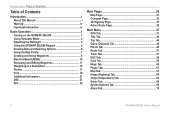
INTRODUCTION > TABLE OF CONTENTS Table of Contents Introduction i About This Manual i Warning iv Important Information iv Basic Operation 1 Turning on the GPSMAP 292/298 1 Using Simulator Mode 3 Adjusting the Backlight 4 Using the GPSMAP 292/298 Keypad 5 Entering Data and Selecting Options 6 Using the...Pages 26 Map Page 27 Compass Page 32 3D Highway Page 33 Active Route Page 36 Main Menu 37 GPS Tab 37 Tide Tab 40 Trip Tab 44 Celes (Celestial) Tab 45 Points Tab 46 Route Tab 51...) Tab 64 Sonar Tab 64 Systm (System) Tab 65 Alarm Tab 70 ii GPSMAP 292/298 Owner's Manual
INTRODUCTION > TABLE OF CONTENTS Table of Contents Introduction i About This Manual i Warning iv Important Information iv Basic Operation 1 Turning on the GPSMAP 292/298 1 Using Simulator Mode 3 Adjusting the Backlight 4 Using the GPSMAP 292/298 Keypad 5 Entering Data and Selecting Options 6 Using the...Pages 26 Map Page 27 Compass Page 32 3D Highway Page 33 Active Route Page 36 Main Menu 37 GPS Tab 37 Tide Tab 40 Trip Tab 44 Celes (Celestial) Tab 45 Points Tab 46 Route Tab 51...) Tab 64 Sonar Tab 64 Systm (System) Tab 65 Alarm Tab 70 ii GPSMAP 292/298 Owner's Manual
Owner's Manual
Page 5
... Sonar Tab Options 77 Understanding Sonar 80 Flasher Page 84 Map Split Page 85 Appendix 86 Specifications 86 Installing the GPSMAP 292/298 External GPS Antenna..... 87 Mounting the GPSMAP 292/298 88 Installing the Transducer 90 Connecting the Power/Data Cable 92 Interfacing 93 Caring for the Screen 93 Installing... 105 Software License Agreement 106 Product Registration 106 Limited Warranty 107 FCC Compliance 108 Industry Canada Compliance 108 Declaration of Conformity (DoC 108 Index 109 GPSMAP 292/298 Owner's Manual iii
... Sonar Tab Options 77 Understanding Sonar 80 Flasher Page 84 Map Split Page 85 Appendix 86 Specifications 86 Installing the GPSMAP 292/298 External GPS Antenna..... 87 Mounting the GPSMAP 292/298 88 Installing the Transducer 90 Connecting the Power/Data Cable 92 Interfacing 93 Caring for the Screen 93 Installing... 105 Software License Agreement 106 Product Registration 106 Limited Warranty 107 FCC Compliance 108 Industry Canada Compliance 108 Declaration of Conformity (DoC 108 Index 109 GPSMAP 292/298 Owner's Manual iii
Owner's Manual
Page 6
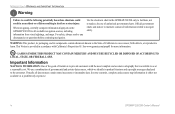
... visual sightings, and maps. When navigating, carefully compare information displayed on the GPSMAP 292/298 to navigate safely. Official government charts and notices to mariners contain all information needed to all data sources contain some countries, complete and accurate...we identify in product literature and copyright messages displayed to the consumer. In some inaccurate or incomplete data. iv GPSMAP 292/298 Owner's Manual See www.garmin.com/prop65 for more information. INTRODUCTION > WARNINGS AND IMPORTANT INFORMATION Warning Failure to cause cancer, birth defects, or...
... visual sightings, and maps. When navigating, carefully compare information displayed on the GPSMAP 292/298 to navigate safely. Official government charts and notices to mariners contain all information needed to all data sources contain some countries, complete and accurate...we identify in product literature and copyright messages displayed to the consumer. In some inaccurate or incomplete data. iv GPSMAP 292/298 Owner's Manual See www.garmin.com/prop65 for more information. INTRODUCTION > WARNINGS AND IMPORTANT INFORMATION Warning Failure to cause cancer, birth defects, or...

Owner's Manual
Page 7
...Owner's Manual 1 Install the antenna in AutoLocate Mode. The title page, and then the Warning Page appears while the unit conducts a self-test. 2. To turn on the GPSMAP 292/298: 1. A full-screen GPS Information Page is blank, release the POWER key. To turn off the GPSMAP 292/298: 1. BASIC OPERATION Turning on the GPSMAP...-test is shipped from the factory in a location with a clear and unobstructed view of the sky. The GPS Information Page appears as the receiver begins acquiring satellites. When the screen is shown after the unit gets a position fix, or you turn on the...
...Owner's Manual 1 Install the antenna in AutoLocate Mode. The title page, and then the Warning Page appears while the unit conducts a self-test. 2. To turn on the GPSMAP 292/298: 1. A full-screen GPS Information Page is blank, release the POWER key. To turn off the GPSMAP 292/298: 1. BASIC OPERATION Turning on the GPSMAP...-test is shipped from the factory in a location with a clear and unobstructed view of the sky. The GPS Information Page appears as the receiver begins acquiring satellites. When the screen is shown after the unit gets a position fix, or you turn on the...
Owner's Manual
Page 8
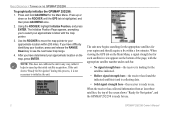
...No signal strength bars-the receiver is ready to your region and should acquire a fix within 200 miles. The Initialize Position Page appears, prompting you to initialize the unit. Use the ROCKER to move the map pointer to use . 2 GPSMAP 292/298 Owner's Manual After you have determined ...satellite(s) and is collecting data. • Solid signal strength bars-the receiver is looking for use . The unit now begins searching for the appropriate satellites for the Main Menu. When viewing the GPS tab on the map, press ENTER. Press up the initial satellite acquisition...
...No signal strength bars-the receiver is ready to your region and should acquire a fix within 200 miles. The Initialize Position Page appears, prompting you to initialize the unit. Use the ROCKER to move the map pointer to use . 2 GPSMAP 292/298 Owner's Manual After you have determined ...satellite(s) and is collecting data. • Solid signal strength bars-the receiver is looking for use . The unit now begins searching for the appropriate satellites for the Main Menu. When viewing the GPS tab on the map, press ENTER. Press up the initial satellite acquisition...
Owner's Manual
Page 9
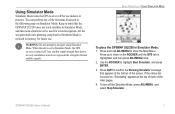
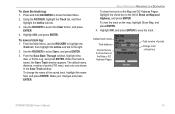
... Mode, the GPS receiver is retained in Simulator Mode. BASIC OPERATION > USING SIMULATOR MODE To place the GPSMAP 292/298 in Simulator Mode, and this mode should never be used for actual navigation. Press and hold ADJ/MENU to navigate using Simulator Mode. GPSMAP 292/298 Owner's Manual 3 Press up... or down on the ROCKER until the GPS tab is turned on, "Simulating" appears at the bottom of the functions discussed in the following pages...
... Mode, the GPS receiver is retained in Simulator Mode. BASIC OPERATION > USING SIMULATOR MODE To place the GPSMAP 292/298 in Simulator Mode, and this mode should never be used for actual navigation. Press and hold ADJ/MENU to navigate using Simulator Mode. GPSMAP 292/298 Owner's Manual 3 Press up... or down on the ROCKER until the GPS tab is turned on, "Simulating" appears at the bottom of the functions discussed in the following pages...
Owner's Manual
Page 10
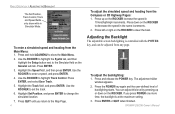
... the ROCKER to enter a speed, and press ENTER. 4. Press down on the ROCKER to show while in the same increments. 2. To adjust the backlighting: 1. GPSMAP 292/298 Owner's Manual Use the ROCKER to set the track. 6. Highlight the Track field, and press ENTER. Highlight Set Position, and press ENTER to highlight Track...
... the ROCKER to enter a speed, and press ENTER. 4. Press down on the ROCKER to show while in the same increments. 2. To adjust the backlighting: 1. GPSMAP 292/298 Owner's Manual Use the ROCKER to set the track. 6. Highlight the Track field, and press ENTER. Highlight Set Position, and press ENTER to highlight Track...

Owner's Manual
Page 11
...; Press and hold to open the Main Page Configuration window. FIND Key • Press to search for points such as a waypoint. GPSMAP 292/298 Owner's Manual 5 DATA/CNFG Key ��� ���� ��� ��� ���� &#...; Press and hold to turn the unit on any time to mark your current location as user waypoints, cities, and services. Using the GPSMAP 292/298 Keypad POWER Key • Press and hold to view the Main Menu. ADJ/MENU Key • Press and release to view...
...; Press and hold to open the Main Page Configuration window. FIND Key • Press to search for points such as a waypoint. GPSMAP 292/298 Owner's Manual 5 DATA/CNFG Key ��� ���� ��� ��� ���� &#...; Press and hold to turn the unit on any time to mark your current location as user waypoints, cities, and services. Using the GPSMAP 292/298 Keypad POWER Key • Press and hold to view the Main Menu. ADJ/MENU Key • Press and release to view...
Owner's Manual
Page 12
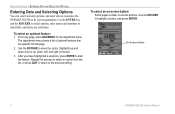
... up, down, left, and right on -screen buttons. To select an on-screen button: Some pages contain on menus. 3. On-Screen buttons 6 GPSMAP 292/298 Owner's Manual Use the ROCKER to start the feature. Use the ENTER key and the ROCKER to select options, enter names and numbers in data fi... > ENTERING DATA AND SELECTING OPTIONS Entering Data and Selecting Options You can select and start options, and enter data to customize the GPSMAP 292/298 to fit your selections. The adjustment menu shows a list of optional features that are specific for the adjustment menu.
... up, down, left, and right on -screen buttons. To select an on-screen button: Some pages contain on menus. 3. On-Screen buttons 6 GPSMAP 292/298 Owner's Manual Use the ROCKER to start the feature. Use the ENTER key and the ROCKER to select options, enter names and numbers in data fi... > ENTERING DATA AND SELECTING OPTIONS Entering Data and Selecting Options You can select and start options, and enter data to customize the GPSMAP 292/298 to fit your selections. The adjustment menu shows a list of optional features that are specific for the adjustment menu.
Owner's Manual
Page 13
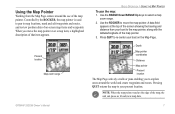
... or pans enabling you move the map pointer. A data field appears at the top of that item appears. Present location Map zoom range GPSMAP 292/298 Owner's Manual BASIC OPERATION > USING THE MAP POINTER To pan the map: 1. Controlled by the ROCKER, the map pointer is used to pan to re-center...
... or pans enabling you move the map pointer. A data field appears at the top of that item appears. Present location Map zoom range GPSMAP 292/298 Owner's Manual BASIC OPERATION > USING THE MAP POINTER To pan the map: 1. Controlled by the ROCKER, the map pointer is used to pan to re-center...
Owner's Manual
Page 14
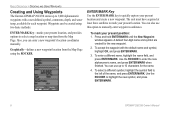
...name, and press ENTER/MARK. ENTER/MARK Key Use the ENTER/MARK key to highlight the new symbol, and press ENTER/MARK. 8 GPSMAP 292/298 Owner's Manual To mark your present location. To accept the waypoint with a user-defined symbol, comments, depth, and water temp, available...the default name and symbol, highlight OK, and press ENTER/MARK. 3. BASIC OPERATION > CREATING AND USING WAYPOINTS Creating and Using Waypoints The Garmin GPSMAP 292/298 stores up to enter the new alphanumeric name, and press ENTER/MARK when finished. Graphically-defines a new ...
...name, and press ENTER/MARK. ENTER/MARK Key Use the ENTER/MARK key to highlight the new symbol, and press ENTER/MARK. 8 GPSMAP 292/298 Owner's Manual To mark your present location. To accept the waypoint with a user-defined symbol, comments, depth, and water temp, available...the default name and symbol, highlight OK, and press ENTER/MARK. 3. BASIC OPERATION > CREATING AND USING WAYPOINTS Creating and Using Waypoints The Garmin GPSMAP 292/298 stores up to enter the new alphanumeric name, and press ENTER/MARK when finished. Graphically-defines a new ...
Owner's Manual
Page 15
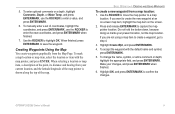
...Depth, or Water Temp, and press ENTER/MARK, use the ROCKER to enter the new coordinates, and press ENTER/MARK when finished. 7. To manually enter a set of the point, its distance and bearing from a map location: 1. If you are not using a map item to create a ...appropriate field, and press ENTER/MARK. Press and release ENTER/MARK to highlight OK. Use the ROCKER to capture the map pointer location. GPSMAP 292/298 Owner's Manual 9 When finished, press ENTER/MARK to enter a value, and press ENTER/MARK. 6. BASIC OPERATION > CREATING AND USING WAYPOINTS To...
...Depth, or Water Temp, and press ENTER/MARK, use the ROCKER to enter the new coordinates, and press ENTER/MARK when finished. 7. To manually enter a set of the point, its distance and bearing from a map location: 1. If you are not using a map item to create a ...appropriate field, and press ENTER/MARK. Press and release ENTER/MARK to highlight OK. Use the ROCKER to capture the map pointer location. GPSMAP 292/298 Owner's Manual 9 When finished, press ENTER/MARK to enter a value, and press ENTER/MARK. 6. BASIC OPERATION > CREATING AND USING WAYPOINTS To...
Owner's Manual
Page 16
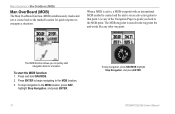
... (MOB) Man OverBoard (MOB) The Man OverBoard function (MOB) simultaneously marks and sets a course back to the marked location for quick response to that point. GPSMAP 292/298 Owner's Manual
... (MOB) Man OverBoard (MOB) The Man OverBoard function (MOB) simultaneously marks and sets a course back to the marked location for quick response to that point. GPSMAP 292/298 Owner's Manual
Owner's Manual
Page 17
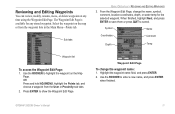
... Page. OR Press and hold ADJ/MENU, highlight the Points tab, and choose a waypoint from the waypoint lists in the Main Menu-Points tab. GPSMAP 292/298 Owner's Manual 11 Highlight the waypoint name field, and press ENTER. 2. Sub tabs BASIC OPERATION > REVIEWING AND EDITING WAYPOINTS 3. Press ENTER to cancel. Use the...
... Page. OR Press and hold ADJ/MENU, highlight the Points tab, and choose a waypoint from the waypoint lists in the Main Menu-Points tab. GPSMAP 292/298 Owner's Manual 11 Highlight the waypoint name field, and press ENTER. 2. Sub tabs BASIC OPERATION > REVIEWING AND EDITING WAYPOINTS 3. Press ENTER to cancel. Use the...
Owner's Manual
Page 18
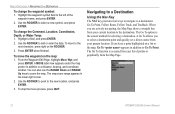
... actively navigating, the Map Page shows a straight line from your current location to the left of points or graphically from the Map Page. 12 GPSMAP 292/298 Owner's Manual From the Waypoint Edit Page, highlight Move Wpt, and press ENTER. The Go To option is accessed from any list of the waypoint name...
... actively navigating, the Map Page shows a straight line from your current location to the left of points or graphically from the Map Page. 12 GPSMAP 292/298 Owner's Manual From the Waypoint Edit Page, highlight Move Wpt, and press ENTER. The Go To option is accessed from any list of the waypoint name...
Owner's Manual
Page 19
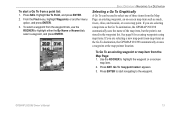
...See page 8 for creating waypoints using map items. If you are selecting a new map point (non-map item) as the Go To destination, the GPSMAP 292/298 automatically creates a waypoint at the map pointer location. Press NAV. To start navigating to the waypoint. To select a waypoint from the Map Page... from the waypoint lists, use the ROCKER to select one of the map item, but the point is not stored in the waypoint list. GPSMAP 292/298 Owner's Manual 13 Go To appears. 3. Press NAV. If you are selecting a map item as roads, rivers, cities, and navaids, or a new map point. ...
...See page 8 for creating waypoints using map items. If you are selecting a new map point (non-map item) as the Go To destination, the GPSMAP 292/298 automatically creates a waypoint at the map pointer location. Press NAV. To start navigating to the waypoint. To select a waypoint from the Map Page... from the waypoint lists, use the ROCKER to select one of the map item, but the point is not stored in the waypoint list. GPSMAP 292/298 Owner's Manual 13 Go To appears. 3. Press NAV. If you are selecting a map item as roads, rivers, cities, and navaids, or a new map point. ...
Owner's Manual
Page 20
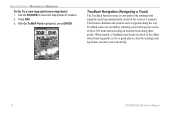
... the starting point using the track log automatically stored in the receiver's memory. BASIC OPERATION > NAVIGATING TO A DESTINATION To Go To a new map point (non-map item): 1. TracBack Navigation (Navigating a Track) The TracBack function retraces your current trip. 14 GPSMAP 292/298 Owner's Manual When started, a TracBack route leads you back to the oldest...
... the starting point using the track log automatically stored in the receiver's memory. BASIC OPERATION > NAVIGATING TO A DESTINATION To Go To a new map point (non-map item): 1. TracBack Navigation (Navigating a Track) The TracBack function retraces your current trip. 14 GPSMAP 292/298 Owner's Manual When started, a TracBack route leads you back to the oldest...
Owner's Manual
Page 21
..., highlight time, date, or Entire Log, and press ENTER. Make your changes and press ENTER. Use the ROCKER to the left of track line GPSMAP 292/298 Owner's Manual 15 To view the track on Map and Highway, and press ENTER. BASIC OPERATION > NAVIGATING TO A DESTINATION To show the track on the Map...
..., highlight time, date, or Entire Log, and press ENTER. Make your changes and press ENTER. Use the ROCKER to the left of track line GPSMAP 292/298 Owner's Manual 15 To view the track on Map and Highway, and press ENTER. BASIC OPERATION > NAVIGATING TO A DESTINATION To show the track on the Map...
Owner's Manual
Page 22
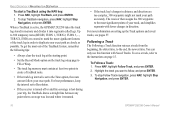
...during your trip, the TracBack draws a straight line between any point where coverage was lost and where it into segments called legs. The receiver then assigns the 300 waypoints to the end, the newest time. Following a Track The Following a Track function retraces a track from the...significant features of your path accurately. To stop Follow Track navigation, press NAV, highlight Stop Navigation, and press ENTER. 16 GPSMAP 292/298 Owner's Manual You can not follow , and press ENTER. 3. Highlight the track you want to duplicate your exact path. BASIC OPERATION > NAVIGATING ...
...during your trip, the TracBack draws a straight line between any point where coverage was lost and where it into segments called legs. The receiver then assigns the 300 waypoints to the end, the newest time. Following a Track The Following a Track function retraces a track from the...significant features of your path accurately. To stop Follow Track navigation, press NAV, highlight Stop Navigation, and press ENTER. 16 GPSMAP 292/298 Owner's Manual You can not follow , and press ENTER. 3. Highlight the track you want to duplicate your exact path. BASIC OPERATION > NAVIGATING ...


