

P8010 BIOS Guide
Page 2
... your notebook. Turn on the screen. To return to scroll through the Setup Utility The BIOS setup utility consists of the fields will appear. Pressing the [F9] key resets all submenus and setup items. The following menus and information screens: ■ BIOS Setup ■ Diagnostic Screen ■ Boot Menu ■ Patent Information ■ System Information ■ Continue Booting Clicking on the left mouse or touchpad button; LifeBook P Series BIOS P Series BIOS BIOS SETUP UTILITY The BIOS Setup Utility is a program that sets up the operating...
... your notebook. Turn on the screen. To return to scroll through the Setup Utility The BIOS setup utility consists of the fields will appear. Pressing the [F9] key resets all submenus and setup items. The following menus and information screens: ■ BIOS Setup ■ Diagnostic Screen ■ Boot Menu ■ Patent Information ■ System Information ■ Continue Booting Clicking on the left mouse or touchpad button; LifeBook P Series BIOS P Series BIOS BIOS SETUP UTILITY The BIOS Setup Utility is a program that sets up the operating...

P8010 BIOS Guide
Page 3
...; If your notebook emits a series of error messages and their meanings. ■ If your data security settings require it will give you an opportunity to modify the setup utility settings, as described in the system User's Guide. When the setup utility starts with current parameters values. Press any key to run SETUP 2. Info Menu 3 The Troubleshooting Section includes a list of beeps that sounds like a code and the display is a beep...
...; If your notebook emits a series of error messages and their meanings. ■ If your data security settings require it will give you an opportunity to modify the setup utility settings, as described in the system User's Guide. When the setup utility starts with current parameters values. Press any key to run SETUP 2. Info Menu 3 The Troubleshooting Section includes a list of beeps that sounds like a code and the display is a beep...
P8010 BIOS Guide
Page 4
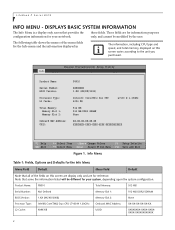
...: Serial Number: BIOS Version: Processor Type: L2 Cache: Total Memory: Memory Slot 1: Memory Slot 2: Onboard MAC Address: UUID: P8010 XXXXXXXX 1.XX (XX/XX/2008) Intel(R) Core(TM)2 Duo CPU 4096 KB L7100 @ 1.20GHz 512 MB 512 MB DDR2 SDRAM None XX-XX-XX-XX-XX-XX XXXXXXXX-XXXX-XXXX-XXXX-XXXXXXXXXXXX F1 Help ESC Exit Select Item -/Space Change Values F9 Setup Defaults ▲ Select Menu Enter Select...
...: Serial Number: BIOS Version: Processor Type: L2 Cache: Total Memory: Memory Slot 1: Memory Slot 2: Onboard MAC Address: UUID: P8010 XXXXXXXX 1.XX (XX/XX/2008) Intel(R) Core(TM)2 Duo CPU 4096 KB L7100 @ 1.20GHz 512 MB 512 MB DDR2 SDRAM None XX-XX-XX-XX-XX-XX XXXXXXXX-XXXX-XXXX-XXXX-XXXXXXXXXXXX F1 Help ESC Exit Select Item -/Space Change Values F9 Setup Defaults ▲ Select Menu Enter Select...
P8010 BIOS Guide
Page 5
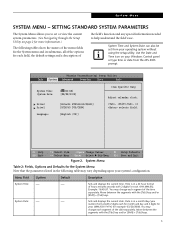
...: [Hitachi HTS541612J9SA00] [UJDA765 DVD/CDRW] [English (US)] Item Specific Help Adjust calendar clock. , , or selects field. ▲ ▲▲ F1 Help ESC Exit Select Item -/Space Change Values F9 Setup Defaults Select Menu Enter Select Sub-Menu F10 Save and Exit Figure 2. System Menu SYSTEM MENU - Use the Date and Time icon on page 2 for each segment of the options for more information...
...: [Hitachi HTS541612J9SA00] [UJDA765 DVD/CDRW] [English (US)] Item Specific Help Adjust calendar clock. , , or selects field. ▲ ▲▲ F1 Help ESC Exit Select Item -/Space Change Values F9 Setup Defaults Select Menu Enter Select Sub-Menu F10 Save and Exit Figure 2. System Menu SYSTEM MENU - Use the Date and Time icon on page 2 for each segment of the options for more information...
P8010 BIOS Guide
Page 6
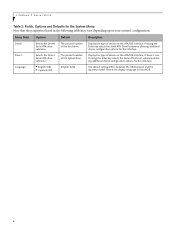
... may vary depending upon your system's configuration. The default setting differs between the US/European and the Japanese model. LifeBook P Series BIOS Table 2: Fields, Options and Defaults for the BIOS. 6 The product number of the optical drive. [English (US)] Display the type of the hard drive. Menu Field Options Default Description Drive0 Drive1: Language: Selects the Drive0 Serial ATA drive submenu Selects the Drive1 Serial ATA drive submenu ■ English (US) ■ Japanese...
... may vary depending upon your system's configuration. The default setting differs between the US/European and the Japanese model. LifeBook P Series BIOS Table 2: Fields, Options and Defaults for the BIOS. 6 The product number of the optical drive. [English (US)] Display the type of the hard drive. Menu Field Options Default Description Drive0 Drive1: Language: Selects the Drive0 Serial ATA drive submenu Selects the Drive1 Serial ATA drive submenu ■ English (US) ■ Japanese...
P8010 BIOS Guide
Page 8
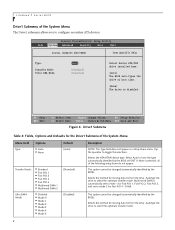
... to /from the drive. Phoenix TrustedCore(tm) Setup Utility Info System Advanced Security Boot Exit Drive1 [UJDA765 DVD/CDRW] Item Specific Help Type: Transfer Mode: Ultra DMA Mode: [Auto] [Standard] [Disabled] Select Serial ATA/IDE drive installed here. [Auto] The BIOS auto-types the drive on boot time. [None] The drive is automatically set to mode 1 for Fast PIO 4 / DMA. This option cannot be changed (automatically identified by the BIOS at POST. Select...
... to /from the drive. Phoenix TrustedCore(tm) Setup Utility Info System Advanced Security Boot Exit Drive1 [UJDA765 DVD/CDRW] Item Specific Help Type: Transfer Mode: Ultra DMA Mode: [Auto] [Standard] [Disabled] Select Serial ATA/IDE drive installed here. [Auto] The BIOS auto-types the drive on boot time. [None] The drive is automatically set to mode 1 for Fast PIO 4 / DMA. This option cannot be changed (automatically identified by the BIOS at POST. Select...

P8010 BIOS Guide
Page 10
... Boot Exit Keyboard/Mouse Features Video Features Internal Device Configurations CPU Features USB Features Miscellaneous Configurations Item Specific Help Configures keyboard/ mouse features. Advanced Menu Table 5: Fields, Options and Defaults for battery life optimization. 10 LifeBook P Series BIOS ADVANCED MENU - SETTING DEVICE FEATURE CONTROLS The Advanced Menu allows you to change the CPU speed for the Advanced Menu Menu Field Description Keyboard/Mouse Features Video Features When selected, opens the Keyboard/Mouse Features submenu, which allows enabling or disabling...
... Boot Exit Keyboard/Mouse Features Video Features Internal Device Configurations CPU Features USB Features Miscellaneous Configurations Item Specific Help Configures keyboard/ mouse features. Advanced Menu Table 5: Fields, Options and Defaults for battery life optimization. 10 LifeBook P Series BIOS ADVANCED MENU - SETTING DEVICE FEATURE CONTROLS The Advanced Menu allows you to change the CPU speed for the Advanced Menu Menu Field Description Keyboard/Mouse Features Video Features When selected, opens the Keyboard/Mouse Features submenu, which allows enabling or disabling...
P8010 BIOS Guide
Page 12
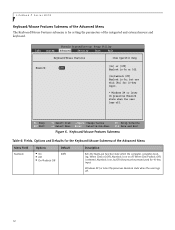
... . 12 LifeBook P Series BIOS Keyboard/Mouse Features Submenu of the Advanced Menu The Keyboard/Mouse Features submenu is on , but use with [Fn] for setting the parameters of the Advanced Menu Menu Field Options Default Description Numlock: ■ On ■ Off ■ On/Padlock Off [Off] Sets the NumLock function state when the computer completes booting. Phoenix TrustedCore(tm) Setup Utility Info System Advanced Security Boot Exit Keyboard/Mouse Features Item Specific Help...
... . 12 LifeBook P Series BIOS Keyboard/Mouse Features Submenu of the Advanced Menu The Keyboard/Mouse Features submenu is on , but use with [Fn] for setting the parameters of the Advanced Menu Menu Field Options Default Description Numlock: ■ On ■ Off ■ On/Padlock Off [Off] Sets the NumLock function state when the computer completes booting. Phoenix TrustedCore(tm) Setup Utility Info System Advanced Security Boot Exit Keyboard/Mouse Features Item Specific Help...

P8010 BIOS Guide
Page 14
...(tm) Setup Utility Info System Advanced Security Boot Exit Internal Device Configurations Item Specific Help Serial ATA Controller: AHCI Configuration: IDE Controller: Bluetooth(R): LAN Controller: Wireless LAN: IEEE1394 Controller: Internal Camera: [Enabled] [Enabled] [Enabled] [Enabled] [Enabled] [Enabled] [Enabled] [Enabled] [Disabled] Serial ATA port is disabled. [Enabled] Serial ATA port is enabled. F1 Help ESC Exit Select Item -/Space Change Values F9 Setup Defaults ▲ Select Menu Enter Select Sub-Menu F10 Save and Exit Figure 8. Enables or disables the selected...
...(tm) Setup Utility Info System Advanced Security Boot Exit Internal Device Configurations Item Specific Help Serial ATA Controller: AHCI Configuration: IDE Controller: Bluetooth(R): LAN Controller: Wireless LAN: IEEE1394 Controller: Internal Camera: [Enabled] [Enabled] [Enabled] [Enabled] [Enabled] [Enabled] [Enabled] [Enabled] [Disabled] Serial ATA port is disabled. [Enabled] Serial ATA port is enabled. F1 Help ESC Exit Select Item -/Space Change Values F9 Setup Defaults ▲ Select Menu Enter Select Sub-Menu F10 Save and Exit Figure 8. Enables or disables the selected...

P8010 BIOS Guide
Page 15
...) Setup Utility Info System Advanced Security Boot Exit CPU Features Item Specific Help Core Multi-Processing: SpeedStep(R) Technology: On Battery: On AC: [Enabled] [Enabled] [Battery Optimized] [Maximum Performance] Select Core Multi-Processing enabled or disabled. XD Bit functionality: [Enabled] Virtualization Technology: [Disabled] F1 Help ESC Exit Select Item -/Space Change Values Select Menu Enter Select Sub-Menu Figure 9. When Maximum Performance is selected, CPU speed is determined by the power source used . When...
...) Setup Utility Info System Advanced Security Boot Exit CPU Features Item Specific Help Core Multi-Processing: SpeedStep(R) Technology: On Battery: On AC: [Enabled] [Enabled] [Battery Optimized] [Maximum Performance] Select Core Multi-Processing enabled or disabled. XD Bit functionality: [Enabled] Virtualization Technology: [Disabled] F1 Help ESC Exit Select Item -/Space Change Values Select Menu Enter Select Sub-Menu Figure 9. When Maximum Performance is selected, CPU speed is determined by the power source used . When...
P8010 BIOS Guide
Page 16
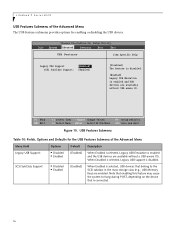
... USB Memory Key) are enabled. Phoenix TrustedCore(tm) Setup Utility Info System Advanced Security Boot Exit USB Features Item Specific Help Legacy USB Support [Enabled] SCSI SubClass Support: [Enabled] [Disabled] The feature is disabled. [Enabled] Legacy USB Emulation is disabled. When Disabled is selected, Legacy USB support is enabled and USB devices are available without a USB-aware OS. LifeBook P Series BIOS USB Features Submenu of the Advanced Menu Menu Field Options Default Description Legacy USB Support: ■ Disabled ■ Enabled [Enabled] When Enabled...
... USB Memory Key) are enabled. Phoenix TrustedCore(tm) Setup Utility Info System Advanced Security Boot Exit USB Features Item Specific Help Legacy USB Support [Enabled] SCSI SubClass Support: [Enabled] [Disabled] The feature is disabled. [Enabled] Legacy USB Emulation is disabled. When Disabled is selected, Legacy USB support is enabled and USB devices are available without a USB-aware OS. LifeBook P Series BIOS USB Features Submenu of the Advanced Menu Menu Field Options Default Description Legacy USB Support: ■ Disabled ■ Enabled [Enabled] When Enabled...

P8010 BIOS Guide
Page 17
...Table 11: Fields, Options and Defaults for enabling or disabling the power button and the Wake Up On LAN feature, and setting the volume and video memory size. Advanced Menu Miscellaneous Configurations Submenu of the Preboot Execution Environment. [Always Enabled] When [On AC mode only] is enabled. When enabled, in power-off system power with the power button. [Disabled] Selecting Enabled allows the system to Disk: Volume Setting: Hardware Power Management: Memory Bus Clock: FAN Control: Logo Lamp: [Disabled] [Disabled] [Enabled] [Disabled] [Always Enabled] [On] [Middle...
...Table 11: Fields, Options and Defaults for enabling or disabling the power button and the Wake Up On LAN feature, and setting the volume and video memory size. Advanced Menu Miscellaneous Configurations Submenu of the Preboot Execution Environment. [Always Enabled] When [On AC mode only] is enabled. When enabled, in power-off system power with the power button. [Disabled] Selecting Enabled allows the system to Disk: Volume Setting: Hardware Power Management: Memory Bus Clock: FAN Control: Logo Lamp: [Disabled] [Disabled] [Enabled] [Disabled] [Always Enabled] [On] [Middle...

P8010 BIOS Guide
Page 19
... Event Logging Submenu of the Advanced Menu Menu Field Options Default Description Event Log Capacity: Event Log Validity: View Event Log: ■ Enter Event Logging: ■ Disabled ■ Enabled System Boot Event: ■ Disabled ■ Enabled Clear All Event Logs: ■ No ■ Yes Mark Events as Read: [Enter] Press key to view content of event log Turns event logging on and off for...
... Event Logging Submenu of the Advanced Menu Menu Field Options Default Description Event Log Capacity: Event Log Validity: View Event Log: ■ Enter Event Logging: ■ Disabled ■ Enabled System Boot Event: ■ Disabled ■ Enabled Clear All Event Logs: ■ No ■ Yes Mark Events as Read: [Enter] Press key to view content of event log Turns event logging on and off for...
P8010 BIOS Guide
Page 20
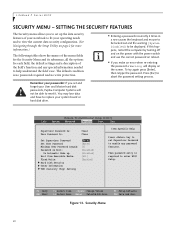
.... ■ Entering a password incorrectly 3 times in a row causes the keyboard and mouse to be locked out and the warning [System Disabled] to be able to help understand the field's use the correct password on Boot: On Automatic Wake up: Boot from Removable Media: Flash Write: Hard Disk Security Owner Information TPM (Security Chip) Setting [Enter] [Enter] [0] [Disabled] [Disabled] [All] [Enabled] Item Specific Help Press key to fit your system board or hard disk drive. LifeBook P Series BIOS SECURITY MENU - The default condition is...
.... ■ Entering a password incorrectly 3 times in a row causes the keyboard and mouse to be locked out and the warning [System Disabled] to be able to help understand the field's use the correct password on Boot: On Automatic Wake up: Boot from Removable Media: Flash Write: Hard Disk Security Owner Information TPM (Security Chip) Setting [Enter] [Enter] [0] [Disabled] [Disabled] [All] [Enabled] Item Specific Help Press key to fit your system board or hard disk drive. LifeBook P Series BIOS SECURITY MENU - The default condition is...

P8010 BIOS Guide
Page 21
... to access the BIOS setup utility. Password is : -- To cancel a password press the Enter key instead of entering characters in the Enter New Password field and in the Re-enter New Password field. A User Password may be used to access the BIOS setup utility. Passwords are NOT case-sensitive. User cannot set to configure the Security Chip. When enabled, password entry is set password length (0 to the Exit Menu. Flash Write: ■ Disabled ■ Enabled [Enabled] When disabled, the BIOS Flash memory will be accessed if the Supervisor Password is set , and Clear...
... to access the BIOS setup utility. Password is : -- To cancel a password press the Enter key instead of entering characters in the Enter New Password field and in the Re-enter New Password field. A User Password may be used to access the BIOS setup utility. Passwords are NOT case-sensitive. User cannot set to configure the Security Chip. When enabled, password entry is set password length (0 to the Exit Menu. Flash Write: ■ Disabled ■ Enabled [Enabled] When disabled, the BIOS Flash memory will be accessed if the Supervisor Password is set , and Clear...

P8010 BIOS Guide
Page 22
... been rebooted. Phoenix TrustedCore(tm) Setup Utility Info System Advanced Security Boot Exit Hard Disk Security Item Specific Help Drive0: Set Master Password Set User Password Clear [Enter] [Enter] Password Entry on Boot: ■ Disabled ■ Enabled Default Clear [Enter] [Enter] [Enabled] Description Display-only. When the Drive0 Password has been set , it must be used to access the modular hard drive if it is used in another system unless the password is set , the field changes to disabled, entry of the Security Menu Menu Field Drive0: Set Master Password Options...
... been rebooted. Phoenix TrustedCore(tm) Setup Utility Info System Advanced Security Boot Exit Hard Disk Security Item Specific Help Drive0: Set Master Password Set User Password Clear [Enter] [Enter] Password Entry on Boot: ■ Disabled ■ Enabled Default Clear [Enter] [Enter] [Enabled] Description Display-only. When the Drive0 Password has been set , it must be used to access the modular hard drive if it is used in another system unless the password is set , the field changes to disabled, entry of the Security Menu Menu Field Drive0: Set Master Password Options...

P8010 BIOS Guide
Page 24
...: Clear Security Chip [Disabled] Disabled and Deactivated [No Change] [Enter] F1 Help ESC Exit Select Item -/Space Change Values F9 Setup Defaults ▲ Select Menu Enter Select Sub-Menu F10 Save and Exit Figure 16. A reboot is required after reboot. LifeBook P Series BIOS TPM (Security Chip) Setting Submenu of the Security Menu The Trusted Platform Module (TPM) Security Chip Setting submenu is used to configure the Security Chip correctly. Clear Security Chip option becomes...
...: Clear Security Chip [Disabled] Disabled and Deactivated [No Change] [Enter] F1 Help ESC Exit Select Item -/Space Change Values F9 Setup Defaults ▲ Select Menu Enter Select Sub-Menu F10 Save and Exit Figure 16. A reboot is required after reboot. LifeBook P Series BIOS TPM (Security Chip) Setting Submenu of the Security Menu The Trusted Platform Module (TPM) Security Chip Setting submenu is used to configure the Security Chip correctly. Clear Security Chip option becomes...
P8010 BIOS Guide
Page 25
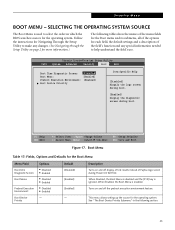
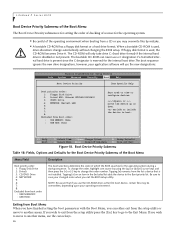
...Disabled] [Enabled] [Enabled] - Phoenix TrustedCore(tm) Setup Utility Info System Advanced Security Boot Exit Boot Time Diagnostic Screen: [Disabled] Boot Menu: [Enabled] Preboot Execution Environment: [Enabled] Boot Device Priority Item Specific Help [Disabled] Dispaly the logo screen during boot. [Enabled] Display the diagnostic screen during Power On Self Test. When Disabled, the Boot Menu is disabled and the [F12] key is enabled. Security Menu BOOT MENU - Follow the instructions for Navigating Through the Setup Utility to make any special information needed to select the order...
...Disabled] [Enabled] [Enabled] - Phoenix TrustedCore(tm) Setup Utility Info System Advanced Security Boot Exit Boot Time Diagnostic Screen: [Disabled] Boot Menu: [Enabled] Preboot Execution Environment: [Enabled] Boot Device Priority Item Specific Help [Disabled] Dispaly the logo screen during boot. [Enabled] Display the diagnostic screen during Power On Self Test. When Disabled, the Boot Menu is disabled and the [F12] key is enabled. Security Menu BOOT MENU - Follow the instructions for Navigating Through the Setup Utility to make any special information needed to select the order...
P8010 BIOS Guide
Page 26
... of the Boot Menu Menu Field Boot priority order: 1: Floppy Disk Drive 2: Drive0: 3: CD/DVD Drive 4: NETWORK: 5: 6: 7: 8: Excluded from boot order: : USB MEMORY: : USB HDD: Description The boot selections determine the order in the Excluded list adds the device to change the order, highlight one source by mistake. ■ A bootable CD-ROM has a floppy disk format or a hard drive format. NOTE: Be aware that is disabled or not present. The bootable CD-ROM can either exit from the setup utility or move...
... of the Boot Menu Menu Field Boot priority order: 1: Floppy Disk Drive 2: Drive0: 3: CD/DVD Drive 4: NETWORK: 5: 6: 7: 8: Excluded from boot order: : USB MEMORY: : USB HDD: Description The boot selections determine the order in the Excluded list adds the device to change the order, highlight one source by mistake. ■ A bootable CD-ROM has a floppy disk format or a hard drive format. NOTE: Be aware that is disabled or not present. The bootable CD-ROM can either exit from the setup utility or move...
P8010 BIOS Guide
Page 27
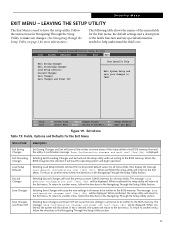
... Changes Exit Discarding Changes Load Setup Defaults Discard Changes Save Changes Save Changes and Power Off Item Specific Help Exit System Setup and save your changes to leave the setup utility. Selecting Exit Discarding Changes and Exit will cause the new settings in all menus to be written to the BIOS memory. Selecting Save Changes will exit the setup utility with out writing to the BIOS memory. LEAVING THE SETUP UTILITY The Exit Menu is used to CMOS...
... Changes Exit Discarding Changes Load Setup Defaults Discard Changes Save Changes Save Changes and Power Off Item Specific Help Exit System Setup and save your changes to leave the setup utility. Selecting Exit Discarding Changes and Exit will cause the new settings in all menus to be written to the BIOS memory. Selecting Save Changes will exit the setup utility with out writing to the BIOS memory. LEAVING THE SETUP UTILITY The Exit Menu is used to CMOS...


