
User Guide
Page 8
... Connecting the Power Adapters 47 Display Panel 48 Opening the Display Panel 48 Adjusting Display Panel Brightness 48 Using the Keyboard 49 Using the Power Options (Windows Vista 49 Using the Windows Mobility Center (Windows Vista 49 Closing the Display Panel 49 Starting Your LifeBook Notebook 50 Power On 50 Boot Sequence 51 Hard Disk Drive Passwords 52 BIOS Setup Utility 52 Booting the System 53 Starting Windows Vista the first time 54 Starting Windows XP the First Time 55 Registering Your LifeBook notebook with Fujitsu 56 Installing Click Me 56 Fujitsu Driver Update Utility...
... Connecting the Power Adapters 47 Display Panel 48 Opening the Display Panel 48 Adjusting Display Panel Brightness 48 Using the Keyboard 49 Using the Power Options (Windows Vista 49 Using the Windows Mobility Center (Windows Vista 49 Closing the Display Panel 49 Starting Your LifeBook Notebook 50 Power On 50 Boot Sequence 51 Hard Disk Drive Passwords 52 BIOS Setup Utility 52 Booting the System 53 Starting Windows Vista the first time 54 Starting Windows XP the First Time 55 Registering Your LifeBook notebook with Fujitsu 56 Installing Click Me 56 Fujitsu Driver Update Utility...
User Guide
Page 10
... 6 Troubleshooting Your LifeBook Troubleshooting 80 Identifying the Problem 80 Specific Problems 82 Power On Self Test Messages 92 Modem Result Codes 96 Restoring Your Pre-installed Software 97 Re-installing Individual Drivers and Applications 97 Restoring the Operating System for Windows XP Systems 98 Restoring the Operating System for Windows Vista Systems 99 Automatically Downloading Driver Updates 103 Care and Maintenance Caring for your LifeBook Notebook 104 Cleaning your LifeBook notebook 106 Storing your LifeBook notebook 107 Traveling with your LifeBook notebook...
... 6 Troubleshooting Your LifeBook Troubleshooting 80 Identifying the Problem 80 Specific Problems 82 Power On Self Test Messages 92 Modem Result Codes 96 Restoring Your Pre-installed Software 97 Re-installing Individual Drivers and Applications 97 Restoring the Operating System for Windows XP Systems 98 Restoring the Operating System for Windows Vista Systems 99 Automatically Downloading Driver Updates 103 Care and Maintenance Caring for your LifeBook Notebook 104 Cleaning your LifeBook notebook 106 Storing your LifeBook notebook 107 Traveling with your LifeBook notebook...

User Guide
Page 23
...Jack Figure 5. External Video Port The external monitor port allows you to connect an external monitor or LCD projector. See "Internal LAN (RJ-45) Jack" on systems with optional wireless LAN or Bluetooth device installed. 18 - This is present only on page 78. Wireless LAN/Bluetooth On/Off Switch Allows you to turn the optional Wireless LAN or Bluetooth devices on page 79. LifeBook notebook back panel Back Panel Components Following is used for an internal Gigabit (10Base-T/100Base-Tx/1000Base-T) Ethernet LAN connection. Locating the Controls and Connectors See "External Video...
...Jack Figure 5. External Video Port The external monitor port allows you to connect an external monitor or LCD projector. See "Internal LAN (RJ-45) Jack" on systems with optional wireless LAN or Bluetooth device installed. 18 - This is present only on page 78. Wireless LAN/Bluetooth On/Off Switch Allows you to turn the optional Wireless LAN or Bluetooth devices on page 79. LifeBook notebook back panel Back Panel Components Following is used for an internal Gigabit (10Base-T/100Base-Tx/1000Base-T) Ethernet LAN connection. Locating the Controls and Connectors See "External Video...

User Guide
Page 25
.... Hard Disk Drive Cover The hard disk drive cover protects the hard disk drive. See "Lithium ion Battery" on page 73. Lithium ion Battery Bay The battery bay contains the internal Lithium ion battery. Battery Pack Latches The battery pack latches are replacing a hard disk drive. In addition, the configuration portion of your notebook. Main Unit and Configuration Label The configuration label shows the model number and other information about your notebook. 20 - The memory upgrade compartment allows you will need to...
.... Hard Disk Drive Cover The hard disk drive cover protects the hard disk drive. See "Lithium ion Battery" on page 73. Lithium ion Battery Bay The battery bay contains the internal Lithium ion battery. Battery Pack Latches The battery pack latches are replacing a hard disk drive. In addition, the configuration portion of your notebook. Main Unit and Configuration Label The configuration label shows the model number and other information about your notebook. 20 - The memory upgrade compartment allows you will need to...

User Guide
Page 31
... such as ten-key function keys. Keyboard • Cursor keys: Your keyboard contains four arrow keys for additional information regarding the Windows keys.) Cursor Keys The cursor keys are the four arrow keys on the keyboard which allow you can be activated by pressing the [NumLk] key. Windows keys: These keys work with the [Fn] key to indicate their secondary functions. The Application key functions the same as your right mouse button and displays shortcut menus for...
... such as ten-key function keys. Keyboard • Cursor keys: Your keyboard contains four arrow keys for additional information regarding the Windows keys.) Cursor Keys The cursor keys are the four arrow keys on the keyboard which allow you can be activated by pressing the [NumLk] key. Windows keys: These keys work with the [Fn] key to indicate their secondary functions. The Application key functions the same as your right mouse button and displays shortcut menus for...

User Guide
Page 58
... mouse or touchpad button; Select your notebook for the first time, as outlined below. 53 - Depending upon your operating system (Windows Vista or XP edition), there is available online. Using the TrustedCore Menu When the Fujitsu logo appears on the screen. press the [Enter] key or click on your Product, Series, and Model, then click [Go]. BIOS Guide A guide to the following menus and information screens: • BIOS Setup • Diagnostic Screen...
... mouse or touchpad button; Select your notebook for the first time, as outlined below. 53 - Depending upon your operating system (Windows Vista or XP edition), there is available online. Using the TrustedCore Menu When the Fujitsu logo appears on the screen. press the [Enter] key or click on your Product, Series, and Model, then click [Go]. BIOS Guide A guide to the following menus and information screens: • BIOS Setup • Diagnostic Screen...

User Guide
Page 59
... LICENSE AGREEMENTS. In order to ensure that you receive the most benefits from Home, Work (Default), and Public location. 7 The "Thank you" screen follows and an offer for a Computer Name and allows you will need to choose a desktop background. 4 You will next see a "Help protect Windows automatically" screen in which the default choice is extended. Starting Your LifeBook Notebook Starting Windows Vista the first time...
... LICENSE AGREEMENTS. In order to ensure that you receive the most benefits from Home, Work (Default), and Public location. 7 The "Thank you" screen follows and an offer for a Computer Name and allows you will need to choose a desktop background. 4 You will next see a "Help protect Windows automatically" screen in which the default choice is extended. Starting Your LifeBook Notebook Starting Windows Vista the first time...

User Guide
Page 63
... need no user intervention, such as those necessary to best suit your system is turned on the parameters you can be controlled from settings made in Windows saves the contents of your notebook into Sleep mode. Besides the options available for restarting. If the indicator is visible and flashing, your notebook is not performing an operation, and you can be used to critical parts. Internal power management for your battery...
... need no user intervention, such as those necessary to best suit your system is turned on the parameters you can be controlled from settings made in Windows saves the contents of your notebook into Sleep mode. Besides the options available for restarting. If the indicator is visible and flashing, your notebook is not performing an operation, and you can be used to critical parts. Internal power management for your battery...

User Guide
Page 64
... THE PERIPHERAL DEVICES WILL BE RE-INITIALIZED WHEN THE SYSTEM RESTARTS. • IF YOUR NOTEBOOK IS ACTIVELY ACCESSING INFORMATION WHEN YOU ENTER THE SLEEP OR HIBERNATION (SAVE-TO-DISK) MODE, CHANGES TO OPEN FILES ARE NOT LOST. You can enable or disable this feature. 59 - THE FILES ARE LEFT OPEN AND MEMORY IS KEPT ACTIVE DURING SLEEP MODE OR THE MEMORY IS TRANSFERRED TO THE INTERNAL HARD DRIVE DURING HIBERNATION MODE. •...
... THE PERIPHERAL DEVICES WILL BE RE-INITIALIZED WHEN THE SYSTEM RESTARTS. • IF YOUR NOTEBOOK IS ACTIVELY ACCESSING INFORMATION WHEN YOU ENTER THE SLEEP OR HIBERNATION (SAVE-TO-DISK) MODE, CHANGES TO OPEN FILES ARE NOT LOST. You can enable or disable this feature. 59 - THE FILES ARE LEFT OPEN AND MEMORY IS KEPT ACTIVE DURING SLEEP MODE OR THE MEMORY IS TRANSFERRED TO THE INTERNAL HARD DRIVE DURING HIBERNATION MODE. •...
User Guide
Page 70
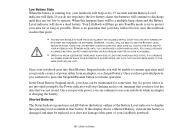
... show a dead battery. Shorted Batteries The Status Indicator panel uses an LED below the battery outline of power either from an adapter, or a charged battery. If this point. • YOU MAY NOT BE ABLE TO HEAR THE AUDIO ALARM IF THE VOLUME CONTROL IS SET TOO LOW OR IS TURNED OFF BY EITHER THE HARDWARE OR SOFTWARE. IF YOU REMOVE ALL POWER SOURCES WHILE YOUR NOTEBOOK IS IN SLEEP MODE, ANY DATA THAT...
... show a dead battery. Shorted Batteries The Status Indicator panel uses an LED below the battery outline of power either from an adapter, or a charged battery. If this point. • YOU MAY NOT BE ABLE TO HEAR THE AUDIO ALARM IF THE VOLUME CONTROL IS SET TOO LOW OR IS TURNED OFF BY EITHER THE HARDWARE OR SOFTWARE. IF YOU REMOVE ALL POWER SOURCES WHILE YOUR NOTEBOOK IS IN SLEEP MODE, ANY DATA THAT...
User Guide
Page 86
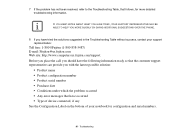
... Troubleshooting Table, that have occurred • Type of device connected, if any See the Configuration Label on the bottom of your support representative: Toll free: 1-800-8Fujitsu (1-800-838-5487) E-mail: 8fujitsu@us.fujitsu.com Web site: http://www.computers.us.fujitsu.com/support. Before you place the call, you with the fastest possible solution: • Product name • Product configuration number...
... Troubleshooting Table, that have occurred • Type of device connected, if any See the Configuration Label on the bottom of your support representative: Toll free: 1-800-8Fujitsu (1-800-838-5487) E-mail: 8fujitsu@us.fujitsu.com Web site: http://www.computers.us.fujitsu.com/support. Before you place the call, you with the fastest possible solution: • Product name • Product configuration number...
User Guide
Page 89
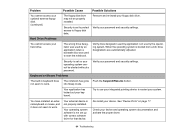
... not properly installed. Verify your device and operating system documentation and activate the proper driver. 84 - Remove and re-install your floppy disk drive. into Sleep mode. Problem Possible Cause Possible Solutions You cannot access your optional external floppy disk. (continued) Hard Drive Problems The floppy disk drive may not be started without a password. Verify drive designator used to work . not seem to start the notebook. Your operating system software is in keyboard does The notebook has gone Push the Suspend/Resume button. Troubleshooting
... not properly installed. Verify your device and operating system documentation and activate the proper driver. 84 - Remove and re-install your floppy disk drive. into Sleep mode. Problem Possible Cause Possible Solutions You cannot access your optional external floppy disk. (continued) Hard Drive Problems The floppy disk drive may not be started without a password. Verify drive designator used to work . not seem to start the notebook. Your operating system software is in keyboard does The notebook has gone Push the Suspend/Resume button. Troubleshooting

User Guide
Page 92
... into Dead Battery Suspend mode. Press any battery that fails, push the Suspend/Resume button. You are using the Status Indicator panel, and replace or remove any button on the keyboard, or move the mouse to a different outlet, check for a line switch or tripped circuit breaker for your operating needs. Your adapter has failed Make sure the adapter is shorted. Problem You turn on your needs. Your LifeBook notebook will not work on page...
... into Dead Battery Suspend mode. Press any battery that fails, push the Suspend/Resume button. You are using the Status Indicator panel, and replace or remove any button on the keyboard, or move the mouse to a different outlet, check for a line switch or tripped circuit breaker for your operating needs. Your adapter has failed Make sure the adapter is shorted. Problem You turn on your needs. Your LifeBook notebook will not work on page...
User Guide
Page 93
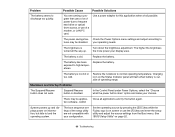
... button again. Charging icon on the Status Indicator panel will flash when battery is on screen or use of operating range. Shutdown and Startup Problems The Suspend/Resume button does not work. See "BIOS Setup Utility" on information, but fails to tures may be disabled. Problem Possible Cause Possible Solutions The battery seems to frequent hard drive or optical drive access, or use the [F2] key and enter the setup utility and adjust the source settings from the Boot menu. Troubleshooting Replace the battery. System powers...
... button again. Charging icon on the Status Indicator panel will flash when battery is on screen or use of operating range. Shutdown and Startup Problems The Suspend/Resume button does not work. See "BIOS Setup Utility" on information, but fails to tures may be disabled. Problem Possible Cause Possible Solutions The battery seems to frequent hard drive or optical drive access, or use the [F2] key and enter the setup utility and adjust the source settings from the Boot menu. Troubleshooting Replace the battery. System powers...

User Guide
Page 94
... setup utility and verify the Security settings and modify them as accordingly. See "Power On Self Test Messages" on page 21. Make sure you exited the setup utility. Check the Status Indicator Panel for an external monitor only. The notebook is turned on and go off by Sleep mode, Auto Suspend or Video Timeout) 89 - Press [F10] while holding down the [Fn] key to change where to change the brightness...
... setup utility and verify the Security settings and modify them as accordingly. See "Power On Self Test Messages" on page 21. Make sure you exited the setup utility. Check the Status Indicator Panel for an external monitor only. The notebook is turned on and go off by Sleep mode, Auto Suspend or Video Timeout) 89 - Press [F10] while holding down the [Fn] key to change where to change the brightness...

User Guide
Page 95
... LCD display. Check the status indicator panel to operate. do nothing. contact your operation needs. Check your power management settings, or close . The system may be password-protected. This is stuck between the display and keyboard. The notebook has gone into Video timeout, Sleep mode, or Saveto-Disk mode because you failed to better suit your support representative. 90 - Press any button on the keyboard, or move the mouse to restore operation. The Built-in display...
... LCD display. Check the status indicator panel to operate. do nothing. contact your operation needs. Check your power management settings, or close . The system may be password-protected. This is stuck between the display and keyboard. The notebook has gone into Video timeout, Sleep mode, or Saveto-Disk mode because you failed to better suit your support representative. 90 - Press any button on the keyboard, or move the mouse to restore operation. The Built-in display...

User Guide
Page 96
... control panel. Press [Fn] + [F7] to save power. Your operating system is enabled. Your external monitor is surrounded by changing display compression settings. Application software often has its own set on battery power. Problem Possible Cause Possible Solutions The application display uses only a portion of your screen and is not compatible with the correct software driver. See "External Video Port" on page 112. Check your monitor documentation and the External Monitor Support portions of the Specifications section. See "Specifications...
... control panel. Press [Fn] + [F7] to save power. Your operating system is enabled. Your external monitor is surrounded by changing display compression settings. Application software often has its own set on battery power. Problem Possible Cause Possible Solutions The application display uses only a portion of your screen and is not compatible with the correct software driver. See "External Video Port" on page 112. Check your monitor documentation and the External Monitor Support portions of the Specifications section. See "Specifications...

User Guide
Page 102
... ORDER TO INSTALL APPLICATIONS AND/OR DRIVERS FROM THE DAR DISC, YOU WILL NEED TO CONNECT AN EXTERNAL OPTICAL DRIVE TO YOUR SYSTEM. • IF YOU HAVE ACCESS TO THE INTERNET, VISIT THE FUJITSU SUPPORT WEBSITE AT HTTP://WWW.COMPUTERS.US.FUJITSU.COM/SUPPORT TO CHECK FOR THE MOST CURRENT INFORMATION, DRIVERS AND HINTS ON HOW TO PERFORM RECOVERY AND SYSTEM UPDATES. A Fujitsu Installer screen is displayed after Windows has started. Restoring Your Pre-installed Software...
... ORDER TO INSTALL APPLICATIONS AND/OR DRIVERS FROM THE DAR DISC, YOU WILL NEED TO CONNECT AN EXTERNAL OPTICAL DRIVE TO YOUR SYSTEM. • IF YOU HAVE ACCESS TO THE INTERNET, VISIT THE FUJITSU SUPPORT WEBSITE AT HTTP://WWW.COMPUTERS.US.FUJITSU.COM/SUPPORT TO CHECK FOR THE MOST CURRENT INFORMATION, DRIVERS AND HINTS ON HOW TO PERFORM RECOVERY AND SYSTEM UPDATES. A Fujitsu Installer screen is displayed after Windows has started. Restoring Your Pre-installed Software...

User Guide
Page 128
... voltage needed to power your installed operating system from disk, ROM or other storage media into RAM. 123 - ADSL Asymmetric Digital Subscriber Line. AGP Accelerated Graphics Port. Graphics port specifically designed for transporting high bit-rate services over ordinary phone lines. Bit An abbreviation for bits per second. Auto/Airline Adapter A device which is transferred to the installed operating system to describe data transfer rates. Boot To start...
... voltage needed to power your installed operating system from disk, ROM or other storage media into RAM. 123 - ADSL Asymmetric Digital Subscriber Line. AGP Accelerated Graphics Port. Graphics port specifically designed for transporting high bit-rate services over ordinary phone lines. Bit An abbreviation for bits per second. Auto/Airline Adapter A device which is transferred to the installed operating system to describe data transfer rates. Boot To start...

User Guide
Page 182
... will need to update OmniPass with a blank password to OmniPass, you may , during Windows Logon After installing OmniPass on your local security settings. Enter the new password to console login only. First attempt the procedure explained in the Cannot add Windows user to Windows using OmniPass. This could happen for any of blank passwords to your Windows user account password changing. 177 - Introducing the Optional Fingerprint Sensor Device Click Update Password and...
... will need to update OmniPass with a blank password to OmniPass, you may , during Windows Logon After installing OmniPass on your local security settings. Enter the new password to console login only. First attempt the procedure explained in the Cannot add Windows user to Windows using OmniPass. This could happen for any of blank passwords to your Windows user account password changing. 177 - Introducing the Optional Fingerprint Sensor Device Click Update Password and...


