
Operating Guide
Page 6
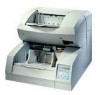
... feeder (ADF). Refer to the CD-ROM for volume filing, using charge-coupled device (CCD) image sensors. This scanner features duplex scanning and high quality image processing with an optional endorser; however, Illustrations in this manual do not include the endorser except those in Chapter 5. Preface This manual explains how to its Operator Guide. ii This manual contains COMPONENTS, INSTALLATION AND CONNECTIONS, OPERATING INSTRUCTION, DOCUMENT SPECIFICATION, SPECIFICATIONS, and SETUP, BROWSE, AND TEST MODES. The CD-ROM contains OPERATING INSTRUCTION, CLEANING, REPLACEMENT...
... feeder (ADF). Refer to the CD-ROM for volume filing, using charge-coupled device (CCD) image sensors. This scanner features duplex scanning and high quality image processing with an optional endorser; however, Illustrations in this manual do not include the endorser except those in Chapter 5. Preface This manual explains how to its Operator Guide. ii This manual contains COMPONENTS, INSTALLATION AND CONNECTIONS, OPERATING INSTRUCTION, DOCUMENT SPECIFICATION, SPECIFICATIONS, and SETUP, BROWSE, AND TEST MODES. The CD-ROM contains OPERATING INSTRUCTION, CLEANING, REPLACEMENT...
Operating Guide
Page 13
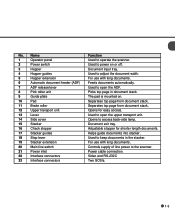
... Check stopper 17 Stacker guides 18 Stop lever 19 Stacker extension 20 Main line switch 21 Power inlet 22 Interface connectors 23 Interface connectors Function Used to access back-side lamp. Feeds documents automatically. Opens to operate the scanner. Used to keep documents in document stack. Picks top page in the stacker. Opens for shorter length documents. Document exit tray. For use with long documents. Controls supply of line power to adjust the document width. Video and RS-232C Two SCSIs. 1-3 Used to open...
... Check stopper 17 Stacker guides 18 Stop lever 19 Stacker extension 20 Main line switch 21 Power inlet 22 Interface connectors 23 Interface connectors Function Used to access back-side lamp. Feeds documents automatically. Opens to operate the scanner. Used to keep documents in document stack. Picks top page in the stacker. Opens for shorter length documents. Document exit tray. For use with long documents. Controls supply of line power to adjust the document width. Video and RS-232C Two SCSIs. 1-3 Used to open...

Operating Guide
Page 46
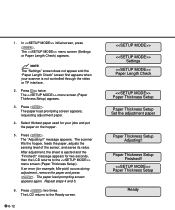
..., Setup mode lock Power on while pressing MENU . To quit a mode, turn off the power. Available functions differ with modes or with MENU pressed Settings Functions not available in addition to enter these modes: • Way 1 Press MENU when the LCD indicates "Ready". Setup, Browse, and Test Modes This scanner has the setup mode, browse mode, and test mode to ease setting up. • Setup mode for customizing the scanner for user requirements • Browse mode...
..., Setup mode lock Power on while pressing MENU . To quit a mode, turn off the power. Available functions differ with modes or with MENU pressed Settings Functions not available in addition to enter these modes: • Way 1 Press MENU when the LCD indicates "Ready". Setup, Browse, and Test Modes This scanner has the setup mode, browse mode, and test mode to ease setting up. • Setup mode for customizing the scanner for user requirements • Browse mode...
Operating Guide
Page 54
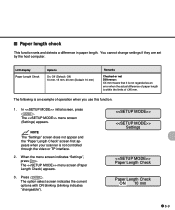
... operation when you use this function. 1. When the menu screen indicates "Settings", press . In initial screen, press ENTER . Settings Paper Length Check Paper Length Check ON 10 mm 6-9 The menu screen (Settings) appears. The menu screen (Paper Length Check) appears. 3. The option select screen indicates the current options with ON blinking (blinking indicates "changeable"). The following is not controlled through the video or TP interface. 2. Press ENTER . You cannot change settings if they are set...
... operation when you use this function. 1. When the menu screen indicates "Settings", press . In initial screen, press ENTER . Settings Paper Length Check Paper Length Check ON 10 mm 6-9 The menu screen (Settings) appears. The menu screen (Paper Length Check) appears. 3. The option select screen indicates the current options with ON blinking (blinking indicates "changeable"). The following is not controlled through the video or TP interface. 2. Press ENTER . You cannot change settings if they are set...
Operating Guide
Page 55
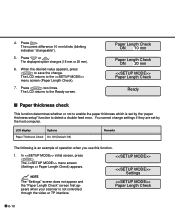
... Paper Length Check ON 20 mm Paper Length Check Ready Paper thickness check This function determines whether or not to detect a double feed error. In initial screen, press ENTER . LCD display Options Paper Thickness Check On, Off (Default: Off) Remarks The following is set by the "paper thickness setup" function to enable the paper thickness which is an example of operation when you use this function. 1. The displayed option changes...
... Paper Length Check ON 20 mm Paper Length Check Ready Paper thickness check This function determines whether or not to detect a double feed error. In initial screen, press ENTER . LCD display Options Paper Thickness Check On, Off (Default: Off) Remarks The following is set by the "paper thickness setup" function to enable the paper thickness which is an example of operation when you use this function. 1. The displayed option changes...
Operating Guide
Page 57
... "Paper Length Check" screen first appears when your jobs and put the paper on the hopper. 5. The menu screen (Paper Thickness Setup) appears. 3. The "Adjusting!!" The paper load prompting screen appears again. The LCD returns to the menu screen (Paper Thickness Setup). Select thickest paper used for example, Mis-pick) occurs during adjustment, remove the paper and press CANCEL . The scanner lifts the hopper, feeds the paper, adjusts the sensing level of the sensor...
... "Paper Length Check" screen first appears when your jobs and put the paper on the hopper. 5. The menu screen (Paper Thickness Setup) appears. 3. The "Adjusting!!" The paper load prompting screen appears again. The LCD returns to the menu screen (Paper Thickness Setup). Select thickest paper used for example, Mis-pick) occurs during adjustment, remove the paper and press CANCEL . The scanner lifts the hopper, feeds the paper, adjusts the sensing level of the sensor...

Operating Guide
Page 58
You cannot change . NOTE The "Settings" screen does not appear and the "Paper Length Check" screen first appears when your scanner is an example of operation when you use this function. 1. The menu screen (Skew Check) appears. Press CANCEL two times. Skew Check Check: ON Skew Check Ready 6-13 LCD display Skew Check Options On, Off (Default: Off) Remarks The following is not controlled through the video or TP...
You cannot change . NOTE The "Settings" screen does not appear and the "Paper Length Check" screen first appears when your scanner is an example of operation when you use this function. 1. The menu screen (Skew Check) appears. Press CANCEL two times. Skew Check Check: ON Skew Check Ready 6-13 LCD display Skew Check Options On, Off (Default: Off) Remarks The following is not controlled through the video or TP...
Operating Guide
Page 59
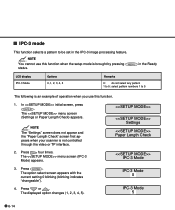
... of operation when you use this function. 1. In initial screen, press ENTER . The menu screen (Settings or Paper Length Check) appears. Press or . IPC-3 Mode 0 IPC-3 Mode 5 6-14 NOTE You cannot use this function when the setup mode is not controlled through the video or TP interface. IPC-3 Mode 3. LCD display IPC-3 Mode Options 0, 1, 2, 3, 4, 5 Remarks 0: do not select any pattern 1 to 5: select pattern numbers 1 to be set in...
... of operation when you use this function. 1. In initial screen, press ENTER . The menu screen (Settings or Paper Length Check) appears. Press or . IPC-3 Mode 0 IPC-3 Mode 5 6-14 NOTE You cannot use this function when the setup mode is not controlled through the video or TP interface. IPC-3 Mode 3. LCD display IPC-3 Mode Options 0, 1, 2, 3, 4, 5 Remarks 0: do not select any pattern 1 to 5: select pattern numbers 1 to be set in...

Operating Guide
Page 62
..." appears in the lower line of operation when you press or , the hopper moves to the next position and its position is an example of the menu screen. 3. The following is automatically saved. Press ENTER . Hopper Height 500 sheets NOTE Each time you use this function. 1. Settings Paper Length Check 2. Hopper Height Hopper Height 1000 sheets 4. If an error occurs during positioning, press...
..." appears in the lower line of operation when you press or , the hopper moves to the next position and its position is an example of the menu screen. 3. The following is automatically saved. Press ENTER . Hopper Height 500 sheets NOTE Each time you use this function. 1. Settings Paper Length Check 2. Hopper Height Hopper Height 1000 sheets 4. If an error occurs during positioning, press...

Operating Guide
Page 64
... your scanner is an example of the menu screen. 3. Settings Paper Length Check Paper Separation Level Paper Separation Level Normal Paper Separation Level Medium Thin Paper Separation Level Ready 6-19 Press repeatedly until "Paper Separation Level" appears in the lower line of operation when you use this function. 1. Press or . Press CANCEL two times. In initial screen, press ENTER . The displayed option changes (Thick to save the change...
... your scanner is an example of the menu screen. 3. Settings Paper Length Check Paper Separation Level Paper Separation Level Normal Paper Separation Level Medium Thin Paper Separation Level Ready 6-19 Press repeatedly until "Paper Separation Level" appears in the lower line of operation when you use this function. 1. Press or . Press CANCEL two times. In initial screen, press ENTER . The displayed option changes (Thick to save the change...

Operating Guide
Page 65
... change settings if they are selected by the host computer. LCD display Drop-out Color Options Front: Green, Red, Blue (Default: Green) Back: Green, Red, Blue (Default: Green) Remarks The following is not controlled through the video or TP interface. NOTE The "Settings" screen does not appear and the "Paper Length Check" screen first appears when your scanner is an example of operation when you use...
... change settings if they are selected by the host computer. LCD display Drop-out Color Options Front: Green, Red, Blue (Default: Green) Back: Green, Red, Blue (Default: Green) Remarks The following is not controlled through the video or TP interface. NOTE The "Settings" screen does not appear and the "Paper Length Check" screen first appears when your scanner is an example of operation when you use...
Operating Guide
Page 67
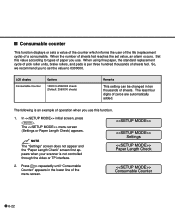
... to 2560000 sheets (Default: 2560000 sheets) Remarks This setting can be changed in the lower line of sheets fed reaches the set value, an alarm occurs. The menu screen (Settings or Paper Length Check) appears. Consumable Counter 6-22 When using fine paper, the standard replacement cycle of pick roller units, brake rollers, and pads is per three hundred thousands of a consumable. The least four digits of paper you use . Set this function. 1. NOTE The "Settings" screen does...
... to 2560000 sheets (Default: 2560000 sheets) Remarks This setting can be changed in the lower line of sheets fed reaches the set value, an alarm occurs. The menu screen (Settings or Paper Length Check) appears. Consumable Counter 6-22 When using fine paper, the standard replacement cycle of pick roller units, brake rollers, and pads is per three hundred thousands of a consumable. The least four digits of paper you use . Set this function. 1. NOTE The "Settings" screen does...
Operating Guide
Page 73
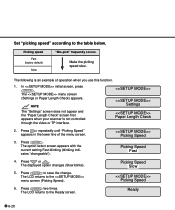
... blinking (blinking indicates "changeable"). Make the picking speed slow. Press ENTER . Press or . Picking Speed Picking Speed Fast 4. The LCD returns to the table below. Press CANCEL two times. The menu screen (Settings or Paper Length Check) appears. The displayed option changes (Slow blinks). 5. Press repeatedly until "Picking Speed" appears in the lower line of operation when you use this function. 1. Set "picking speed" according to the menu screen (Picking Speed). Picking speed Fast (factory default) Slow...
... blinking (blinking indicates "changeable"). Make the picking speed slow. Press ENTER . Press or . Picking Speed Picking Speed Fast 4. The LCD returns to the table below. Press CANCEL two times. The menu screen (Settings or Paper Length Check) appears. The displayed option changes (Slow blinks). 5. Press repeatedly until "Picking Speed" appears in the lower line of operation when you use this function. 1. Set "picking speed" according to the menu screen (Picking Speed). Picking speed Fast (factory default) Slow...

Operating Guide
Page 75
.... The menu screen (Settings or Paper Length Check) appears. Press or . The displayed option changes (SCSI, VIDEO, TP_IF ). 5. Settings Paper Length Check 6-30 4. NOTE You cannot use this function when the setup mode is not controlled through the video or TP interface. In initial screen, press ENTER . To quit the , turn off the power. NOTE The "Settings" screen does not appear and the "Paper Length Check" screen first appears when your scanner is...
.... The menu screen (Settings or Paper Length Check) appears. Press or . The displayed option changes (SCSI, VIDEO, TP_IF ). 5. Settings Paper Length Check 6-30 4. NOTE You cannot use this function when the setup mode is not controlled through the video or TP interface. In initial screen, press ENTER . To quit the , turn off the power. NOTE The "Settings" screen does not appear and the "Paper Length Check" screen first appears when your scanner is...
Operating Guide
Page 83
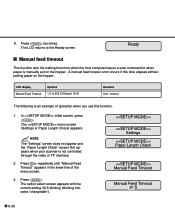
... Manual Feed Timeout Options 1 S to 255 S (Default: 30 S) Remarks Unit: second The following is an example of the menu screen. 3. The LCD returns to when paper is not controlled through the video or TP interface. 2. Settings Paper Length Check Manual Feed Timeout Manual Feed Timeout 30 S 6-38 NOTE The "Settings" screen does not appear and the "Paper Length Check" screen first appears when your scanner is manually put on the hopper. Ready Manual feed...
... Manual Feed Timeout Options 1 S to 255 S (Default: 30 S) Remarks Unit: second The following is an example of the menu screen. 3. The LCD returns to when paper is not controlled through the video or TP interface. 2. Settings Paper Length Check Manual Feed Timeout Manual Feed Timeout 30 S 6-38 NOTE The "Settings" screen does not appear and the "Paper Length Check" screen first appears when your scanner is manually put on the hopper. Ready Manual feed...

Operating Guide
Page 99
... numbering system. Density Degree of darkness of the document, specifically in Duplex reading mode. Automatic start mode ( manual start mode) In this mode the reading operation is 210 x 297 mm (8.25 x 11.6 inches). Automatic separation allows the scanner to reading the back-side of an image. A bit is a set of read document accumulates until an operator resets the counter. ASCII The acronym for American Standard Code for Information Interchange. Back-side reading = Back-side scanning Refers to switch...
... numbering system. Density Degree of darkness of the document, specifically in Duplex reading mode. Automatic start mode ( manual start mode) In this mode the reading operation is 210 x 297 mm (8.25 x 11.6 inches). Automatic separation allows the scanner to reading the back-side of an image. A bit is a set of read document accumulates until an operator resets the counter. ASCII The acronym for American Standard Code for Information Interchange. Back-side reading = Back-side scanning Refers to switch...

Operating Guide
Page 104
.... SCSI-ID Used to specify a particular SCSI device when the initiator selects a target or the target re-connects to the initiator. Temporary Error An error that transmits the paper. SF1 sensor The document detection sensor. It detects the light that is often necessary in networking environments, where the scanner may be used for control). Information is lowered. Setup mode In this mode, users can be shared. It also detects the double feed error...
.... SCSI-ID Used to specify a particular SCSI device when the initiator selects a target or the target re-connects to the initiator. Temporary Error An error that transmits the paper. SF1 sensor The document detection sensor. It detects the light that is often necessary in networking environments, where the scanner may be used for control). Information is lowered. Setup mode In this mode, users can be shared. It also detects the double feed error...

Operating Guide
Page 108
... leading edge of paper 6-18 Side cover 1-3 Skew check 6-13 Specifications 5-1 Stacker 1-3 Stacker extension 1-3 Stacker guide 1-3 START key 6-43 Satus display, transition of 3-9 Stop lever 1-1, 1-3 T Temporary errors 1-7 Test items Device life 6-53 Offline feed test 6-51 Options 6-53 Test mode 3-7, 6-47 Test mode, contents of 6-49 TP_IF baud rate 6-30 Transition of screens in setup mode 6-6 operator panel status and display 3-9 Turning the Power On 3-1 the main line switch off 2-4 U Units 1-2 Units and Assemblies...
... leading edge of paper 6-18 Side cover 1-3 Skew check 6-13 Specifications 5-1 Stacker 1-3 Stacker extension 1-3 Stacker guide 1-3 START key 6-43 Satus display, transition of 3-9 Stop lever 1-1, 1-3 T Temporary errors 1-7 Test items Device life 6-53 Offline feed test 6-51 Options 6-53 Test mode 3-7, 6-47 Test mode, contents of 6-49 TP_IF baud rate 6-30 Transition of screens in setup mode 6-6 operator panel status and display 3-9 Turning the Power On 3-1 the main line switch off 2-4 U Units 1-2 Units and Assemblies...

Reference Guide
Page 12
...-side lamp. Feeds and scans documents. Separates top page from document stack. Used to operate the scanner. Separates top page from document stack. Opens for shorter length documents. Document exit tray. For use with long documents. No. Name 1 Operator panel 2 Power switch 3 Hopper 4 Hopper guide 5 Hopper extension 6 Automatic document feeder (ADF) 7 ADF release lever 8 Pick roller unit 9 Guide plate 10 Pad 11 Brake roller 12 Upper transport unit 13 Side cover 14 Lever 15 Stacker 16 Stacker guide 17 Stacker extension 18 Stop lever 19 Check stopper 20 Main line switch...
...-side lamp. Feeds and scans documents. Separates top page from document stack. Used to operate the scanner. Separates top page from document stack. Opens for shorter length documents. Document exit tray. For use with long documents. No. Name 1 Operator panel 2 Power switch 3 Hopper 4 Hopper guide 5 Hopper extension 6 Automatic document feeder (ADF) 7 ADF release lever 8 Pick roller unit 9 Guide plate 10 Pad 11 Brake roller 12 Upper transport unit 13 Side cover 14 Lever 15 Stacker 16 Stacker guide 17 Stacker extension 18 Stop lever 19 Check stopper 20 Main line switch...
Reference Guide
Page 66
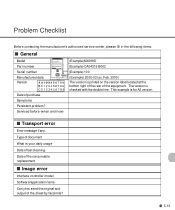
s Transport error Error message if any. Date of the consumable replacement s Image error Interface controller model Software/application name Can yhou send the original and output of the equipment. Feb. 2000) The version is your daily usage Date of purchase Symptoms Persistent problem? Type of document What is printed on the version label located at the bottom right of the rear of the sheet by...
s Transport error Error message if any. Date of the consumable replacement s Image error Interface controller model Software/application name Can yhou send the original and output of the equipment. Feb. 2000) The version is your daily usage Date of purchase Symptoms Persistent problem? Type of document What is printed on the version label located at the bottom right of the rear of the sheet by...


