English Manual
Page 32
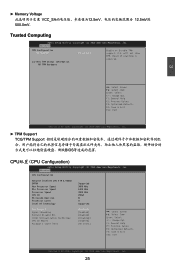
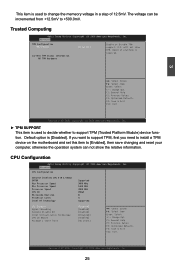
... EMT64 Supported Max Processor Speed 3000 MHz Min Processor Speed 1600 MHz Processor Speed 3000 MHz CPU ID 206a3 Microcode Revision 8 Processor Cores 4 Intel HT Technology Supported C1E Support Hyper-threading Execute Disable Bit Intel Virtualization Technology CPU C6 Report Package C State limit [Enabled] [Enabled] [Enabled] [Disabled] [Enabled] [No Limit] → ← : Select Screen ↑ ↓ : Select Item Enter: Select +/-: Change Opt. ► Memory Voltage VCC_SA 12.5mV 12.5mV到 500.0mV。 Trusted Computing Aptio Setup Utility - will...
... EMT64 Supported Max Processor Speed 3000 MHz Min Processor Speed 1600 MHz Processor Speed 3000 MHz CPU ID 206a3 Microcode Revision 8 Processor Cores 4 Intel HT Technology Supported C1E Support Hyper-threading Execute Disable Bit Intel Virtualization Technology CPU C6 Report Package C State limit [Enabled] [Enabled] [Enabled] [Disabled] [Enabled] [No Limit] → ← : Select Screen ↑ ↓ : Select Item Enter: Select +/-: Change Opt. ► Memory Voltage VCC_SA 12.5mV 12.5mV到 500.0mV。 Trusted Computing Aptio Setup Utility - will...
English Manual
Page 36
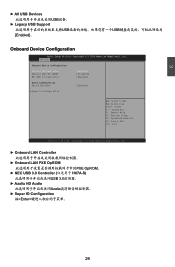
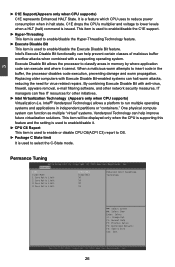
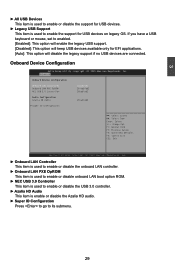
... HD Audio Azalia ► Super IO Configuration 按 Advanced Onboard Device Configuration Onboard LAN Controller Onboard LAN PXE OpROM NEC USB 3.0 Controller [Enabled] [Disabled] [Enabled] Audio Configuration Azalia HD Audio [Enabled] ▶ Super IO Configuration → ← : Select Screen ↑ ↓ : Select Item Enter: Select +/-: Change Opt. C opyright (C) 2010 American Megatrends, Inc. 3 ► All USB Devices USB设备。 ► Legacy USB Support USB USB Enabled]。 Onboard Device Configuration Aptio Setup Utility -
... HD Audio Azalia ► Super IO Configuration 按 Advanced Onboard Device Configuration Onboard LAN Controller Onboard LAN PXE OpROM NEC USB 3.0 Controller [Enabled] [Disabled] [Enabled] Audio Configuration Azalia HD Audio [Enabled] ▶ Super IO Configuration → ← : Select Screen ↑ ↓ : Select Item Enter: Select +/-: Change Opt. C opyright (C) 2010 American Megatrends, Inc. 3 ► All USB Devices USB设备。 ► Legacy USB Support USB USB Enabled]。 Onboard Device Configuration Aptio Setup Utility -
English Manual
Page 109
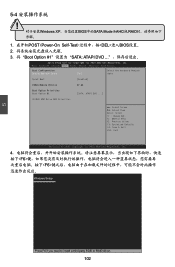
... RAID driver. 102 Main Advanced Chipset Boot Power Health Security Save & Exit Boot Configuration Bootup Numlock State [On] Select the keyboard NumLock state Quiet Boot [Enabled] CSM16 Module Version 07.63 Boot Option Priorities Boot Option #1 [SATA: ATAPI DVD ...] CD/DVD ROM Drive BBS Priorities → ← : Select Screen ↑ ↓ : Select Item Enter: Select +/-: Change Opt. F1: General Help F2: Previous Values F3: Optimized Defaults F4: Save & Exit ESC: Exit Version 2.02.1205. 5 CAUTION 5-4 Windows XP BIOS...
... RAID driver. 102 Main Advanced Chipset Boot Power Health Security Save & Exit Boot Configuration Bootup Numlock State [On] Select the keyboard NumLock state Quiet Boot [Enabled] CSM16 Module Version 07.63 Boot Option Priorities Boot Option #1 [SATA: ATAPI DVD ...] CD/DVD ROM Drive BBS Priorities → ← : Select Screen ↑ ↓ : Select Item Enter: Select +/-: Change Opt. F1: General Help F2: Previous Values F3: Optimized Defaults F4: Save & Exit ESC: Exit Version 2.02.1205. 5 CAUTION 5-4 Windows XP BIOS...

English Manual
Page 110
... Additional Device ENTER=Continue F3=Exit 6 RAID Enter>键。 Windows Setup Please insert the disk labeled manufacturer-supplied hardware support disk into Drive A: * Press ENTER when ready ENTER=Continue ESC=Cancel F3=Exit 103 Currently, Setup will load support for the following mass storage device(s): * To specify additional SCSI adapters, CD-ROM drivers, or special disk controllers for which you have a device support disk from a mass storage device manufacturer, press S. * If you have any device support disks from a mass storage device...
... Additional Device ENTER=Continue F3=Exit 6 RAID Enter>键。 Windows Setup Please insert the disk labeled manufacturer-supplied hardware support disk into Drive A: * Press ENTER when ready ENTER=Continue ESC=Cancel F3=Exit 103 Currently, Setup will load support for the following mass storage device(s): * To specify additional SCSI adapters, CD-ROM drivers, or special disk controllers for which you have a device support disk from a mass storage device manufacturer, press S. * If you have any device support disks from a mass storage device...
User manual
Page 20
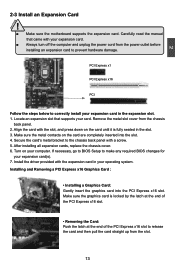
... the metal contacts on your card. Turn on the card are completely inserted into the PCI Express x16 slot. If necessary, go to BIOS Setup to prevent hardware damage. Carefully read the manual that supports your computer. After installing all expansion cards, replace the chassis cover. 6. CAUTION 2 2-3 Install an Expansion Card ! ■ Make sure the motherboard supports the expansion card. Install the driver provided with the slot, and press down on the...
... the metal contacts on your card. Turn on the card are completely inserted into the PCI Express x16 slot. If necessary, go to BIOS Setup to prevent hardware damage. Carefully read the manual that supports your computer. After installing all expansion cards, replace the chassis cover. 6. CAUTION 2 2-3 Install an Expansion Card ! ■ Make sure the motherboard supports the expansion card. Install the driver provided with the slot, and press down on the...
User manual
Page 23
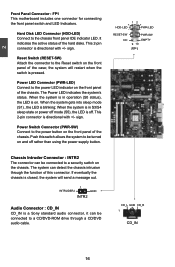
... panel switch and LED Indicators. When the system is in S3/S4 sleep state or power off mode (S5), the LED is on the chassis. PWR-LED - RESET-SW PWR-SW NC EMPTY 9 10 FP1 Chassis Intruder Connector : INTR2 The connector can be connected to the chassis front panel IDE indicator LED. When the system is in operation (S0 status), the LED is off rather than using the power supply button. 12 + + HDD-LED - This 2-pin connector...
... panel switch and LED Indicators. When the system is in S3/S4 sleep state or power off mode (S5), the LED is on the chassis. PWR-LED - RESET-SW PWR-SW NC EMPTY 9 10 FP1 Chassis Intruder Connector : INTR2 The connector can be connected to the chassis front panel IDE indicator LED. When the system is in operation (S0 status), the LED is off rather than using the power supply button. 12 + + HDD-LED - This 2-pin connector...
User manual
Page 25
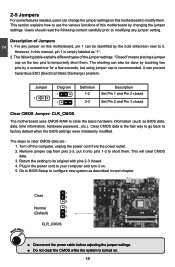
... clear CMOS data. 3. For any jumper setting. 2 2-5 Jumpers For some features needed, users can change the jumper settings on this motherboard to clear CMOS data are : 1. The steps to modify them . Remove jumper cap from the power outlet. 2. It can prevent hazardous ESD (Electrical Static Discharge) problem. This section explains how to short them . Clear CMOS data is simply labeled as BIOS data, date, time information, hardware password...etc.). Return the setting...
... clear CMOS data. 3. For any jumper setting. 2 2-5 Jumpers For some features needed, users can change the jumper settings on this motherboard to clear CMOS data are : 1. The steps to modify them . Remove jumper cap from the power outlet. 2. It can prevent hazardous ESD (Electrical Static Discharge) problem. This section explains how to short them . Clear CMOS data is simply labeled as BIOS data, date, time information, hardware password...etc.). Return the setting...

User manual
Page 26
...; Management Engine function. Enable 1 (Default) 2 3 Disable 1 2 3 MFG ! ■ Before flashing BIOS ROM, you can enable the Intel® Management Engine function. It provides latest IT management features such as Intel® AMT, that allows to enable or disable Intel® Management Engine function. CAUTION 19 19 Set the jumper to pins 2-3 first. 2 Intel® ME Jumper: MFG This motherboard uses MFG jumper to improve management of...
...; Management Engine function. Enable 1 (Default) 2 3 Disable 1 2 3 MFG ! ■ Before flashing BIOS ROM, you can enable the Intel® Management Engine function. It provides latest IT management features such as Intel® AMT, that allows to enable or disable Intel® Management Engine function. CAUTION 19 19 Set the jumper to pins 2-3 first. 2 Intel® ME Jumper: MFG This motherboard uses MFG jumper to improve management of...
User manual
Page 28
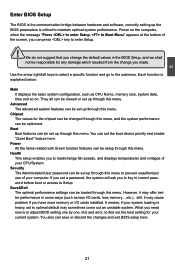
... more memory or I/O cards installed. Chipset The values for the chipset can be set up through this menu to read/change fan speeds, and displays temperatures and voltages of the screen, you can be loaded through this menu. If you set the boot device priority and enable "Quiet Boot" feature here. Use the arrow right/left keys to select a specific function and go to Setup. Save&Exit The optimal performance settings can press key to optimal default may...
... more memory or I/O cards installed. Chipset The values for the chipset can be set up through this menu to read/change fan speeds, and displays temperatures and voltages of the screen, you can be loaded through this menu. If you set the boot device priority and enable "Quiet Boot" feature here. Use the arrow right/left keys to select a specific function and go to Setup. Save&Exit The optimal performance settings can press key to optimal default may...
User manual
Page 32
... [Disabled] Enable or Disable TPM support. Advanced CPU Configuration Genuine Intel(R) CPU 0 @ 3.00GHz EMT64 Supported Max Processor Speed 3000 MHz Min Processor Speed 1600 MHz Processor Speed 3000 MHz CPU ID 206a3 Microcode Revision 8 Processor Cores 4 Intel HT Technology Supported C1E Support Hyper-threading Execute Disable Bit Intel Virtualization Technology CPU C6 Report Package C State limit [Enabled] [Enabled] [Enabled] [Disabled] [Enabled] [No Limit] → ← : Select Screen ↑ ↓ : Select Item Enter: Select +/-: Change Opt. The voltage...
... [Disabled] Enable or Disable TPM support. Advanced CPU Configuration Genuine Intel(R) CPU 0 @ 3.00GHz EMT64 Supported Max Processor Speed 3000 MHz Min Processor Speed 1600 MHz Processor Speed 3000 MHz CPU ID 206a3 Microcode Revision 8 Processor Cores 4 Intel HT Technology Supported C1E Support Hyper-threading Execute Disable Bit Intel Virtualization Technology CPU C6 Report Package C State limit [Enabled] [Enabled] [Enabled] [Disabled] [Enabled] [No Limit] → ← : Select Screen ↑ ↓ : Select Item Enter: Select +/-: Change Opt. The voltage...
User manual
Page 33
... Disable Bit allows the processor to reduce power consumption when in memory by where application code can help improve future virtualization solutions. Copyright (C) 2010 American Megatrends, Inc. 26 3 ► C1E Support(Appears only when CPU supports) C1E represents Enhanced HALT State. It is used to enable/disable it cannot. This item will be displayed only when the CPU is supporting this feature and the setting is used to...
... Disable Bit allows the processor to reduce power consumption when in memory by where application code can help improve future virtualization solutions. Copyright (C) 2010 American Megatrends, Inc. 26 3 ► C1E Support(Appears only when CPU supports) C1E represents Enhanced HALT State. It is used to enable/disable it cannot. This item will be displayed only when the CPU is supporting this feature and the setting is used to...
User manual
Page 34
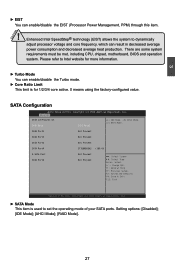
... Configuration SATA Mode [IDE Mode] (1) IDE Mode. (2) AHCI Mode. (3) RAID Mode. Setting options: [Disabled]; [IDE Mode]; [AHCI Mode]; [RAID Mode]. 27 SATA Port1 Not Present SATA Port2 Not Present SATA Port3 Not Present SATA Port4 ST3160815AS (160.0) E-SATA Port SATA Port5 Not Present Not Present → ← : Select Screen ↑ ↓ : Select Item Enter: Select +/-: Change Opt. There are some system requirements must be met, including CPU, chipset, motherboard, BIOS and operation system. Please refer to Intel website for 1/2/3/4 core active. 0 means using...
... Configuration SATA Mode [IDE Mode] (1) IDE Mode. (2) AHCI Mode. (3) RAID Mode. Setting options: [Disabled]; [IDE Mode]; [AHCI Mode]; [RAID Mode]. 27 SATA Port1 Not Present SATA Port2 Not Present SATA Port3 Not Present SATA Port4 ST3160815AS (160.0) E-SATA Port SATA Port5 Not Present Not Present → ← : Select Screen ↑ ↓ : Select Item Enter: Select +/-: Change Opt. There are some system requirements must be met, including CPU, chipset, motherboard, BIOS and operation system. Please refer to Intel website for 1/2/3/4 core active. 0 means using...
User manual
Page 36
... IO Configuration → ← : Select Screen ↑ ↓ : Select Item Enter: Select +/-: Change Opt. If you have a USB keyboard or mouse, set to enabled. [Enabled]: This option will enable the legacy USB support. [Disabled]: This option will keep USB devices available only for USB devices on legacy OS. 3 ► All USB Devices This item is used to enable the support for EFI applications. [Auto]: This option will disable the legacy support if no USB devices are connected. Copyright (C) 2010 American Megatrends, Inc. ► Onboard LAN Controller This...
... IO Configuration → ← : Select Screen ↑ ↓ : Select Item Enter: Select +/-: Change Opt. If you have a USB keyboard or mouse, set to enabled. [Enabled]: This option will enable the legacy USB support. [Disabled]: This option will keep USB devices available only for USB devices on legacy OS. 3 ► All USB Devices This item is used to enable the support for EFI applications. [Auto]: This option will disable the legacy support if no USB devices are connected. Copyright (C) 2010 American Megatrends, Inc. ► Onboard LAN Controller This...
User manual
Page 42
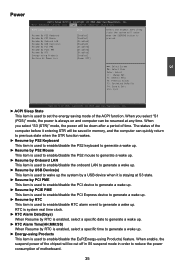
...)" mode, the power is used to enable/disable RTC alarm event to wake up the system by a USB device when it entering STR will be saved in order to generate a wake up . The status of the ACPI function. Main Advanced Chipset Boot Power Health Security Save & Exit ACPI Sleep State Resume By PS2 Keyboard Resume By PS2 Mouse Resume By Onboard LAN Resume By USB Device(s) Resume By PCI PME Resume By PCIE PME...
...)" mode, the power is used to enable/disable RTC alarm event to wake up the system by a USB device when it entering STR will be saved in order to generate a wake up . The status of the ACPI function. Main Advanced Chipset Boot Power Health Security Save & Exit ACPI Sleep State Resume By PS2 Keyboard Resume By PS2 Mouse Resume By Onboard LAN Resume By USB Device(s) Resume By PCI PME Resume By PCIE PME...
User manual
Page 44
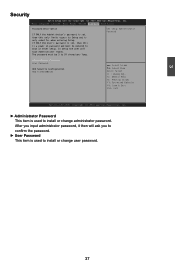
...Aptio Setup Utility - Set Setup Administrator Password Administrator Password User Password HDD Security Configuration HDD 0:ST3160815AS → ← : Select Screen ↑ ↓ : Select Item Enter: Select +/-: Change Opt. Copyright (C) 2010 American Megatrends, Inc. ► Administrator Password This item is used to Setup and is set , then this is used to boot or enter Setup. Main Advanced Chipset Boot Power Health Security Save & Exit Password Description If ONLY the Administrator's password is set , then this only limits access to install or change user password...
...Aptio Setup Utility - Set Setup Administrator Password Administrator Password User Password HDD Security Configuration HDD 0:ST3160815AS → ← : Select Screen ↑ ↓ : Select Item Enter: Select +/-: Change Opt. Copyright (C) 2010 American Megatrends, Inc. ► Administrator Password This item is used to Setup and is set , then this is used to boot or enter Setup. Main Advanced Chipset Boot Power Health Security Save & Exit Password Description If ONLY the Administrator's password is set , then this only limits access to install or change user password...
User manual
Page 47
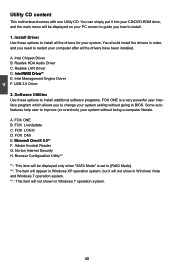
... drivers have been installed. Norton Internet Security H. Install Driver Use these options to install additional software programs. FOX ONE is set to restart your computer after all the drivers for your system setting without being a computer literate. USB 3.0 Driver 2. Realtek LAN Driver D. Intel Management Engine Driver F. You should install the drivers in order, and you how to BIOS. Realtek HDA Audio Driver C. Browser Configuration Utility*3 *1 : This item will be displayed only when "SATA Mode" is a very powerful user...
... drivers have been installed. Norton Internet Security H. Install Driver Use these options to install additional software programs. FOX ONE is set to restart your computer after all the drivers for your system setting without being a computer literate. USB 3.0 Driver 2. Realtek LAN Driver D. Intel Management Engine Driver F. You should install the drivers in order, and you how to BIOS. Realtek HDA Audio Driver C. Browser Configuration Utility*3 *1 : This item will be displayed only when "SATA Mode" is a very powerful user...
User manual
Page 76
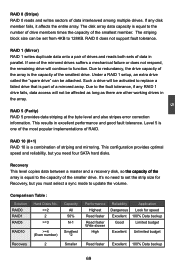
... one of the most popular implementations of RAID. Due to 128KB. RAID 10 (0+1) RAID 10 is part of the mirrored drives suffers a mechanical failure or does not respond, the remaining drive will be affected as long as there are other working drives in the array. This configuration provides optimal speed and reliability, but you need to set from 4KB to the fault tolerance...
... one of the most popular implementations of RAID. Due to 128KB. RAID 10 (0+1) RAID 10 is part of the mirrored drives suffers a mechanical failure or does not respond, the remaining drive will be affected as long as there are other working drives in the array. This configuration provides optimal speed and reliability, but you need to set from 4KB to the fault tolerance...
User manual
Page 98
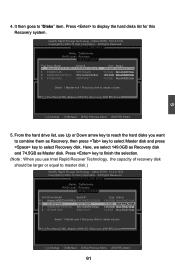
... the hard drive list, use Up or Down arrow key to reach the hard disks you use Intel Rapid Recover Technology, the capacity of recovery disk should be larger or equal to master disk.) Intel(RIn) tMela(Rtr)ixRSatpoirdagSetoMraagneaTgeecrhonpotilongyR-OOMptvio5n.0R.0O.1M01-11I0C.0H.90R.10w3R2AID5 CCooppyyrriigghhtt((CC)) 22000033--1004 IInntteell CCoorrppoorraattiioonn.AlAl Rll iRgihgthstsReRseesrevrevde.d. [ CREATE VOLUME MENU ] Name: TryRecovery RAID Level: Recovery [ SELECT DISKS ] Port Drive Model Serial # Size...
... the hard drive list, use Up or Down arrow key to reach the hard disks you use Intel Rapid Recover Technology, the capacity of recovery disk should be larger or equal to master disk.) Intel(RIn) tMela(Rtr)ixRSatpoirdagSetoMraagneaTgeecrhonpotilongyR-OOMptvio5n.0R.0O.1M01-11I0C.0H.90R.10w3R2AID5 CCooppyyrriigghhtt((CC)) 22000033--1004 IInntteell CCoorrppoorraattiioonn.AlAl Rll iRgihgthstsReRseesrevrevde.d. [ CREATE VOLUME MENU ] Name: TryRecovery RAID Level: Recovery [ SELECT DISKS ] Port Drive Model Serial # Size...
User manual
Page 108
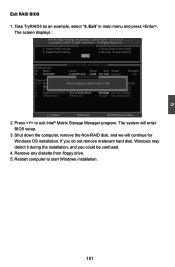
... RAID BIOS 1. Create RAID Volume 3. Recover Volume Options 5. Remove any diskette from floppy drive. 5. Reset Disks to exit? Shut down the computer, remove the Non-RAID disk, and we will enter BIOS setup. 3. The screen displays : Intel(RIn) tMela(Rtr)ixRSatpoirdagSetoMraagneaTgeecrhonpotilongyR-OOMptvio5n.0R.0O.1M01-11I0C.0H.90R.10w3R2AID5 CCooppyyrriigghhtt((CC)) 22000033--1004 IInntteell CCoorrppoorraattiioonn.AlAl lRl RigihgthstsRReseesrevrevde.d. [ MAIN MENU ] 1. Exit [ DISK/VOLUME INFORMATION ] RAID Volume : ID Name Level Stripe Size Status...
... RAID BIOS 1. Create RAID Volume 3. Recover Volume Options 5. Remove any diskette from floppy drive. 5. Reset Disks to exit? Shut down the computer, remove the Non-RAID disk, and we will enter BIOS setup. 3. The screen displays : Intel(RIn) tMela(Rtr)ixRSatpoirdagSetoMraagneaTgeecrhonpotilongyR-OOMptvio5n.0R.0O.1M01-11I0C.0H.90R.10w3R2AID5 CCooppyyrriigghhtt((CC)) 22000033--1004 IInntteell CCoorrppoorraattiioonn.AlAl lRl RigihgthstsRReseesrevrevde.d. [ MAIN MENU ] 1. Exit [ DISK/VOLUME INFORMATION ] RAID Volume : ID Name Level Stripe Size Status...
User manual
Page 110
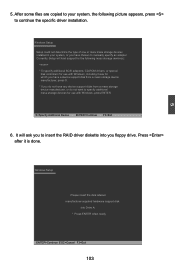
After some files are copied to your system, or you have any device support disks from a mass storage device manufacturer, press S. * If you floppy drive. S=Specify Additional Device ENTER=Continue F3=Exit 6. 5. Windows Setup Setup could not determine the type of one or more mass storage devices installed in your system, the following mass storage device(s): * To specify additional SCSI adapters, CD-ROM drivers, or special disk controllers for use with Windows, including those for which...
After some files are copied to your system, or you have any device support disks from a mass storage device manufacturer, press S. * If you floppy drive. S=Specify Additional Device ENTER=Continue F3=Exit 6. 5. Windows Setup Setup could not determine the type of one or more mass storage devices installed in your system, the following mass storage device(s): * To specify additional SCSI adapters, CD-ROM drivers, or special disk controllers for use with Windows, including those for which...


