English Manual.
Page 6
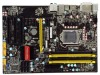
... Install the Memory 11 Install an Expansion Card 13 Install other Internal Connectors 14 Jumpers 18 Chapter 3 BIOS Setup Enter BIOS Setup 21 Main Menu 21 System Information 23 Advanced BIOS Features 25 Fox Central Control Unit 27 Advanced Chipset Features 32 Integrated Peripherals 33 Power Management Setup 37 ...PC Health Status 39 BIOS Security Features 40 Load Optimal Defaults 41 Save Changes and Exit 41 Discard Changes and Exit 41 Chapter 4 CD Instruction ...
... Install the Memory 11 Install an Expansion Card 13 Install other Internal Connectors 14 Jumpers 18 Chapter 3 BIOS Setup Enter BIOS Setup 21 Main Menu 21 System Information 23 Advanced BIOS Features 25 Fox Central Control Unit 27 Advanced Chipset Features 32 Integrated Peripherals 33 Power Management Setup 37 ...PC Health Status 39 BIOS Security Features 40 Load Optimal Defaults 41 Save Changes and Exit 41 Discard Changes and Exit 41 Chapter 4 CD Instruction ...

English Manual.
Page 15
... computer if the CPU cooler is not recommended that supports HT Technology and has it does not meet the standard requirements for HT Technology ■ A BIOS that the system bus frequency be inserted if oriented incorrectly. (Or you may occur. ■ Set the CPU host frequency in accordance with the CPU...
... computer if the CPU cooler is not recommended that supports HT Technology and has it does not meet the standard requirements for HT Technology ■ A BIOS that the system bus frequency be inserted if oriented incorrectly. (Or you may occur. ■ Set the CPU host frequency in accordance with the CPU...

English Manual.
Page 18
... DIMM first, then install black DIMM the second. DIMM3 - DS/SS - Single Channel - - A memory module can not function if no yellow DIMM is installed, the BIOS will automatically check the memory in each pair of DIMM(1,2, 3, 4) on the motherboard.) 11 11 CAUTION If you need to insert the memory, switch the...
... DIMM first, then install black DIMM the second. DIMM3 - DS/SS - Single Channel - - A memory module can not function if no yellow DIMM is installed, the BIOS will automatically check the memory in each pair of DIMM(1,2, 3, 4) on the motherboard.) 11 11 CAUTION If you need to insert the memory, switch the...

English Manual.
Page 20
... the PCI Express x16 slot. • Removing the Card: Push the latch at the end of the PCI Express x16 slot to make any required BIOS changes for your expansion card. ■ Always turn off the computer and unplug the power cord from the power outlet before installing an expansion card... the slot. 4. Remove the metal slot cover from the slot. 13 13 Make sure the metal contacts on your operating system. If necessary, go to BIOS Setup to release the card and then pull the card straight up from the chassis back panel. 2. Turn on the card are completely inserted into...
... the PCI Express x16 slot. • Removing the Card: Push the latch at the end of the PCI Express x16 slot to make any required BIOS changes for your expansion card. ■ Always turn off the computer and unplug the power cord from the power outlet before installing an expansion card... the slot. 4. Remove the metal slot cover from the slot. 13 13 Make sure the metal contacts on your operating system. If necessary, go to BIOS Setup to release the card and then pull the card straight up from the chassis back panel. 2. Turn on the card are completely inserted into...

English Manual.
Page 22
... for legacy compatibility. We recommend you are three main fan headers on the right. The fan speed can connect to any IDE type of the BIOS Setup. CAUTION ! These fans can be controlled and monitored in the motherboard. 12 RLSD SIN SOUT DTR GND DSR RTS CTS RI EMPTY 9 10 COM1...
... for legacy compatibility. We recommend you are three main fan headers on the right. The fan speed can connect to any IDE type of the BIOS Setup. CAUTION ! These fans can be controlled and monitored in the motherboard. 12 RLSD SIN SOUT DTR GND DSR RTS CTS RI EMPTY 9 10 COM1...
English Manual.
Page 25
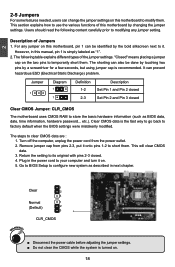
... 2 and Pin 3 closed . 4. Remove jumper cap from the power outlet. 2. This section explains how to store the basic hardware information (such as BIOS data, date, time information, hardware password... Users should read the following table explains different types of the jumper settings. Go to...jumper cap on the two pins to modify them. etc.). It can also be identified by the bold silkscreen next to factory default when the BIOS settings were mistakenly modified. Clear CMOS data is turned on. 18 18 However, in the power cord to its original with pins 2-3 closed...
... 2 and Pin 3 closed . 4. Remove jumper cap from the power outlet. 2. This section explains how to store the basic hardware information (such as BIOS data, date, time information, hardware password... Users should read the following table explains different types of the jumper settings. Go to...jumper cap on the two pins to modify them. etc.). It can also be identified by the bold silkscreen next to factory default when the BIOS settings were mistakenly modified. Clear CMOS data is turned on. 18 18 However, in the power cord to its original with pins 2-3 closed...

English Manual.
Page 26
Intel® Management Engine (ME) is an embedded microcontroller located in Intel chipset. Before flashing BIOS ROM, you can disable the Intel® Management Engine function. 1 Enable 2 (Default) 3 1 Disable 2 3 MFG ! Set the jumper to pins 1-2, you need to set MFG jumper ...
Intel® Management Engine (ME) is an embedded microcontroller located in Intel chipset. Before flashing BIOS ROM, you can disable the Intel® Management Engine function. 1 Enable 2 (Default) 3 1 Disable 2 3 MFG ! Set the jumper to pins 1-2, you need to set MFG jumper ...

English Manual.
Page 27
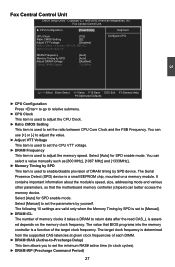
... appears on the screen during the system Power On Self Test (POST) process. 2. We do not guarantee the content of the BIOS parameters are also provided. Please visit our website for reference only. You want to change system settings through the...Integrated Peripherals ■ Power Management Setup ■ PC Health Status ■ BIOS Security Features ■ Load Optimal Defaults ■ Save & Exit Setup ■ Exit Without Saving Since BIOS could be updated some other times, the BIOS information described in the future. This chapter tells how to change the default CMOS...
... appears on the screen during the system Power On Self Test (POST) process. 2. We do not guarantee the content of the BIOS parameters are also provided. Please visit our website for reference only. You want to change system settings through the...Integrated Peripherals ■ Power Management Setup ■ PC Health Status ■ BIOS Security Features ■ Load Optimal Defaults ■ Save & Exit Setup ■ Exit Without Saving Since BIOS could be updated some other times, the BIOS information described in the future. This chapter tells how to change the default CMOS...

English Manual.
Page 28
... bottom of setup functions together with two exit choices. Main Menu The main menu allows you made. Each item in the BIOS Setup, and we shall not be responsible for the chipset can be changed through this menu, and the system performance can...CMOS Setup Utility - Copyright (C) 1985-2009, American Megatrends, Inc. ► System Information ► PC Health Status ► Advanced BIOS Features ► BIOS Security Features ► Fox Central Control Unit Load Optimal Defaults ► Advanced Chipset Features Save & Exit Setup ► Integrated Peripherals...
... bottom of setup functions together with two exit choices. Main Menu The main menu allows you made. Each item in the BIOS Setup, and we shall not be responsible for the chipset can be changed through this menu, and the system performance can...CMOS Setup Utility - Copyright (C) 1985-2009, American Megatrends, Inc. ► System Information ► PC Health Status ► Advanced BIOS Features ► BIOS Security Features ► Fox Central Control Unit Load Optimal Defaults ► Advanced Chipset Features Save & Exit Setup ► Integrated Peripherals...

English Manual.
Page 29
It means, if your system loading is to adjust BIOS setting one by one, trial and error, to find out the best setting for your current system. ► Save & Exit Setup Save setting values to ... Setup. ► Load Optimal Defaults The optimal performance settings can be set up through this menu to prevent unauthorized use of your CPU/System. ► BIOS Security Features The Supervisor/User password can be set up through this menu. ► PC Health Status This setup enables you to read/change anything...
It means, if your system loading is to adjust BIOS setting one by one, trial and error, to find out the best setting for your current system. ► Save & Exit Setup Save setting values to ... Setup. ► Load Optimal Defaults The optimal performance settings can be set up through this menu to prevent unauthorized use of your CPU/System. ► BIOS Security Features The Supervisor/User password can be set up through this menu. ► PC Health Status This setup enables you to read/change anything...
English Manual.
Page 30
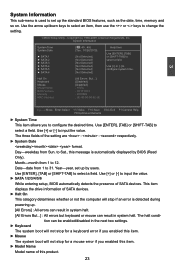
...► SATA 5 [Not Detected] configure system time. ► SATA 6 [Not Detected] Halt On Keyboard Mouse Model Name BIOS Version Memory MAC Address [All Errors But ...] [Disabled] [Disabled] : H55A : 9C1F1D10 : 2048MB : 8E-00-00-00-8E-8E 3 Move Enter:Select +/-/:Value F10:Save ESC:Exit F1:General Help...This item displays the drive information of this message is detected during powering up the standard BIOS features, such as the date, time, memory and so on. Use the arrow up by BIOS (Read Only). to Sat., this product. 23 CMOS Setup Utility - Day-weekday from...
...► SATA 5 [Not Detected] configure system time. ► SATA 6 [Not Detected] Halt On Keyboard Mouse Model Name BIOS Version Memory MAC Address [All Errors But ...] [Disabled] [Disabled] : H55A : 9C1F1D10 : 2048MB : 8E-00-00-00-8E-8E 3 Move Enter:Select +/-/:Value F10:Save ESC:Exit F1:General Help...This item displays the drive information of this message is detected during powering up the standard BIOS features, such as the date, time, memory and so on. Use the arrow up by BIOS (Read Only). to Sat., this product. 23 CMOS Setup Utility - Day-weekday from...

English Manual.
Page 31
3 ► BIOS Version It displays the current BIOS version. The size is needed. ► Memory This item displays the current memory size. User can check this information and discuss with the field service people if a BIOS upgrade is depending on how many memory modules were installed in your system before powering on. ► MAC Address This item shows the onboard LAN MAC address. 24
3 ► BIOS Version It displays the current BIOS version. The size is needed. ► Memory This item displays the current memory size. User can check this information and discuss with the field service people if a BIOS upgrade is depending on how many memory modules were installed in your system before powering on. ► MAC Address This item shows the onboard LAN MAC address. 24

English Manual.
Page 32
... removable drives. ► CD/DVD Drives This option is used to specify the boot priority sequence from available CD/DVD drives. 25 3 Advanced BIOS Features CMOS Setup Utility - Advanced BIOS Features Quiet Boot Bootup Num-Lock PCI Latency Timer ► Intel VT-d Configuration ► Boot Device Priority ► Hard Disk Drives ►...
... removable drives. ► CD/DVD Drives This option is used to specify the boot priority sequence from available CD/DVD drives. 25 3 Advanced BIOS Features CMOS Setup Utility - Advanced BIOS Features Quiet Boot Bootup Num-Lock PCI Latency Timer ► Intel VT-d Configuration ► Boot Device Priority ► Hard Disk Drives ►...
English Manual.
Page 34
... Megatrends, Inc. Select [Auto] for SPD enable mode. It contains important information about the module's speed, size, addressing mode and various other parameters, so that BIOS programs into the memory controller is used to set the ratio between CPU Core Clock and the FSB Frequency. Select [Auto] for SPD enable mode.
... Megatrends, Inc. Select [Auto] for SPD enable mode. It contains important information about the module's speed, size, addressing mode and various other parameters, so that BIOS programs into the memory controller is used to set the ratio between CPU Core Clock and the FSB Frequency. Select [Auto] for SPD enable mode.

English Manual.
Page 37
... average power consumption and decreased average heat production. There are some system requirements must be met, including CPU, chipset, motherboard, BIOS and operation system. It is set to "Auto" can allow BIOS to dynamically adjust processor voltage and core frequency, which can select the EIST (Processor Power Management, PPM) through this item...
... average power consumption and decreased average heat production. There are some system requirements must be met, including CPU, chipset, motherboard, BIOS and operation system. It is set to "Auto" can allow BIOS to dynamically adjust processor voltage and core frequency, which can select the EIST (Processor Power Management, PPM) through this item...

English Manual.
Page 39
... that high RAM to simply be ignored, resulting in the S4 (Suspend to enable/disable memory remapping around memory hole. Assertion Width SLP_S4# is enabled, BIOS will take the RAM that would occupy that 3.5-4GB address space and re-map it wasn't possible or practical to 2 seconds]. 32 3 Advanced Chipset Features...
... that high RAM to simply be ignored, resulting in the S4 (Suspend to enable/disable memory remapping around memory hole. Assertion Width SLP_S4# is enabled, BIOS will take the RAM that would occupy that 3.5-4GB address space and re-map it wasn't possible or practical to 2 seconds]. 32 3 Advanced Chipset Features...

English Manual.
Page 42
Move Enter:Select +/-/:Value F10:Save ESC:Exit F1:General Help F9:Optimized Defaults ► Serial Port1 Address This item is used to Select Serial Port1 Base Addresses. Copyright (C) 1985-2009, American Megatrends, Inc. SuperIO Configuration SuperIO Configuration Help Item Serial Port1 Address [3F8/IRQ4] Al low s BIOS to assign the I/O address and interrupt request (IRQ) for the onboard serial port 1. 3 35 SuperIO Configuration CMOS Setup Utility -
Move Enter:Select +/-/:Value F10:Save ESC:Exit F1:General Help F9:Optimized Defaults ► Serial Port1 Address This item is used to Select Serial Port1 Base Addresses. Copyright (C) 1985-2009, American Megatrends, Inc. SuperIO Configuration SuperIO Configuration Help Item Serial Port1 Address [3F8/IRQ4] Al low s BIOS to assign the I/O address and interrupt request (IRQ) for the onboard serial port 1. 3 35 SuperIO Configuration CMOS Setup Utility -
English Manual.
Page 43
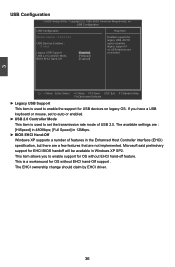
...off feature. Microsoft said preliminary support for legacy USB. USB Configuration USB Configuration Help Item Module Version - 2.24.5-13.4 Enables support for EHCI BIOS handoff will be available in Windows XP SP2. This is used to set to auto or enabled. ► USB 2.0 Controller Mode This item...by EHCI driver. 36 This item allows you have a USB keyboard or mouse, set the transmission rate mode of features in 12Mbps. ► BIOS EHCI Hand-Off Windows XP supports a number of USB 2.0. If you to enable the support for OS without EHCI hand-Off support . 3 ...
...off feature. Microsoft said preliminary support for legacy USB. USB Configuration USB Configuration Help Item Module Version - 2.24.5-13.4 Enables support for EHCI BIOS handoff will be available in Windows XP SP2. This is used to set to auto or enabled. ► USB 2.0 Controller Mode This item...by EHCI driver. 36 This item allows you have a USB keyboard or mouse, set the transmission rate mode of features in 12Mbps. ► BIOS EHCI Hand-Off Windows XP supports a number of USB 2.0. If you to enable the support for OS without EHCI hand-Off support . 3 ...

English Manual.
Page 44
... management of mobile, desktop, and server platforms. It defines five sleeping states, they are lost (the OS is responsible for initial boot operations within the BIOS to distinguish whether or not the boot is going to wake from a saved memory image. 37 The S4 sleeping state is a low wake latency sleeping...
... management of mobile, desktop, and server platforms. It defines five sleeping states, they are lost (the OS is responsible for initial boot operations within the BIOS to distinguish whether or not the boot is going to wake from a saved memory image. 37 The S4 sleeping state is a low wake latency sleeping...

English Manual.
Page 47
... [Full Access]: Allow any field to be displayed only when a User Password was set user access level. BIOS Security Features Security Settings Help Item Supervisor Password : Installed Install or Change the User Password : Installed password.... 3 BIOS Security Features CMOS Setup Utility - It is used to enter BIOS setup, but the fields can not be changed. [Limited]: Allow only limited fields to be changed except...
... [Full Access]: Allow any field to be displayed only when a User Password was set user access level. BIOS Security Features Security Settings Help Item Supervisor Password : Installed Install or Change the User Password : Installed password.... 3 BIOS Security Features CMOS Setup Utility - It is used to enter BIOS setup, but the fields can not be changed. [Limited]: Allow only limited fields to be changed except...


