

English Manual.
Page 6
... Illustration of the Optional Accessory 21 Jumpers...24 Onboard Button 26 Onboard LED 26 Onboard Debug LED 27 Chapter 3 BIOS Setup Enter BIOS Setup 29 Main Menu 29 Standard CMOS Features 31 Advanced BIOS Features 33 Advanced Chipset Features 35 Integrated Peripherals 36 Power Management Setup 40 PnP/PCI Configurations 43... Set Supervisor Password 56 Set User Password 56 Save & Exit Setup 56 Exit Without Saving 56 Chapter 4 CD Instruction Utility CD Introduction 58 AEGIS PANEL Main Panel 61 HW Monitor 62
... Illustration of the Optional Accessory 21 Jumpers...24 Onboard Button 26 Onboard LED 26 Onboard Debug LED 27 Chapter 3 BIOS Setup Enter BIOS Setup 29 Main Menu 29 Standard CMOS Features 31 Advanced BIOS Features 33 Advanced Chipset Features 35 Integrated Peripherals 36 Power Management Setup 40 PnP/PCI Configurations 43... Set Supervisor Password 56 Set User Password 56 Save & Exit Setup 56 Exit Without Saving 56 Chapter 4 CD Instruction Utility CD Introduction 58 AEGIS PANEL Main Panel 61 HW Monitor 62
English Manual.
Page 10
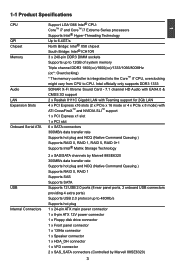
...) * The memory controller is integrated into the CoreTM i7 CPU, overclocking might vary from CPU to 480Mb/s Supports hot plug Internal Connectors 1 x 24-pin ATX main power connector 1 x 8-pin ATX 12V power connector 1 x Floppy disk drive connector 1 x Front panel connector 1 x 1394a connector 1 x Speaker connector 1 x HDA_DH connector 1 x VFD connector 2 x SAS_SATA connectors (Controlled...
...) * The memory controller is integrated into the CoreTM i7 CPU, overclocking might vary from CPU to 480Mb/s Supports hot plug Internal Connectors 1 x 24-pin ATX main power connector 1 x 8-pin ATX 12V power connector 1 x Floppy disk drive connector 1 x Front panel connector 1 x 1394a connector 1 x Speaker connector 1 x HDA_DH connector 1 x VFD connector 2 x SAS_SATA connectors (Controlled...

English Manual.
Page 35
... provided. Please visit our support website for reference only. You have to run the Setup Program when the following information : ■ Enter BIOS Setup ■ Main Menu ■ Standard CMOS Features ■ Advanced BIOS Features ■ Advanced Chipset Features ■ Integrated Peripherals ■ Power Management Setup ■ PnP/PCI Configurations ■...
... provided. Please visit our support website for reference only. You have to run the Setup Program when the following information : ■ Enter BIOS Setup ■ Main Menu ■ Standard CMOS Features ■ Advanced BIOS Features ■ Advanced Chipset Features ■ Integrated Peripherals ■ Power Management Setup ■ PnP/PCI Configurations ■...

English Manual.
Page 36
... The BIOS is the communication bridge between hardware and software, correctly setting up through this menu. 29 Main Menu The main menu allows you to select from the change the default values in the main menu is critical to maintain optimal system performance. They all can be set up the BIOS parameters is...
... The BIOS is the communication bridge between hardware and software, correctly setting up through this menu. 29 Main Menu The main menu allows you to select from the change the default values in the main menu is critical to maintain optimal system performance. They all can be set up the BIOS parameters is...

English Manual.
Page 63
... on when you will be set up through this function or input a new password to exit CMOS without saving your access right. SAVE to the main menu. Quit Without Saving (Y/N)? It may fail to work. Press any key to skip. press to continue... PASSWORD DISABLED !!! eters of system to load ... be asked to enter a password only when you to input this menu. After you get the right to access the BIOS, you try to the main menu. A dialogue pops out, select then press to improve the performances of a regular User password. Set User Password The user password can be set...
... on when you will be set up through this function or input a new password to exit CMOS without saving your access right. SAVE to the main menu. Quit Without Saving (Y/N)? It may fail to work. Press any key to skip. press to continue... PASSWORD DISABLED !!! eters of system to load ... be asked to enter a password only when you to input this menu. After you get the right to access the BIOS, you try to the main menu. A dialogue pops out, select then press to improve the performances of a regular User password. Set User Password The user password can be set...

English Manual.
Page 65
... install Realtek LAN driver. Realtek 811X LAN Driver Use it to install all the installations of drivers. The CD will automatically run and display the main menu on "Driver", then use these options to install Intel chipset driver. Intel Chipset Driver Use it to install Realtek HDA audio driver. Driver Click...
... install Realtek LAN driver. Realtek 811X LAN Driver Use it to install all the installations of drivers. The CD will automatically run and display the main menu on "Driver", then use these options to install Intel chipset driver. Intel Chipset Driver Use it to install Realtek HDA audio driver. Driver Click...
English Manual.
Page 68
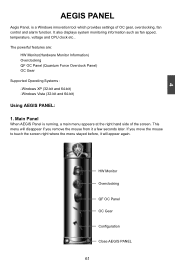
If you remove the mouse from it will appear again. 4 AEGIS PANEL Aegis Panel, is running, a main menu appears at the right hand side of OC gear, overclocking, fan control and alarm function. Main Panel When AEGIS Panel is a Windows innovation tool which provides settings of the screen. This menu will disappear if...
If you remove the mouse from it will appear again. 4 AEGIS PANEL Aegis Panel, is running, a main menu appears at the right hand side of OC gear, overclocking, fan control and alarm function. Main Panel When AEGIS Panel is a Windows innovation tool which provides settings of the screen. This menu will disappear if...

English Manual.
Page 81
... (32-bit and 64-bit) ■ Windows 2003 (32-bit and 64-bit) ■ Windows Vista (32-bit and 64-bit) Using FOX LOGO: Main Page Main screen Backup Change Delete Exit Minimize Website About WARNING! Boot time Logo will be displayed if you change Logo or delete current Logo, the system...
... (32-bit and 64-bit) ■ Windows 2003 (32-bit and 64-bit) ■ Windows Vista (32-bit and 64-bit) Using FOX LOGO: Main Page Main screen Backup Change Delete Exit Minimize Website About WARNING! Boot time Logo will be displayed if you change Logo or delete current Logo, the system...

English Manual.
Page 85
... is important. Basic mirroring can speed up reading data as fault tolerance). The following RAID configurations are provided for example a database of customer orders; The main aims of using error checking the total system can be designed to provide increased data reliability (fault tolerance) or increased I/O (input/ output) performance, or both...
... is important. Basic mirroring can speed up reading data as fault tolerance). The following RAID configurations are provided for example a database of customer orders; The main aims of using error checking the total system can be designed to provide increased data reliability (fault tolerance) or increased I/O (input/ output) performance, or both...

English Manual.
Page 90
...). 2. Press to save the setting then PC will display a message asking you to press + keys simultaneously to enter the main menu of Intel® Matrix Storage Manager Option ROM Utility. AwardBIOS CMOS Setup Utility OnChip IDE Device SATA Mode Legacy Mode Support...Previous Values F7:Optimized Defaults 5-3 Create RAID in BIOS Enter RAID BIOS Setup When BIOS is restarted, it will reboot itself. AAll lRl RigihgthstsRReseesrevrevde.d. [ MAIN MENU ] 1. Phoenix - Select and Set the "SATA Mode" option to enter Configuration Utility. Press the + to [RAID]. 4. Create RAID ...
...). 2. Press to save the setting then PC will display a message asking you to press + keys simultaneously to enter the main menu of Intel® Matrix Storage Manager Option ROM Utility. AwardBIOS CMOS Setup Utility OnChip IDE Device SATA Mode Legacy Mode Support...Previous Values F7:Optimized Defaults 5-3 Create RAID in BIOS Enter RAID BIOS Setup When BIOS is restarted, it will reboot itself. AAll lRl RigihgthstsRReseesrevrevde.d. [ MAIN MENU ] 1. Phoenix - Select and Set the "SATA Mode" option to enter Configuration Utility. Press the + to [RAID]. 4. Create RAID ...

English Manual.
Page 94
...to create this volume ? (Y/N) : 9. Create RAID Volume 3. Are you sure you want to the main menu, a 200GB RAID0 system is normally configured. IInntteell((RR)) MMaattrriixx SSttoorraaggee MMaannaaggeerr ooppttiioonn RROOMM vv85..00.....00..11003191 ICH190RRwwRRAAIDID55 CCooppyyrriigghhtt((CC)) 22000033--0084 IInntteell CCoorrppoorraattiioonn. AAll lRl RigihgthstsRReseesrevrevde.d. [ MAIN MENU ] 1. Delete RAID Volume 4. IInntteell((RR)) MMaattrriixx SSttoorraaggee MMaannaaggeerr ooppttiioonn RROOMM vv85..00..00..11003191 ICH190RRwwRRAAIDID55...
...to create this volume ? (Y/N) : 9. Create RAID Volume 3. Are you sure you want to the main menu, a 200GB RAID0 system is normally configured. IInntteell((RR)) MMaattrriixx SSttoorraaggee MMaannaaggeerr ooppttiioonn RROOMM vv85..00.....00..11003191 ICH190RRwwRRAAIDID55 CCooppyyrriigghhtt((CC)) 22000033--0084 IInntteell CCoorrppoorraattiioonn. AAll lRl RigihgthstsRReseesrevrevde.d. [ MAIN MENU ] 1. Delete RAID Volume 4. IInntteell((RR)) MMaattrriixx SSttoorraaggee MMaannaaggeerr ooppttiioonn RROOMM vv85..00..00..11003191 ICH190RRwwRRAAIDID55...

English Manual.
Page 98
Two RAID0 volumes were configured. Create RAID Volume 3. Delete RAID Volume 4. AAll lRl RigihgthstsRReseesrevrevde.d. [ MAIN MENU ] 1. Reset Disks to the main menu. Exit [ DISK/VOLUME INFORMATION ] RAID Volume : ID Name Level Stripe Size 0 TryRAID0 RAID0(Stripe) 128KB 200.0GB 1 TryRAID0-1 RAID0(Stripe) 128KB 265.8GB Status ...
Two RAID0 volumes were configured. Create RAID Volume 3. Delete RAID Volume 4. AAll lRl RigihgthstsRReseesrevrevde.d. [ MAIN MENU ] 1. Reset Disks to the main menu. Exit [ DISK/VOLUME INFORMATION ] RAID Volume : ID Name Level Stripe Size 0 TryRAID0 RAID0(Stripe) 128KB 200.0GB 1 TryRAID0-1 RAID0(Stripe) 128KB 265.8GB Status ...

English Manual.
Page 99
... 92 In "Name" item, you can input a device name for the RAID1 system and press to apply it as TryRAID1 to make a selection from the main menu and press . 2. In "RAID Level" item, you can use Up or Down arrow key to replace the default Volume0. IInntteell((RR)) MMaattrriixx SSttoorraaggee MMaannaaggeerr...
... 92 In "Name" item, you can input a device name for the RAID1 system and press to apply it as TryRAID1 to make a selection from the main menu and press . 2. In "RAID Level" item, you can use Up or Down arrow key to replace the default Volume0. IInntteell((RR)) MMaattrriixx SSttoorraaggee MMaannaaggeerr...

English Manual.
Page 101
...Select 7. Entering a lower capacity allows you want to create this volume ? (Y/N) : Press to create the volume and return to the main menu. Exit [ DISK/VOLUME INFORMATION ] RAID Volume : ID Name Level Stripe Size 0 TryRAID1 RAID1(Mirror) N/A 232.9GB Status Normal ... and press . A warning message will skip "Strip Size" menu for RAID1. Are you sure you to Non-RAID 2. AAll lRl RigihgthstsRReseesrevrevde.d. [ MAIN MENU ] 1. Delete RAID Volume 4. It will appear : WARNING: ALL DATA ON SELECTED DISKS WILL BE LOST. Create RAID Volume 3. 5 6. ...
...Select 7. Entering a lower capacity allows you want to create this volume ? (Y/N) : Press to create the volume and return to the main menu. Exit [ DISK/VOLUME INFORMATION ] RAID Volume : ID Name Level Stripe Size 0 TryRAID1 RAID1(Mirror) N/A 232.9GB Status Normal ... and press . A warning message will skip "Strip Size" menu for RAID1. Are you sure you to Non-RAID 2. AAll lRl RigihgthstsRReseesrevrevde.d. [ MAIN MENU ] 1. Delete RAID Volume 4. It will appear : WARNING: ALL DATA ON SELECTED DISKS WILL BE LOST. Create RAID Volume 3. 5 6. ...

English Manual.
Page 102
... system and press to replace the default Volume0. In "RAID Level" item, you can use Up or Down arrow key to make a selection from the main menu and press . 2. RAID 10: Mirrors data and stripes the mirror. Create RAID 10 (0+1) 1.
... system and press to replace the default Volume0. In "RAID Level" item, you can use Up or Down arrow key to make a selection from the main menu and press . 2. RAID 10: Mirrors data and stripes the mirror. Create RAID 10 (0+1) 1.

English Manual.
Page 103
...this volume ? (Y/N) : Press to create the volume and return to Non-RAID 2. Reset Disks to the main menu. IInntteell((RR)) MMaattrriixx SSttoorraaggee MMaannaaggeerr ooppttiioonn RROOMM vv85..00..00..11003191 ICH190RRwwRRAAIDID55 CCooppyyrriigghhtt((CC)) 22000033--0084 IInntteell ...[ HELP ] The following are selected for RAID10, so there is no need to go to Disks option. 5. AAll lRl RigihgthstsRReseesrevrevde.d. [ MAIN MENU ] 1. Because all four disks are typical values: RAID0 - 128KB RAID10 - 64KB RAID5 - 64KB [↑↓]-Change [TAB]-Next...
...this volume ? (Y/N) : Press to create the volume and return to Non-RAID 2. Reset Disks to the main menu. IInntteell((RR)) MMaattrriixx SSttoorraaggee MMaannaaggeerr ooppttiioonn RROOMM vv85..00..00..11003191 ICH190RRwwRRAAIDID55 CCooppyyrriigghhtt((CC)) 22000033--0084 IInntteell ...[ HELP ] The following are selected for RAID10, so there is no need to go to Disks option. 5. AAll lRl RigihgthstsRReseesrevrevde.d. [ MAIN MENU ] 1. Because all four disks are typical values: RAID0 - 128KB RAID10 - 64KB RAID5 - 64KB [↑↓]-Change [TAB]-Next...

English Manual.
Page 104
... 97 In "Name" item, you can input a device name for the RAID5 system and press to apply it as TryRAID5 to make a selection from the main menu and press . 2. IInntteell((RR)) MMaattrriixx SSttoorraaggee MMaannaaggeerr ooppttiioonn RROOMM vv85..00..00..11003191 ICH190RRwwRRAAIDID55 CCooppyyrriigghhtt((CC)) 22000033--0084 IInntteell CCoorrppoorraattiioonn. IInntteell((RR)) MMaattrriixx SSttoorraaggee...
... 97 In "Name" item, you can input a device name for the RAID5 system and press to apply it as TryRAID5 to make a selection from the main menu and press . 2. IInntteell((RR)) MMaattrriixx SSttoorraaggee MMaannaaggeerr ooppttiioonn RROOMM vv85..00..00..11003191 ICH190RRwwRRAAIDID55 CCooppyyrriigghhtt((CC)) 22000033--0084 IInntteell CCoorrppoorraattiioonn. IInntteell((RR)) MMaattrriixx SSttoorraaggee...

English Manual.
Page 106
...RAID 2. In "Capacity" item, use the default value, and press . Select "Create Volume" and press . AAll lRl RigihgthstsRReseesrevrevde.d. [ MAIN MENU ] 1. The default value is , 232.9GB * 2 = 465.8GB. 8. Press . IInntteell((RR)) MMaattrriixx SSttoorraaggee MMaannaaggeerr ooppttiioonn ...RROOMM vv85..00..00..11003191 ICH190RRwwRRAAIDID55 CCooppyyrriigghhtt((CC)) 22000033--0084 IInntteell CCoorrppoorraattiioonn. Reset Disks to the main menu. Use Up or Down arrow key to select the desired strip size when entering "Strip Size" menu. Delete RAID Volume ...
...RAID 2. In "Capacity" item, use the default value, and press . Select "Create Volume" and press . AAll lRl RigihgthstsRReseesrevrevde.d. [ MAIN MENU ] 1. The default value is , 232.9GB * 2 = 465.8GB. 8. Press . IInntteell((RR)) MMaattrriixx SSttoorraaggee MMaannaaggeerr ooppttiioonn ...RROOMM vv85..00..00..11003191 ICH190RRwwRRAAIDID55 CCooppyyrriigghhtt((CC)) 22000033--0084 IInntteell CCoorrppoorraattiioonn. Reset Disks to the main menu. Use Up or Down arrow key to select the desired strip size when entering "Strip Size" menu. Delete RAID Volume ...

English Manual.
Page 107
Select "2. AAll lRl RigihgthstsRReseesrevrevde.d. [ MAIN MENU ] 1. Exit [ DISK/VOLUME INFORMATION ] RAID Volume : ID Name Level Stripe Size 0 TryRAID5 RAID5(Parity) 64KB 465.8GB Status Normal Bootable Yes Physical Disks: Port ... Capacity Status Bootable TryRAID05 RIDA0I(DS5tr(iPpaer)ity) 3 2 465.8GB Normal Yes [ HELP ] Deleting a volume will reset the disks to delete. Delete RAID Volume" in main menu and press . Create RAID Volume 3. Use Up or Down arrow key to select the RAID set you want to non-RAID. 5 Delete RAID Volume...
Select "2. AAll lRl RigihgthstsRReseesrevrevde.d. [ MAIN MENU ] 1. Exit [ DISK/VOLUME INFORMATION ] RAID Volume : ID Name Level Stripe Size 0 TryRAID5 RAID5(Parity) 64KB 465.8GB Status Normal Bootable Yes Physical Disks: Port ... Capacity Status Bootable TryRAID05 RIDA0I(DS5tr(iPpaer)ity) 3 2 465.8GB Normal Yes [ HELP ] Deleting a volume will reset the disks to delete. Delete RAID Volume" in main menu and press . Create RAID Volume 3. Use Up or Down arrow key to select the RAID set you want to non-RAID. 5 Delete RAID Volume...

English Manual.
Page 108
...[ THEEDLPD]ISKS WILL BE LOST! Are you sure you want to delete "TryRAID5"? (Y/N) : Deleting a volume will reset the disks to Non-RAID 2. AAll lRl RigihgthstsRReseesrevrevde.d. [ MAIN MENU ] 1. Reset Disks to non-RAID. WARNING: ALL DISK DATA WILL BE DELETED. [↑↓]-Select [ESC]-Previous Menu [DEL]-Delete Volume 4. Return to confirm... Disk [↑↓]-Select [ESC]-Exit [ENTER]-Select Menu 101 Create RAID Volume 3. 5 3. After key is pressed, the screen appears as below: Press key to Main Menu.
...[ THEEDLPD]ISKS WILL BE LOST! Are you sure you want to delete "TryRAID5"? (Y/N) : Deleting a volume will reset the disks to Non-RAID 2. AAll lRl RigihgthstsRReseesrevrevde.d. [ MAIN MENU ] 1. Reset Disks to non-RAID. WARNING: ALL DISK DATA WILL BE DELETED. [↑↓]-Select [ESC]-Previous Menu [DEL]-Delete Volume 4. Return to confirm... Disk [↑↓]-Select [ESC]-Exit [ENTER]-Select Menu 101 Create RAID Volume 3. 5 3. After key is pressed, the screen appears as below: Press key to Main Menu.