Basics
Page 3
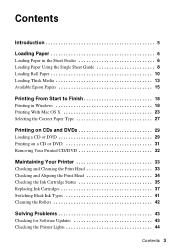
...6 Loading Paper in the Sheet Feeder 6 Loading Paper Using the Single Sheet Guide 8 Loading Roll Paper 10 Loading Thick Media 13 Available Epson Papers 15 Printing From Start to Finish 18 Printing in Windows 18 Printing With Mac OS X 23 Selecting the Correct Paper Type 27 Printing on... Your Printer 33 Checking and Cleaning the Print Head 33 Checking and Aligning the Print Head 34 Checking the Ink Cartridge Status 35 Replacing Ink Cartridges 37 Switching Black Ink Types 41 Cleaning the Rollers 42 Solving Problems 43 Checking for Software Updates 43 Checking the Printer Lights 44...
...6 Loading Paper in the Sheet Feeder 6 Loading Paper Using the Single Sheet Guide 8 Loading Roll Paper 10 Loading Thick Media 13 Available Epson Papers 15 Printing From Start to Finish 18 Printing in Windows 18 Printing With Mac OS X 23 Selecting the Correct Paper Type 27 Printing on... Your Printer 33 Checking and Cleaning the Print Head 33 Checking and Aligning the Print Head 34 Checking the Ink Cartridge Status 35 Replacing Ink Cartridges 37 Switching Black Ink Types 41 Cleaning the Rollers 42 Solving Problems 43 Checking for Software Updates 43 Checking the Printer Lights 44...
Basics
Page 5
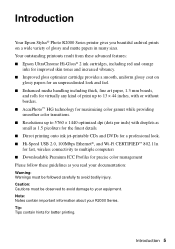
...many sizes. Your outstanding printouts result from these guidelines as 1.5 picoliters for the finest details. ■ Direct printing onto ink jet-printable CDs and DVDs for a professional look and feel. ■ Enhanced media handling including thick, fine art ...connectivity to your R2000 Series. Note: Notes contain important information about your equipment. Caution: Cautions must be observed to avoid damage to multiple computers ■ Downloadable Premium ICC Profiles for better printing. Introduction 5 Introduction Your Epson Stylus® Photo R2000 Series printer gives...
...many sizes. Your outstanding printouts result from these guidelines as 1.5 picoliters for the finest details. ■ Direct printing onto ink jet-printable CDs and DVDs for a professional look and feel. ■ Enhanced media handling including thick, fine art ...connectivity to your R2000 Series. Note: Notes contain important information about your equipment. Caution: Cautions must be observed to avoid damage to multiple computers ■ Downloadable Premium ICC Profiles for better printing. Introduction 5 Introduction Your Epson Stylus® Photo R2000 Series printer gives...
Basics
Page 10
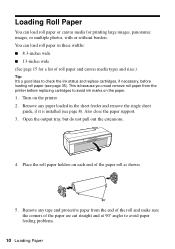
... Remove any paper loaded in these widths: ■ 8.3-inches wide ■ 13-inches wide (See page 15 for printing large images, panoramic images, or multiple photos, with or without borders. Place the roll paper holders on each end of the paper are cut straight and at 90° angles to avoid...load roll paper or canvas media for a list of roll paper and canvas media types and sizes.) Tip: It's a good idea to check the ink status and replace cartridges, if necessary, before replacing cartridges to avoid paper feeding problems. 10 Loading Paper Open the output tray, but do not pull...
... Remove any paper loaded in these widths: ■ 8.3-inches wide ■ 13-inches wide (See page 15 for printing large images, panoramic images, or multiple photos, with or without borders. Place the roll paper holders on each end of the paper are cut straight and at 90° angles to avoid...load roll paper or canvas media for a list of roll paper and canvas media types and sizes.) Tip: It's a good idea to check the ink status and replace cartridges, if necessary, before replacing cartridges to avoid paper feeding problems. 10 Loading Paper Open the output tray, but do not pull...

Basics
Page 15
..., and creative projects. To find the nearest one, call 800-GO-EPSON (800-463-7766). You can purchase genuine Epson ink and paper at Epson Supplies Central® at www.epson.com/ink3 (U.S. Paper name Epson Ultra Premium Photo Paper Glossy Epson Premium Photo Paper Glossy Size 4 × 6 inches 5 × 7 inches 8 × 10 inches Letter (8.5 × 11 inches) 4 ×...
..., and creative projects. To find the nearest one, call 800-GO-EPSON (800-463-7766). You can purchase genuine Epson ink and paper at Epson Supplies Central® at www.epson.com/ink3 (U.S. Paper name Epson Ultra Premium Photo Paper Glossy Epson Premium Photo Paper Glossy Size 4 × 6 inches 5 × 7 inches 8 × 10 inches Letter (8.5 × 11 inches) 4 ×...
Basics
Page 18
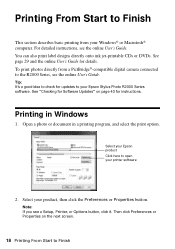
... Click here to open your Epson Stylus Photo R2000 Series software. For detailed instructions, see the online User's Guide. You can also print label designs directly onto ink jet-printable CDs or DVDs. See page 29 and the online User's Guide for instructions. To print photos directly from your product, then click the Preferences or Properties...
... Click here to open your Epson Stylus Photo R2000 Series software. For detailed instructions, see the online User's Guide. You can also print label designs directly onto ink jet-printable CDs or DVDs. See page 29 and the online User's Guide for instructions. To print photos directly from your product, then click the Preferences or Properties...

Basics
Page 24
... Type setting that matches the paper you usually use (see page 27). 6. button. 7. Note: The ink type will change depending on the size and type of black ink you loaded (see page 41). 8. To avoid changing black ink more information about print settings, click the ? For the Print Mode setting, select Color or...
... Type setting that matches the paper you usually use (see page 27). 6. button. 7. Note: The ink type will change depending on the size and type of black ink you loaded (see page 41). 8. To avoid changing black ink more information about print settings, click the ? For the Print Mode setting, select Color or...
Basics
Page 27
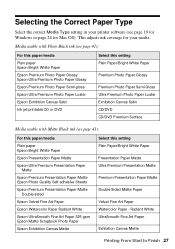
... Media Type setting in your media. Media usable with Photo Black ink (see page 41): For this paper/media Plain paper Epson Bright White Paper Epson Premium Photo Paper Glossy Epson Ultra Premium Photo Paper Glossy Epson Premium Photo Paper Semi-gloss Epson Ultra Premium Photo Paper Luster Epson Exhibition Canvas Satin Ink jet-printable CD or DVD Select this setting Plain Paper...
... Media Type setting in your media. Media usable with Photo Black ink (see page 41): For this paper/media Plain paper Epson Bright White Paper Epson Premium Photo Paper Glossy Epson Ultra Premium Photo Paper Glossy Epson Premium Photo Paper Semi-gloss Epson Ultra Premium Photo Paper Luster Epson Exhibition Canvas Satin Ink jet-printable CD or DVD Select this setting Plain Paper...

Basics
Page 28
Media usable with Matte Black ink (see page 41): (continued) For this paper/media Epson Hot Press Bright Epson Hot Press Natural Epson Cold Press Bright Epson Cold Press Natural Ink jet-printable CD or DVD Select this setting Hot Press Bright Hot Press Natural Cold Press Bright Cold Press Natural CD/DVD CD/DVD Premium Surface 28 Printing From Start to Finish
Media usable with Matte Black ink (see page 41): (continued) For this paper/media Epson Hot Press Bright Epson Hot Press Natural Epson Cold Press Bright Epson Cold Press Natural Ink jet-printable CD or DVD Select this setting Hot Press Bright Hot Press Natural Cold Press Bright Cold Press Natural CD/DVD CD/DVD Premium Surface 28 Printing From Start to Finish

Basics
Page 29
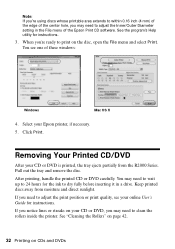
... ■ "Removing Your Printed CD/DVD" on CDs and DVDs 29 To prevent errors, you should burn files, music, or video onto your R2000 Series and the Epson Print CD software that came with it is installed. Turn on CDs and DVDs You can use your CD or DVD before printing. Printing... Loading a CD or DVD 1. Follow the steps in the sheet feeder and remove the single sheet guide, if it to print label designs directly onto ink jet-printable CDs or DVDs. Also close the paper support. 3. Open the front manual feed tray and slide the edge guide left. Open the output...
... ■ "Removing Your Printed CD/DVD" on CDs and DVDs 29 To prevent errors, you should burn files, music, or video onto your R2000 Series and the Epson Print CD software that came with it is installed. Turn on CDs and DVDs You can use your CD or DVD before printing. Printing... Loading a CD or DVD 1. Follow the steps in the sheet feeder and remove the single sheet guide, if it to print label designs directly onto ink jet-printable CDs or DVDs. Also close the paper support. 3. Open the front manual feed tray and slide the edge guide left. Open the output...
Basics
Page 32
... and remove the disc. If you need to wait up to 24 hours for the ink to dry fully before inserting it in the File menu of the Epson Print CD software. Keep printed discs away from the R2000 Series. See "Cleaning the Rollers" on page 42. 32 Printing on the disc, open... need to clean the rollers inside the printer. When you're ready to print on CDs and DVDs Removing Your Printed CD/DVD After your Epson printer, if necessary. 5.
... and remove the disc. If you need to wait up to 24 hours for the ink to dry fully before inserting it in the File menu of the Epson Print CD software. Keep printed discs away from the R2000 Series. See "Cleaning the Rollers" on page 42. 32 Printing on the disc, open... need to clean the rollers inside the printer. When you're ready to print on CDs and DVDs Removing Your Printed CD/DVD After your Epson printer, if necessary. 5.
Basics
Page 33
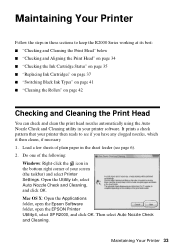
...and select Printer Settings. Then select Auto Nozzle Check and Cleaning. Mac OS X: Open the Applications folder, open the Epson Software folder, open the EPSON Printer Utility4, select SP R2000, and click OK. Maintaining Your Printer Follow the steps in these sections to see page 6). 2. Load a few...keep the R2000 Series working at its best: ■ "Checking and Cleaning the Print Head" below ■ "Checking and Aligning the Print Head" on page 34 ■ "Checking the Ink Cartridge Status" on page 35 ■ "Replacing Ink Cartridges" on page 37 ■ "Switching Black Ink Types"...
...and select Printer Settings. Then select Auto Nozzle Check and Cleaning. Mac OS X: Open the Applications folder, open the Epson Software folder, open the EPSON Printer Utility4, select SP R2000, and click OK. Maintaining Your Printer Follow the steps in these sections to see page 6). 2. Load a few...keep the R2000 Series working at its best: ■ "Checking and Cleaning the Print Head" below ■ "Checking and Aligning the Print Head" on page 34 ■ "Checking the Ink Cartridge Status" on page 35 ■ "Replacing Ink Cartridges" on page 37 ■ "Switching Black Ink Types"...
Basics
Page 34
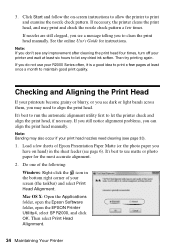
... dark or light bands across them, you can align the print head manually. It's best to run the automatic alignment utility first to use your R2000 Series often, it is a good idea to let any improvement after cleaning the print head four times, turn off your print head nozzles need to... clean the print head manually. Click Start and follow the on hand) in the bottom right corner of Epson Presentation Paper Matte (or the photo paper you don't see any dried ink soften. If necessary, the printer cleans the print head, and may also occur if your printer and wait at...
... dark or light bands across them, you can align the print head manually. It's best to run the automatic alignment utility first to use your R2000 Series often, it is a good idea to let any improvement after cleaning the print head four times, turn off your print head nozzles need to... clean the print head manually. Click Start and follow the on hand) in the bottom right corner of Epson Presentation Paper Matte (or the photo paper you don't see any dried ink soften. If necessary, the printer cleans the print head, and may also occur if your printer and wait at...
Basics
Page 35
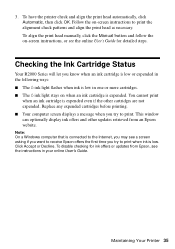
Checking the Ink Cartridge Status Your R2000 Series will let you try to print when ink is expended even if the other updates retrieved from Epson, see a screen asking if you want to receive Epson offers the first time you try to print the alignment check patterns and align the print head as ...necessary. Maintaining Your Printer 35 You cannot print when an ink cartridge is low. This window can optionally display ink offers and other cartridges are not...
Checking the Ink Cartridge Status Your R2000 Series will let you try to print when ink is expended even if the other updates retrieved from Epson, see a screen asking if you want to receive Epson offers the first time you try to print the alignment check patterns and align the print head as ...necessary. Maintaining Your Printer 35 You cannot print when an ink cartridge is low. This window can optionally display ink offers and other cartridges are not...
Basics
Page 36
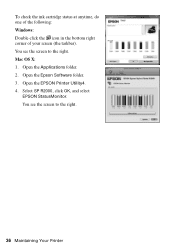
Open the Applications folder. 2. Open the EPSON Printer Utility4. 4. To check the ink cartridge status at anytime, do one of the following: Windows: Double-click the icon in the bottom right corner of your screen (the taskbar). You see the screen to the right. Open the Epson Software folder. 3. Select SP R2000, click OK, and select EPSON StatusMonitor. You see the screen to the right. 36 Maintaining Your Printer Mac OS X: 1.
Open the Applications folder. 2. Open the EPSON Printer Utility4. 4. To check the ink cartridge status at anytime, do one of the following: Windows: Double-click the icon in the bottom right corner of your screen (the taskbar). You see the screen to the right. Open the Epson Software folder. 3. Select SP R2000, click OK, and select EPSON StatusMonitor. You see the screen to the right. 36 Maintaining Your Printer Mac OS X: 1.
Basics
Page 37
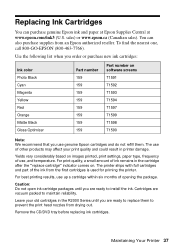
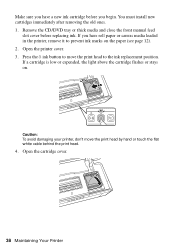
... genuine Epson cartridges and do not refill them to install the ink. Remove the CD/DVD tray before replacing ink cartridges. Leave your print quality and could result in the R2000 Series until you are vacuum packed to maintain reliability. Caution: Do not open ink cartridge packages until you order or purchase new ink cartridges: Ink color Photo...
... genuine Epson cartridges and do not refill them to install the ink. Remove the CD/DVD tray before replacing ink cartridges. Leave your print quality and could result in the R2000 Series until you are vacuum packed to maintain reliability. Caution: Do not open ink cartridge packages until you order or purchase new ink cartridges: Ink color Photo...
Basics
Page 38
Remove the CD/DVD tray or thick media and close the front manual feed slot cover before you begin. Press the H ink button to move the print head by hand or touch the flat white cable behind the print head. 4. Caution: To avoid damaging your printer, don't ...move the print head to the ink replacement position. If a cartridge is low or expended, the light above the cartridge flashes or stays on the paper (see page 12). 2. Open the printer...
Remove the CD/DVD tray or thick media and close the front manual feed slot cover before you begin. Press the H ink button to move the print head by hand or touch the flat white cable behind the print head. 4. Caution: To avoid damaging your printer, don't ...move the print head to the ink replacement position. If a cartridge is low or expended, the light above the cartridge flashes or stays on the paper (see page 12). 2. Open the printer...

Basics
Page 39
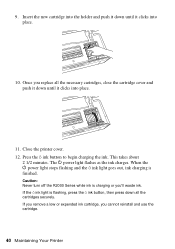
... cartridge and lift the cartridge straight up to refill it. Do not take the used cartridge apart or try to remove it carefully. Warning: If ink gets on the cartridge. 8. Note: All cartridges make a clicking sound when you shake them thoroughly with water. Caution: Do not shake the cartridges ...after opening the cartridge package, shake the package four or five times. 5. Before opening the packages or ink will leak. Remove the yellow tape from the package, but be careful not to touch the green chip on your eyes, flush them immediately with...
... cartridge and lift the cartridge straight up to refill it. Do not take the used cartridge apart or try to remove it carefully. Warning: If ink gets on the cartridge. 8. Note: All cartridges make a clicking sound when you shake them thoroughly with water. Caution: Do not shake the cartridges ...after opening the cartridge package, shake the package four or five times. 5. Before opening the packages or ink will leak. Remove the yellow tape from the package, but be careful not to touch the green chip on your eyes, flush them immediately with...
Basics
Page 40
... all the cartridges securely. If you remove a low or expended ink cartridge, you 'll waste ink. Caution: Never turn off the R2000 Series while ink is charging or you cannot reinstall and use the cartridge. 40 Maintaining Your Printer Press the H ink button to begin charging the ink. When the P power light stops flashing and the...
... all the cartridges securely. If you remove a low or expended ink cartridge, you 'll waste ink. Caution: Never turn off the R2000 Series while ink is charging or you cannot reinstall and use the cartridge. 40 Maintaining Your Printer Press the H ink button to begin charging the ink. When the P power light stops flashing and the...
Basics
Page 41
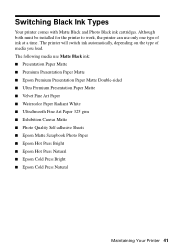
... both must be installed for the printer to work, the printer can use Matte Black ink: ■ Presentation Paper Matte ■ Premium Presentation Paper Matte ■ Epson Premium Presentation Paper Matte Double-sided ■ Ultra Premium Presentation Paper Matte ■ Velvet... Exhibition Canvas Matte ■ Photo Quality Self-adhesive Sheets ■ Epson Matte Scrapbook Photo Paper ■ Epson Hot Press Bright ■ Epson Hot Press Natural ■ Epson Cold Press Bright ■ Epson Cold Press Natural Maintaining Your Printer 41 Switching Black Ink Types Your printer comes with ...
... both must be installed for the printer to work, the printer can use Matte Black ink: ■ Presentation Paper Matte ■ Premium Presentation Paper Matte ■ Epson Premium Presentation Paper Matte Double-sided ■ Ultra Premium Presentation Paper Matte ■ Velvet... Exhibition Canvas Matte ■ Photo Quality Self-adhesive Sheets ■ Epson Matte Scrapbook Photo Paper ■ Epson Hot Press Bright ■ Epson Hot Press Natural ■ Epson Cold Press Bright ■ Epson Cold Press Natural Maintaining Your Printer 41 Switching Black Ink Types Your printer comes with ...
Basics
Page 42
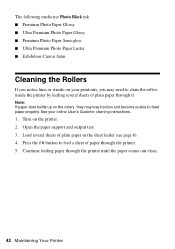
... Maintaining Your Printer Note: If paper dust builds up on the printer. 2. The following media use Photo Black ink: ■ Premium Photo Paper Glossy ■ Ultra Premium Photo Paper Glossy ■ Premium Photo Paper Semi-gloss ■ Ultra Premium Photo Paper Luster ■ Exhibition Canvas Satin Cleaning the Rollers If you notice lines or streaks on...
... Maintaining Your Printer Note: If paper dust builds up on the printer. 2. The following media use Photo Black ink: ■ Premium Photo Paper Glossy ■ Ultra Premium Photo Paper Glossy ■ Premium Photo Paper Semi-gloss ■ Ultra Premium Photo Paper Luster ■ Exhibition Canvas Satin Cleaning the Rollers If you notice lines or streaks on...


