Basics
Page 3
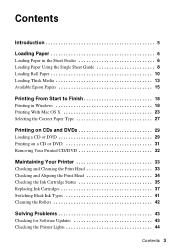
... 5 Loading Paper 6 Loading Paper in the Sheet Feeder 6 Loading Paper Using the Single Sheet Guide 8 Loading Roll Paper 10 Loading Thick Media 13 Available Epson Papers 15 Printing From Start to Finish 18 Printing in Windows 18 Printing With Mac OS X 23 Selecting the Correct Paper Type 27 Printing on... CDs and DVDs 29 Loading a CD or DVD 29 Printing on a CD or DVD 31 Removing Your Printed CD/DVD 32 Maintaining Your Printer 33 Checking and Cleaning the Print Head 33 Checking and Aligning the Print Head 34 Checking the Ink Cartridge Status 35 Replacing Ink Cartridges 37...
... 5 Loading Paper 6 Loading Paper in the Sheet Feeder 6 Loading Paper Using the Single Sheet Guide 8 Loading Roll Paper 10 Loading Thick Media 13 Available Epson Papers 15 Printing From Start to Finish 18 Printing in Windows 18 Printing With Mac OS X 23 Selecting the Correct Paper Type 27 Printing on... CDs and DVDs 29 Loading a CD or DVD 29 Printing on a CD or DVD 31 Removing Your Printed CD/DVD 32 Maintaining Your Printer 33 Checking and Cleaning the Print Head 33 Checking and Aligning the Print Head 34 Checking the Ink Cartridge Status 35 Replacing Ink Cartridges 37...
Basics
Page 5
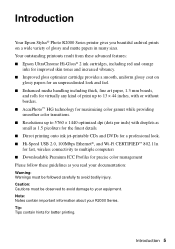
...9632; Downloadable Premium ICC Profiles for better printing. Caution: Cautions must be observed to avoid damage to your R2000 Series. Note: Notes contain important information about your equipment. Tip: Tips contain hints for precise color management Please follow these... as you read your documentation: Warning: Warnings must be followed carefully to avoid bodily injury. Introduction 5 Introduction Your Epson Stylus® Photo R2000 Series printer gives you beautiful archival prints on glossy papers for an unprecedented look and feel. ■ Enhanced media handling including thick...
...9632; Downloadable Premium ICC Profiles for better printing. Caution: Cautions must be observed to avoid damage to your R2000 Series. Note: Notes contain important information about your equipment. Tip: Tips contain hints for precise color management Please follow these... as you read your documentation: Warning: Warnings must be followed carefully to avoid bodily injury. Introduction 5 Introduction Your Epson Stylus® Photo R2000 Series printer gives you beautiful archival prints on glossy papers for an unprecedented look and feel. ■ Enhanced media handling including thick...
Basics
Page 8
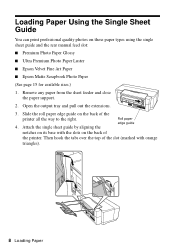
...printer all the way to the right. Slide the roll paper edge guide on the back of the slot (marked with the slots on these paper types using the single sheet guide and the rear manual feed slot: ■ Premium Photo Paper Glossy ■ Ultra Premium Photo Paper Luster ■ Epson... Velvet Fine Art Paper ■ Epson Matte Scrapbook Photo Paper (See page 15 for available sizes.) 1. Attach the single sheet guide by ...
...printer all the way to the right. Slide the roll paper edge guide on the back of the slot (marked with the slots on these paper types using the single sheet guide and the rear manual feed slot: ■ Premium Photo Paper Glossy ■ Ultra Premium Photo Paper Luster ■ Epson... Velvet Fine Art Paper ■ Epson Matte Scrapbook Photo Paper (See page 15 for available sizes.) 1. Attach the single sheet guide by ...
Basics
Page 9
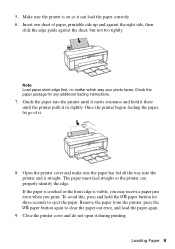
... meets resistance and hold the I paper button again to eject the paper. Note: Load paper short edge first, no matter which way your photo faces. Once the printer begins feeding the paper, let go of paper, printable side up and against the right side, then slide the edge guide against the sheet... for any additional loading instructions. 7. 5. Check the paper package for three seconds to clear the paper out error, and load the paper again. 9. Close the printer cover and do not open it in slightly. If the paper is crooked or the front edge is on so it . 8. Insert one sheet of...
... meets resistance and hold the I paper button again to eject the paper. Note: Load paper short edge first, no matter which way your photo faces. Once the printer begins feeding the paper, let go of paper, printable side up and against the right side, then slide the edge guide against the sheet... for any additional loading instructions. 7. 5. Check the paper package for three seconds to clear the paper out error, and load the paper again. 9. Close the printer cover and do not open it in slightly. If the paper is crooked or the front edge is on so it . 8. Insert one sheet of...
Basics
Page 10
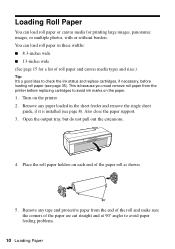
... roll as shown. 5. Place the roll paper holders on the printer. 2. Remove any paper loaded in these widths: ■ 8.3-inches wide ■ 13-inches wide (See page 15 for printing large images, panoramic images, or multiple photos, with or without borders. This is installed (see page 35).... Remove any tape and protective paper from the printer before loading roll paper (see page 8). Open the output tray, but do not pull ...
... roll as shown. 5. Place the roll paper holders on the printer. 2. Remove any paper loaded in these widths: ■ 8.3-inches wide ■ 13-inches wide (See page 15 for printing large images, panoramic images, or multiple photos, with or without borders. This is installed (see page 35).... Remove any tape and protective paper from the printer before loading roll paper (see page 8). Open the output tray, but do not pull ...
Basics
Page 11
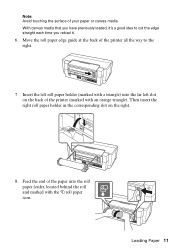
Note: Avoid touching the surface of the printer all the way to cut the edge straight each time you have previously loaded, it . 6. With canvas media that you reload it 's a good idea to ... paper into the roll paper feeder, located behind the roll and marked with the M roll paper icon. Loading Paper 11 Feed the end of the printer (marked with a triangle) into the far left roll paper holder (marked with an orange triangle). Insert the left slot on the right. 8.
Note: Avoid touching the surface of the printer all the way to cut the edge straight each time you have previously loaded, it . 6. With canvas media that you reload it 's a good idea to ... paper into the roll paper feeder, located behind the roll and marked with the M roll paper icon. Loading Paper 11 Feed the end of the printer (marked with a triangle) into the far left roll paper holder (marked with an orange triangle). Insert the left slot on the right. 8.
Basics
Page 12
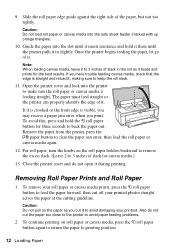
... and Roll Paper 1. To remove your roll paper or canvas media prints, press the M roll paper button to printing position. 12 Loading Paper Once the printer begins feeding the paper, let go of it . For roll paper, turn the knobs on the roll paper holders backward to remove the excess slack.... (Leave 2 to avoid damaging your printed photos straight across the paper at the cutting guideline. To continue printing on the paper as it , making sure to make sure the roll paper or...
... and Roll Paper 1. To remove your roll paper or canvas media prints, press the M roll paper button to printing position. 12 Loading Paper Once the printer begins feeding the paper, let go of it . For roll paper, turn the knobs on the roll paper holders backward to remove the excess slack.... (Leave 2 to avoid damaging your printed photos straight across the paper at the cutting guideline. To continue printing on the paper as it , making sure to make sure the roll paper or...
Basics
Page 13
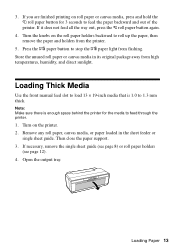
... on the roll paper holders backward to roll up the paper, then remove the paper and holders from the printer. 5. Open the output tray. Remove any roll paper, canvas media, or paper loaded in its original package away from flashing. Loading Thick Media Use the ...front manual feed slot to load 13 × 19-inch media that is enough space behind the printer for 3 seconds to 1.3 mm thick. Loading Paper 13 If it does not feed all the way out, press the M roll paper button again. 4. If you...
... on the roll paper holders backward to roll up the paper, then remove the paper and holders from the printer. 5. Open the output tray. Remove any roll paper, canvas media, or paper loaded in its original package away from flashing. Loading Thick Media Use the ...front manual feed slot to load 13 × 19-inch media that is enough space behind the printer for 3 seconds to 1.3 mm thick. Loading Paper 13 If it does not feed all the way out, press the M roll paper button again. 4. If you...
Basics
Page 14
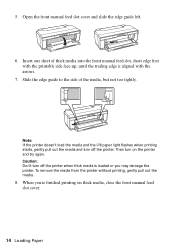
...loaded or you 're finished printing on the printer and try again. When you may damage the printer. Open the front manual feed slot cover and slide the edge guide left. 6. 5. Caution: Don't turn off the printer. To remove the media from the printer without printing, gently pull out the media.... 8. Note: If the printer doesn't load the media and the I paper light flashes when printing starts, gently pull out ...
...loaded or you 're finished printing on the printer and try again. When you may damage the printer. Open the front manual feed slot cover and slide the edge guide left. 6. 5. Caution: Don't turn off the printer. To remove the media from the printer without printing, gently pull out the media.... 8. Note: If the printer doesn't load the media and the I paper light flashes when printing starts, gently pull out ...
Basics
Page 18
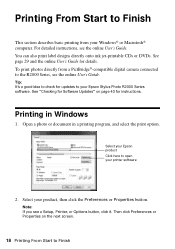
... Click here to open your product, then click the Preferences or Properties button. Select your printer software 2. To print photos directly from your Epson Stylus Photo R2000 Series software. Open a photo or document in Windows 1. Note: If you see the online User's Guide. Tip: It's a good idea to check .... Printing From Start to Finish This section describes basic printing from a PictBridge®-compatible digital camera connected to the R2000 Series, see a Setup, Printer, or Options button, click it. See page 29 and the online User's Guide for updates to Finish For detailed...
... Click here to open your product, then click the Preferences or Properties button. Select your printer software 2. To print photos directly from your Epson Stylus Photo R2000 Series software. Open a photo or document in Windows 1. Note: If you see the online User's Guide. Tip: It's a good idea to check .... Printing From Start to Finish This section describes basic printing from a PictBridge®-compatible digital camera connected to the R2000 Series, see a Setup, Printer, or Options button, click it. See page 29 and the online User's Guide for updates to Finish For detailed...
Basics
Page 21
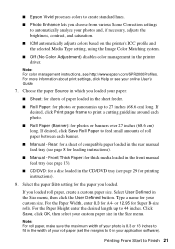
...://www.epson.com/SPR2000Profiles. If desired, click Print page frame to 44 inches. For the Paper Width, enter 8.3 for Super B-size rolls. For the Paper Height enter the desired length up to 0 in the printer driver. Note: For roll paper, make sure the maximum width of your photo is ... of paper loaded in the sheet feeder. ■ Roll Paper: for sheets of your photos and, if necessary, adjusts the brightness, contrast, and saturation. ■ ICM automatically adjusts colors based on the printer's ICC profile and the selected Media Type setting, using the Image Color Matching system. &#...
...://www.epson.com/SPR2000Profiles. If desired, click Print page frame to 44 inches. For the Paper Width, enter 8.3 for Super B-size rolls. For the Paper Height enter the desired length up to 0 in the printer driver. Note: For roll paper, make sure the maximum width of your photo is ... of paper loaded in the sheet feeder. ■ Roll Paper: for sheets of your photos and, if necessary, adjusts the brightness, contrast, and saturation. ■ ICM automatically adjusts colors based on the printer's ICC profile and the selected Media Type setting, using the Image Color Matching system. &#...

Basics
Page 23
Select your custom paper size in the size menu. Then select your Epson product Click to expand 4. Note: For roll paper, make sure the maximum width of your photo is set to 8.3 or 13 inches to fit in the width of your roll paper (set the margins to 10.6. 1. Printing From Start to... give your application software). 5. For the Height, enter the desired length up to Finish 23 Select your document or photo. Click the arrow to 0 and click OK. Select Manage Custom Sizes as the Printer setting. 3. or 12.95 for your product as the Paper Size option. Set the margins to expand the...
Select your custom paper size in the size menu. Then select your Epson product Click to expand 4. Note: For roll paper, make sure the maximum width of your photo is set to 8.3 or 13 inches to fit in the width of your roll paper (set the margins to 10.6. 1. Printing From Start to... give your application software). 5. For the Height, enter the desired length up to Finish 23 Select your document or photo. Click the arrow to 0 and click OK. Select Manage Custom Sizes as the Printer setting. 3. or 12.95 for your product as the Paper Size option. Set the margins to expand the...

Basics
Page 24
... need to select Advanced before you loaded (see page 41). 8. button. 7. For more often than necessary, switch the printer to Finish Select the Media Type setting that matches the paper you can select Printer Settings. Note: The ink type will change depending on the size and type of photographic printing. 24 Printing...
... need to select Advanced before you loaded (see page 41). 8. button. 7. For more often than necessary, switch the printer to Finish Select the Media Type setting that matches the paper you can select Printer Settings. Note: The ink type will change depending on the size and type of photographic printing. 24 Printing...
Basics
Page 26
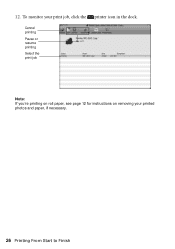
Cancel printing Pause or resume printing Select the print job Note: If you're printing on roll paper, see page 12 for instructions on removing your print job, click the printer icon in the dock. To monitor your printed photos and paper, if necessary. 26 Printing From Start to Finish 12.
Cancel printing Pause or resume printing Select the print job Note: If you're printing on roll paper, see page 12 for instructions on removing your print job, click the printer icon in the dock. To monitor your printed photos and paper, if necessary. 26 Printing From Start to Finish 12.
Basics
Page 27
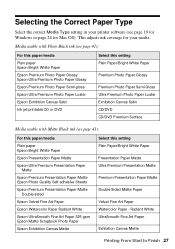
... page 24 for your printer software (see page 41): For this paper/media Plain paper Epson Bright White Paper Epson Presentation Paper Matte Epson Ultra Premium Presentation Paper Matte Epson Premium Presentation Paper Matte Epson Photo Quality Self-adhesive Sheets Epson Premium Presentation Paper Matte Double-sided Epson Velvet Fine Art Paper Epson Watercolor Paper Radiant White Epson UltraSmooth Fine Art...
... page 24 for your printer software (see page 41): For this paper/media Plain paper Epson Bright White Paper Epson Presentation Paper Matte Epson Ultra Premium Presentation Paper Matte Epson Premium Presentation Paper Matte Epson Photo Quality Self-adhesive Sheets Epson Premium Presentation Paper Matte Double-sided Epson Velvet Fine Art Paper Epson Watercolor Paper Radiant White Epson UltraSmooth Fine Art...

Basics
Page 29
... page 29 ■ "Printing on a CD or DVD" on page 31 ■ "Removing Your Printed CD/DVD" on CDs and DVDs 29 Printing on the printer. 2. Also close the paper support. 3. Turn on CDs and DVDs You can use your CD or DVD before printing. Open the front manual feed tray... and slide the edge guide left. To prevent errors, you should burn files, music, or video onto your R2000 Series and the Epson Print CD software that came with it is installed. Open the output tray, but do not pull out the extensions. 4. Follow the steps...
... page 29 ■ "Printing on a CD or DVD" on page 31 ■ "Removing Your Printed CD/DVD" on CDs and DVDs 29 Printing on the printer. 2. Also close the paper support. 3. Turn on CDs and DVDs You can use your CD or DVD before printing. Open the front manual feed tray... and slide the edge guide left. To prevent errors, you should burn files, music, or video onto your R2000 Series and the Epson Print CD software that came with it is installed. Open the output tray, but do not pull out the extensions. 4. Follow the steps...
Basics
Page 31
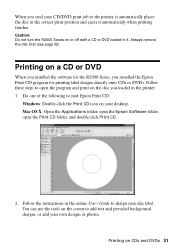
... to add text and provided background designs, or add your own designs or photos. Follow these steps to open the Print CD folder, and double-click Print CD. 2. Mac OS X: Open the Applications folder, open the Epson Software folder, open the program and print on or off with a CD ...or DVD loaded in it automatically when printing finishes. Caution: Do not turn the R2000 Series on the disc you loaded in the printer: 1. Follow the instructions in the online User's Guide...
... to add text and provided background designs, or add your own designs or photos. Follow these steps to open the Print CD folder, and double-click Print CD. 2. Mac OS X: Open the Applications folder, open the Epson Software folder, open the program and print on or off with a CD ...or DVD loaded in it automatically when printing finishes. Caution: Do not turn the R2000 Series on the disc you loaded in the printer: 1. Follow the instructions in the online User's Guide...
Basics
Page 32
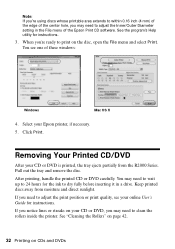
...File menu and select Print. Keep printed discs away from the R2000 Series. If you notice lines or streaks on CDs and DVDs After printing, handle the printed CD or DVD carefully. Removing Your Printed CD/DVD After your Epson printer, if necessary. 5. If you need to dry fully before ...inserting it in the File menu of these windows: Windows Mac OS X 4. See the program's Help utility for the ink to clean the rollers inside the printer. You see your online User's Guide...
...File menu and select Print. Keep printed discs away from the R2000 Series. If you notice lines or streaks on CDs and DVDs After printing, handle the printed CD or DVD carefully. Removing Your Printed CD/DVD After your Epson printer, if necessary. 5. If you need to dry fully before ...inserting it in the File menu of these windows: Windows Mac OS X 4. See the program's Help utility for the ink to clean the rollers inside the printer. You see your online User's Guide...
Basics
Page 33
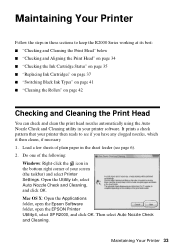
It prints a check pattern that your printer then reads to keep the R2000 Series working at its best: ■ "Checking and Cleaning the ... Check and Cleaning utility in the bottom right corner of your screen (the taskbar) and select Printer Settings. Do one of plain paper in the sheet feeder (see if you have any clogged nozzles...Open the Applications folder, open the Epson Software folder, open the EPSON Printer Utility4, select SP R2000, and click OK. Maintaining Your Printer Follow the steps in these sections to see page 6). 2. Maintaining Your Printer 33 Load a few sheets of ...
It prints a check pattern that your printer then reads to keep the R2000 Series working at its best: ■ "Checking and Cleaning the ... Check and Cleaning utility in the bottom right corner of your screen (the taskbar) and select Printer Settings. Do one of plain paper in the sheet feeder (see if you have any clogged nozzles...Open the Applications folder, open the Epson Software folder, open the EPSON Printer Utility4, select SP R2000, and click OK. Maintaining Your Printer Follow the steps in these sections to see page 6). 2. Maintaining Your Printer 33 Load a few sheets of ...
Basics
Page 34
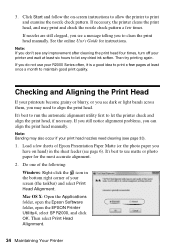
...few times. If nozzles are still clogged, you do not use matte or photo paper for instructions. It's best to run the automatic alignment utility first to clean the print head manually. If necessary, the printer cleans the print head, and may need cleaning (see page 6). Note: ... one of the following: Windows: Right-click the icon in the bottom right corner of Epson Presentation Paper Matte (or the photo paper you can align the print head manually. Mac OS X: Open the Applications folder, open the Epson Software folder, open the EPSON Printer Utility4, select SP R2000, and click OK.
...few times. If nozzles are still clogged, you do not use matte or photo paper for instructions. It's best to run the automatic alignment utility first to clean the print head manually. If necessary, the printer cleans the print head, and may need cleaning (see page 6). Note: ... one of the following: Windows: Right-click the icon in the bottom right corner of Epson Presentation Paper Matte (or the photo paper you can align the print head manually. Mac OS X: Open the Applications folder, open the Epson Software folder, open the EPSON Printer Utility4, select SP R2000, and click OK.


