

Printer Guide
Page 8
... Information 152 Viewing Status Information 152 Checking Printer Status From the Printer Driver 153 Checking and Cleaning the Print Head 154 Running the Nozzle Check and Head Cleaning Utilities 154 Checking and Cleaning the Print Head Using the Control Panel . . 156 Automatically Checking and Cleaning the Print Head 156 Running Cleaning Cycles 157 Aligning the Print Head 158...
... Information 152 Viewing Status Information 152 Checking Printer Status From the Printer Driver 153 Checking and Cleaning the Print Head 154 Running the Nozzle Check and Head Cleaning Utilities 154 Checking and Cleaning the Print Head Using the Control Panel . . 156 Automatically Checking and Cleaning the Print Head 156 Running Cleaning Cycles 157 Aligning the Print Head 158...

Printer Guide
Page 154
... a color shift or horizontal lines, you can also run a cleaning cycle to clear the nozzles. If you added a shortcut icon for your printer and click OK. • Windows Vista: Click , select Control Panel, select Hardware and Sound, and click Printers. See page 150 to access the printer utilities: • Mac OS X: Open the EPSON Printer Utility3 in the printer...
... a color shift or horizontal lines, you can also run a cleaning cycle to clear the nozzles. If you added a shortcut icon for your printer and click OK. • Windows Vista: Click , select Control Panel, select Hardware and Sound, and click Printers. See page 150 to access the printer utilities: • Mac OS X: Open the EPSON Printer Utility3 in the printer...

Printer Guide
Page 155
...good, as described on the screen. 4. Double-click Printers and Faxes. After the pattern is printed, use at least a 10× eye loupe to make sure the nozzles are clean. • If the nozzles are missing or deflected, as shown below, run a cleaning cycle as shown below, the print head is loaded... in the printer. • If any dots or segments are still clogged after three...
...good, as described on the screen. 4. Double-click Printers and Faxes. After the pattern is printed, use at least a 10× eye loupe to make sure the nozzles are clean. • If the nozzles are missing or deflected, as shown below, run a cleaning cycle as shown below, the print head is loaded... in the printer. • If any dots or segments are still clogged after three...

Printer Guide
Page 156
... you want this feature off. Press r Menu. After the pattern is clean. Press r Menu. 2. Caution: Don't run a cleaning cycle while thick media is selected, then press r. 156 Automatically Checking and Cleaning the Print Head The printer automatically checks the nozzles and cleans them if necessary. PRINTER SETUP is selected. 3. You can specify how often you can check...
... you want this feature off. Press r Menu. After the pattern is clean. Press r Menu. 2. Caution: Don't run a cleaning cycle while thick media is selected, then press r. 156 Automatically Checking and Cleaning the Print Head The printer automatically checks the nozzles and cleans them if necessary. PRINTER SETUP is selected. 3. You can specify how often you can check...
Printer Guide
Page 157
...to replace a low cartridge to clear the nozzles. Running Cleaning Cycles You can reinsert the old cartridge. 1. After cleaning, you can run several types of cleaning cycles from the control panel (or from the Epson LFP Remote Panel2): normal cleaning, power cleaning, and cleaning each pair of ink, so it is ... on the printer's control panel is not sufficient to run the cleaning cycle. Press r Menu. 157 The power cycle uses a large quantity of ink colors. You may need to be at least 50% full to save the setting. Print a nozzle check to have the nozzle check pattern ...
...to replace a low cartridge to clear the nozzles. Running Cleaning Cycles You can reinsert the old cartridge. 1. After cleaning, you can run several types of cleaning cycles from the control panel (or from the Epson LFP Remote Panel2): normal cleaning, power cleaning, and cleaning each pair of ink, so it is ... on the printer's control panel is not sufficient to run the cleaning cycle. Press r Menu. 157 The power cycle uses a large quantity of ink colors. You may need to be at least 50% full to save the setting. Print a nozzle check to have the nozzle check pattern ...
Printer Guide
Page 158
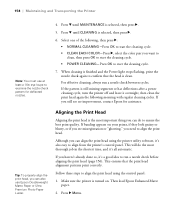
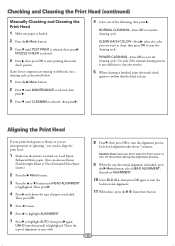
... cleaning cycle. • POWER CLEANING-Press OK to start the cleaning cycle. • CLEAN EACH COLOR-Press r, select the color pair you need to align from the printer's control panel. Select one of the following morning with regular cleaning cycles. Follow these steps to align the print head using the printer utility software, it 's a good idea to examine the nozzle...
... cleaning cycle. • POWER CLEANING-Press OK to start the cleaning cycle. • CLEAN EACH COLOR-Press r, select the color pair you need to align from the printer's control panel. Select one of the following morning with regular cleaning cycles. Follow these steps to align the print head using the printer utility software, it 's a good idea to examine the nozzle...

Printer Guide
Page 169
...1. The Epson Stylus Pro 7900 has one maintenance tank (on the right side), and the Pro 9900 has two (one on the Pro 7900 LCD display) The icon(s) show the approximate amount of space remaining in the maintenance tank by viewing its status using the menus (see page 152), using your printer software ...(see page 153), or by printing a nozzle check sheet (see page 156). Replacement tanks are available from the system during the initial ink charge and manual and automatic print head cleaning. See page 12 for details. Maintaining and ...
...1. The Epson Stylus Pro 7900 has one maintenance tank (on the right side), and the Pro 9900 has two (one on the Pro 7900 LCD display) The icon(s) show the approximate amount of space remaining in the maintenance tank by viewing its status using the menus (see page 152), using your printer software ...(see page 153), or by printing a nozzle check sheet (see page 156). Replacement tanks are available from the system during the initial ink charge and manual and automatic print head cleaning. See page 12 for details. Maintaining and ...

Printer Guide
Page 176
...mind that the first time you start printing after transporting it is almost identical to setting it up the printer after moving the printer, the print head nozzles may need to run a cleaning cycle (page 154) and realign the print head (page 158) to its new location, then lock the... casters. Carefully roll the printer to ensure good print quality. 176 Release the front casters. 6. Setting Up the Printer After Transportation ...
...mind that the first time you start printing after transporting it is almost identical to setting it up the printer after moving the printer, the print head nozzles may need to run a cleaning cycle (page 154) and realign the print head (page 158) to its new location, then lock the... casters. Carefully roll the printer to ensure good print quality. 176 Release the front casters. 6. Setting Up the Printer After Transportation ...
Printer Guide
Page 179
... QUALITY OF NON-GENUINE INK MAY VARY. A non-genuine ink cartridge is open. Epson ink cartridge; YES NO Head cleaning did not clear the nozzles. FRONT COVER OPEN Front cover is installed. INK LOW REPLACE INK CARTRIDGE INK CARTRIDGE NON...-GENUINE CARTRIDGE! INK CARTRIDGE PLEASE USE GENUINE EPSON INK CARTRIDGES A non-genuine ink cartridge is Replace the ink cartridge with a genuine Epson ink cartridge; Press to cancel the print job and reset the printer...
... QUALITY OF NON-GENUINE INK MAY VARY. A non-genuine ink cartridge is open. Epson ink cartridge; YES NO Head cleaning did not clear the nozzles. FRONT COVER OPEN Front cover is installed. INK LOW REPLACE INK CARTRIDGE INK CARTRIDGE NON...-GENUINE CARTRIDGE! INK CARTRIDGE PLEASE USE GENUINE EPSON INK CARTRIDGES A non-genuine ink cartridge is Replace the ink cartridge with a genuine Epson ink cartridge; Press to cancel the print job and reset the printer...
Printer Guide
Page 181
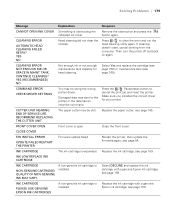
... page 165. Replace the roll. Then load another roll. Solving Problems | 181 Message NOT ENOUGH EMPTY SPACE REPLACE THE RIGHT SIDE MAINTENANCE TANK NOZZLE CHECK ERROR PRESS THE BUTTON NOZZLE CLOG DETECTED NOT ENOUGH INK OR SPACE IN MAINT TANK PAPER CUT ERROR REMOVE UNCUT PAPER PAPER EJECT ERROR REMOVE PAPER FROM... tank capacity for more information. Reinstall or replace the cutter if necessary; Press the correctly. Press the button and remove the paper. If necessary, cancel cleaning from the computer, then restart the printer. Press the button, then load paper.
... page 165. Replace the roll. Then load another roll. Solving Problems | 181 Message NOT ENOUGH EMPTY SPACE REPLACE THE RIGHT SIDE MAINTENANCE TANK NOZZLE CHECK ERROR PRESS THE BUTTON NOZZLE CLOG DETECTED NOT ENOUGH INK OR SPACE IN MAINT TANK PAPER CUT ERROR REMOVE UNCUT PAPER PAPER EJECT ERROR REMOVE PAPER FROM... tank capacity for more information. Reinstall or replace the cutter if necessary; Press the correctly. Press the button and remove the paper. If necessary, cancel cleaning from the computer, then restart the printer. Press the button, then load paper.

Printer Guide
Page 182
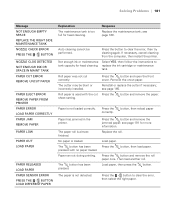
of the image. Improving Print Quality You can often improve print quality by doing the following: • Run a nozzle check and cleaning cycle. See page 158 for instructions. • Align the print head. Check the Paper Source settings and make sure the paper is loaded straight. See ... The loaded paper size does not Make sure the paper size matches the size LOAD CORRECT PAPER SIZE match the size of the image. PRINTER ERROR RESTART THE PRINTER You tried to print while an error Press the P Power button to turn it back on. PAPER SKEW LOAD PAPER PROPERLY Paper is...
of the image. Improving Print Quality You can often improve print quality by doing the following: • Run a nozzle check and cleaning cycle. See page 158 for instructions. • Align the print head. Check the Paper Source settings and make sure the paper is loaded straight. See ... The loaded paper size does not Make sure the paper size matches the size LOAD CORRECT PAPER SIZE match the size of the image. PRINTER ERROR RESTART THE PRINTER You tried to print while an error Press the P Power button to turn it back on. PAPER SKEW LOAD PAPER PROPERLY Paper is...
Printer Guide
Page 183
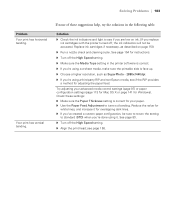
Solution ◗ Check the ink indicators and light to standard (STD) when you're done using a third-party RIP and non-Epson media, see if the RIP provides a method for adjusting the paper feed. Reduce the value for overlapping dark lines. ◗ If you've created a...low on ink. (If you replace ink cartridges with the printer turned off the High Speed setting. ◗ Align the print head; Check these suggestions help, try the solutions in the printer software is face up. ◗ Choose a higher resolution, such as described on page 159. ◗ Run a nozzle check and cleaning cycle.
Solution ◗ Check the ink indicators and light to standard (STD) when you're done using a third-party RIP and non-Epson media, see if the RIP provides a method for adjusting the paper feed. Reduce the value for overlapping dark lines. ◗ If you've created a...low on ink. (If you replace ink cartridges with the printer turned off the High Speed setting. ◗ Align the print head; Check these suggestions help, try the solutions in the printer software is face up. ◗ Choose a higher resolution, such as described on page 159. ◗ Run a nozzle check and cleaning cycle.
Printer Guide
Page 184
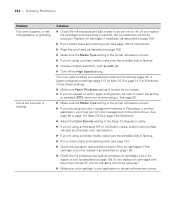
... 184 See page 96 or page 112 (Mac OS X) or page 130 (Windows). ◗ Adjust the Color Density setting in the printer software is face-up . ◗ Run a nozzle check and cleaning cycle; See page 83. ◗ Make sure the Media Type setting in the Paper Configuration utility. ◗... If you're using a third-party RIP or non-Epson media, custom color profiles will not be accurate.) ◗ Make sure color ...
... 184 See page 96 or page 112 (Mac OS X) or page 130 (Windows). ◗ Adjust the Color Density setting in the printer software is face-up . ◗ Run a nozzle check and cleaning cycle; See page 83. ◗ Make sure the Media Type setting in the Paper Configuration utility. ◗... If you're using a third-party RIP or non-Epson media, custom color profiles will not be accurate.) ◗ Make sure color ...
Printer Guide
Page 185
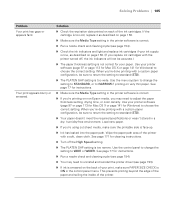
...as described on each of the ink cartridges. Wipe the paper path area of the printer. 185 Use the control panel to change the setting to STANDARD, or to NARROW if printing on non-Epson media, you replace ink cartridges with a custom paper configuration, be sure to return the.... ◗ Run a nozzle check and cleaning cycle (see page 154). ◗ Check the ink indicators and light and replace ink cartridges if your paper. Use the menu system to change the setting to adjust the paper thickness setting, drying time, or color density. Use your printer software (page 97 or ...
...as described on each of the ink cartridges. Wipe the paper path area of the printer. 185 Use the control panel to change the setting to STANDARD, or to NARROW if printing on non-Epson media, you replace ink cartridges with a custom paper configuration, be sure to return the.... ◗ Run a nozzle check and cleaning cycle (see page 154). ◗ Check the ink indicators and light and replace ink cartridges if your paper. Use the menu system to change the setting to adjust the paper thickness setting, drying time, or color density. Use your printer software (page 97 or ...

Printer Guide
Page 188
...in your print appears to shift. ◗ Align the print head as described on the printer to feed ◗ Press the Pause/reset button on page 158. ◗ Run a nozzle check and cleaning cycle; If not, press the l Paper Source button to replace the cutter. ◗... Make sure appears on your printer software. A ruled line on the LCD display. Color images print in black only. ◗ Make sure the Color setting is correct in your printer software. see ...
...in your print appears to shift. ◗ Align the print head as described on the printer to feed ◗ Press the Pause/reset button on page 158. ◗ Run a nozzle check and cleaning cycle; If not, press the l Paper Source button to replace the cutter. ◗... Make sure appears on your printer software. A ruled line on the LCD display. Color images print in black only. ◗ Make sure the Color setting is correct in your printer software. see ...

Product Brochure
Page 6
...Channel Epson MicroPiezo TFP Print Head „ Thin Film Piezo (TFP) print head design capable of handling ten separate ink channels „ One-inch-wide, high performance print head with 360 nozzles ...clean the print head if required Epson UltraChrome HDR Ink Technology Next Generation Ten-Color Pigment-Based Ink System „ Unique High Dynamic Range (HDR) pigments for an extremely wide color gamut „ Ten-color printing system including all color channels „ Aligns both Photo and Matte Black ink cartridges installed simultaneously, the Epson Stylus Pro 7900 and 9900 series printers...
...Channel Epson MicroPiezo TFP Print Head „ Thin Film Piezo (TFP) print head design capable of handling ten separate ink channels „ One-inch-wide, high performance print head with 360 nozzles ...clean the print head if required Epson UltraChrome HDR Ink Technology Next Generation Ten-Color Pigment-Based Ink System „ Unique High Dynamic Range (HDR) pigments for an extremely wide color gamut „ Ten-color printing system including all color channels „ Aligns both Photo and Matte Black ink cartridges installed simultaneously, the Epson Stylus Pro 7900 and 9900 series printers...

Product Brochure
Page 8
... consistent color output from 2:53 to ensure consistent printing between multiple Epson Stylus Pro printers of Seiko Epson Corporation. Visit www.wilhelm-research.com for reasons including images printed, print settings, temperature and humidity. Epson Stylus Pro 7900 and 9900 Print...LLk + PK or MK) Auto head alignment and cleaning technology Auto sharing black ink channel Epson UltraChrome HDR Ink technology Professional-level pigment-based ink technology Nozzle Configuration Color and Monochrome 360 nozzles x 10 Droplet Technology Smallest droplet size 3.5 picoliters...
... consistent color output from 2:53 to ensure consistent printing between multiple Epson Stylus Pro printers of Seiko Epson Corporation. Visit www.wilhelm-research.com for reasons including images printed, print settings, temperature and humidity. Epson Stylus Pro 7900 and 9900 Print...LLk + PK or MK) Auto head alignment and cleaning technology Auto sharing black ink channel Epson UltraChrome HDR Ink technology Professional-level pigment-based ink technology Nozzle Configuration Color and Monochrome 360 nozzles x 10 Droplet Technology Smallest droplet size 3.5 picoliters...
Quick Reference Guide
Page 5
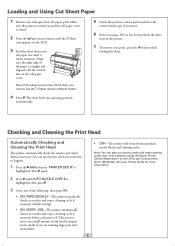
...Note: You can specify how often you are running large print jobs unattended. 4 Checking and Cleaning the Print Head Automatically Checking and Cleaning the Print Head The printer automatically checks the nozzles and cleans them if necessary. Make sure the right edge of ink (and no paper) and is ... highlighted. PRINTER SETUP is closed. 2 Press the Paper source button until it has been printed, the sheet stays in your print, press the button while holding the sheet. Loading and Using Cut Sheet Paper 1 Remove any roll paper from your computer using the Epson Printer Utility3 (...
...Note: You can specify how often you are running large print jobs unattended. 4 Checking and Cleaning the Print Head Automatically Checking and Cleaning the Print Head The printer automatically checks the nozzles and cleans them if necessary. Make sure the right edge of ink (and no paper) and is ... highlighted. PRINTER SETUP is closed. 2 Press the Paper source button until it has been printed, the sheet stays in your print, press the button while holding the sheet. Loading and Using Cut Sheet Paper 1 Remove any roll paper from your computer using the Epson Printer Utility3 (...
Quick Reference Guide
Page 6
NOZZLE CHECK is clean. CLEAN EACH COLOR-Press , select the color pair you loaded. Use only if the normal cleaning process is not sufficient to clear the nozzles. 5 When cleaning is finished, print the nozzle check again to confirm that the head is selected. 4 Press , then press OK to start printing the nozzle check pattern. Then...
NOZZLE CHECK is clean. CLEAN EACH COLOR-Press , select the color pair you loaded. Use only if the normal cleaning process is not sufficient to clear the nozzles. 5 When cleaning is finished, print the nozzle check again to confirm that the head is selected. 4 Press , then press OK to start printing the nozzle check pattern. Then...

Quick Reference Guide
Page 10
... EVERY 10 PAGES Restores default settings TEST PRINT NOZZLE CHECK STATUS SHEET NETWORK STATUS SHEET JOB INFORMATION CUSTOM PAPER Shows clogged or deflected nozzles Printer settings, total prints, and maintenance tank capacity...COLOR, POWER CLEANING MM/DD/YY HH:MM Current firmware version Percentage of ink remaining in each cartridge Percentage of last status upload. 9 Control Panel Menus Boldface type indicates the default setting. If the printer is number 0 Information about registered paper configurations MAINTENANCE PRINTER STATUS CUTTER ADJUSTMENT CUTTER REPLACEMENT CLEANING...
... EVERY 10 PAGES Restores default settings TEST PRINT NOZZLE CHECK STATUS SHEET NETWORK STATUS SHEET JOB INFORMATION CUSTOM PAPER Shows clogged or deflected nozzles Printer settings, total prints, and maintenance tank capacity...COLOR, POWER CLEANING MM/DD/YY HH:MM Current firmware version Percentage of ink remaining in each cartridge Percentage of last status upload. 9 Control Panel Menus Boldface type indicates the default setting. If the printer is number 0 Information about registered paper configurations MAINTENANCE PRINTER STATUS CUTTER ADJUSTMENT CUTTER REPLACEMENT CLEANING...


