
Printer Guide
Page 16
...rating. • Do not block or cover the openings in this button, POWER OFF appears on the printer. • Do not attempt to service the printer yourself. • Power down the printer from the control panel, unplug the printer, and refer servicing to the printer until the panel shuts off using the .... For California customers only: The lithium batteries in the printer's case. • Do not put your hand inside the printer during printing. • Do not move the print head by hand unless instructed to do so by an Epson service technician; This ensures that the print head is safely...
...rating. • Do not block or cover the openings in this button, POWER OFF appears on the printer. • Do not attempt to service the printer yourself. • Power down the printer from the control panel, unplug the printer, and refer servicing to the printer until the panel shuts off using the .... For California customers only: The lithium batteries in the printer's case. • Do not put your hand inside the printer during printing. • Do not move the print head by hand unless instructed to do so by an Epson service technician; This ensures that the print head is safely...
Printer Guide
Page 17
Note that there is a valve in the ink supply port, making covers or plugs unnecessary, but care is consumed because the printer automatically performs a reliability check. • If you remove an ink cartridge for later use an ink cartridge beyond the date printed on the side of ...
Note that there is a valve in the ink supply port, making covers or plugs unnecessary, but care is consumed because the printer automatically performs a reliability check. • If you remove an ink cartridge for later use an ink cartridge beyond the date printed on the side of ...

Printer Guide
Page 18
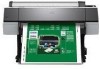
Front Roll paper holder Roll paper cover Front cover Control panel Ink bay Paper basket Back Interface connector for optional equipment USB interface for the Pro 7900 unless otherwise noted. 18 | Introduction Printer Parts These illustrations show the Epson Stylus Pro 9900, but the parts are the same for computer Ink bay Casters Network interface Maintenance tank (Pro 9900 includes two tanks, one on each side of printer) 18 AC inlet
Front Roll paper holder Roll paper cover Front cover Control panel Ink bay Paper basket Back Interface connector for optional equipment USB interface for the Pro 7900 unless otherwise noted. 18 | Introduction Printer Parts These illustrations show the Epson Stylus Pro 9900, but the parts are the same for computer Ink bay Casters Network interface Maintenance tank (Pro 9900 includes two tanks, one on each side of printer) 18 AC inlet
Printer Guide
Page 43
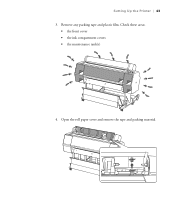
Setting Up the Printer | 43 3. Check these areas: • the front cover • the ink compartment covers • the maintenance tank(s) 4. Remove any packing tape and plastic film. Open the roll paper cover and remove the tape and packing material. 43
Setting Up the Printer | 43 3. Check these areas: • the front cover • the ink compartment covers • the maintenance tank(s) 4. Remove any packing tape and plastic film. Open the roll paper cover and remove the tape and packing material. 43

Printer Guide
Page 44
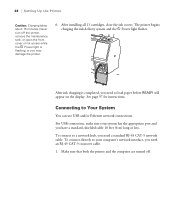
Note: The illustrations in case you need to the AC inlet on the back of the printer. 44 Save the packing material in the following sections show the Epson Stylus Pro 9900, but the instructions are the same for the Pro 7900. Close the front cover. 7. Open the front cover and remove the tape and packing material. Connect the power cord to ship the printer. 6. 44 | Setting Up the Printer 5.
Note: The illustrations in case you need to the AC inlet on the back of the printer. 44 Save the packing material in the following sections show the Epson Stylus Pro 9900, but the instructions are the same for the Pro 7900. Close the front cover. 7. Open the front cover and remove the tape and packing material. Connect the power cord to ship the printer. 6. 44 | Setting Up the Printer 5.

Printer Guide
Page 46
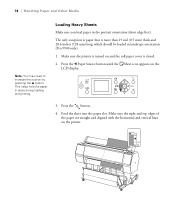
Make sure you order a new set of the ink in each cartridge to be used. Open both ink covers. 46 The cartridges shipped with your printer are provided mainly to charge the ink system. Press the P Power button to turn on the LCD display and the ink covers pop open slightly. 2. During the initial installation process, it is normal for initial ink charging. In a moment, INSTALL INK CARTRIDGE appears on the printer. 46 | Setting Up the Printer Installing Ink Use the ink cartridges that came with your printer for most of cartridges as soon as possible. 1.
Make sure you order a new set of the ink in each cartridge to be used. Open both ink covers. 46 The cartridges shipped with your printer are provided mainly to charge the ink system. Press the P Power button to turn on the LCD display and the ink covers pop open slightly. 2. During the initial installation process, it is normal for initial ink charging. In a moment, INSTALL INK CARTRIDGE appears on the printer. 46 | Setting Up the Printer Installing Ink Use the ink cartridges that came with your printer for most of cartridges as soon as possible. 1.
Printer Guide
Page 48
... a standard, shielded cable 10 feet (6 m) long or less. Make sure that both the printer and the computer are turned off the printer, remove the maintenance tank, or open the front cover or ink covers while the P Power light is completed, you need a standard RJ-45 CAT-5 network cable.... After installing all 11 cartridges, close the ink covers. Connecting to load paper before READY will appear on the display. 48 | Setting Up the Printer Caution: Charging takes about 15 minutes. For USB connection, make sure your computer's network interface...
... a standard, shielded cable 10 feet (6 m) long or less. Make sure that both the printer and the computer are turned off the printer, remove the maintenance tank, or open the front cover or ink covers while the P Power light is completed, you need a standard RJ-45 CAT-5 network cable.... After installing all 11 cartridges, close the ink covers. Connecting to load paper before READY will appear on the display. 48 | Setting Up the Printer Caution: Charging takes about 15 minutes. For USB connection, make sure your computer's network interface...

Printer Guide
Page 62
62 | Handling Paper and Other Media Tip: You can use Maintenance mode to switch the units of the roll paper loaded in the printer, from 15 to 300 ft (5 to 99.5 m), then press OK. 9. Press r, then select the length at which you want to receive an alert message, from ... 3 to 50 ft (1 to exit the menu. Press r, then select the length of measurement in the Printer 1. Press to 15 m), then press OK. 11. Open the roll paper cover. 62 Press u to go back to select ROLL LENGTH ALERT. 10. See page 164 for instructions. 6. Press l, then press d to REMAINING PPR SETUP...
62 | Handling Paper and Other Media Tip: You can use Maintenance mode to switch the units of the roll paper loaded in the printer, from 15 to 300 ft (5 to 99.5 m), then press OK. 9. Press r, then select the length at which you want to receive an alert message, from ... 3 to 50 ft (1 to exit the menu. Press r, then select the length of measurement in the Printer 1. Press to 15 m), then press OK. 11. Open the roll paper cover. 62 Press u to go back to select ROLL LENGTH ALERT. 10. See page 164 for instructions. 6. Press l, then press d to REMAINING PPR SETUP...

Printer Guide
Page 71
Handling Paper and Other Media | 71 Removing Paper from the Printer 1. Press the button to release the paper. • If automatic media tracking is on, the barcode and paper information is printed. • If you are not using the Auto Take-Up Reel, the paper is rewound automatically. 71 Open the roll paper cover. 2.
Handling Paper and Other Media | 71 Removing Paper from the Printer 1. Press the button to release the paper. • If automatic media tracking is on, the barcode and paper information is printed. • If you are not using the Auto Take-Up Reel, the paper is rewound automatically. 71 Open the roll paper cover. 2.
Printer Guide
Page 74
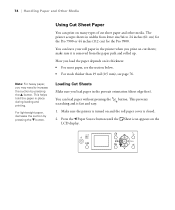
... the printer is turned on and the roll paper cover is fast and easy. You can print on many types of cut sheets; Note: For heavy paper, you may need to 24 inches (61 cm) for the Pro 7900 or 44... inches (112 cm) for the Pro 9900....| Handling Paper and Other Media Using Cut Sheet Paper You can leave your roll paper in the printer when you print on cut sheet paper and other media. This helps hold the paper in the portrait orientation (...
... the printer is turned on and the roll paper cover is fast and easy. You can print on many types of cut sheets; Note: For heavy paper, you may need to 24 inches (61 cm) for the Pro 7900 or 44... inches (112 cm) for the Pro 9900....| Handling Paper and Other Media Using Cut Sheet Paper You can leave your roll paper in the printer when you print on cut sheet paper and other media. This helps hold the paper in the portrait orientation (...

Printer Guide
Page 75
... it meets resistance. Handling Paper and Other Media | 75 3. If you see a question on the roll paper cover. 4. Make sure the right edge of the paper is finished, the sheet stays in the printer. 8. Press OK. 7. The sheet feeds into the paper slot until it is straight and aligned with the vertical...
... it meets resistance. Handling Paper and Other Media | 75 3. If you see a question on the roll paper cover. 4. Make sure the right edge of the paper is finished, the sheet stays in the printer. 8. Press OK. 7. The sheet feeds into the paper slot until it is straight and aligned with the vertical...
Printer Guide
Page 76
... load paper in place during loading and printing. The only exception is paper that is closed. 2. Press the button. 4. Make sure the printer is turned on the printer. 76 Make sure the right and top edges of the paper are straight and aligned with the horizontal and vertical lines on and... the roll paper cover is more than 19 mil (0.5 mm) thick and 28.6 inches (728 mm) long, which should be loaded in landscape orientation (Pro 9900 only...
... load paper in place during loading and printing. The only exception is paper that is closed. 2. Press the button. 4. Make sure the printer is turned on the printer. 76 Make sure the right and top edges of the paper are straight and aligned with the horizontal and vertical lines on and... the roll paper cover is more than 19 mil (0.5 mm) thick and 28.6 inches (728 mm) long, which should be loaded in landscape orientation (Pro 9900 only...
Printer Guide
Page 159
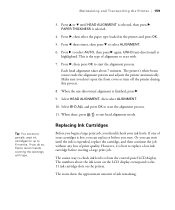
...of print quality. Each head alignment takes about 7 minutes. Make sure you do so, Epson recommends covering the openings with . 7. Select BI-D ALL and press OK to start with tape. 3. Maintaining and Transporting the Printer | 159 Tip: You can replace it is best to replace a low ink cartridge ... to select AUTO, then press r again. Press r, then select the paper type loaded in the printer and press OK. 5. If you don't open the front cover or turn off the printer during this process. 8. Or you can wait until HEAD ALIGNMENT is low, you can store partially ...
...of print quality. Each head alignment takes about 7 minutes. Make sure you do so, Epson recommends covering the openings with . 7. Select BI-D ALL and press OK to start with tape. 3. Maintaining and Transporting the Printer | 159 Tip: You can replace it is best to replace a low ink cartridge ... to select AUTO, then press r again. Press r, then select the paper type loaded in the printer and press OK. 5. If you don't open the front cover or turn off the printer during this process. 8. Or you can wait until HEAD ALIGNMENT is low, you can store partially ...
Printer Guide
Page 160
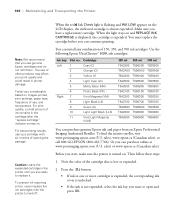
... you can purchase online at www.proimaging.epson.com (U.S. Then follow these steps: 1. Note the color of ink remains in one or more cartridges is expended, the corresponding ink cover is unlocked. • If the ink is low or expended. 2. Before you start, make sure the printer is almost expended. Yields vary considerably based...
... you can purchase online at www.proimaging.epson.com (U.S. Then follow these steps: 1. Note the color of ink remains in one or more cartridges is expended, the corresponding ink cover is unlocked. • If the ink is low or expended. 2. Before you start, make sure the printer is almost expended. Yields vary considerably based...
Printer Guide
Page 161
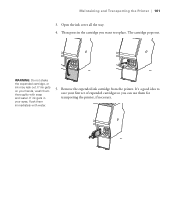
If ink gets on your hands, wash them immediately with soap and water. If ink gets in the cartridge you can use them for transporting the printer, if necessary. 161 Open the ink cover all the way. 4. Then press in your first set of expended cartridges so you want to save your eyes, flush them thoroughly with water. 5. The cartridge pops out. It's a good idea to replace. Remove the expended ink cartridge from the printer. Maintaining and Transporting the Printer | 161 3. WARNING: Do not shake the expended cartridge, or ink may leak out.
If ink gets on your hands, wash them immediately with soap and water. If ink gets in the cartridge you can use them for transporting the printer, if necessary. 161 Open the ink cover all the way. 4. Then press in your first set of expended cartridges so you want to save your eyes, flush them thoroughly with water. 5. The cartridge pops out. It's a good idea to replace. Remove the expended ink cartridge from the printer. Maintaining and Transporting the Printer | 161 3. WARNING: Do not shake the expended cartridge, or ink may leak out.
Printer Guide
Page 162
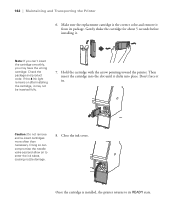
... often than necessary. Gently shake the cartridge for about 5 seconds before installing it from its READY state. 162 Close the ink cover. 162 | Maintaining and Transporting the Printer 6. Check the package and product code. Doing so can 't insert the cartridge smoothly, you may not be inserted fully. 7.... to enter the ink tubes, causing nozzle damage. 8. Once the cartridge is the correct color and remove it . Hold the cartridge with the arrow pointing toward the printer. Then insert the cartridge into the slot until it clicks into place. Note: If you can compromise the ...
... often than necessary. Gently shake the cartridge for about 5 seconds before installing it from its READY state. 162 Close the ink cover. 162 | Maintaining and Transporting the Printer 6. Check the package and product code. Doing so can 't insert the cartridge smoothly, you may not be inserted fully. 7.... to enter the ink tubes, causing nozzle damage. 8. Once the cartridge is the correct color and remove it . Hold the cartridge with the arrow pointing toward the printer. Then insert the cartridge into the slot until it clicks into place. Note: If you can compromise the ...

Printer Guide
Page 166
Loosen the screw using a cross-head screwdriver. 166 166 | Maintaining and Transporting the Printer 5. To remove the cutter cover, press in the tab and pull it down. 6.
Loosen the screw using a cross-head screwdriver. 166 166 | Maintaining and Transporting the Printer 5. To remove the cutter cover, press in the tab and pull it down. 6.

Printer Guide
Page 168
... to finish the replacement process. Select the pattern number on the control panel. Then turn on the printer and press the OK button. 3. Press OK to home position. 5. 168 | Maintaining and Transporting the Printer 2. Align the cover, then press it in until it . After you print the pattern, put the two cut between...
... to finish the replacement process. Select the pattern number on the control panel. Then turn on the printer and press the OK button. 3. Press OK to home position. 5. 168 | Maintaining and Transporting the Printer 2. Align the cover, then press it in until it . After you print the pattern, put the two cut between...

Printer Guide
Page 171
... the printer. Contact Epson if you think the printer needs lubrication. If your printer working at its best, clean it if it . Then unplug the power cord and disconnect the printer from your prints may be soiled. Cleaning the Printer To keep your prints are off the printer and ...roller, or absorption pads inside the printer. 4. otherwise your system. 3. Open the front cover and use canned air or a soft lint-free cloth to feed the paper without printing on the printer mechanism or electronic components. Don't spray the inside of the printer, then dry it with lubricants;...
... the printer. Contact Epson if you think the printer needs lubrication. If your printer working at its best, clean it if it . Then unplug the power cord and disconnect the printer from your prints may be soiled. Cleaning the Printer To keep your prints are off the printer and ...roller, or absorption pads inside the printer. 4. otherwise your system. 3. Open the front cover and use canned air or a soft lint-free cloth to feed the paper without printing on the printer mechanism or electronic components. Don't spray the inside of the printer, then dry it with lubricants;...

Warranty Statement
Page 6
... manufacturer's specified usage, which service program will be answered during the limited warranty period, please call , please be verified by this booklet. Epson also warrants that the Epson Stylus Pro ink jet printer covered by the serial number. This line will be free from the date of original purchase (proof of purchase. The new items assume...
... manufacturer's specified usage, which service program will be answered during the limited warranty period, please call , please be verified by this booklet. Epson also warrants that the Epson Stylus Pro ink jet printer covered by the serial number. This line will be free from the date of original purchase (proof of purchase. The new items assume...


