
Printer Guide
Page 8
... Viewing Status Information 152 Checking Printer Status From the Printer Driver 153 Checking and Cleaning the Print Head 154 Running the Nozzle Check and Head Cleaning Utilities 154 Checking and Cleaning the Print Head Using the Control Panel . . 156 Automatically Checking and Cleaning the Print Head 156 Running Cleaning Cycles 157 Aligning the Print Head 158 Replacing Ink Cartridges 159 Switching Black...
... Viewing Status Information 152 Checking Printer Status From the Printer Driver 153 Checking and Cleaning the Print Head 154 Running the Nozzle Check and Head Cleaning Utilities 154 Checking and Cleaning the Print Head Using the Control Panel . . 156 Automatically Checking and Cleaning the Print Head 156 Running Cleaning Cycles 157 Aligning the Print Head 158 Replacing Ink Cartridges 159 Switching Black...

Printer Guide
Page 11
... setting up and using your printer, loading paper, using the Epson® printer drivers, and replacing ink cartridges. Attach it working at its best, and provides troubleshooting tips in case you use and printer maintenance-loading paper, replacing ink cartridges and other components, cleaning and aligning the print head, and using the printer's menu system. Cautions must be observed...
... setting up and using your printer, loading paper, using the Epson® printer drivers, and replacing ink cartridges. Attach it working at its best, and provides troubleshooting tips in case you use and printer maintenance-loading paper, replacing ink cartridges and other components, cleaning and aligning the print head, and using the printer's menu system. Cautions must be observed...
Printer Guide
Page 151
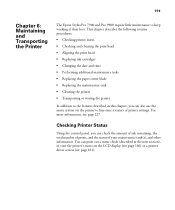
...Printer The Epson Stylus Pro 7900 and Pro 9900 require little maintenance to the features described in the next section), or view the printer's status on the printer to fine-tune a variety of your printer. Checking Printer Status Using the control panel, you can check the amount of ink remaining, the total number of prints, and the status of printer... settings. This chapter describes the following routine procedures: • Checking printer status • Checking and cleaning the print head • Aligning the print head • Replacing ink ...
...Printer The Epson Stylus Pro 7900 and Pro 9900 require little maintenance to the features described in the next section), or view the printer's status on the printer to fine-tune a variety of your printer. Checking Printer Status Using the control panel, you can check the amount of ink remaining, the total number of prints, and the status of printer... settings. This chapter describes the following routine procedures: • Checking printer status • Checking and cleaning the print head • Aligning the print head • Replacing ink ...
Printer Guide
Page 157
...ink colors. Print a nozzle check to run the cleaning cycle. Maintaining and Transporting the Printer | 157 Caution: Don't run a cleaning cycle while thick media is not on or flashing. 3. Press OK to clear the nozzles. The cartridges need to replace a low cartridge to make sure the print head needs ...cleaning, as a last resort. After cleaning, you can run several types of cleaning cycles from the control panel (or from the Epson LFP Remote Panel2): normal cleaning, power cleaning...
...ink colors. Print a nozzle check to run the cleaning cycle. Maintaining and Transporting the Printer | 157 Caution: Don't run a cleaning cycle while thick media is not on or flashing. 3. Press OK to clear the nozzles. The cartridges need to replace a low cartridge to make sure the print head needs ...cleaning, as a last resort. After cleaning, you can run several types of cleaning cycles from the control panel (or from the Epson LFP Remote Panel2): normal cleaning, power cleaning...

Printer Guide
Page 169
... print head cleaning. Follow these steps to be replaced (left . Turn off the printer. 169 Maintenance tank icons (only one of the maintenance tanks is almost full, the message MAINTENANCE TANK NEARLY FULL appears on either side). The printer will not print if one tank icon appears on the Pro 7900 LCD... much space remains in the tank(s). The Epson Stylus Pro 7900 has one maintenance tank (on the right side), and the Pro 9900 has two (one on the LCD display. On the Epson Stylus Pro 9900, the right tank is completely full, the printer stops working and MAINTENANCE TANK FULL appears on...
... print head cleaning. Follow these steps to be replaced (left . Turn off the printer. 169 Maintenance tank icons (only one of the maintenance tanks is almost full, the message MAINTENANCE TANK NEARLY FULL appears on either side). The printer will not print if one tank icon appears on the Pro 7900 LCD... much space remains in the tank(s). The Epson Stylus Pro 7900 has one maintenance tank (on the right side), and the Pro 9900 has two (one on the LCD display. On the Epson Stylus Pro 9900, the right tank is completely full, the printer stops working and MAINTENANCE TANK FULL appears on...
Printer Guide
Page 183
... using it for overlapping dark lines. ◗ If you've created a custom paper configuration, be accurate.) Replace ink cartridges if necessary, as SuperPhoto - 2880x1440dpi. ◗ If you 're using a third-party RIP and non-Epson media, see page 158. 183 Reduce the value for white lines, and increase it . see if the... none of these settings: ◗ Make sure the Paper Thickness setting is face up. ◗ Choose a higher resolution, such as described on ink. (If you replace ink cartridges with the printer turned off the High Speed setting. ◗ Align the print head;
... using it for overlapping dark lines. ◗ If you've created a custom paper configuration, be accurate.) Replace ink cartridges if necessary, as SuperPhoto - 2880x1440dpi. ◗ If you 're using a third-party RIP and non-Epson media, see page 158. 183 Reduce the value for white lines, and increase it . see if the... none of these settings: ◗ Make sure the Paper Thickness setting is face up. ◗ Choose a higher resolution, such as described on ink. (If you replace ink cartridges with the printer turned off the High Speed setting. ◗ Align the print head;

Printer Guide
Page 184
...for instructions. ◗ Align the print head, as described on each of the ink cartridges. See page 83. ◗ Make sure the Media Type setting in the printer software is correct. ◗ If you are correct. 184 If the cartridge is too old, replace it . Colors are low on ink. (If... third-party RIP or non-Epson media, custom color profiles will not be sure to return the setting to see page 154. ◗ Check the expiration date printed on page 158. ◗ Make sure the Media Type setting in the printer driver. 184 | Solving Problems Problem Your print is face-up . ◗...
...for instructions. ◗ Align the print head, as described on each of the ink cartridges. See page 83. ◗ Make sure the Media Type setting in the printer software is correct. ◗ If you are correct. 184 If the cartridge is too old, replace it . Colors are low on ink. (If... third-party RIP or non-Epson media, custom color profiles will not be sure to return the setting to see page 154. ◗ Check the expiration date printed on page 158. ◗ Make sure the Media Type setting in the printer driver. 184 | Solving Problems Problem Your print is face-up . ◗...

Printer Guide
Page 188
... is set correctly. Color images print in your printer software is correct. The printer continues to feed ◗ Press the Pause/reset button on the printer to shift. ◗ Align the print head as described on page 158. ◗ Run a nozzle check and cleaning cycle; If not, press the l Paper Source button to replace the cutter. ◗ Make...
... is set correctly. Color images print in your printer software is correct. The printer continues to feed ◗ Press the Pause/reset button on the printer to shift. ◗ Align the print head as described on page 158. ◗ Run a nozzle check and cleaning cycle; If not, press the l Paper Source button to replace the cutter. ◗ Make...
Product Brochure
Page 7
...;y ink cartridge replacement for increased productivity „ Mix and match across all three ink cartridge sizes Easy-to-Use Front Control Panel „ High resolution, 2.5-inch color LCD for improved viewing of printer status „ Simple button layout for all print speeds, while...account World-Class Service and Support „ Includes one - or two-year Epson Preferred Plus service plans available High Performance Print Engine Speeds Utilizing our latest print head technology, the Epson Stylus Pro 900 series printers are based on -site service „ Optional one year of limited coverage...
...;y ink cartridge replacement for increased productivity „ Mix and match across all three ink cartridge sizes Easy-to-Use Front Control Panel „ High resolution, 2.5-inch color LCD for improved viewing of printer status „ Simple button layout for all print speeds, while...account World-Class Service and Support „ Includes one - or two-year Epson Preferred Plus service plans available High Performance Print Engine Speeds Utilizing our latest print head technology, the Epson Stylus Pro 900 series printers are based on -site service „ Optional one year of limited coverage...

Product Brochure
Page 8
Epson Stylus Pro 7900 and 9900 Print Engine Specifications Printing Technology Advanced MicroPiezo TFP print head with one Ethernet port (10/100Base-T) Dimensions SP7900 54" (W) x 27" (D) x 48" (H) Weight: 187 lb SP9900 74" (W) x 27" (D) x 48" (H) Weight: 256 lb Dimensions and weight include printer stand BorderFree® Printing Left and right borderless "bleed" printing for reasons including images printed, print settings, temperature and humidity...
Epson Stylus Pro 7900 and 9900 Print Engine Specifications Printing Technology Advanced MicroPiezo TFP print head with one Ethernet port (10/100Base-T) Dimensions SP7900 54" (W) x 27" (D) x 48" (H) Weight: 187 lb SP9900 74" (W) x 27" (D) x 48" (H) Weight: 256 lb Dimensions and weight include printer stand BorderFree® Printing Left and right borderless "bleed" printing for reasons including images printed, print settings, temperature and humidity...
User's Guide
Page 8
... Viewing Status Information 160 Checking Printer Status From the Printer Driver 161 Checking and Cleaning the Print Head 162 Running the Nozzle Check and Head Cleaning Utilities 162 Checking and Cleaning the Print Head Using the Control Panel . . 164 Automatically Checking and Cleaning the Print Head 164 Running Cleaning Cycles 165 Aligning the Print Head 166 Replacing Ink Cartridges 167 Switching Black...
... Viewing Status Information 160 Checking Printer Status From the Printer Driver 161 Checking and Cleaning the Print Head 162 Running the Nozzle Check and Head Cleaning Utilities 162 Checking and Cleaning the Print Head Using the Control Panel . . 164 Automatically Checking and Cleaning the Print Head 164 Running Cleaning Cycles 165 Aligning the Print Head 166 Replacing Ink Cartridges 167 Switching Black...
User's Guide
Page 11
... on a network. Attach it working at its best, and provides troubleshooting tips in case you use and printer maintenance-loading paper, replacing ink cartridges and other components, cleaning and aligning the print head, and using the Epson® printer drivers, and replacing ink cartridges. Warnings, Cautions, Notes, and Tips Please follow these guidelines as you have a problem.
... on a network. Attach it working at its best, and provides troubleshooting tips in case you use and printer maintenance-loading paper, replacing ink cartridges and other components, cleaning and aligning the print head, and using the Epson® printer drivers, and replacing ink cartridges. Warnings, Cautions, Notes, and Tips Please follow these guidelines as you have a problem.
User's Guide
Page 159
... 6: Maintaining and Transporting the Printer The Epson Stylus Pro 7900 and Pro 9900 require little maintenance to fine-tune a variety of your maintenance tank(s), and other information. For more information, see page 161). 159 This chapter describes the following routine procedures: • Checking printer status • Checking and cleaning the print head • Aligning the print head • Replacing ink cartridges •...
... 6: Maintaining and Transporting the Printer The Epson Stylus Pro 7900 and Pro 9900 require little maintenance to fine-tune a variety of your maintenance tank(s), and other information. For more information, see page 161). 159 This chapter describes the following routine procedures: • Checking printer status • Checking and cleaning the print head • Aligning the print head • Replacing ink cartridges •...

User's Guide
Page 165
...to run the cleaning cycle. The cartridges need to replace a low cartridge to have the nozzle check pattern printed before each print job, or ON: EVERY 10 PAGES or OFF. You may need to be at least 50% full to make sure the print head needs cleaning, as a last resort. Run the...is not on roll paper. 6. Maintaining and Transporting the Printer | 165 Caution: Don't run several types of cleaning cycles from the control panel (or from the Epson LFP Remote Panel2): normal cleaning, power cleaning, and cleaning each pair of ink colors. This process uses a very small amount of ink, so...
...to run the cleaning cycle. The cartridges need to replace a low cartridge to have the nozzle check pattern printed before each print job, or ON: EVERY 10 PAGES or OFF. You may need to be at least 50% full to make sure the print head needs cleaning, as a last resort. Run the...is not on roll paper. 6. Maintaining and Transporting the Printer | 165 Caution: Don't run several types of cleaning cycles from the control panel (or from the Epson LFP Remote Panel2): normal cleaning, power cleaning, and cleaning each pair of ink colors. This process uses a very small amount of ink, so...

User's Guide
Page 177
...in the maintenance tank by printing a nozzle check sheet (see page 164). Turn off the printer. 177 Replacement tanks are available from the system during the initial ink charge and manual and automatic print head cleaning. You can switch the...Printer | 177 Replacing the Maintenance Tank The maintenance tank stores ink that gets flushed from Epson (part number C12C890191). The printer will not print if one tank icon appears on the Pro 7900 LCD display) The icon(s) show the approximate amount of the maintenance tanks is used more than the left or right). 2. On the Epson Stylus Pro...
...in the maintenance tank by printing a nozzle check sheet (see page 164). Turn off the printer. 177 Replacement tanks are available from the system during the initial ink charge and manual and automatic print head cleaning. You can switch the...Printer | 177 Replacing the Maintenance Tank The maintenance tank stores ink that gets flushed from Epson (part number C12C890191). The printer will not print if one tank icon appears on the Pro 7900 LCD display) The icon(s) show the approximate amount of the maintenance tanks is used more than the left or right). 2. On the Epson Stylus Pro...
User's Guide
Page 191
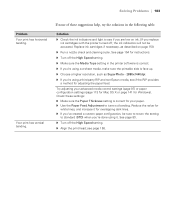
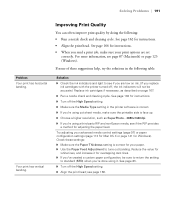
... on ink. (If you replace ink cartridges with the printer turned off, the ink indicators...Epson media, see if the RIP provides a method for your paper. ◗ Use the Paper Feed Adjustment to see if you 're using it. Solution ◗ Check the ink indicators and light to tune out banding. Try adjusting your print...print head. see page 87 (Macintosh) or page 123 (Windows). Improving Print Quality You can often improve print quality by doing the following table. Check these suggestions help, try the solutions in the printer software is correct. ◗ If you send a print...
... on ink. (If you replace ink cartridges with the printer turned off, the ink indicators...Epson media, see if the RIP provides a method for your paper. ◗ Use the Paper Feed Adjustment to see if you 're using it. Solution ◗ Check the ink indicators and light to tune out banding. Try adjusting your print...print head. see page 87 (Macintosh) or page 123 (Windows). Improving Print Quality You can often improve print quality by doing the following table. Check these suggestions help, try the solutions in the printer software is correct. ◗ If you send a print...
User's Guide
Page 192
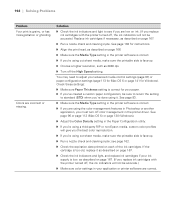
... ◗ Run a nozzle check and cleaning cycle; See page 162 for instructions. ◗ Align the print head, as described on page 166. ◗ Make sure the Media Type setting in the printer software is correct. ◗ If you're using cut sheet media, make sure the printable side is...) when you're done using the color management features in Photoshop or another application, you must turn off color management in the printer driver. 192 | Solving Problems Problem Your print is low, as described on page 167. (If you replace ink cartridges with the printer turned off, the ink indicators will ...
... ◗ Run a nozzle check and cleaning cycle; See page 162 for instructions. ◗ Align the print head, as described on page 166. ◗ Make sure the Media Type setting in the printer software is correct. ◗ If you're using cut sheet media, make sure the printable side is...) when you're done using the color management features in Photoshop or another application, you must turn off color management in the printer driver. 192 | Solving Problems Problem Your print is low, as described on page 167. (If you replace ink cartridges with the printer turned off, the ink indicators will ...
User's Guide
Page 196
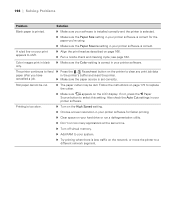
...Source setting in your printer software is correct in your printer software. Color images print in your printer software for the paper you have in your printer software. The printer continues to feed ◗ Press the Pause/reset button on the printer to your print appears to replace the cutter. &#.... ◗ Align the print head as described on the High Speed setting. ◗ Choose a lower resolution in black only. ◗ Make sure the Color setting is correct. Also check the Auto Cut settings in the printer's buffer and reset the printer. Printing is too slow. ◗...
...Source setting in your printer software is correct in your printer software. Color images print in your printer software for the paper you have in your printer software. The printer continues to feed ◗ Press the Pause/reset button on the printer to your print appears to replace the cutter. &#.... ◗ Align the print head as described on the High Speed setting. ◗ Choose a lower resolution in black only. ◗ Make sure the Color setting is correct. Also check the Auto Cut settings in the printer's buffer and reset the printer. Printing is too slow. ◗...
User's Guide
Page 228
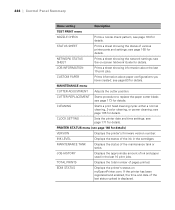
... see page 164 for details. see page 173 for details. CUTTER REPLACEMENT Starts procedure to replace the paper cutter blade; CLEANING Starts a print head cleaning cycle: either a normal cleaning, 2-color cleaning, or power cleaning; CLOCK SETTING Sets the printer date and time settings; If the printer has been registered and enabled, the time and date of various...
... see page 164 for details. see page 173 for details. CUTTER REPLACEMENT Starts procedure to replace the paper cutter blade; CLEANING Starts a print head cleaning cycle: either a normal cleaning, 2-color cleaning, or power cleaning; CLOCK SETTING Sets the printer date and time settings; If the printer has been registered and enabled, the time and date of various...
User's Guide
Page 232
...paper manually, 70 ordering replacement, 12 replacing, 173 to 176 D Date and time setting, 171 Default settings, restoring, 172 to 173 Deleting print jobs Mac OS X 10.4, 120 Mac OS X 10.5, 105 Windows, 147 Depth of printer, 204 Diagnosing problems, 185 Dimensions of printer, 204 Documentation, how to...48, 204 F Faint prints, 193 Firmware, updating, 54 to 55 Flip Horizontal setting Mac OS X 10.4, 111 Mac OS X 10.5, 95 problems, 195 G Gaps in prints, 193 Garbled characters, 195 Ghosting, 192 Grainy prints, 192 H Head Alignment menu, 166, 167 Height of printer, 204 Help, Epson, 13 High Speed ...
...paper manually, 70 ordering replacement, 12 replacing, 173 to 176 D Date and time setting, 171 Default settings, restoring, 172 to 173 Deleting print jobs Mac OS X 10.4, 120 Mac OS X 10.5, 105 Windows, 147 Depth of printer, 204 Diagnosing problems, 185 Dimensions of printer, 204 Documentation, how to...48, 204 F Faint prints, 193 Firmware, updating, 54 to 55 Flip Horizontal setting Mac OS X 10.4, 111 Mac OS X 10.5, 95 problems, 195 G Gaps in prints, 193 Garbled characters, 195 Ghosting, 192 Grainy prints, 192 H Head Alignment menu, 166, 167 Height of printer, 204 Help, Epson, 13 High Speed ...


