Product Information Guide
Page 1
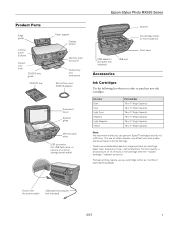
... cable for computer (not included) USB port Accessories Ink Cartridges Use the following list when you order or purchase new ink cartridges: Ink color Black Cyan Light Cyan Magenta Light Magenta Yellow Part number 78 or 77 (High Capacity) 78 or 77 (High Capacity) 78 or 77..., print settings, paper type, frequency of opening the package. For best printing results, use genuine Epson® cartridges and do not refill them. Yields vary considerably based on . Epson Stylus Photo RX595 Series Product Parts Edge guide Control panel buttons Output tray lever CD/DVD tray guide CD/DVD tray...
... cable for computer (not included) USB port Accessories Ink Cartridges Use the following list when you order or purchase new ink cartridges: Ink color Black Cyan Light Cyan Magenta Light Magenta Yellow Part number 78 or 77 (High Capacity) 78 or 77 (High Capacity) 78 or 77..., print settings, paper type, frequency of opening the package. For best printing results, use genuine Epson® cartridges and do not refill them. Yields vary considerably based on . Epson Stylus Photo RX595 Series Product Parts Edge guide Control panel buttons Output tray lever CD/DVD tray guide CD/DVD tray...
Product Information Guide
Page 3
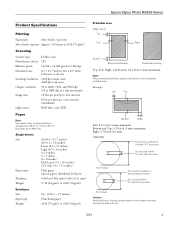
... (80 mm) area Do not print within 0.7 inch (18 mm) area 8 cm discs Caution: Avoid printing in the expanded printable area. Epson Stylus Photo RX595 Series Product Specifications Printing Paper path Sheet feeder, top entry Sheet feeder capacity Approx. 120 sheets at 20 lb (75 g/m2) Scanning Scanner type... Photoelectric device Effective pixels Document size Scanning resolution Output resolution Image data Light source Flatbed color CIS 10,200 × 14,040 pixels at 1200 dpi 8.5 × 11.7 inches (216 × 297 mm), US Letter or ...
... (80 mm) area Do not print within 0.7 inch (18 mm) area 8 cm discs Caution: Avoid printing in the expanded printable area. Epson Stylus Photo RX595 Series Product Specifications Printing Paper path Sheet feeder, top entry Sheet feeder capacity Approx. 120 sheets at 20 lb (75 g/m2) Scanning Scanner type... Photoelectric device Effective pixels Document size Scanning resolution Output resolution Image data Light source Flatbed color CIS 10,200 × 14,040 pixels at 1200 dpi 8.5 × 11.7 inches (216 × 297 mm), US Letter or ...
Product Information Guide
Page 4
... print quality, a small amount of files: Up to 999 Ink Cartridges Note: We recommend that you use genuine Epson cartridges and do not refill them. Epson Stylus Photo RX595 Series Memory Cards Compatible memory cards CompactFlash® Microdrive™ SD™ SDHC™ miniSD™* miniSDHC* microSD... 2.21 standard Image size: 80 × 80 pixels to 60.5 Hz 0.6 A (1.2 A maximum) 15 W 4W 1.3 W 0.2 W 4 5/07 Color Cyan, Magenta, Yellow, Light Cyan, Light Magenta, Black Part number 78 or 77 (High Capacity) Cartridge life Opened package: Within 6 months Unopened package: ...
... print quality, a small amount of files: Up to 999 Ink Cartridges Note: We recommend that you use genuine Epson cartridges and do not refill them. Epson Stylus Photo RX595 Series Memory Cards Compatible memory cards CompactFlash® Microdrive™ SD™ SDHC™ miniSD™* miniSDHC* microSD... 2.21 standard Image size: 80 × 80 pixels to 60.5 Hz 0.6 A (1.2 A maximum) 15 W 4W 1.3 W 0.2 W 4 5/07 Color Cyan, Magenta, Yellow, Light Cyan, Light Magenta, Black Part number 78 or 77 (High Capacity) Cartridge life Opened package: Within 6 months Unopened package: ...
Product Information Guide
Page 5
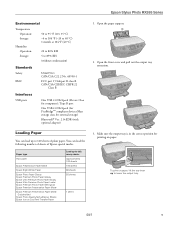
Epson Stylus Photo RX595 Series Environmental Temperature Operation: Storage: Humidity Operation: Storage: 50 to 95 °F (10 t 35 °C) -4 to 104 °F (-20 to 40 °C) 1 month at 104 &#...
Epson Stylus Photo RX595 Series Environmental Temperature Operation: Storage: Humidity Operation: Storage: 50 to 95 °F (10 t 35 °C) -4 to 104 °F (-20 to 40 °C) 1 month at 104 &#...
Product Information Guide
Page 6
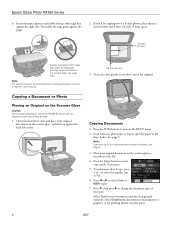
... against the back left . 4. Close the cover gently so you 'll be copying two 4 × 6-inch photos, place them as described to enter copy mode, if necessary. 5. See page 5. to select the number (up to select Color or B&W copies. 7. Press l or r to 99). 6. Press d, then press r to the recommended number of the... (5 mm) 3. Insert the paper, glossy or printable side up to change the document type, if necessary. Then slide the edge guide against the right side. Epson Stylus Photo RX595 Series 4.
... against the back left . 4. Close the cover gently so you 'll be copying two 4 × 6-inch photos, place them as described to enter copy mode, if necessary. 5. See page 5. to select the number (up to select Color or B&W copies. 7. Press l or r to 99). 6. Press d, then press r to the recommended number of the... (5 mm) 3. Insert the paper, glossy or printable side up to change the document type, if necessary. Then slide the edge guide against the right side. Epson Stylus Photo RX595 Series 4.
Product Information Guide
Page 7
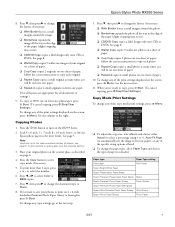
... of paper. ❏ 2-up to the recommended number of paper; Press d, then press r to the next step. 9. Epson Stylus Photo RX595 Series 8. See the next section. 11. When you want to size your paper), or any copy settings, go to change ... more than 1 copy, press + or - to turn on page 6. 4. Glossy Epson Premium Photo Paper Semi-gloss Epson Ultra Premium Photo Paper Glossy Ultra Glossy Epson Photo Paper Glossy Photo Paper 5/07 7 To change the document type to select Color or B&W copies. 7. See page 5. Paper type Paper Type setting Plain paper Plain Paper...
... of paper. ❏ 2-up to the recommended number of paper; Press d, then press r to the next step. 9. Epson Stylus Photo RX595 Series 8. See the next section. 11. When you want to size your paper), or any copy settings, go to change ... more than 1 copy, press + or - to turn on page 6. 4. Glossy Epson Premium Photo Paper Semi-gloss Epson Ultra Premium Photo Paper Glossy Ultra Glossy Epson Photo Paper Glossy Photo Paper 5/07 7 To change the document type to select Color or B&W copies. 7. See page 5. Paper type Paper Type setting Plain paper Plain Paper...
Product Information Guide
Page 8
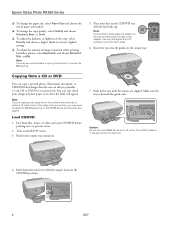
... in the tray until the arrows are aligned. Caution: Do not turn the RX595 Series on the RX595 Series. 3. Make sure the tray is beneath the guide rails. You can copy a printed photo, illustration, document, or CD/DVD label design directly onto an ink jet-printable... a higher (darker) or lower (lighter) setting. ❏ To adjust the amount of image expansion when printing borderless photos, select Expansion and choose Standard, Min, or Mid. Epson Stylus Photo RX595 Series ❏ To change the paper size, select Paper Size and choose the size of paper you use the Min ...
... in the tray until the arrows are aligned. Caution: Do not turn the RX595 Series on the RX595 Series. 3. Make sure the tray is beneath the guide rails. You can copy a printed photo, illustration, document, or CD/DVD label design directly onto an ink jet-printable... a higher (darker) or lower (lighter) setting. ❏ To adjust the amount of image expansion when printing borderless photos, select Expansion and choose Standard, Min, or Mid. Epson Stylus Photo RX595 Series ❏ To change the paper size, select Paper Size and choose the size of paper you use the Min ...

Product Information Guide
Page 9
...jet-printable CDs or DVDs to create a custom label. Select Graphics for illustrations or Photo for instructions. 5/07 9 Printing on a CD or DVD You can use due to differences in place. Press the Copy button to select Color or B&W copies. 6. Adjusting the ink density may be necessary for CD/DVD printing.)... Plain Paper. ❏ To adjust the ink density if ink smears on your CD/DVD (see the previous section) on the scanner glass. 3. Epson Stylus Photo RX595 Series Placing an Original CD/DVD on the Scanner Glass You can place a CD/DVD label-side-down in the center of the scanner glass...
...jet-printable CDs or DVDs to create a custom label. Select Graphics for illustrations or Photo for instructions. 5/07 9 Printing on a CD or DVD You can use due to differences in place. Press the Copy button to select Color or B&W copies. 6. Adjusting the ink density may be necessary for CD/DVD printing.)... Plain Paper. ❏ To adjust the ink density if ink smears on your CD/DVD (see the previous section) on the scanner glass. 3. Epson Stylus Photo RX595 Series Placing an Original CD/DVD on the Scanner Glass You can place a CD/DVD label-side-down in the center of the scanner glass...
Product Information Guide
Page 10
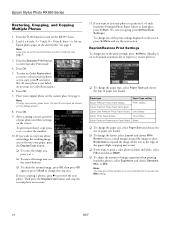
...of paper you loaded. ❏ To change any of sheets. Paper type Paper Type setting Epson Premium Photo Paper Glossy Prem. Epson Stylus Photo RX595 Series Restoring, Cropping, and Copying Multiple Photos 1. to preview the next photo. If you copy, press r and select On. (If your paper, press the Display/...07 See page 5. Press the Specialty Print button to turn on Color Restoration to restore colors in the sheet feeder. Then press the Display/Crop button and crop the second photo as you 're copying 2 photos, press r to select the number. 10. Reprint/Restore Print ...
...of paper you loaded. ❏ To change any of sheets. Paper type Paper Type setting Epson Premium Photo Paper Glossy Prem. Epson Stylus Photo RX595 Series Restoring, Cropping, and Copying Multiple Photos 1. to preview the next photo. If you copy, press r and select On. (If your paper, press the Display/...07 See page 5. Press the Specialty Print button to turn on Color Restoration to restore colors in the sheet feeder. Then press the Display/Crop button and crop the second photo as you 're copying 2 photos, press r to select the number. 10. Reprint/Restore Print ...
Product Information Guide
Page 11
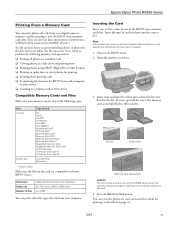
...Scanning to print individual photos or photos by inserting it into the correct slot. Insert your card into the correct slot as shown below to a memory card or other file types directly from your computer. You can view the photos on page 12. 5/07 11 Epson Stylus Photo RX595 Series Printing From ...a Memory Card You can print photos directly from your digital camera's memory card by the date they were taken. Top slot ...
...Scanning to print individual photos or photos by inserting it into the correct slot. Insert your card into the correct slot as shown below to a memory card or other file types directly from your computer. You can view the photos on page 12. 5/07 11 Epson Stylus Photo RX595 Series Printing From ...a Memory Card You can print photos directly from your digital camera's memory card by the date they were taken. Top slot ...
Product Information Guide
Page 12
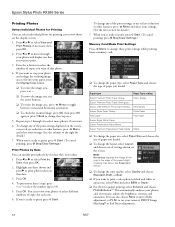
... display one of the paper (slight cropping may occur; You can quickly print photos by Date, then press OK. 2. Epson Stylus Photo RX595 Series Printing Photos Select Individual Photos for Printing You can select individual photos for printing as you view them on that date. 3. When you're ready to print, press x ... If you want to print, press x Start. Press the + button to select the number of copies you 're ready to print a color photo in black and white or sepia tone, select Filter and select B&W or Sepia. ❏ For the best quality printing, select Enhance and ...
... display one of the paper (slight cropping may occur; You can quickly print photos by Date, then press OK. 2. Epson Stylus Photo RX595 Series Printing Photos Select Individual Photos for Printing You can select individual photos for printing as you view them on that date. 3. When you're ready to print, press x ... If you want to print, press x Start. Press the + button to select the number of copies you 're ready to print a color photo in black and white or sepia tone, select Filter and select B&W or Sepia. ❏ For the best quality printing, select Enhance and ...
Product Information Guide
Page 13
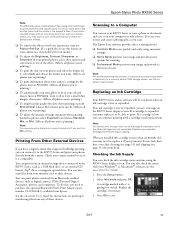
Epson Stylus Photo RX595 Series Note: PhotoEnhance uses a sophisticated face recognition technology to optimize photos that supports PictBridge printing, you can connect it to the RX595 Series and print your photos directly from an external storage device connected to the RX595 Series, such as a USB flash drive, or an external CD...both eyes and the nose must replace it off to retain the special color effects. ❏ To remove the effects of red eyes in your printed photos, select these devices. The Epson Scan software provides three scanning modes: ❏ Full Auto Mode scans quickly...
Epson Stylus Photo RX595 Series Note: PhotoEnhance uses a sophisticated face recognition technology to optimize photos that supports PictBridge printing, you can connect it to the RX595 Series and print your photos directly from an external storage device connected to the RX595 Series, such as a USB flash drive, or an external CD...both eyes and the nose must replace it off to retain the special color effects. ❏ To remove the effects of red eyes in your printed photos, select these devices. The Epson Scan software provides three scanning modes: ❏ Full Auto Mode scans quickly...
Product Information Guide
Page 14
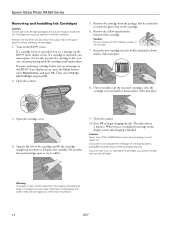
..., or ink will leak. 7. Open the cartridge cover. 4. If you cannot reinstall and use the cartridge. Warning: If ink gets on the RX595 Series display screen. Insert the new cartridge into place. 8. This takes about 2 minutes. Keep ink cartridges out of the reach of the cartridge....while ink is low or expended, you 'll waste ink. Remove the CD/DVD tray and return the output tray to print. Epson Stylus Photo RX595 Series Removing and Installing Ink Cartridges Caution: Do not open ink cartridge packages until you can continue printing until the cartridge needs replacement...
..., or ink will leak. 7. Open the cartridge cover. 4. If you cannot reinstall and use the cartridge. Warning: If ink gets on the RX595 Series display screen. Insert the new cartridge into place. 8. This takes about 2 minutes. Keep ink cartridges out of the reach of the cartridge....while ink is low or expended, you 'll waste ink. Remove the CD/DVD tray and return the output tray to print. Epson Stylus Photo RX595 Series Removing and Installing Ink Cartridges Caution: Do not open ink cartridge packages until you can continue printing until the cartridge needs replacement...
Product Information Guide
Page 15
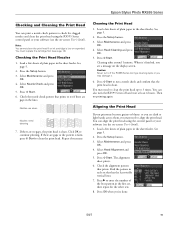
...Nozzle Check and press OK. 5. Check the nozzle check pattern that has the least visible vertical lines. 7. Select Maintenance and press OK. 4. Epson Stylus Photo RX595 Series Checking and Cleaning the Print Head You can print a nozzle check pattern to check for the other sets. 8. See page 5. 2. Nozzles... are clean Nozzles need to clean the print head up to continue printing. Click OK to 3 times. Caution: Never turn the RX595 Series off the RX595 Series during a cleaning cycle or you see page 13). Press x Start to run a nozzle check and confirm that prints. Load...
...Nozzle Check and press OK. 5. Check the nozzle check pattern that has the least visible vertical lines. 7. Select Maintenance and press OK. 4. Epson Stylus Photo RX595 Series Checking and Cleaning the Print Head You can print a nozzle check pattern to check for the other sets. 8. See page 5. 2. Nozzles... are clean Nozzles need to clean the print head up to continue printing. Click OK to 3 times. Caution: Never turn the RX595 Series off the RX595 Series during a cleaning cycle or you see page 13). Press x Start to run a nozzle check and confirm that prints. Load...
Product Information Guide
Page 16
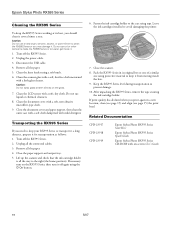
...a long distance, prepare it off the RX595 Series. 2. Related Documentation CPD-23917 CPD-23918 CPD-23919 Epson Stylus Photo RX595 Series Start Here Epson Stylus Photo RX595 Series Quick Guide Epson Stylus Photo RX595 Series CD-ROM with a little glass cleaner. Epson Stylus Photo RX595 Series Cleaning the RX595 Series To keep it . Clean the scanner...turn it for transportation as follows: 1. Do not use a hard brush, benzine, alcohol, or paint thinner to clean the RX595 Series or you need to prevent damage. 10. Remove all the paper. 5. Clean the sheet feeder using the P On button...
...a long distance, prepare it off the RX595 Series. 2. Related Documentation CPD-23917 CPD-23918 CPD-23919 Epson Stylus Photo RX595 Series Start Here Epson Stylus Photo RX595 Series Quick Guide Epson Stylus Photo RX595 Series CD-ROM with a little glass cleaner. Epson Stylus Photo RX595 Series Cleaning the RX595 Series To keep it . Clean the scanner...turn it for transportation as follows: 1. Do not use a hard brush, benzine, alcohol, or paint thinner to clean the RX595 Series or you need to prevent damage. 10. Remove all the paper. 5. Clean the sheet feeder using the P On button...
Quick Reference Guide
Page 4
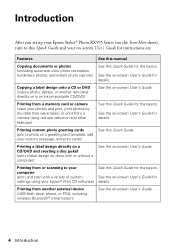
...up your Epson Stylus® Photo RX595 Series (see the Start Here sheet), turn to your computer (print and scan with or without a computer) See the on -screen User's Guide for the basics. Printing custom photo greeting cards See this Quick Guide. (print a photo on -screen...for instructions on: Features See this manual Copying documents or photos (including automatic color photo restoration, borderless photos, and instant photo reprints) See this Quick Guide for details. Copying a label design onto a CD or DVD (copy a photo, design, or another external device (USB flash drive, ...
...up your Epson Stylus® Photo RX595 Series (see the Start Here sheet), turn to your computer (print and scan with or without a computer) See the on -screen User's Guide for the basics. Printing custom photo greeting cards See this Quick Guide. (print a photo on -screen...for instructions on: Features See this manual Copying documents or photos (including automatic color photo restoration, borderless photos, and instant photo reprints) See this Quick Guide for details. Copying a label design onto a CD or DVD (copy a photo, design, or another external device (USB flash drive, ...
Quick Reference Guide
Page 14
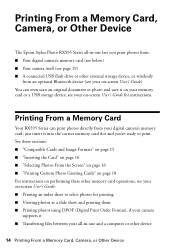
...on your digital camera's memory card; Printing From a Memory Card Your RX595 Series can even scan an original document or photo and save it into the correct memory card slot and you print photos from: ■ Your digital camera's memory card (see below) &#...photos for printing ■ Viewing photos as a slide show and printing them ■ Printing photos using DPOF (Digital Print Order Format), if your camera supports it ■ Transferring files between your on-screen User's Guide for instructions. Printing From a Memory Card, Camera, or Other Device The Epson Stylus Photo RX595...
...on your digital camera's memory card; Printing From a Memory Card Your RX595 Series can even scan an original document or photo and save it into the correct memory card slot and you print photos from: ■ Your digital camera's memory card (see below) &#...photos for printing ■ Viewing photos as a slide show and printing them ■ Printing photos using DPOF (Digital Print Order Format), if your camera supports it ■ Transferring files between your on-screen User's Guide for instructions. Printing From a Memory Card, Camera, or Other Device The Epson Stylus Photo RX595...
Quick Reference Guide
Page 21
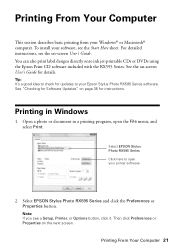
... the on -screen User's Guide for updates to open the File menu, and select Print. See the on -screen User's Guide. Select EPSON Stylus Photo RX595 Series Click here to your software, see a Setup, Printer, or Options button, click it. Note: If you see the Start Here sheet...You can also print label designs directly onto ink jet-printable CDs or DVDs using the Epson Print CD software included with the RX595 Series. See "Checking for instructions. Select EPSON Stylus Photo RX595 Series and click the Preferences or Properties button. Then click Preferences or Properties on page ...
... the on -screen User's Guide for updates to open the File menu, and select Print. See the on -screen User's Guide. Select EPSON Stylus Photo RX595 Series Click here to your software, see a Setup, Printer, or Options button, click it. Note: If you see the Start Here sheet...You can also print label designs directly onto ink jet-printable CDs or DVDs using the Epson Print CD software included with the RX595 Series. See "Checking for instructions. Select EPSON Stylus Photo RX595 Series and click the Preferences or Properties button. Then click Preferences or Properties on page ...
Quick Reference Guide
Page 23
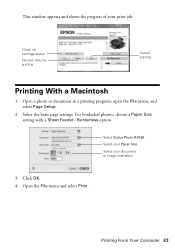
For borderless photos, choose a Paper Size setting with a Sheet Feeder - Select Stylus Photo RX595 Select your Paper Size Select your print job. Click OK. 4. Printing From Your Computer 23 Open the File menu and select Print. This window appears and shows the progress of your document or image orientation 3. Borderless option. Select the basic page settings. Open a photo or document in a printing program, open the File menu, and select Page Setup. 2. Check ink cartridge status Pause or resume printing Cancel printing Printing With a Macintosh 1.
For borderless photos, choose a Paper Size setting with a Sheet Feeder - Select Stylus Photo RX595 Select your Paper Size Select your print job. Click OK. 4. Printing From Your Computer 23 Open the File menu and select Print. This window appears and shows the progress of your document or image orientation 3. Borderless option. Select the basic page settings. Open a photo or document in a printing program, open the File menu, and select Page Setup. 2. Check ink cartridge status Pause or resume printing Cancel printing Printing With a Macintosh 1.
Quick Reference Guide
Page 24
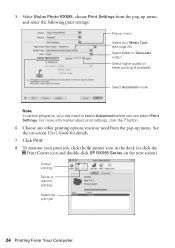
Choose any other printing options you can select Print Settings. To monitor your Media Type (see page 25) Select Color or Grayscale output Select higher quality or faster printing (if available) Select Automatic mode Note: In certain programs, you may need to select... User's Guide for details. 7. button. 6. Click Print. 8. For more information about print settings, click the ? See the on the next screen). Select Stylus Photo RX595, choose Print Settings from the pop-up menu, and select the following print settings: Pop-up menu. Cancel printing Pause or resume printing Select the ...
Choose any other printing options you can select Print Settings. To monitor your Media Type (see page 25) Select Color or Grayscale output Select higher quality or faster printing (if available) Select Automatic mode Note: In certain programs, you may need to select... User's Guide for details. 7. button. 6. Click Print. 8. For more information about print settings, click the ? See the on the next screen). Select Stylus Photo RX595, choose Print Settings from the pop-up menu, and select the following print settings: Pop-up menu. Cancel printing Pause or resume printing Select the ...


