Product Information Guide
Page 6
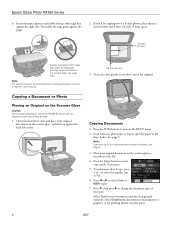
...-screen User's Guide. Load letterhead or pre-printed paper top edge first. Press the P On button to select Color or B&W copies. 7. Note: Load only up to the recommended number of the RX595 Series or use the document cover as described to 99). 6. see the on the RX595 Series.... 2. Note: For details on paper and instructions on the scanner glass as writing surface. 1. Epson Stylus Photo RX595 ...
...-screen User's Guide. Load letterhead or pre-printed paper top edge first. Press the P On button to select Color or B&W copies. 7. Note: Load only up to the recommended number of the RX595 Series or use the document cover as described to 99). 6. see the on the RX595 Series.... 2. Note: For details on paper and instructions on the scanner glass as writing surface. 1. Epson Stylus Photo RX595 ...

Product Information Guide
Page 9
...-Outer and adjust the distance from the center and edge of disc you use your RX595 Series to print a design directly onto ink jet-printable CDs or DVDs to select Color or B&W copies. 6. See the on-screen User's Guide for photos. (Do not select Text when copying onto a CD/DVD.) 7. Close the document cover gently... a CD/DVD label-side-down in the center of the label, press x Menu and see page 6), or your design onto a CD or DVD, press x Start. Epson Stylus Photo RX595 Series Placing an Original CD/DVD on the Scanner Glass You can print on CD/DVDs using the...
...-Outer and adjust the distance from the center and edge of disc you use your RX595 Series to print a design directly onto ink jet-printable CDs or DVDs to select Color or B&W copies. 6. See the on-screen User's Guide for photos. (Do not select Text when copying onto a CD/DVD.) 7. Close the document cover gently... a CD/DVD label-side-down in the center of the label, press x Menu and see page 6), or your design onto a CD or DVD, press x Start. Epson Stylus Photo RX595 Series Placing an Original CD/DVD on the Scanner Glass You can print on CD/DVDs using the...
Product Information Guide
Page 11
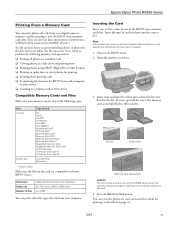
...; Scanning to print individual photos or photos by inserting it into the correct slot. You can view the photos on -screen User's Guide to the left. (It won't go in one of the following memory card operations: ❏ Printing all the way.) The memory card access light flashes, then stays lit. Epson Stylus Photo RX595 Series Printing From a Memory...
...; Scanning to print individual photos or photos by inserting it into the correct slot. You can view the photos on -screen User's Guide to the left. (It won't go in one of the following memory card operations: ❏ Printing all the way.) The memory card access light flashes, then stays lit. Epson Stylus Photo RX595 Series Printing From a Memory...
Product Information Guide
Page 13
...instructions, or instructions on -screen User's Guide. 1. see the on scanning a photo or document to a memory card or USB storage device, see page 15) the print head. Epson Stylus Photo RX595 Series Note: PhotoEnhance uses a sophisticated face recognition technology to optimize photos that supports PictBridge printing, you...down printing, turn off PhotoEnhance to retain the special color effects. ❏ To remove the effects of image expansion when printing borderless photos, select Expansion and choose Standard, Min, or Mid. (Affects all photos you 're printing.) Note: You may need ...
...instructions, or instructions on -screen User's Guide. 1. see the on scanning a photo or document to a memory card or USB storage device, see page 15) the print head. Epson Stylus Photo RX595 Series Note: PhotoEnhance uses a sophisticated face recognition technology to optimize photos that supports PictBridge printing, you...down printing, turn off PhotoEnhance to retain the special color effects. ❏ To remove the effects of image expansion when printing borderless photos, select Expansion and choose Standard, Min, or Mid. (Affects all photos you 're printing.) Note: You may need ...
Product Information Guide
Page 15
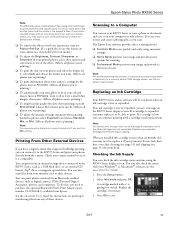
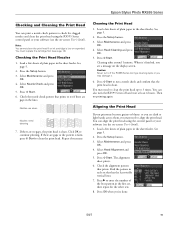
Epson Stylus Photo RX595 Series Checking and Cleaning the Print Head You can print a nozzle check pattern to check for the other sets. 8. Select Maintenance and press OK. 4. Click ... or your printouts become grainy or blurry, or you see page 13). You can align the print head using the RX595 Series control panel or your software (see the on -screen User's Guide). 1. Load a few sheets of plain paper in the lines. Press the Setup button. 3. Cleaning the Print Head 1. See page 5. 2. Caution...
Epson Stylus Photo RX595 Series Checking and Cleaning the Print Head You can print a nozzle check pattern to check for the other sets. 8. Select Maintenance and press OK. 4. Click ... or your printouts become grainy or blurry, or you see page 13). You can align the print head using the RX595 Series control panel or your software (see the on -screen User's Guide). 1. Load a few sheets of plain paper in the lines. Press the Setup button. 3. Cleaning the Print Head 1. See page 5. 2. Caution...
Product Information Guide
Page 16
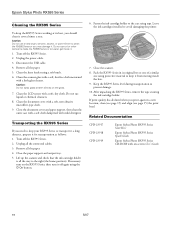
... microfiber-type cloth. 9. Epson Stylus Photo RX595 Series Cleaning the RX595 Series To keep the RX595 Series working at its original box or one of a similar size using protective material to keep it several times a year. Turn off the RX595 Series. 2. Caution: Do not spray glass cleaner directly on -screen User's Guide 16 5/07 Transporting the RX595 Series If you...
... microfiber-type cloth. 9. Epson Stylus Photo RX595 Series Cleaning the RX595 Series To keep the RX595 Series working at its original box or one of a similar size using protective material to keep it several times a year. Turn off the RX595 Series. 2. Caution: Do not spray glass cleaner directly on -screen User's Guide 16 5/07 Transporting the RX595 Series If you...
Quick Reference Guide
Page 4
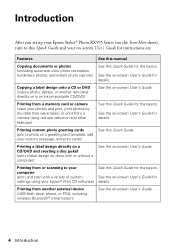
Introduction After you set up your Epson Stylus® Photo RX595 Series (see the Start Here sheet), turn to your Epson® Print CD software) See this Quick Guide for details. Printing from a memory card or camera (view your photos and print, print photos by the date they were taken, or print from a camera using your computer (print and...
Introduction After you set up your Epson Stylus® Photo RX595 Series (see the Start Here sheet), turn to your Epson® Print CD software) See this Quick Guide for details. Printing from a memory card or camera (view your photos and print, print photos by the date they were taken, or print from a camera using your computer (print and...
Quick Reference Guide
Page 5
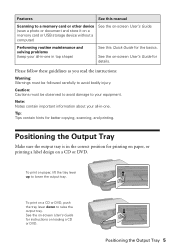
...basics. Tip: Tips contain hints for printing on paper, or printing a label design on loading a CD or DVD. See the on-screen User's Guide for details. Performing routine maintenance and solving problems (keep your equipment. Please follow these guidelines as you read the instructions: Warning: Warnings must ...be followed carefully to your all -in top shape) See this manual Scanning to a memory card or other device (scan a photo or document and store it on a memory card or USB storage device without a computer) See the on a CD or DVD, push the tray ...
...basics. Tip: Tips contain hints for printing on paper, or printing a label design on loading a CD or DVD. See the on-screen User's Guide for details. Performing routine maintenance and solving problems (keep your equipment. Please follow these guidelines as you read the instructions: Warning: Warnings must ...be followed carefully to your all -in top shape) See this manual Scanning to a memory card or other device (scan a photo or document and store it on a memory card or USB storage device without a computer) See the on a CD or DVD, push the tray ...
Quick Reference Guide
Page 6
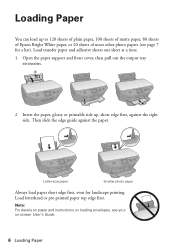
...edge first. Then slide the edge guide against the right side. Insert the paper, glossy or printable side up to 120 sheets of plain paper, 100 sheets of matte paper, 80 sheets of Epson Bright White paper, or 20 sheets of most other photo papers (see your on loading envelopes..., see page 7 for landscape printing. Load transfer paper and adhesive sheets one sheet at a time. 1. Note: For details on paper and instructions on -screen User's Guide. 6 Loading Paper
...edge first. Then slide the edge guide against the right side. Insert the paper, glossy or printable side up to 120 sheets of plain paper, 100 sheets of matte paper, 80 sheets of Epson Bright White paper, or 20 sheets of most other photo papers (see your on loading envelopes..., see page 7 for landscape printing. Load transfer paper and adhesive sheets one sheet at a time. 1. Note: For details on paper and instructions on -screen User's Guide. 6 Loading Paper

Quick Reference Guide
Page 9
Copying a Photo or Document Follow the instructions in this section to position your original face-down on -screen User's Guide. Placing an Original on the Scanner Glass Caution: Do not place anything on the scanner glass, and make color or black-and-white copies. Close the cover gently so you don't move the... original. Open the document cover and place your originals correctly on top of the all-in-one or use the document cover as writing surface. Copying a Photo or Document 9 To ...
Copying a Photo or Document Follow the instructions in this section to position your original face-down on -screen User's Guide. Placing an Original on the Scanner Glass Caution: Do not place anything on the scanner glass, and make color or black-and-white copies. Close the cover gently so you don't move the... original. Open the document cover and place your originals correctly on top of the all-in-one or use the document cover as writing surface. Copying a Photo or Document 9 To ...
Quick Reference Guide
Page 12
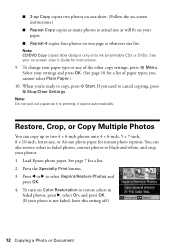
...User's Guide for instructions. 9. You can copy up Copy copies two photos on one sheet. (Follow the on-screen instructions.) ■ Repeat Copy copies as many photos at actual size as it ejects automatically. Press the Specialty Print button. 3. Press l or r to select Reprint/Restore Photos and press OK. 4. Load Epson photo... Plain Paper.) 10. See page 7 for a list. 2. See your paper. ■ Repeat-4 copies four photos on Color Restoration to restore colors in faded photos, convert photos to black-and-white, and crop your settings and press OK. (See page 10 for a list of the ...
...User's Guide for instructions. 9. You can copy up Copy copies two photos on one sheet. (Follow the on-screen instructions.) ■ Repeat Copy copies as many photos at actual size as it ejects automatically. Press the Specialty Print button. 3. Press l or r to select Reprint/Restore Photos and press OK. 4. Load Epson photo... Plain Paper.) 10. See page 7 for a list. 2. See your paper. ■ Repeat-4 copies four photos on Color Restoration to restore colors in faded photos, convert photos to black-and-white, and crop your settings and press OK. (See page 10 for a list of the ...
Quick Reference Guide
Page 14
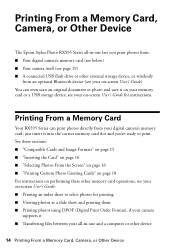
...; Your digital camera's memory card (see below) ■ Your camera itself (see your on-screen User's Guide for printing ■ Viewing photos as a slide show and printing them ■ Printing photos using DPOF (Digital Print Order Format), if your camera supports it on your digital camera's memory card... storage device, or wirelessly from your memory card or a USB storage device; Printing From a Memory Card, Camera, or Other Device The Epson Stylus Photo RX595 Series all -in -one and a computer or other device 14 Printing From a Memory Card, Camera, or Other Device See these sections...
...; Your digital camera's memory card (see below) ■ Your camera itself (see your on-screen User's Guide for printing ■ Viewing photos as a slide show and printing them ■ Printing photos using DPOF (Digital Print Order Format), if your camera supports it on your digital camera's memory card... storage device, or wirelessly from your memory card or a USB storage device; Printing From a Memory Card, Camera, or Other Device The Epson Stylus Photo RX595 Series all -in -one and a computer or other device 14 Printing From a Memory Card, Camera, or Other Device See these sections...

Quick Reference Guide
Page 16
...17. 5. Caution: Do not remove the card or turn off the RX595 Series while the memory card access light is not flashing, then pull the card straight out of its slot. Note: To print all the way. Load Epson photo paper. See page 7 for a list. 2. Press the Memory Card ...button. 3. Press OK. To print photos by the date they were taken, see page 15). The card won't go in all the photos on -screen User's Guide. Make sure the RX595 Series is turned on. 2.
...17. 5. Caution: Do not remove the card or turn off the RX595 Series while the memory card access light is not flashing, then pull the card straight out of its slot. Note: To print all the way. Load Epson photo paper. See page 7 for a list. 2. Press the Memory Card ...button. 3. Press OK. To print photos by the date they were taken, see page 15). The card won't go in all the photos on -screen User's Guide. Make sure the RX595 Series is turned on. 2.
Quick Reference Guide
Page 20
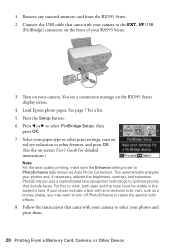
...User's Guide for a list. 5. Follow the instructions that came with an intentional color cast, such as Auto Photo Correction). 1. You see a connection message on the front of your photo includes a face with your camera to the EXT. Press l or r to optimize photos... photos and, if necessary, adjusts the brightness, contrast, and saturation. Load Epson photo ...RX595 Series. 3. For this to retain the special color effects. 8. I/F USB (PictBridge) connector on the RX595 Series display screen. 4. Press the Setup button. 6. This automatically analyzes your photos...
...User's Guide for a list. 5. Follow the instructions that came with an intentional color cast, such as Auto Photo Correction). 1. You see a connection message on the front of your photo includes a face with your camera to the EXT. Press l or r to optimize photos... photos and, if necessary, adjusts the brightness, contrast, and saturation. Load Epson photo ...RX595 Series. 3. For this to retain the special color effects. 8. I/F USB (PictBridge) connector on the RX595 Series display screen. 4. Press the Setup button. 6. This automatically analyzes your photos...
Quick Reference Guide
Page 21
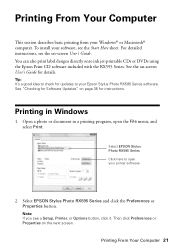
...Updates" on the next screen. Printing in a printing program, open your Epson Stylus Photo RX595 Series software. Select EPSON Stylus Photo RX595 Series Click here to your printer software 2. See the on -screen User's Guide. See "Checking for details. Open a photo or document in Windows 1. Select EPSON Stylus Photo RX595 Series and click the Preferences or Properties button. Tip: It's a good..., Printer, or Options button, click it. You can also print label designs directly onto ink jet-printable CDs or DVDs using the Epson Print CD software included with the RX595 Series.
...Updates" on the next screen. Printing in a printing program, open your Epson Stylus Photo RX595 Series software. Select EPSON Stylus Photo RX595 Series Click here to your printer software 2. See the on -screen User's Guide. See "Checking for details. Open a photo or document in Windows 1. Select EPSON Stylus Photo RX595 Series and click the Preferences or Properties button. Tip: It's a good..., Printer, or Options button, click it. You can also print label designs directly onto ink jet-printable CDs or DVDs using the Epson Print CD software included with the RX595 Series.
Quick Reference Guide
Page 22
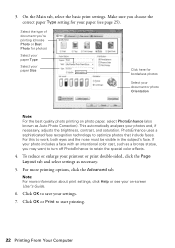
...: For the best quality photo printing on -screen User's Guide. 6. Select the type of document you choose the correct paper Type setting for borderless photos Select your printout or print double-sided, click the Page Layout tab and select settings as Auto Photo Correction). Click OK or Print to retain the special color effects. 4. For this...
...: For the best quality photo printing on -screen User's Guide. 6. Select the type of document you choose the correct paper Type setting for borderless photos Select your printout or print double-sided, click the Page Layout tab and select settings as Auto Photo Correction). Click OK or Print to retain the special color effects. 4. For this...
Quick Reference Guide
Page 24
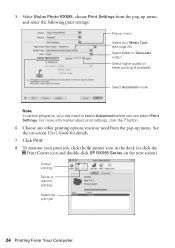
To monitor your Media Type (see page 25) Select Color or Grayscale output Select higher quality or faster printing (if available) Select Automatic mode Note: In certain programs, you may need to select Advanced before ... other printing options you can select Print Settings. Select Stylus Photo RX595, choose Print Settings from the pop-up menu Select your print job, click the printer icon in the dock (or click the Print Center icon and double-click SP RX595 Series on -screen User's Guide for details. 7. See the on the next screen). Click...
To monitor your Media Type (see page 25) Select Color or Grayscale output Select higher quality or faster printing (if available) Select Automatic mode Note: In certain programs, you may need to select Advanced before ... other printing options you can select Print Settings. Select Stylus Photo RX595, choose Print Settings from the pop-up menu Select your print job, click the printer icon in the dock (or click the Print Center icon and double-click SP RX595 Series on -screen User's Guide for details. 7. See the on the next screen). Click...
Quick Reference Guide
Page 26
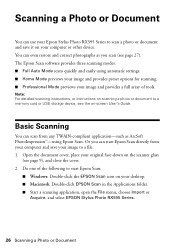
... other device. Open the document cover, place your image to start Epson Scan directly from any TWAIN-compliant application-such as you can start Epson Scan: ■ Windows: Double-click the EPSON Scan icon on -screen User's Guide. Basic Scanning You can use your Epson Stylus Photo RX595 Series to a memory card or USB storage device, see page 9), and...
... other device. Open the document cover, place your image to start Epson Scan directly from any TWAIN-compliant application-such as you can start Epson Scan: ■ Windows: Double-click the EPSON Scan icon on -screen User's Guide. Basic Scanning You can use your Epson Stylus Photo RX595 Series to a memory card or USB storage device, see page 9), and...
Quick Reference Guide
Page 27
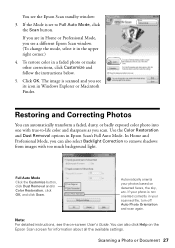
...Auto Mode Click the Customize button, click Dust Removal and/or Color Restoration, click OK, and click Scan. To restore color in Epson Scan's Full Auto Mode. Automatically orients your scanned file, turn off Auto Photo Orientation and scan again. You can automatically transform a faded, dusty... or Professional Mode, you see a different Epson Scan window. (To change the mode, select it in Windows Explorer or Macintosh Finder. You see the on-screen User's Guide. Restoring and Correcting Photos You can also click Help on the Epson Scan screen for information about all the available...
...Auto Mode Click the Customize button, click Dust Removal and/or Color Restoration, click OK, and click Scan. To restore color in Epson Scan's Full Auto Mode. Automatically orients your scanned file, turn off Auto Photo Orientation and scan again. You can automatically transform a faded, dusty... or Professional Mode, you see a different Epson Scan window. (To change the mode, select it in Windows Explorer or Macintosh Finder. You see the on-screen User's Guide. Restoring and Correcting Photos You can also click Help on the Epson Scan screen for information about all the available...
Quick Reference Guide
Page 28
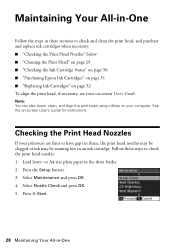
... these sections to check the print head nozzles: 1. Note: You can also check, clean, and align the print head using utilities on -screen User's Guide for instructions. See the on your printouts are faint or have gaps in them, the print head nozzles may be clogged or ink may be... Nozzles" below ■ "Cleaning the Print Head" on page 29 ■ "Checking the Ink Cartridge Status" on page 30 ■ "Purchasing Epson Ink Cartridges" on page 31 ■ "Replacing Ink Cartridges" on page 32 To align the print head, if necessary, see your on-screen User's Guide. Press the Setup button. 3.
... these sections to check the print head nozzles: 1. Note: You can also check, clean, and align the print head using utilities on -screen User's Guide for instructions. See the on your printouts are faint or have gaps in them, the print head nozzles may be clogged or ink may be... Nozzles" below ■ "Cleaning the Print Head" on page 29 ■ "Checking the Ink Cartridge Status" on page 30 ■ "Purchasing Epson Ink Cartridges" on page 31 ■ "Replacing Ink Cartridges" on page 32 To align the print head, if necessary, see your on-screen User's Guide. Press the Setup button. 3.


