
Epson Scan ICM Updater v1.20 (PSB.2008.07.001)
Page 1
...as a free download from www.Adobe.com) on the Configuration button. Follow the onscreen prompts to and including 3.4xA Note: Scanners/All-in-One's using Epson Scan 3.5xA or later already include the latest ICM module and are not affected. Note: Installation completes in a few seconds.... Subject: 07/08/2008 Originator: RY PSB.2008.07.001 Authorization: TE08-0061 Rev A Total Pages: 1 All Scanners and All-in-One's using Epson Scan Epson Scan ICM updater v.1.20 for Epson Scan-affects all driver versions up to complete the installation. Select the Color tab and enable ICM.
...as a free download from www.Adobe.com) on the Configuration button. Follow the onscreen prompts to and including 3.4xA Note: Scanners/All-in-One's using Epson Scan 3.5xA or later already include the latest ICM module and are not affected. Note: Installation completes in a few seconds.... Subject: 07/08/2008 Originator: RY PSB.2008.07.001 Authorization: TE08-0061 Rev A Total Pages: 1 All Scanners and All-in-One's using Epson Scan Epson Scan ICM updater v.1.20 for Epson Scan-affects all driver versions up to complete the installation. Select the Color tab and enable ICM.
Product Information Guide
Page 1
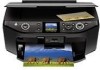
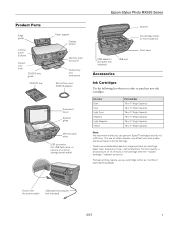
Epson Stylus Photo RX595 Series Product Parts Edge guide Control panel buttons Output tray lever CD/DVD tray guide CD/DVD tray Paper support Display screen Memory card slot cover Output tray and extensions Mini or 8-cm mini CD/DVD adapter Document cover Scanner glass Memory card slots USB connector (for USB flash...USB cable for computer (not included) USB port Accessories Ink Cartridges Use the following list when you order or purchase new ink cartridges: Ink color Black Cyan Light Cyan Magenta Light Magenta Yellow Part number 78 or 77 (High Capacity) 78 or 77 (High Capacity) 78 or 77 (...
Epson Stylus Photo RX595 Series Product Parts Edge guide Control panel buttons Output tray lever CD/DVD tray guide CD/DVD tray Paper support Display screen Memory card slot cover Output tray and extensions Mini or 8-cm mini CD/DVD adapter Document cover Scanner glass Memory card slots USB connector (for USB flash...USB cable for computer (not included) USB port Accessories Ink Cartridges Use the following list when you order or purchase new ink cartridges: Ink color Black Cyan Light Cyan Magenta Light Magenta Yellow Part number 78 or 77 (High Capacity) 78 or 77 (High Capacity) 78 or 77 (...
Product Information Guide
Page 3
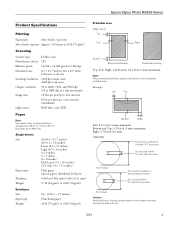
Epson Stylus Photo RX595 Series Product Specifications Printing Paper path Sheet feeder, top entry Sheet feeder capacity Approx. 120 sheets at 20 lb (75 g/m2) Scanning Scanner type Photoelectric device Effective pixels Document size Scanning resolution Output resolution Image data Light source Flatbed color CIS 10,200 ... × 7 inches 8 × 10 inches Half Letter (5.5 × 8.5 inches) 16:9 wide (4 × 7.11 inches) Plain paper Special papers distributed by Epson 0.003 to 0.004 inch (0.08 to 0.11 mm) 17 lb (64 g/m2) to 24 lb (90 g/m2) Envelopes Size Paper type Weight No. 10 (4.1...
Epson Stylus Photo RX595 Series Product Specifications Printing Paper path Sheet feeder, top entry Sheet feeder capacity Approx. 120 sheets at 20 lb (75 g/m2) Scanning Scanner type Photoelectric device Effective pixels Document size Scanning resolution Output resolution Image data Light source Flatbed color CIS 10,200 ... × 7 inches 8 × 10 inches Half Letter (5.5 × 8.5 inches) 16:9 wide (4 × 7.11 inches) Plain paper Special papers distributed by Epson 0.003 to 0.004 inch (0.08 to 0.11 mm) 17 lb (64 g/m2) to 24 lb (90 g/m2) Envelopes Size Paper type Weight No. 10 (4.1...
Product Information Guide
Page 6
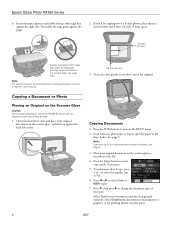
...99). 6. Select Text for printing photos on the scanner glass as described to the recommended number of the RX595 Series or use the document cover as shown below and at least 1/4 inch (5 mm) apart. 1/4 inch (5 mm) Always load paper short edge first, even for landscape printing. Epson Stylus Photo RX595 Series 4. Place your original face... on loading envelopes, see page 5. 3. If you don't move the original. See page 5. Copying Documents 1. Press the Copy button to select Color or B&W copies. 7. Note: Load only up , short edge first, against the paper. 2.
...99). 6. Select Text for printing photos on the scanner glass as described to the recommended number of the RX595 Series or use the document cover as shown below and at least 1/4 inch (5 mm) apart. 1/4 inch (5 mm) Always load paper short edge first, even for landscape printing. Epson Stylus Photo RX595 Series 4. Place your original face... on loading envelopes, see page 5. 3. If you don't move the original. See page 5. Copying Documents 1. Press the Copy button to select Color or B&W copies. 7. Note: Load only up , short edge first, against the paper. 2.
Product Information Guide
Page 7
... Semi-gloss Epson Ultra Premium Photo Paper Glossy Ultra Glossy Epson Photo Paper Glossy Photo Paper 5/07 7 See page 5. To print photos on one sheet of paper. ❏ 2-up to the recommended number of paper you 're ready to Photo. 8. to select Color or B&W copies. 7. Press d, then ... section. 3. Press d, then press r to the edge of paper ❏ Repeat-4 copies 4 small photos on 4 × 6-inch borderless Premium Photo Paper Glossy or Semi-gloss, press x Start. Epson Stylus Photo RX595 Series 8. To copy at 100% size on letter-size plain paper, press x Start. (To cancel ...
... Semi-gloss Epson Ultra Premium Photo Paper Glossy Ultra Glossy Epson Photo Paper Glossy Photo Paper 5/07 7 See page 5. To print photos on one sheet of paper. ❏ 2-up to the recommended number of paper you 're ready to Photo. 8. to select Color or B&W copies. 7. Press d, then ... section. 3. Press d, then press r to the edge of paper ❏ Repeat-4 copies 4 small photos on 4 × 6-inch borderless Premium Photo Paper Glossy or Semi-gloss, press x Start. Epson Stylus Photo RX595 Series 8. To copy at 100% size on letter-size plain paper, press x Start. (To cancel ...

Product Information Guide
Page 9
...select Color or B&W copies. 6. Press l or r to enter copy mode, if necessary. 4. Printing on a CD or DVD You can use due to create a custom label. You can print on CD/DVDs using the Epson Print CD computer software that came with your design onto a CD or DVD, press x Start. Epson Stylus Photo RX595 ...Series Placing an Original CD/DVD on the Scanner Glass You can place a CD/DVD label-side-down in the center of the scanner glass as described on page 8 (or plain paper to adjust the position or ...
...select Color or B&W copies. 6. Press l or r to enter copy mode, if necessary. 4. Printing on a CD or DVD You can use due to create a custom label. You can print on CD/DVDs using the Epson Print CD computer software that came with your design onto a CD or DVD, press x Start. Epson Stylus Photo RX595 ...Series Placing an Original CD/DVD on the Scanner Glass You can place a CD/DVD label-side-down in the center of the scanner glass as described on page 8 (or plain paper to adjust the position or ...
Product Information Guide
Page 10
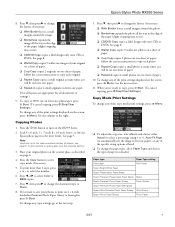
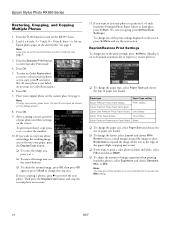
... To adjust the amount of paper you 're copying 2 photos, press r to turn on Color Restoration.) 6. Glossy Epson Premium Photo Paper Semi-gloss Epson Ultra Premium Photo Paper Glossy Ultra Glossy Epson Photo Paper Glossy Photo Paper Epson Premium Presentation Paper Matte Matte ❏ To change the paper...the crop area. Epson Stylus Photo RX595 Series Restoring, Cropping, and Copying Multiple Photos 1. Note: To copy two photos, place them 1/4 inch (5 mm) apart as shown on the scanner glass. Note: You may occur). ❏ If you see a preview of your photo is set to ...
... To adjust the amount of paper you 're copying 2 photos, press r to turn on Color Restoration.) 6. Glossy Epson Premium Photo Paper Semi-gloss Epson Ultra Premium Photo Paper Glossy Ultra Glossy Epson Photo Paper Glossy Photo Paper Epson Premium Presentation Paper Matte Matte ❏ To change the paper...the crop area. Epson Stylus Photo RX595 Series Restoring, Cropping, and Copying Multiple Photos 1. Note: To copy two photos, place them 1/4 inch (5 mm) apart as shown on the scanner glass. Note: You may occur). ❏ If you see a preview of your photo is set to ...
Product Information Guide
Page 14
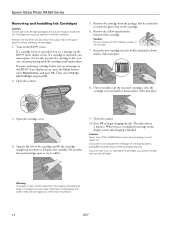
...Remove the yellow tape from the package, but be able to print. Squeeze the tab on the RX595 Series display screen. If you see a message on the cartridge. 6. Epson Stylus Photo RX595 Series Removing and Installing Ink Cartridges Caution: Do not open ink cartridge packages until you are vacuum ... clicks into your hands, wash them immediately with soap and water. Once you see a completion message on the RX595 Series. Close the scanner. 10. Turn on the display screen, ink charging is low or expended, you replace all the cartridges securely. Open the...
...Remove the yellow tape from the package, but be able to print. Squeeze the tab on the RX595 Series display screen. If you see a message on the cartridge. 6. Epson Stylus Photo RX595 Series Removing and Installing Ink Cartridges Caution: Do not open ink cartridge packages until you are vacuum ... clicks into your hands, wash them immediately with soap and water. Once you see a completion message on the RX595 Series. Close the scanner. 10. Turn on the display screen, ink charging is low or expended, you replace all the cartridges securely. Open the...
Product Information Guide
Page 16
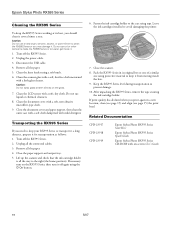
...print quality has declined when you print again in its best, you may damage it. Epson Stylus Photo RX595 Series Cleaning the RX595 Series To keep it from moving inside it. 1. Clean the scanner glass with a soft, lint-free cloth moistened with a soft, dry cloth. Remove...home position). Lift up the scanner and check that the ink cartridge holder is all the paper. 4. Related Documentation CPD-23917 CPD-23918 CPD-23919 Epson Stylus Photo RX595 Series Start Here Epson Stylus Photo RX595 Series Quick Guide Epson Stylus Photo RX595 Series CD-ROM with on the RX595 Series, then turn on ...
...print quality has declined when you print again in its best, you may damage it. Epson Stylus Photo RX595 Series Cleaning the RX595 Series To keep it from moving inside it. 1. Clean the scanner glass with a soft, lint-free cloth moistened with a soft, dry cloth. Remove...home position). Lift up the scanner and check that the ink cartridge holder is all the paper. 4. Related Documentation CPD-23917 CPD-23918 CPD-23919 Epson Stylus Photo RX595 Series Start Here Epson Stylus Photo RX595 Series Quick Guide Epson Stylus Photo RX595 Series CD-ROM with on the RX595 Series, then turn on ...
Quick Reference Guide
Page 2
...Special Papers 7 Copying a Photo or Document 9 Placing an Original on the Scanner Glass 9 Copying a Document 10 Copying a Photo 11 Restore, Crop, or Copy Multiple Photos 12 Printing From a ...Memory Card, Camera, or Other Device . . 14 Printing From a Memory Card 14 Printing From a Digital Camera 19 Printing From Your Computer 21 Printing in Windows 21 Printing With a Macintosh 23 Selecting the Correct Paper Type 25 Scanning a Photo... or Document 26 Basic Scanning 26 Restoring and Correcting Photos 27 Maintaining Your All-in-...
...Special Papers 7 Copying a Photo or Document 9 Placing an Original on the Scanner Glass 9 Copying a Document 10 Copying a Photo 11 Restore, Crop, or Copy Multiple Photos 12 Printing From a ...Memory Card, Camera, or Other Device . . 14 Printing From a Memory Card 14 Printing From a Digital Camera 19 Printing From Your Computer 21 Printing in Windows 21 Printing With a Macintosh 23 Selecting the Correct Paper Type 25 Scanning a Photo... or Document 26 Basic Scanning 26 Restoring and Correcting Photos 27 Maintaining Your All-in-...

Quick Reference Guide
Page 9
... Caution: Do not place anything on the scanner glass, with a soft non-abrasive microfiber cloth. 1. If necessary, clean the cover only with the top against the back left corner. 2. Close the cover gently ... this section to position your originals correctly on -screen User's Guide. To copy directly onto ink jet-printable CDs or DVDs, see the on the scanner glass, and make color or black-and-white copies. Copying a Photo or Document Follow the instructions in -one or use the document cover as writing surface. Copying...
... Caution: Do not place anything on the scanner glass, with a soft non-abrasive microfiber cloth. 1. If necessary, clean the cover only with the top against the back left corner. 2. Close the cover gently ... this section to position your originals correctly on -screen User's Guide. To copy directly onto ink jet-printable CDs or DVDs, see the on the scanner glass, and make color or black-and-white copies. Copying a Photo or Document Follow the instructions in -one or use the document cover as writing surface. Copying...
Quick Reference Guide
Page 10
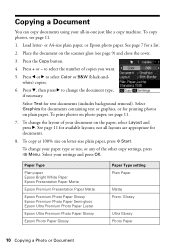
... Press + or - to select Color or B&W (black-andwhite) copies. 6. Select your document on the scanner glass (see page 11. 1. Paper Type Plain paper Epson Bright White Paper Epson Presentation Paper Matte Epson Premium Presentation Paper Matte Epson Premium Photo Paper Glossy Epson Premium Photo Paper Semi-gloss Epson Ultra Premium Photo Paper Luster Epson Ultra Premium Photo Paper Glossy Epson Photo Paper Glossy Paper Type...
... Press + or - to select Color or B&W (black-andwhite) copies. 6. Select your document on the scanner glass (see page 11. 1. Paper Type Plain paper Epson Bright White Paper Epson Presentation Paper Matte Epson Premium Presentation Paper Matte Epson Premium Photo Paper Glossy Epson Premium Photo Paper Semi-gloss Epson Ultra Premium Photo Paper Luster Epson Ultra Premium Photo Paper Glossy Epson Photo Paper Glossy Paper Type...
Quick Reference Guide
Page 11
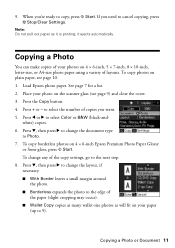
...settings, go to 9). Copying a Photo or Document 11 When you want. 5. Place your photos on the scanner glass (see page 10. 1. To copy borderless photos on plain paper, see page 9) and close the cover. 3. To copy photos on 4 × 6-inch Epson Premium Photo Paper Glossy or Semi-gloss, press... x Start. To change any of layouts. If you need to select Color or ...
...settings, go to 9). Copying a Photo or Document 11 When you want. 5. Place your photos on the scanner glass (see page 10. 1. To copy borderless photos on plain paper, see page 9) and close the cover. 3. To copy photos on 4 × 6-inch Epson Premium Photo Paper Glossy or Semi-gloss, press... x Start. To change any of layouts. If you need to select Color or ...
Quick Reference Guide
Page 13
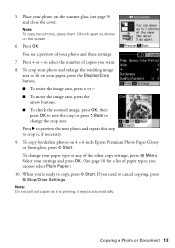
Place your photo on 4 × 6-inch Epson Premium Photo Paper Glossy or Semi-gloss, press x Start. To change the crop area. When you need to copy, press x Start. Copying a Photo or Document 13 To copy borderless photos on the scanner glass (see a preview of the other copy settings, press x Menu.... If you 're ready to cancel copying, press y Stop/Clear Settings. 5. Note: To copy two photos, place them 1/4-inch apart as it...
Place your photo on 4 × 6-inch Epson Premium Photo Paper Glossy or Semi-gloss, press x Start. To change the crop area. When you need to copy, press x Start. Copying a Photo or Document 13 To copy borderless photos on the scanner glass (see a preview of the other copy settings, press x Menu.... If you 're ready to cancel copying, press y Stop/Clear Settings. 5. Note: To copy two photos, place them 1/4-inch apart as it...
Quick Reference Guide
Page 19
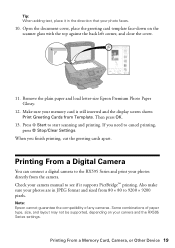
...and load letter-size Epson Premium Photo Paper Glossy. 12. Printing From a Memory Card, Camera, or Other Device 19 Press x Start to cancel printing, press y Stop/Clear Settings. Printing From a Digital Camera You can connect a digital camera to the RX595 Series and print your...RX595 Series settings. If you finish printing, cut the greeting cards apart. Also make sure your photos are in the direction that your camera manual to 9200 × 9200 pixels. Note: Epson cannot guarantee the compatibility of paper type, size, and layout may not be supported, depending on the scanner...
...and load letter-size Epson Premium Photo Paper Glossy. 12. Printing From a Memory Card, Camera, or Other Device 19 Press x Start to cancel printing, press y Stop/Clear Settings. Printing From a Digital Camera You can connect a digital camera to the RX595 Series and print your...RX595 Series settings. If you finish printing, cut the greeting cards apart. Also make sure your photos are in the direction that your camera manual to 9200 × 9200 pixels. Note: Epson cannot guarantee the compatibility of paper type, size, and layout may not be supported, depending on the scanner...
Quick Reference Guide
Page 26
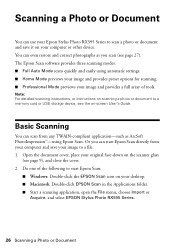
..., and select EPSON Stylus Photo RX595 Series. 26 Scanning a Photo or Document You can start Epson Scan: ■ Windows: Double-click the EPSON Scan icon on -screen User's Guide. Basic Scanning You can scan from your computer and save your image to scan a photo or document and save it on your original face-down on the scanner glass (see...
..., and select EPSON Stylus Photo RX595 Series. 26 Scanning a Photo or Document You can start Epson Scan: ■ Windows: Double-click the EPSON Scan icon on -screen User's Guide. Basic Scanning You can scan from your computer and save your image to scan a photo or document and save it on your original face-down on the scanner glass (see...
Quick Reference Guide
Page 32
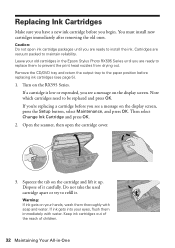
...ready to prevent the print head nozzles from drying out. Open the scanner, then open ink cartridge packages until you see a message on the display screen. Dispose of children. 32 Maintaining Your All-in the Epson Stylus Photo RX595 Series until you see page 5). 1. Do not take the used... cartridge apart or try to maintain reliability. Turn on the RX595 Series. If ink gets into your hands, wash them immediately with soap ...
...ready to prevent the print head nozzles from drying out. Open the scanner, then open ink cartridge packages until you see a message on the display screen. Dispose of children. 32 Maintaining Your All-in the Epson Stylus Photo RX595 Series until you see page 5). 1. Do not take the used... cartridge apart or try to maintain reliability. Turn on the RX595 Series. If ink gets into your hands, wash them immediately with soap ...
Quick Reference Guide
Page 33
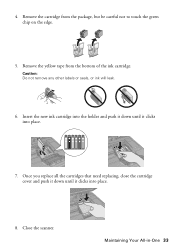
Remove the yellow tape from the package, but be careful not to touch the green chip on the edge. 5. Caution: Do not remove any other labels or seals, or ink will leak. 6. Maintaining Your All-in-One 33 Insert the new ink cartridge into the holder and push it down until it clicks into place. 7. Remove the cartridge from the bottom of the ink cartridge. 4. Close the scanner. Once you replace all the cartridges that need replacing, close the cartridge cover and push it down until it clicks into place. 8.
Remove the yellow tape from the package, but be careful not to touch the green chip on the edge. 5. Caution: Do not remove any other labels or seals, or ink will leak. 6. Maintaining Your All-in-One 33 Insert the new ink cartridge into the holder and push it down until it clicks into place. 7. Remove the cartridge from the bottom of the ink cartridge. 4. Close the scanner. Once you replace all the cartridges that need replacing, close the cartridge cover and push it down until it clicks into place. 8.
Quick Reference Guide
Page 35
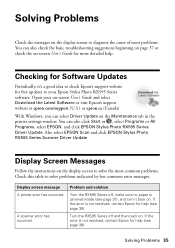
... (see page 39). You can select Driver Update on the Maintenance tab in the printer settings window. A scanner error has occurred. Also select EPSON Scan and click EPSON Stylus Photo RX595 Series Scanner Driver Update. Open your Epson Stylus Photo RX595 Series software. Problem and solution Turn the RX595 Series off and then back on. If the error is not resolved, contact...
... (see page 39). You can select Driver Update on the Maintenance tab in the printer settings window. A scanner error has occurred. Also select EPSON Scan and click EPSON Stylus Photo RX595 Series Scanner Driver Update. Open your Epson Stylus Photo RX595 Series software. Problem and solution Turn the RX595 Series off and then back on. If the error is not resolved, contact...
Quick Reference Guide
Page 37
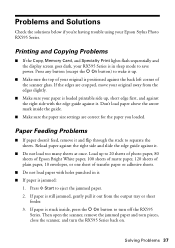
... printable side up, short edge first, and against the back left corner of the scanner glass. Paper Feeding Problems ■ If paper doesn't feed, remove it out from the edges slightly. ■ Make sure your Epson Stylus Photo RX595 Series. Printing and Copying Problems ■ If the Copy, Memory Card, and Specialty..., gently pull it and flip through the stack to 20 sheets of photo paper, 80 sheets of Epson Bright White paper, 100 sheets of matte paper, 120 sheets of plain paper, 10 envelopes, or one sheet of your RX595 Series is in it. ■ If paper is positioned against the...
... printable side up, short edge first, and against the back left corner of the scanner glass. Paper Feeding Problems ■ If paper doesn't feed, remove it out from the edges slightly. ■ Make sure your Epson Stylus Photo RX595 Series. Printing and Copying Problems ■ If the Copy, Memory Card, and Specialty..., gently pull it and flip through the stack to 20 sheets of photo paper, 80 sheets of Epson Bright White paper, 100 sheets of matte paper, 120 sheets of plain paper, 10 envelopes, or one sheet of your RX595 Series is in it. ■ If paper is positioned against the...


