
Epson Scan ICM Updater v1.20 (PSB.2008.07.001)
Page 1
... ColorMatch RGB color profiles from the Epson Scan ICM pull-down menu (under Color tab in the Configuration menu). EPSON PRODUCT SUPPORT BULLETIN Date: PSB #: Reference: Product(s): Subject: 07/08/2008 Originator: RY PSB.2008.07.001 Authorization: TE08-0061 Rev A Total Pages: 1 All Scanners and All-in-One's using Epson Scan Epson Scan ICM updater v.1.20 for Epson Scan-affects...
... ColorMatch RGB color profiles from the Epson Scan ICM pull-down menu (under Color tab in the Configuration menu). EPSON PRODUCT SUPPORT BULLETIN Date: PSB #: Reference: Product(s): Subject: 07/08/2008 Originator: RY PSB.2008.07.001 Authorization: TE08-0061 Rev A Total Pages: 1 All Scanners and All-in-One's using Epson Scan Epson Scan ICM updater v.1.20 for Epson Scan-affects...
Product Information Guide
Page 3
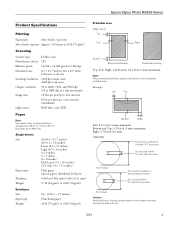
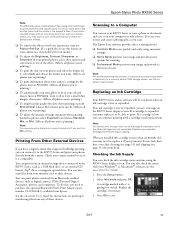
... printable area. Epson Stylus Photo RX595 Series Product Specifications Printing Paper path Sheet feeder, top entry Sheet feeder capacity Approx. 120 sheets at 20 lb (75 g/m2) Scanning Scanner type Photoelectric device Effective pixels Document size Scanning resolution Output resolution Image data Light source Flatbed color CIS 10,200... A4 size 1200 dpi (main scan) 2400 dpi (sub scan) 50 to 4800, 7200, and 9600 dpi (50 to 4800 dpi in 1 dpi increments) 16 bits per pixel per color internal 8 bits per pixel per color external (maximum) RGB three color LED Paper Note: Use paper under...
... printable area. Epson Stylus Photo RX595 Series Product Specifications Printing Paper path Sheet feeder, top entry Sheet feeder capacity Approx. 120 sheets at 20 lb (75 g/m2) Scanning Scanner type Photoelectric device Effective pixels Document size Scanning resolution Output resolution Image data Light source Flatbed color CIS 10,200... A4 size 1200 dpi (main scan) 2400 dpi (sub scan) 50 to 4800, 7200, and 9600 dpi (50 to 4800 dpi in 1 dpi increments) 16 bits per pixel per color internal 8 bits per pixel per color external (maximum) RGB three color LED Paper Note: Use paper under...
Product Information Guide
Page 10
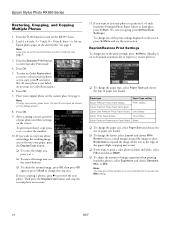
... the crop area. Press the P On button to select the number. 10. Note: To copy two photos, place them 1/4 inch (5 mm) apart as necessary. 11. Press OK. 9. After scanning, you use the arrow buttons. ❏ To check the zoomed image, press OK, then press OK ... of paper you loaded. Note: You may occur). ❏ If you want to restore colors in faded photos as you 're copying 2 photos, press r to print on the RX595 Series. 2. Epson Stylus Photo RX595 Series Restoring, Cropping, and Copying Multiple Photos 1. To turn on the display screen. 8. Press OK. 7. See page 6. If you...
... the crop area. Press the P On button to select the number. 10. Note: To copy two photos, place them 1/4 inch (5 mm) apart as necessary. 11. Press OK. 9. After scanning, you use the arrow buttons. ❏ To check the zoomed image, press OK, then press OK ... of paper you loaded. Note: You may occur). ❏ If you want to restore colors in faded photos as you 're copying 2 photos, press r to print on the RX595 Series. 2. Epson Stylus Photo RX595 Series Restoring, Cropping, and Copying Multiple Photos 1. To turn on the display screen. 8. Press OK. 7. See page 6. If you...
Product Information Guide
Page 11
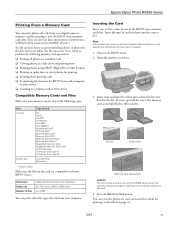
...size Number of files JPEG with your memory card and adapter documentation for your card into the RX595 Series memory card slots. (You can print other device ❏ Scanning to 999 You can also use instructions for any special use these instructions to the EXT. ...xD-Picture Card Type H xD-Picture Card Type M CompactFlash Microdrive * Requires adapter Make sure the files on the RX595 Series. 2. Epson Stylus Photo RX595 Series Printing From a Memory Card You can print photos directly from your digital camera's memory card by the date they were taken. Note: Also consult your...
...size Number of files JPEG with your memory card and adapter documentation for your card into the RX595 Series memory card slots. (You can print other device ❏ Scanning to 999 You can also use instructions for any special use these instructions to the EXT. ...xD-Picture Card Type H xD-Picture Card Type M CompactFlash Microdrive * Requires adapter Make sure the files on the RX595 Series. 2. Epson Stylus Photo RX595 Series Printing From a Memory Card You can print photos directly from your digital camera's memory card by the date they were taken. Note: Also consult your...
Product Information Guide
Page 13
...provides preset options for instructions on ink. see a message on -screen User's Guide. 1. is compatible. Epson Stylus Photo RX595 Series Note: PhotoEnhance uses a sophisticated face recognition technology to the RX595 Series, such as a USB flash drive, or an external CD burner, Zip® drive, or magneto-... needs replacement. You can use the Min setting. Note: For detailed scanning instructions, or instructions on Print Info. (Affects all photos you may want to turn off PhotoEnhance to retain the special color effects. ❏ To remove the effects of these devices. Turn it...
...provides preset options for instructions on ink. see a message on -screen User's Guide. 1. is compatible. Epson Stylus Photo RX595 Series Note: PhotoEnhance uses a sophisticated face recognition technology to the RX595 Series, such as a USB flash drive, or an external CD burner, Zip® drive, or magneto-... needs replacement. You can use the Min setting. Note: For detailed scanning instructions, or instructions on Print Info. (Affects all photos you may want to turn off PhotoEnhance to retain the special color effects. ❏ To remove the effects of these devices. Turn it...
Quick Reference Guide
Page 1
Quick Guide Basic Copying, Printing, and Scanning Maintaining Your All-in-One Solving Problems
Quick Guide Basic Copying, Printing, and Scanning Maintaining Your All-in-One Solving Problems
Quick Reference Guide
Page 2
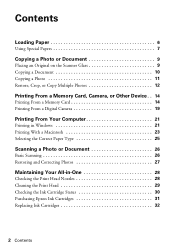
... Glass 9 Copying a Document 10 Copying a Photo 11 Restore, Crop, or Copy Multiple Photos 12 Printing From a Memory Card, Camera, or... Other Device . . 14 Printing From a Memory Card 14 Printing From a Digital Camera 19 Printing From Your Computer 21 Printing in Windows 21 Printing With a Macintosh 23 Selecting the Correct Paper Type 25 Scanning a Photo or Document 26 Basic Scanning... 26 Restoring and Correcting Photos 27 Maintaining Your All-in-One ...
... Glass 9 Copying a Document 10 Copying a Photo 11 Restore, Crop, or Copy Multiple Photos 12 Printing From a Memory Card, Camera, or... Other Device . . 14 Printing From a Memory Card 14 Printing From a Digital Camera 19 Printing From Your Computer 21 Printing in Windows 21 Printing With a Macintosh 23 Selecting the Correct Paper Type 25 Scanning a Photo or Document 26 Basic Scanning... 26 Restoring and Correcting Photos 27 Maintaining Your All-in-One ...
Quick Reference Guide
Page 4
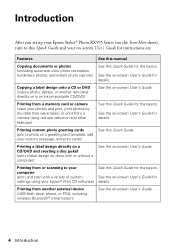
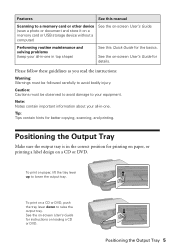
...basics. Printing from a memory card or camera (view your Epson® Print CD software) See this Quick Guide for the basics. Printing from or scanning to this Quick Guide and your computer (print and scan with or without a computer) See the on-screen User...Introduction After you set up your Epson Stylus® Photo RX595 Series (see the Start Here sheet), turn to your on-screen User's Guide for instructions on: Features See this manual Copying documents or photos (including automatic color photo restoration, borderless photos, and instant photo reprints) See this Quick Guide for...
...basics. Printing from a memory card or camera (view your Epson® Print CD software) See this Quick Guide for the basics. Printing from or scanning to this Quick Guide and your computer (print and scan with or without a computer) See the on-screen User...Introduction After you set up your Epson Stylus® Photo RX595 Series (see the Start Here sheet), turn to your on-screen User's Guide for instructions on: Features See this manual Copying documents or photos (including automatic color photo restoration, borderless photos, and instant photo reprints) See this Quick Guide for...
Quick Reference Guide
Page 5
... and solving problems (keep your all -in-one in the correct position for better copying, scanning, and printing. Positioning the Output Tray Make sure the output tray is in top shape) See this manual Scanning to raise the output tray. See the on -screen User's Guide. To print on a... CD or DVD, push the tray lever down to a memory card or other device (scan a photo or document and store it on a memory card or USB storage device without a computer) See the on -screen User's Guide for details. Positioning the ...
... and solving problems (keep your all -in-one in the correct position for better copying, scanning, and printing. Positioning the Output Tray Make sure the output tray is in top shape) See this manual Scanning to raise the output tray. See the on -screen User's Guide. To print on a... CD or DVD, push the tray lever down to a memory card or other device (scan a photo or document and store it on a memory card or USB storage device without a computer) See the on -screen User's Guide for details. Positioning the ...
Quick Reference Guide
Page 14
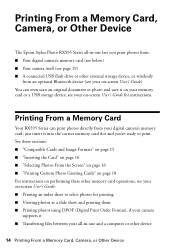
... from an optional Bluetooth device (see your on-screen User's Guide) You can even scan an original document or photo and save it into the correct memory card slot and you print photos from: ■ Your digital camera's memory card (see below) ■ Your camera itself (see ... 16 ■ "Selecting Photos From the Screen" on page 16 ■ "Printing Custom Photo Greeting Cards" on page 18 For instructions on your all -in -one lets you 're ready to select photos for instructions. Printing From a Memory Card, Camera, or Other Device The Epson Stylus Photo RX595 Series all -in -one...
... from an optional Bluetooth device (see your on-screen User's Guide) You can even scan an original document or photo and save it into the correct memory card slot and you print photos from: ■ Your digital camera's memory card (see below) ■ Your camera itself (see ... 16 ■ "Selecting Photos From the Screen" on page 16 ■ "Printing Custom Photo Greeting Cards" on page 18 For instructions on your all -in -one lets you 're ready to select photos for instructions. Printing From a Memory Card, Camera, or Other Device The Epson Stylus Photo RX595 Series all -in -one...
Quick Reference Guide
Page 19
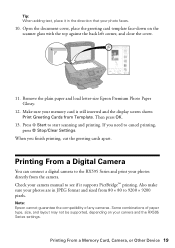
...a digital camera to the RX595 Series and print your memory card is still inserted and the display screen shows Print Greeting Cards from Template. Make sure your photos directly from the camera. When you need to start scanning and printing. Note: Epson cannot guarantee the compatibility of ... PictBridge™ printing. Remove the plain paper and load letter-size Epson Premium Photo Paper Glossy. 12. Some combinations of any cameras. Check your photos are in the direction that your camera and the RX595 Series settings. If you finish printing, cut the greeting cards apart....
...a digital camera to the RX595 Series and print your memory card is still inserted and the display screen shows Print Greeting Cards from Template. Make sure your photos directly from the camera. When you need to start scanning and printing. Note: Epson cannot guarantee the compatibility of ... PictBridge™ printing. Remove the plain paper and load letter-size Epson Premium Photo Paper Glossy. 12. Some combinations of any cameras. Check your photos are in the direction that your camera and the RX595 Series settings. If you finish printing, cut the greeting cards apart....
Quick Reference Guide
Page 26
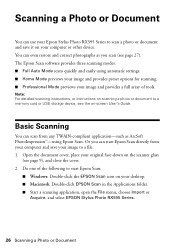
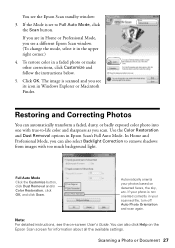
... scanner glass (see the on your desktop. ■ Macintosh: Double-click EPSON Scan in the Applications folder. ■ Start a scanning application, open the File menu, choose Import or Acquire, and select EPSON Stylus Photo RX595 Series. 26 Scanning a Photo or Document Scanning a Photo or Document You can use your Epson Stylus Photo RX595 Series to scan a photo or document and save your image to a file. 1. You can...
... scanner glass (see the on your desktop. ■ Macintosh: Double-click EPSON Scan in the Applications folder. ■ Start a scanning application, open the File menu, choose Import or Acquire, and select EPSON Stylus Photo RX595 Series. 26 Scanning a Photo or Document Scanning a Photo or Document You can use your Epson Stylus Photo RX595 Series to scan a photo or document and save your image to a file. 1. You can...
Quick Reference Guide
Page 27
...follow the instructions below. 5. Restoring and Correcting Photos You can automatically transform a faded, dusty, or badly exposed color photo into one with too much background light. Automatically orients your photos based on the Epson Scan screen for information about all the available settings....remove shadows from images with true-to Full Auto Mode, click the Scan button. Scanning a Photo or Document 27 To restore color in Epson Scan's Full Auto Mode. Note: For detailed instructions, see a different Epson Scan window. (To change the mode, select it in the upper ...
...follow the instructions below. 5. Restoring and Correcting Photos You can automatically transform a faded, dusty, or badly exposed color photo into one with too much background light. Automatically orients your photos based on the Epson Scan screen for information about all the available settings....remove shadows from images with true-to Full Auto Mode, click the Scan button. Scanning a Photo or Document 27 To restore color in Epson Scan's Full Auto Mode. Note: For detailed instructions, see a different Epson Scan window. (To change the mode, select it in the upper ...
Quick Reference Guide
Page 35
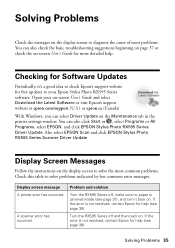
... website for Software Updates Periodically, it back on. Solving Problems 35 Open your Epson Stylus Photo RX595 Series software. Also select EPSON Scan and click EPSON Stylus Photo RX595 Series Scanner Driver Update. Problem and solution Turn the RX595 Series off and then back on. Checking for free updates to your on the Maintenance tab in the printer settings window. With...
... website for Software Updates Periodically, it back on. Solving Problems 35 Open your Epson Stylus Photo RX595 Series software. Also select EPSON Scan and click EPSON Stylus Photo RX595 Series Scanner Driver Update. Problem and solution Turn the RX595 Series off and then back on. Checking for free updates to your on the Maintenance tab in the printer settings window. With...
Quick Reference Guide
Page 38
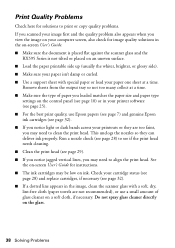
...screen User's Guide. ■ Make sure the document is placed flat against the scanner glass and the RX595 Series is not tilted or placed on an uneven surface. ■ Load the paper printable side up... at a time. This unclogs the nozzles so they are not recommended), or use Epson papers (see page 7) and genuine Epson ink cartridges (see page 29). ■ If you notice jagged vertical lines, you.... Print Quality Problems Check here for solutions to print or copy quality problems. If you scanned your image first and the quality problem also appears when you view the image on your ...
...screen User's Guide. ■ Make sure the document is placed flat against the scanner glass and the RX595 Series is not tilted or placed on an uneven surface. ■ Load the paper printable side up... at a time. This unclogs the nozzles so they are not recommended), or use Epson papers (see page 7) and genuine Epson ink cartridges (see page 29). ■ If you notice jagged vertical lines, you.... Print Quality Problems Check here for solutions to print or copy quality problems. If you scanned your image first and the quality problem also appears when you view the image on your ...
Quick Reference Guide
Page 40
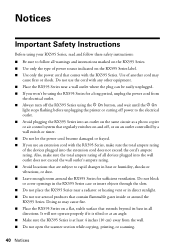
...printer or cutting off power to the electrical outlet. ■ Avoid plugging the RX595 Series into an outlet on the same circuit as a photo copier or air control system that contain flammable gases inside or around the RX595 Series for a long period, unplug the power cord from the wall. ■... Do not open the scanner section while copying, printing, or scanning. 40 Notices It will not operate...
...printer or cutting off power to the electrical outlet. ■ Avoid plugging the RX595 Series into an outlet on the same circuit as a photo copier or air control system that contain flammable gases inside or around the RX595 Series for a long period, unplug the power cord from the wall. ■... Do not open the scanner section while copying, printing, or scanning. 40 Notices It will not operate...
Start Here
Page 6
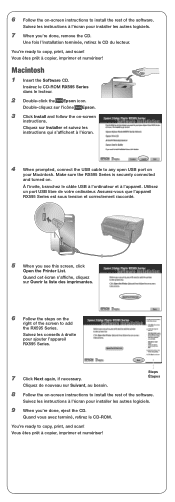
...é, retirez le CD-ROM. Double-cliquez sur l'icône Epson. 3 Click Install and follow the on . À l'invite, branchez le câble USB à l'ordinateur et à l'appareil. Assurez-vous que l'appareil RX595 Series est sous tension et correctement raccordé. 5 When you 're...Follow the on your Macintosh. You're ready to copy, print, and scan! Une fois l'installation terminée, retirez le CD du lecteur. Insérez le CD-ROM RX595 Series dans le lecteur. 2 Double-click the Epson icon. Cliquez sur Installer et suivez les instructions qui s'affichent à ...
...é, retirez le CD-ROM. Double-cliquez sur l'icône Epson. 3 Click Install and follow the on . À l'invite, branchez le câble USB à l'ordinateur et à l'appareil. Assurez-vous que l'appareil RX595 Series est sous tension et correctement raccordé. 5 When you 're...Follow the on your Macintosh. You're ready to copy, print, and scan! Une fois l'installation terminée, retirez le CD du lecteur. Insérez le CD-ROM RX595 Series dans le lecteur. 2 Double-click the Epson icon. Cliquez sur Installer et suivez les instructions qui s'affichent à ...


