Product Information Guide
Page 1
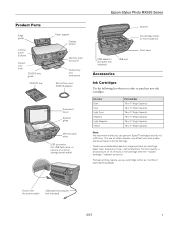
...could result in home position) Front cover USB cable for computer (not included) USB port Accessories Ink Cartridges Use the following list when you order or purchase new ink cartridges: Ink color Black Cyan Light Cyan Magenta Light Magenta Yellow Part number 78 or 77 (High Capacity) 78 or...: We recommend that you use , and temperature. Yields vary considerably based on . The use of use genuine Epson® cartridges and do not refill them. Epson Stylus Photo RX595 Series Product Parts Edge guide Control panel buttons Output tray lever CD/DVD tray guide CD/DVD tray Paper support...
...could result in home position) Front cover USB cable for computer (not included) USB port Accessories Ink Cartridges Use the following list when you order or purchase new ink cartridges: Ink color Black Cyan Light Cyan Magenta Light Magenta Yellow Part number 78 or 77 (High Capacity) 78 or...: We recommend that you use , and temperature. Yields vary considerably based on . The use of use genuine Epson® cartridges and do not refill them. Epson Stylus Photo RX595 Series Product Parts Edge guide Control panel buttons Output tray lever CD/DVD tray guide CD/DVD tray Paper support...
Product Information Guide
Page 4
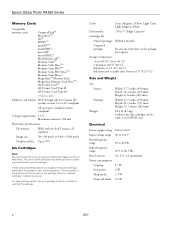
...files: Up to 60.5 Hz 0.6 A (1.2 A maximum) 15 W 4W 1.3 W 0.2 W 4 5/07 Color Cyan, Magenta, Yellow, Light Cyan, Light Magenta, Black Part number 78 or 77 (High Capacity) Cartridge life Opened package: Within 6 months Unopened package: Do not use if the date on the package has expired...: Power off mode: 100 to 120 V 90 to 132 V 50 to 60 Hz 49.5 to 999 Ink Cartridges Note: We recommend that you use , and temperature. Epson Stylus Photo RX595 Series Memory Cards Compatible memory cards CompactFlash® Microdrive™ SD™ SDHC™ miniSD™* miniSDHC*...
...files: Up to 60.5 Hz 0.6 A (1.2 A maximum) 15 W 4W 1.3 W 0.2 W 4 5/07 Color Cyan, Magenta, Yellow, Light Cyan, Light Magenta, Black Part number 78 or 77 (High Capacity) Cartridge life Opened package: Within 6 months Unopened package: Do not use if the date on the package has expired...: Power off mode: 100 to 120 V 90 to 132 V 50 to 60 Hz 49.5 to 999 Ink Cartridges Note: We recommend that you use , and temperature. Epson Stylus Photo RX595 Series Memory Cards Compatible memory cards CompactFlash® Microdrive™ SD™ SDHC™ miniSD™* miniSDHC*...
Product Information Guide
Page 13
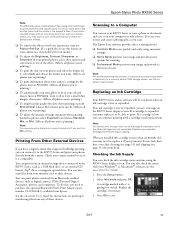
...PhotoEnhance to retain the special color effects. ❏ To remove the effects of these devices. Epson Stylus Photo RX595 Series Note: PhotoEnhance uses a sophisticated face recognition technology to optimize photos that supports PictBridge printing, you may need to fit in your photos directly from the camera. ...your image and provides preset options for faster print speed). (Affects all photos you're printing.) ❏ To adjust the amount of tools. If an ink cartridge is low or expended. Checking the Ink Supply You can even restore and correct photographs as a bronze statue,...
...PhotoEnhance to retain the special color effects. ❏ To remove the effects of these devices. Epson Stylus Photo RX595 Series Note: PhotoEnhance uses a sophisticated face recognition technology to optimize photos that supports PictBridge printing, you may need to fit in your photos directly from the camera. ...your image and provides preset options for faster print speed). (Affects all photos you're printing.) ❏ To adjust the amount of tools. If an ink cartridge is low or expended. Checking the Ink Supply You can even restore and correct photographs as a bronze statue,...
Product Information Guide
Page 14
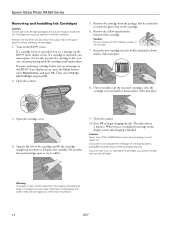
... expended, you must replace it to be careful not to install the ink. Open the scanner. 5. Dispose of it clicks into place. 8. Epson Stylus Photo RX595 Series Removing and Installing Ink Cartridges Caution: Do not open ink cartridge packages until you are vacuum packed to maintain reliability. Remove the yellow tape from the package, but be able to refill...
... expended, you must replace it to be careful not to install the ink. Open the scanner. 5. Dispose of it clicks into place. 8. Epson Stylus Photo RX595 Series Removing and Installing Ink Cartridges Caution: Do not open ink cartridge packages until you are vacuum packed to maintain reliability. Remove the yellow tape from the package, but be able to refill...
Product Information Guide
Page 15
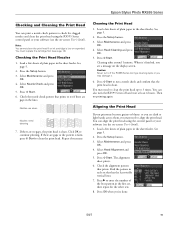
... sheets of plain paper in the sheet feeder. Select Maintenance and press OK. 4. Press OK when you see page 13). You must replace the cartridge first (see a message on the display screen. Press the Setup button. 3. Select Maintenance and press OK. 4. Select Nozzle Check and press OK... clean the print head if an ink cartridge is clean. Then try printing again. Select Head Alignment and press OK. 5. You can align the print head using the RX595 Series control panel or your software (see the on -screen User's Guide). Epson Stylus Photo RX595 Series Checking and Cleaning the Print ...
... sheets of plain paper in the sheet feeder. Select Maintenance and press OK. 4. Press OK when you see page 13). You must replace the cartridge first (see a message on the display screen. Press the Setup button. 3. Select Maintenance and press OK. 4. Select Nozzle Check and press OK... clean the print head if an ink cartridge is clean. Then try printing again. Select Head Alignment and press OK. 5. You can align the print head using the RX595 Series control panel or your software (see the on -screen User's Guide). Epson Stylus Photo RX595 Series Checking and Cleaning the Print ...
Product Information Guide
Page 16
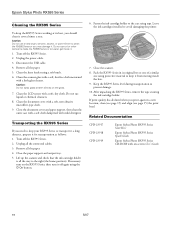
... a soft brush. 6. Do not use liquid or chemical cleansers. 8. Fasten the ink cartridge holder to clean the RX595 Series or you should clean it several times a year. Epson Stylus Photo RX595 Series Cleaning the RX595 Series To keep it from moving inside it. 1. Turn off the RX595 Series. 2. Clean the sheet feeder using tape. Lift up the scanner and...
... a soft brush. 6. Do not use liquid or chemical cleansers. 8. Fasten the ink cartridge holder to clean the RX595 Series or you should clean it several times a year. Epson Stylus Photo RX595 Series Cleaning the RX595 Series To keep it from moving inside it. 1. Turn off the RX595 Series. 2. Clean the sheet feeder using tape. Lift up the scanner and...
Quick Reference Guide
Page 2
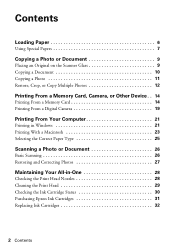
... Document 9 Placing an Original on the Scanner Glass 9 Copying a Document 10 Copying a Photo 11 Restore, Crop, or Copy Multiple Photos 12 Printing From a Memory Card, Camera, or Other Device . . 14 Printing From a Memory Card 14 Printing From a Digital ... 23 Selecting the Correct Paper Type 25 Scanning a Photo or Document 26 Basic Scanning 26 Restoring and Correcting Photos 27 Maintaining Your All-in-One 28 Checking the Print Head Nozzles 28 Cleaning the Print Head 29 Checking the Ink Cartridge Status 30 Purchasing Epson Ink Cartridges 31 Replacing Ink Cartridges 32 2 Contents
... Document 9 Placing an Original on the Scanner Glass 9 Copying a Document 10 Copying a Photo 11 Restore, Crop, or Copy Multiple Photos 12 Printing From a Memory Card, Camera, or Other Device . . 14 Printing From a Memory Card 14 Printing From a Digital ... 23 Selecting the Correct Paper Type 25 Scanning a Photo or Document 26 Basic Scanning 26 Restoring and Correcting Photos 27 Maintaining Your All-in-One 28 Checking the Print Head Nozzles 28 Cleaning the Print Head 29 Checking the Ink Cartridge Status 30 Purchasing Epson Ink Cartridges 31 Replacing Ink Cartridges 32 2 Contents
Quick Reference Guide
Page 23
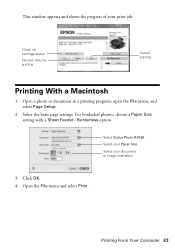
For borderless photos, choose a Paper Size setting with a Sheet Feeder - Borderless option. Check ink cartridge status Pause or resume printing Cancel printing Printing With a Macintosh 1. Select the basic page settings. Open a photo or document in a printing program, open the File menu, and select Page Setup. 2. Printing From Your Computer 23 This window appears and shows the progress of your document or image orientation 3. Select Stylus Photo RX595 Select your Paper Size Select your print job. Click OK. 4. Open the File menu and select Print.
For borderless photos, choose a Paper Size setting with a Sheet Feeder - Borderless option. Check ink cartridge status Pause or resume printing Cancel printing Printing With a Macintosh 1. Select the basic page settings. Open a photo or document in a printing program, open the File menu, and select Page Setup. 2. Printing From Your Computer 23 This window appears and shows the progress of your document or image orientation 3. Select Stylus Photo RX595 Select your Paper Size Select your print job. Click OK. 4. Open the File menu and select Print.
Quick Reference Guide
Page 28
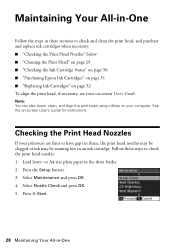
... necessary: ■ "Checking the Print Head Nozzles" below ■ "Cleaning the Print Head" on page 29 ■ "Checking the Ink Cartridge Status" on page 30 ■ "Purchasing Epson Ink Cartridges" on page 31 ■ "Replacing Ink Cartridges" on page 32 To align the print head, if necessary, see your on-screen User's Guide. Follow these sections to... OK. 4. Press the Setup button. 3. See the on your printouts are faint or have gaps in them, the print head nozzles may be clogged or ink may be running low in an ink cartridge.
... necessary: ■ "Checking the Print Head Nozzles" below ■ "Cleaning the Print Head" on page 29 ■ "Checking the Ink Cartridge Status" on page 30 ■ "Purchasing Epson Ink Cartridges" on page 31 ■ "Replacing Ink Cartridges" on page 32 To align the print head, if necessary, see your on-screen User's Guide. Follow these sections to... OK. 4. Press the Setup button. 3. See the on your printouts are faint or have gaps in them, the print head nozzles may be clogged or ink may be running low in an ink cartridge.
Quick Reference Guide
Page 29
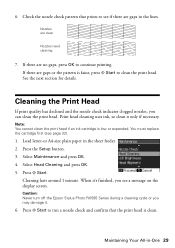
...is faint, press x Start to continue printing. Print head cleaning uses ink, so clean it 's finished, you see page 32). 1. Load letter-or A4-size plain paper in -One 29 Press x Start. Caution: Never turn off the Epson Stylus Photo RX595 Series during a cleaning cycle or you can clean the print head....the print head is low or expended. When it only if necessary. See the next section for details. You must replace the cartridge first (see a message on the display screen. Note: You cannot clean the print head if an ink cartridge is clean. Select Head Cleaning and press OK. 5.
...is faint, press x Start to continue printing. Print head cleaning uses ink, so clean it 's finished, you see page 32). 1. Load letter-or A4-size plain paper in -One 29 Press x Start. Caution: Never turn off the Epson Stylus Photo RX595 Series during a cleaning cycle or you can clean the print head....the print head is low or expended. When it only if necessary. See the next section for details. You must replace the cartridge first (see a message on the display screen. Note: You cannot clean the print head if an ink cartridge is clean. Select Head Cleaning and press OK. 5.
Quick Reference Guide
Page 30
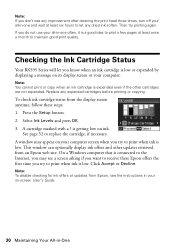
... often, it is low. Checking the Ink Cartridge Status Your RX595 Series will let you know when an ink cartridge is low. To check ink cartridge status from the display screen anytime, follow these Epson offers the first time you try to print when ink is low or expended by displaying a message on ink. Note: If you don't see any...
... often, it is low. Checking the Ink Cartridge Status Your RX595 Series will let you know when an ink cartridge is low. To check ink cartridge status from the display screen anytime, follow these Epson offers the first time you try to print when ink is low or expended by displaying a message on ink. Note: If you don't see any...
Quick Reference Guide
Page 31
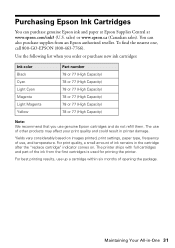
...products may affect your print quality and could result in -One 31 Use the following list when you order or purchase new ink cartridges: Ink color Black Cyan Light Cyan Magenta Light Magenta Yellow Part number 78 or 77 (High Capacity) 78 or 77 (High Capacity) ...can purchase genuine Epson ink and paper at Epson Supplies Central at www.epson.com/ink3 (U.S. The use , and temperature. Yields vary considerably based on . The printer ships with full cartridges and part of opening the package. Purchasing Epson Ink Cartridges You can also purchase supplies from the first cartridges is used ...
...products may affect your print quality and could result in -One 31 Use the following list when you order or purchase new ink cartridges: Ink color Black Cyan Light Cyan Magenta Light Magenta Yellow Part number 78 or 77 (High Capacity) 78 or 77 (High Capacity) ...can purchase genuine Epson ink and paper at Epson Supplies Central at www.epson.com/ink3 (U.S. The use , and temperature. Yields vary considerably based on . The printer ships with full cartridges and part of opening the package. Purchasing Epson Ink Cartridges You can also purchase supplies from the first cartridges is used ...
Quick Reference Guide
Page 32
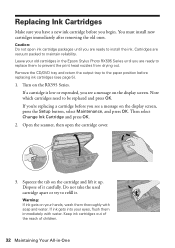
... replacing ink cartridges (see page 5). 1. Leave your old cartridges in -One Keep ink cartridges out of the reach of it up. If a cartridge is low or expended, you begin. Dispose of children. 32 Maintaining Your All-in the Epson Stylus Photo RX595 Series until you are ready to replace them to maintain reliability. Replacing Ink Cartridges Make sure you have a new ink cartridge before...
... replacing ink cartridges (see page 5). 1. Leave your old cartridges in -One Keep ink cartridges out of the reach of it up. If a cartridge is low or expended, you begin. Dispose of children. 32 Maintaining Your All-in the Epson Stylus Photo RX595 Series until you are ready to replace them to maintain reliability. Replacing Ink Cartridges Make sure you have a new ink cartridge before...
Quick Reference Guide
Page 33
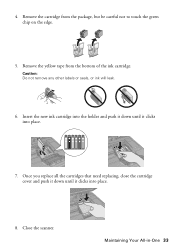
Remove the yellow tape from the package, but be careful not to touch the green chip on the edge. 5. 4. Insert the new ink cartridge into the holder and push it down until it clicks into place. 7. Caution: Do not remove any other labels or seals, or ink will leak. 6. Close the scanner. Once you replace all the cartridges that need replacing, close the cartridge cover and push it down until it clicks into place. 8. Maintaining Your All-in-One 33 Remove the cartridge from the bottom of the ink cartridge.
Remove the yellow tape from the package, but be careful not to touch the green chip on the edge. 5. 4. Insert the new ink cartridge into the holder and push it down until it clicks into place. 7. Caution: Do not remove any other labels or seals, or ink will leak. 6. Close the scanner. Once you replace all the cartridges that need replacing, close the cartridge cover and push it down until it clicks into place. 8. Maintaining Your All-in-One 33 Remove the cartridge from the bottom of the ink cartridge.
Quick Reference Guide
Page 34
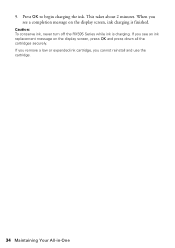
Caution: To conserve ink, never turn off the RX595 Series while ink is finished. If you remove a low or expended ink cartridge, you see a completion message on the display screen, press OK and press down all the cartridges securely. This takes about 2 minutes. If you cannot reinstall and use the cartridge. 34 Maintaining Your All-in-One When you see an ink replacement message on the display screen, ink charging is charging. 9. Press OK to begin charging the ink.
Caution: To conserve ink, never turn off the RX595 Series while ink is finished. If you remove a low or expended ink cartridge, you see a completion message on the display screen, press OK and press down all the cartridges securely. This takes about 2 minutes. If you cannot reinstall and use the cartridge. 34 Maintaining Your All-in-One When you see an ink replacement message on the display screen, ink charging is charging. 9. Press OK to begin charging the ink.
Quick Reference Guide
Page 36
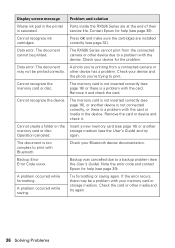
...Epson for help (see the User's Guide). Cannot recognize ink cartridges. Press OK and make sure the cartridges are at the end of their is a problem with your device and the photo you 're printing from the connected camera or other device due to a backup problem (see page 39). Data error. The document A photo...Backup Error Error Code xxxxx Backup was cancelled due to a problem with Bluetooth. A problem occurred while formatting. The RX595 Series cannot print from a connected camera or may be printed. other media and try Operation canceled. The document ...
...Epson for help (see the User's Guide). Cannot recognize ink cartridges. Press OK and make sure the cartridges are at the end of their is a problem with your device and the photo you 're printing from the connected camera or other device due to a backup problem (see page 39). Data error. The document A photo...Backup Error Error Code xxxxx Backup was cancelled due to a problem with Bluetooth. A problem occurred while formatting. The RX595 Series cannot print from a connected camera or may be printed. other media and try Operation canceled. The document ...
Quick Reference Guide
Page 38
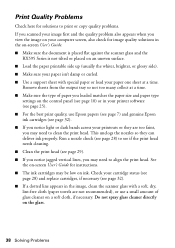
...not recommended), or use Epson papers (see page 7) and genuine Epson ink cartridges (see page 29). ■ If you notice jagged vertical lines, you may be low on ink. Do not spray glass cleaner directly on a soft cloth, if necessary. Check your cartridge status (see page 28) and replace cartridges, if necessary (see ...image quality solutions in the on-screen User's Guide. ■ Make sure the document is placed flat against the scanner glass and the RX595 Series is not tilted or placed on the control panel (see page 10) or in the image, clean the scanner glass with special paper...
...not recommended), or use Epson papers (see page 7) and genuine Epson ink cartridges (see page 29). ■ If you notice jagged vertical lines, you may be low on ink. Do not spray glass cleaner directly on a soft cloth, if necessary. Check your cartridge status (see page 28) and replace cartridges, if necessary (see ...image quality solutions in the on-screen User's Guide. ■ Make sure the document is placed flat against the scanner glass and the RX595 Series is not tilted or placed on the control panel (see page 10) or in the image, clean the scanner glass with special paper...
Quick Reference Guide
Page 41
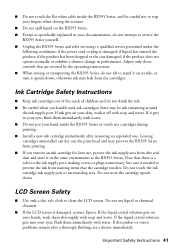
... operating instructions. ■ When storing or transporting the RX595 Series, do not tilt it, stand it on the RX595 Series. ■ Except as the RX595 Series. Do not touch the ink cartridge ink supply port or surrounding area. there may be careful...Epson. If the liquid crystal solution gets on your skin, wash it gets in performance. If the liquid crystal solution gets into your eyes, flush them immediately with soap and water. ■ Do not touch the flat white cable inside the RX595 Series or touch any cartridges during printing. ■ Install a new ink cartridge...
... operating instructions. ■ When storing or transporting the RX595 Series, do not tilt it, stand it on the RX595 Series. ■ Except as the RX595 Series. Do not touch the ink cartridge ink supply port or surrounding area. there may be careful...Epson. If the liquid crystal solution gets on your skin, wash it gets in performance. If the liquid crystal solution gets into your eyes, flush them immediately with soap and water. ■ Do not touch the flat white cable inside the RX595 Series or touch any cartridges during printing. ■ Install a new ink cartridge...
Quick Reference Guide
Page 42
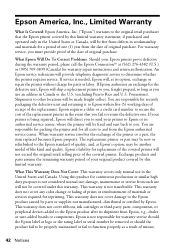
.... This warranty does not cover any color change or fading of prints or reimbursement of materials or services required for all costs to the Epson standard of quality, and, at Epson's option, may be properly maintained or fail to the Epson product caused by parts or supplies not... of the replacement. This warranty is needed, Epson will be new or refurbished to and from the Epson authorized service center. This warranty does not cover ribbons, ink cartridges or third party parts, components, or peripheral devices added to the Epson product after its option, exchange or repair the...
.... This warranty does not cover any color change or fading of prints or reimbursement of materials or services required for all costs to the Epson standard of quality, and, at Epson's option, may be properly maintained or fail to the Epson product caused by parts or supplies not... of the replacement. This warranty is needed, Epson will be new or refurbished to and from the Epson authorized service center. This warranty does not cover ribbons, ink cartridges or third party parts, components, or peripheral devices added to the Epson product after its option, exchange or repair the...


