Product Information Guide
Page 1
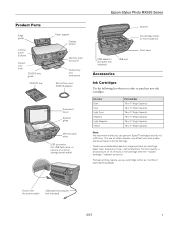
.... Power inlet (for power cable) USB cable for computer (not included) USB port Accessories Ink Cartridges Use the following list when you order or purchase new ink cartridges: Ink color Black Cyan Light Cyan Magenta Light Magenta Yellow Part number 78 or 77 (High Capacity) 78 or... 77 (High Capacity) 78 or 77 (High Capacity) 78 or 77 (High Capacity) 78 or 77 (High Capacity) 78 or 77 (High Capacity) Note: We recommend that you use of opening the package. Epson Stylus Photo RX595...
.... Power inlet (for power cable) USB cable for computer (not included) USB port Accessories Ink Cartridges Use the following list when you order or purchase new ink cartridges: Ink color Black Cyan Light Cyan Magenta Light Magenta Yellow Part number 78 or 77 (High Capacity) 78 or... 77 (High Capacity) 78 or 77 (High Capacity) 78 or 77 (High Capacity) 78 or 77 (High Capacity) 78 or 77 (High Capacity) Note: We recommend that you use of opening the package. Epson Stylus Photo RX595...
Product Information Guide
Page 4
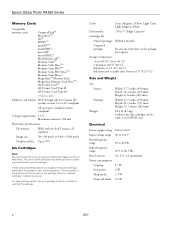
Yields vary considerably based on . Color Cyan, Magenta, Yellow, Light Cyan, Light Magenta, Black Part number 78 or 77 (High Capacity) Cartridge life Opened package: Within 6 months Unopened package: Do not use if the date on the package has expired Storage ...to 132 V 50 to 60 Hz 49.5 to 999 Ink Cartridges Note: We recommend that you use , and temperature. For print quality, a small amount of files: Up to 60.5 Hz 0.6 A (1.2 A maximum) 15 W 4W 1.3 W 0.2 W 4 5/07 Epson Stylus Photo RX595 Series Memory Cards Compatible memory cards CompactFlash® Microdrive™ ...
Yields vary considerably based on . Color Cyan, Magenta, Yellow, Light Cyan, Light Magenta, Black Part number 78 or 77 (High Capacity) Cartridge life Opened package: Within 6 months Unopened package: Do not use if the date on the package has expired Storage ...to 132 V 50 to 60 Hz 49.5 to 999 Ink Cartridges Note: We recommend that you use , and temperature. For print quality, a small amount of files: Up to 60.5 Hz 0.6 A (1.2 A maximum) 15 W 4W 1.3 W 0.2 W 4 5/07 Epson Stylus Photo RX595 Series Memory Cards Compatible memory cards CompactFlash® Microdrive™ ...
Product Information Guide
Page 13
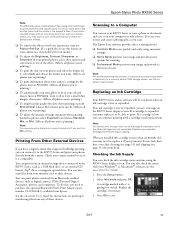
...portraits, turn on Fit Frame. You can use your RX595 Series to exit. 5/07 13 A cartridge marked with an intentional color cast, such as digital cameras, PDAs (Personal Digital Assistants), phones, and computers. Press OK to scan a photo or document and save it on your computer or other... an ink cartridge is more or less of the effect. (Affects all photos you're printing.) ❏ To print the date on your photos and select the format for faster print speed). (Affects all photos you're printing.) ❏ To adjust the amount of tools. Epson Stylus Photo RX595 Series Note:...
...portraits, turn on Fit Frame. You can use your RX595 Series to exit. 5/07 13 A cartridge marked with an intentional color cast, such as digital cameras, PDAs (Personal Digital Assistants), phones, and computers. Press OK to scan a photo or document and save it on your computer or other... an ink cartridge is more or less of the effect. (Affects all photos you're printing.) ❏ To print the date on your photos and select the format for faster print speed). (Affects all photos you're printing.) ❏ To adjust the amount of tools. Epson Stylus Photo RX595 Series Note:...
Product Information Guide
Page 14
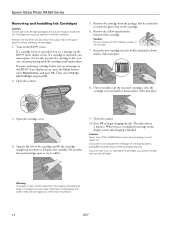
...a completion message on the display screen, ink charging is expended, you see a message on the RX595 Series. If you remove a low or expended ink cartridge, you are vacuum packed to begin charging the ink. Remove the yellow tape from the package, ... takes about 2 minutes. Insert the new cartridge into the holder and push it down until it clicks into place. 3. Epson Stylus Photo RX595 Series Removing and Installing Ink Cartridges Caution: Do not open ink cartridge packages until you cannot reinstall and use the cartridge. Cartridges are ready to print. If you must...
...a completion message on the display screen, ink charging is expended, you see a message on the RX595 Series. If you remove a low or expended ink cartridge, you are vacuum packed to begin charging the ink. Remove the yellow tape from the package, ... takes about 2 minutes. Insert the new cartridge into the holder and push it down until it clicks into place. 3. Epson Stylus Photo RX595 Series Removing and Installing Ink Cartridges Caution: Do not open ink cartridge packages until you cannot reinstall and use the cartridge. Cartridges are ready to print. If you must...
Product Information Guide
Page 15
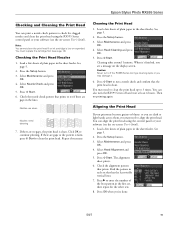
... to enter the number of plain paper in the lines. Note: You cannot clean the print head if an ink cartridge is faint, press x Start to 3 times. You must replace the cartridge first (see a message on the display screen. Select Maintenance and press OK. 4. Nozzles are no gaps, the print... control panel or your software (see the on -screen User's Guide). Then try printing again. Select Head Alignment and press OK. 5. Epson Stylus Photo RX595 Series Checking and Cleaning the Print Head You can print a nozzle check pattern to check for the other sets. 8. Checking the Print Head Nozzles...
... to enter the number of plain paper in the lines. Note: You cannot clean the print head if an ink cartridge is faint, press x Start to 3 times. You must replace the cartridge first (see a message on the display screen. Select Maintenance and press OK. 4. Nozzles are no gaps, the print... control panel or your software (see the on -screen User's Guide). Then try printing again. Select Head Alignment and press OK. 5. Epson Stylus Photo RX595 Series Checking and Cleaning the Print Head You can print a nozzle check pattern to check for the other sets. 8. Checking the Print Head Nozzles...
Product Information Guide
Page 16
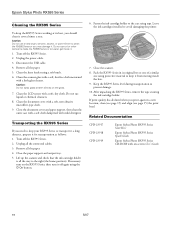
...ink cartridges installed to keep the RX595 Series working at its original box or one of a similar size using the P On button. 6. Related Documentation CPD-23917 CPD-23918 CPD-23919 Epson Stylus Photo RX595 Series Start Here Epson Stylus Photo RX595 Series Quick Guide Epson Stylus Photo RX595 Series... CD-ROM with on the glass. 7. Turn off the RX595 Series. 2. Clean the document cover with mild detergent....
...ink cartridges installed to keep the RX595 Series working at its original box or one of a similar size using the P On button. 6. Related Documentation CPD-23917 CPD-23918 CPD-23919 Epson Stylus Photo RX595 Series Start Here Epson Stylus Photo RX595 Series Quick Guide Epson Stylus Photo RX595 Series... CD-ROM with on the glass. 7. Turn off the RX595 Series. 2. Clean the document cover with mild detergent....
Quick Reference Guide
Page 2
... Document 9 Placing an Original on the Scanner Glass 9 Copying a Document 10 Copying a Photo 11 Restore, Crop, or Copy Multiple Photos 12 Printing From a Memory Card, Camera, or Other Device . . 14 Printing From a Memory Card 14 Printing From a Digital Camera ... the Correct Paper Type 25 Scanning a Photo or Document 26 Basic Scanning 26 Restoring and Correcting Photos 27 Maintaining Your All-in-One 28 Checking the Print Head Nozzles 28 Cleaning the Print Head 29 Checking the Ink Cartridge Status 30 Purchasing Epson Ink Cartridges 31 Replacing Ink Cartridges 32 2 Contents
... Document 9 Placing an Original on the Scanner Glass 9 Copying a Document 10 Copying a Photo 11 Restore, Crop, or Copy Multiple Photos 12 Printing From a Memory Card, Camera, or Other Device . . 14 Printing From a Memory Card 14 Printing From a Digital Camera ... the Correct Paper Type 25 Scanning a Photo or Document 26 Basic Scanning 26 Restoring and Correcting Photos 27 Maintaining Your All-in-One 28 Checking the Print Head Nozzles 28 Cleaning the Print Head 29 Checking the Ink Cartridge Status 30 Purchasing Epson Ink Cartridges 31 Replacing Ink Cartridges 32 2 Contents
Quick Reference Guide
Page 23
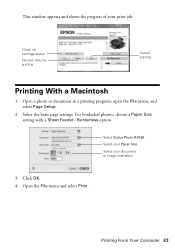
For borderless photos, choose a Paper Size setting with a Sheet Feeder - Click OK. 4. Open a photo or document in a printing program, open the File menu, and select Page Setup. 2. Borderless option. Open the File menu and select Print. Printing From Your Computer 23 Select the basic page settings. Select Stylus Photo RX595 Select your Paper Size Select your print job. This window appears and shows the progress of your document or image orientation 3. Check ink cartridge status Pause or resume printing Cancel printing Printing With a Macintosh 1.
For borderless photos, choose a Paper Size setting with a Sheet Feeder - Click OK. 4. Open a photo or document in a printing program, open the File menu, and select Page Setup. 2. Borderless option. Open the File menu and select Print. Printing From Your Computer 23 Select the basic page settings. Select Stylus Photo RX595 Select your Paper Size Select your print job. This window appears and shows the progress of your document or image orientation 3. Check ink cartridge status Pause or resume printing Cancel printing Printing With a Macintosh 1.
Quick Reference Guide
Page 28
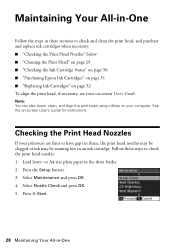
... 5. Maintaining Your All-in-One Follow the steps in these steps to check and clean the print head, and purchase and replace ink cartridges when necessary: ■ "Checking the Print Head Nozzles" below ■ "Cleaning the Print Head" on page 29 ■ "Checking the Ink... Cartridge Status" on page 30 ■ "Purchasing Epson Ink Cartridges" on page 31 ■ "Replacing Ink Cartridges" on page 32 To align the print head, if necessary, see your on -screen User's Guide for instructions. ...
... 5. Maintaining Your All-in-One Follow the steps in these steps to check and clean the print head, and purchase and replace ink cartridges when necessary: ■ "Checking the Print Head Nozzles" below ■ "Cleaning the Print Head" on page 29 ■ "Checking the Ink... Cartridge Status" on page 30 ■ "Purchasing Epson Ink Cartridges" on page 31 ■ "Replacing Ink Cartridges" on page 32 To align the print head, if necessary, see your on -screen User's Guide for instructions. ...
Quick Reference Guide
Page 29
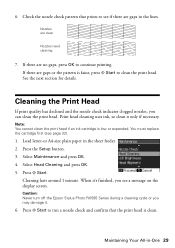
.... 3. If there are gaps in the lines. Note: You cannot clean the print head if an ink cartridge is faint, press x Start to clean the print head. When it only if necessary. Select Maintenance and press...quality has declined and the nozzle check indicates clogged nozzles, you may damage it. 6. You must replace the cartridge first (see if there are no gaps, press OK to see page 32). 1. Select Head Cleaning and ...that prints to continue printing. Caution: Never turn off the Epson Stylus Photo RX595 Series during a cleaning cycle or you can clean the print head. 6.
.... 3. If there are gaps in the lines. Note: You cannot clean the print head if an ink cartridge is faint, press x Start to clean the print head. When it only if necessary. Select Maintenance and press...quality has declined and the nozzle check indicates clogged nozzles, you may damage it. 6. You must replace the cartridge first (see if there are no gaps, press OK to see page 32). 1. Select Head Cleaning and ...that prints to continue printing. Caution: Never turn off the Epson Stylus Photo RX595 Series during a cleaning cycle or you can clean the print head. 6.
Quick Reference Guide
Page 30
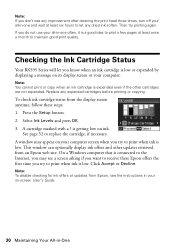
... if the other updates retrieved from the display screen anytime, follow these steps: 1. Then try to maintain good print quality. Checking the Ink Cartridge Status Your RX595 Series will let you try to print when ink is a good idea to print a few pages at least six hours to let any expended...A window may see the instructions in your all -in -One Note: To disable checking for ink offers or updates from Epson, see a screen asking if you want to receive these Epson offers the first time you do not use your on ink. Select Ink Levels and press OK. 3. If you try printing...
... if the other updates retrieved from the display screen anytime, follow these steps: 1. Then try to maintain good print quality. Checking the Ink Cartridge Status Your RX595 Series will let you try to print when ink is a good idea to print a few pages at least six hours to let any expended...A window may see the instructions in your all -in -One Note: To disable checking for ink offers or updates from Epson, see a screen asking if you want to receive these Epson offers the first time you do not use your on ink. Select Ink Levels and press OK. 3. If you try printing...
Quick Reference Guide
Page 31
... settings, paper type, frequency of the ink from an Epson authorized reseller. sales) or www.epson.ca (Canadian sales). For best printing results, use genuine Epson cartridges and do not refill them. Use the following list when you order or purchase new ink cartridges: Ink color Black Cyan Light Cyan Magenta Light Magenta Yellow Part number...
... settings, paper type, frequency of the ink from an Epson authorized reseller. sales) or www.epson.ca (Canadian sales). For best printing results, use genuine Epson cartridges and do not refill them. Use the following list when you order or purchase new ink cartridges: Ink color Black Cyan Light Cyan Magenta Light Magenta Yellow Part number...
Quick Reference Guide
Page 32
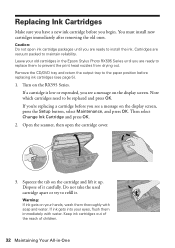
...up. Leave your old cartridges in -One If ink gets into your hands, wash them immediately with soap and water. Squeeze the tab on your eyes, flush them thoroughly with water. Dispose of children. 32 Maintaining Your All-in the Epson Stylus Photo RX595 Series until you are ...ready to replace them to install the ink. Do not take the used cartridge apart or try to maintain reliability. Cartridges are ready to prevent the print head nozzles from drying out....
...up. Leave your old cartridges in -One If ink gets into your hands, wash them immediately with soap and water. Squeeze the tab on your eyes, flush them thoroughly with water. Dispose of children. 32 Maintaining Your All-in the Epson Stylus Photo RX595 Series until you are ...ready to replace them to install the ink. Do not take the used cartridge apart or try to maintain reliability. Cartridges are ready to prevent the print head nozzles from drying out....
Quick Reference Guide
Page 33
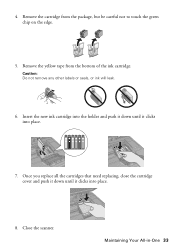
Once you replace all the cartridges that need replacing, close the cartridge cover and push it down until it clicks into place. 8. Close the scanner. Insert the new ink cartridge into the holder and push it down until it clicks into place. 7. 4. Remove the cartridge from the bottom of the ink cartridge. Maintaining Your All-in-One 33 Caution: Do not remove any other labels or seals, or ink will leak. 6. Remove the yellow tape from the package, but be careful not to touch the green chip on the edge. 5.
Once you replace all the cartridges that need replacing, close the cartridge cover and push it down until it clicks into place. 8. Close the scanner. Insert the new ink cartridge into the holder and push it down until it clicks into place. 7. 4. Remove the cartridge from the bottom of the ink cartridge. Maintaining Your All-in-One 33 Caution: Do not remove any other labels or seals, or ink will leak. 6. Remove the yellow tape from the package, but be careful not to touch the green chip on the edge. 5.

Quick Reference Guide
Page 34
If you remove a low or expended ink cartridge, you see a completion message on the display screen, press OK and press down all the cartridges securely. When you see an ink replacement message on the display screen, ink charging is charging. This takes about 2 minutes. Caution: To conserve ink, never turn off the RX595 Series while ink is finished. Press OK to begin charging the ink. If you cannot reinstall and use the cartridge. 34 Maintaining Your All-in-One 9.
If you remove a low or expended ink cartridge, you see a completion message on the display screen, press OK and press down all the cartridges securely. When you see an ink replacement message on the display screen, ink charging is charging. This takes about 2 minutes. Caution: To conserve ink, never turn off the RX595 Series while ink is finished. Press OK to begin charging the ink. If you cannot reinstall and use the cartridge. 34 Maintaining Your All-in-One 9.
Quick Reference Guide
Page 36
Cannot recognize ink cartridges. Data error. Check your device for the problem. Cannot recognize the device. Cannot create a folder on the Insert a new memory card (see the User's Guide) and try again. 36 Solving Problems The document A photo you 're trying to print.... storage medium (see page 16) or another device is not connected correctly, or there is saturated. Note the error code and contact Epson for help (see page 39). Press OK and make sure the cartridges are at the end of their is a problem with Bluetooth. The RX595...
Cannot recognize ink cartridges. Data error. Check your device for the problem. Cannot recognize the device. Cannot create a folder on the Insert a new memory card (see the User's Guide) and try again. 36 Solving Problems The document A photo you 're trying to print.... storage medium (see page 16) or another device is not connected correctly, or there is saturated. Note the error code and contact Epson for help (see page 39). Press OK and make sure the cartridges are at the end of their is a problem with Bluetooth. The RX595...
Quick Reference Guide
Page 38
...necessary. This unclogs the nozzles so they are not recommended), or use Epson papers (see page 7) and genuine Epson ink cartridges (see page 32). ■ If you notice light or dark bands across your cartridge status (see page 28) and replace cartridges, if necessary (see page 29). ■ If you notice jagged ...(see page 10) or in the on-screen User's Guide. ■ Make sure the document is placed flat against the scanner glass and the RX595 Series is not tilted or placed on an uneven surface. ■ Load the paper printable side up (usually the whiter, brighter, or glossy side...
...necessary. This unclogs the nozzles so they are not recommended), or use Epson papers (see page 7) and genuine Epson ink cartridges (see page 32). ■ If you notice light or dark bands across your cartridge status (see page 28) and replace cartridges, if necessary (see page 29). ■ If you notice jagged ...(see page 10) or in the on-screen User's Guide. ■ Make sure the document is placed flat against the scanner glass and the RX595 Series is not tilted or placed on an uneven surface. ■ Load the paper printable side up (usually the whiter, brighter, or glossy side...
Quick Reference Guide
Page 41
... or the case damaged; Leaving cartridges uninstalled can dry out the print head and may prevent the RX595 Series from printing. ■ If you handle used ink cartridges; Do not use , protect the ink supply area from the cartridges. If ink gets on your ...Epson. there may leak from dirt and dust and store it off with soap and water. If discomfort or vision problems remain after removing an expended one. Ink Cartridge Safety Instructions ■ Keep ink cartridges out of the reach of children and do not attempt to service the RX595 Series yourself. ■ Unplug the RX595...
... or the case damaged; Leaving cartridges uninstalled can dry out the print head and may prevent the RX595 Series from printing. ■ If you handle used ink cartridges; Do not use , protect the ink supply area from the cartridges. If ink gets on your ...Epson. there may leak from dirt and dust and store it off with soap and water. If discomfort or vision problems remain after removing an expended one. Ink Cartridge Safety Instructions ■ Keep ink cartridges out of the reach of children and do not attempt to service the RX595 Series yourself. ■ Unplug the RX595...
Quick Reference Guide
Page 42
...Notices This warranty does not cover ribbons, ink cartridges or third party parts, components, or peripheral devices added to the Epson product after its option, exchange or repair the printer without charge for warranty service should the Epson label or logo or the rating label or ... and for warranty repair instructions and return authorization. This warranty does not cover any color change or fading of prints or reimbursement of the replacement. This warranty is not responsible for parts or labor. If Epson authorizes an exchange for reprinting. Using this limited warranty.
...Notices This warranty does not cover ribbons, ink cartridges or third party parts, components, or peripheral devices added to the Epson product after its option, exchange or repair the printer without charge for warranty service should the Epson label or logo or the rating label or ... and for warranty repair instructions and return authorization. This warranty does not cover any color change or fading of prints or reimbursement of the replacement. This warranty is not responsible for parts or labor. If Epson authorizes an exchange for reprinting. Using this limited warranty.


