Product Information Guide
Page 6
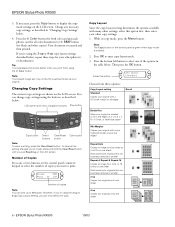
... a setting, press the Clear/Reset button. You can print up Copy Layout setting, you 're using the buttons, as described below , repeat these options: Copy Layout setting Standard Copies your original with a 0.12-inch margin on all color documents) or x B&W button (for your original. EPSON Stylus Photo RX500 10/03 Glossy 100% Photo 01 LTR Number of...
... a setting, press the Clear/Reset button. You can print up Copy Layout setting, you 're using the buttons, as described below , repeat these options: Copy Layout setting Standard Copies your original with a 0.12-inch margin on all color documents) or x B&W button (for your original. EPSON Stylus Photo RX500 10/03 Glossy 100% Photo 01 LTR Number of...
Product Information Guide
Page 8
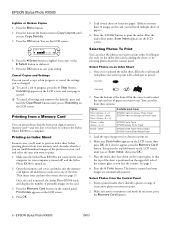
...the x Color button. The form is ejected. ❏ To cancel all settings and return to a computer. From a printed index sheet, identify a photo or range of paper you don't even have to connect the Stylus Photo RX500 to the defaults, press and hold the Clear/Reset button until...screen, then press OK. (If it . 5. Press the x Color button to print. 1. Letter Available paper types EPSON Premium Glossy Photo Paper EPSON Premium Semigloss Photo Paper EPSON Photo Paper EPSON Glossy Photo Paper EPSON Matte Paper Heavyweight EPSON Double-Sided Matte Paper 3. Make sure Scan Index appears on the...
...the x Color button. The form is ejected. ❏ To cancel all settings and return to a computer. From a printed index sheet, identify a photo or range of paper you don't even have to connect the Stylus Photo RX500 to the defaults, press and hold the Clear/Reset button until...screen, then press OK. (If it . 5. Press the x Color button to print. 1. Letter Available paper types EPSON Premium Glossy Photo Paper EPSON Premium Semigloss Photo Paper EPSON Photo Paper EPSON Glossy Photo Paper EPSON Matte Paper Heavyweight EPSON Double-Sided Matte Paper 3. Make sure Scan Index appears on the...

User's Guide
Page 27
...5. Use the numeric keypad to enter the percentage by which you see Optional Zoom Copy Menu 3.Optional Zoom 3. Just press and hold the Clear/Reset button until you see Optional Zoom. Restoring Default Settings You can manually adjust the size of your setting. 50% Enter a value... Press the ...bottom left button (next to Copy Layout) until you see Resetting on the LCD screen, and the page is ejected. Copying Without a Computer 27 Press the Menu button to access the Copy Menu. 2. Canceling ...
...5. Use the numeric keypad to enter the percentage by which you see Optional Zoom Copy Menu 3.Optional Zoom 3. Just press and hold the Clear/Reset button until you see Optional Zoom. Restoring Default Settings You can manually adjust the size of your setting. 50% Enter a value... Press the ...bottom left button (next to Copy Layout) until you see Resetting on the LCD screen, and the page is ejected. Copying Without a Computer 27 Press the Menu button to access the Copy Menu. 2. Canceling ...

User's Guide
Page 96
Press the x Color button. Then press the Memory Card button and select your photos, you 've loaded special paper, use the Clear/Reset button. Luster 96 Using Memory Cards You can 't use this setting Plain Glossy Prem. Your photos are printed. Change any of these settings. See the next section for details. 7. Choosing Print Settings...
Press the x Color button. Then press the Memory Card button and select your photos, you 've loaded special paper, use the Clear/Reset button. Luster 96 Using Memory Cards You can 't use this setting Plain Glossy Prem. Your photos are printed. Change any of these settings. See the next section for details. 7. Choosing Print Settings...


