Quick Guide
Page 3
Maintaining Your All-in-One 30 Checking the Print Head Nozzles 30 Cleaning the Print Head 31 Checking Ink Levels 32 Purchasing Epson Ink Cartridges 32 Replacing Ink Cartridges 33 Solving Problems 36 Checking for Software Updates 36 Error Indicators 37 Problems and Solutions 38 Where To Get Help 40 Notices 41 Contents 3
Maintaining Your All-in-One 30 Checking the Print Head Nozzles 30 Cleaning the Print Head 31 Checking Ink Levels 32 Purchasing Epson Ink Cartridges 32 Replacing Ink Cartridges 33 Solving Problems 36 Checking for Software Updates 36 Error Indicators 37 Problems and Solutions 38 Where To Get Help 40 Notices 41 Contents 3
Quick Guide
Page 6
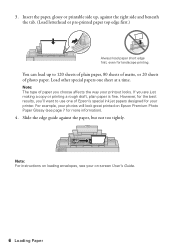
Insert the paper, glossy or printable side up to use one sheet at a time. Load other special papers one of Epson's special ink jet papers designed for landscape printing. For example, your printout looks. Note: The type of photo paper. If you choose affects the way your photos ... right side and beneath the tab. (Load letterhead or pre-printed paper top edge first.) Always load paper short edge first, even for your on Epson Premium Photo Paper Glossy (see page 7 for the best results, you'll want to 120 sheets of plain paper, 80 sheets of matte, or 20...
Insert the paper, glossy or printable side up to use one sheet at a time. Load other special papers one of Epson's special ink jet papers designed for landscape printing. For example, your printout looks. Note: The type of photo paper. If you choose affects the way your photos ... right side and beneath the tab. (Load letterhead or pre-printed paper top edge first.) Always load paper short edge first, even for your on Epson Premium Photo Paper Glossy (see page 7 for the best results, you'll want to 120 sheets of plain paper, 80 sheets of matte, or 20...

Quick Guide
Page 7
...find the nearest one, call 800-GO-EPSON (800-463-7766). Paper type Epson Ultra Premium Photo Paper Glossy Epson Premium Photo Paper Glossy Epson Premium Photo Paper Semi-gloss Epson Photo Paper Glossy Epson Bright White Paper Epson Premium Presentation Paper Matte Epson Premium Presentation Paper Matte Double-sided Size Part... 20 50 100 500 50 50 100 50 Using Special Papers 7 You can purchase genuine Epson ink and paper at Epson Supplies CentralSM at www.epson.com/ink3 (U.S. Using Special Papers Epson offers a wide array of high quality papers, making it easy to maximize the impact of...
...find the nearest one, call 800-GO-EPSON (800-463-7766). Paper type Epson Ultra Premium Photo Paper Glossy Epson Premium Photo Paper Glossy Epson Premium Photo Paper Semi-gloss Epson Photo Paper Glossy Epson Bright White Paper Epson Premium Presentation Paper Matte Epson Premium Presentation Paper Matte Double-sided Size Part... 20 50 100 500 50 50 100 50 Using Special Papers 7 You can purchase genuine Epson ink and paper at Epson Supplies CentralSM at www.epson.com/ink3 (U.S. Using Special Papers Epson offers a wide array of high quality papers, making it easy to maximize the impact of...
Quick Guide
Page 23
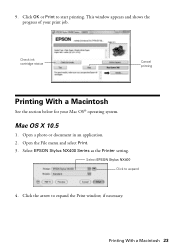
This window appears and shows the progress of your Mac OS® operating system. Check ink cartridge status Cancel printing Printing With a Macintosh See the section below for your print job. Open the File menu and select Print. 3. Mac OS X 10.5 1. Select EPSON Stylus NX400 Series as the Printer setting. Open a photo or document in an application. 2. Printing With a Macintosh 23 Click the arrow to start printing. Click OK or Print to expand the Print window, if necessary. 9. Select EPSON Stylus NX400 Click to expand 4.
This window appears and shows the progress of your Mac OS® operating system. Check ink cartridge status Cancel printing Printing With a Macintosh See the section below for your print job. Open the File menu and select Print. 3. Mac OS X 10.5 1. Select EPSON Stylus NX400 Series as the Printer setting. Open a photo or document in an application. 2. Printing With a Macintosh 23 Click the arrow to start printing. Click OK or Print to expand the Print window, if necessary. 9. Select EPSON Stylus NX400 Click to expand 4.
Quick Guide
Page 24
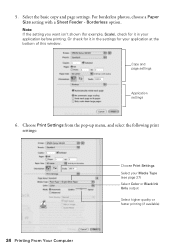
... setting you want isn't shown (for example, Scale), check for it in the settings for it in your Media Type (see page 27) Select Color or Black Ink Only output Select higher quality or faster printing (if available) 24 Printing From Your Computer Borderless option. Or check for your application at the...
... setting you want isn't shown (for example, Scale), check for it in the settings for it in your Media Type (see page 27) Select Color or Black Ink Only output Select higher quality or faster printing (if available) 24 Printing From Your Computer Borderless option. Or check for your application at the...
Quick Guide
Page 26
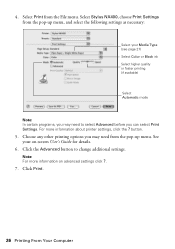
... (see page 27) Select Color or Black ink Select higher quality or faster printing (if available) Select Automatic mode Note: In certain programs, you may need to change additional settings. Click the Advanced button to select Advanced before you may need from the File menu. button. 5. 4. Select Stylus NX400, choose Print Settings from the...
... (see page 27) Select Color or Black ink Select higher quality or faster printing (if available) Select Automatic mode Note: In certain programs, you may need to change additional settings. Click the Advanced button to select Advanced before you may need from the File menu. button. 5. 4. Select Stylus NX400, choose Print Settings from the...
Quick Guide
Page 27
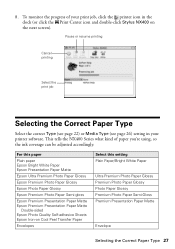
... Print Center icon and double-click Stylus NX400 on Cool Peel Transfer Paper Envelopes Select this paper Plain paper Epson Bright White Paper Epson Presentation Paper Matte Epson Ultra Premium Photo Paper Glossy Epson Premium Photo Paper Glossy Epson Photo Paper Glossy Epson Premium Photo Paper Semi-gloss Epson Premium Presentation Paper Matte Epson Premium Presentation Paper Matte Double-sided...
... Print Center icon and double-click Stylus NX400 on Cool Peel Transfer Paper Envelopes Select this paper Plain paper Epson Bright White Paper Epson Presentation Paper Matte Epson Ultra Premium Photo Paper Glossy Epson Premium Photo Paper Glossy Epson Photo Paper Glossy Epson Premium Photo Paper Semi-gloss Epson Premium Presentation Paper Matte Epson Premium Presentation Paper Matte Double-sided...
Quick Guide
Page 30
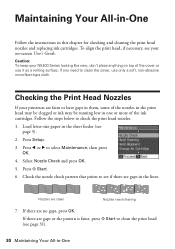
... then press OK. 4. Press l or r to check the print head nozzles. 1. If there are gaps in -One Checking the Print Head Nozzles If your NX400 Series looking like new, don't place anything on -screen User's Guide. If you need cleaning 7. Check the nozzle check pattern that prints to see your... on top of the ink cartridges. Nozzles are clean Nozzles need to clean the print head (see page 5). 2. If there are faint or have gaps in them, some of...
... then press OK. 4. Press l or r to check the print head nozzles. 1. If there are gaps in -One Checking the Print Head Nozzles If your NX400 Series looking like new, don't place anything on -screen User's Guide. If you need cleaning 7. Check the nozzle check pattern that prints to see your... on top of the ink cartridges. Nozzles are clean Nozzles need to clean the print head (see page 5). 2. If there are faint or have gaps in them, some of...
Quick Guide
Page 31
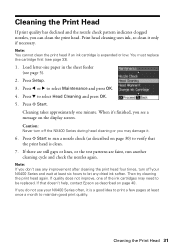
Cleaning the Print Head If print quality has declined and the nozzle check pattern indicates clogged nozzles, you don't see any dried ink soften. Load letter-size paper in the sheet feeder (see page 33). 1. Press l or r to select Head Cleaning and press OK. 5. When it is clean. ...wait at least once a month to let any improvement after cleaning the print head four times, turn off your NX400 Series often, it 's finished, you may need to verify that doesn't help, contact Epson as described on page 30) to be replaced. Cleaning the Print Head 31 Press x Start. If that the...
Cleaning the Print Head If print quality has declined and the nozzle check pattern indicates clogged nozzles, you don't see any dried ink soften. Load letter-size paper in the sheet feeder (see page 33). 1. Press l or r to select Head Cleaning and press OK. 5. When it is clean. ...wait at least once a month to let any improvement after cleaning the print head four times, turn off your NX400 Series often, it 's finished, you may need to verify that doesn't help, contact Epson as described on page 30) to be replaced. Cleaning the Print Head 31 Press x Start. If that the...

Quick Guide
Page 32
... computer that is expended even if the other updates retrieved from Epson, see a screen asking if you want to receive these Epson offers the first time you order or purchase new ink cartridges: Ink color Black Cyan Magenta Yellow High Capacity 68 - - - sales) or www.epson.ca (Canadian sales). Use the following list when you try...
... computer that is expended even if the other updates retrieved from Epson, see a screen asking if you want to receive these Epson offers the first time you order or purchase new ink cartridges: Ink color Black Cyan Magenta Yellow High Capacity 68 - - - sales) or www.epson.ca (Canadian sales). Use the following list when you try...
Quick Guide
Page 33
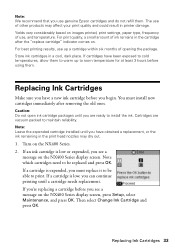
... which cartridges need to be able to install the ink. Replacing Ink Cartridges 33 Then select Change Ink Cartridge and press OK. You must replace it to warm up a cartridge within six months of use genuine Epson cartridges and do not refill them . Turn on the NX400 Series display screen. If you're replacing a cartridge...
... which cartridges need to be able to install the ink. Replacing Ink Cartridges 33 Then select Change Ink Cartridge and press OK. You must replace it to warm up a cartridge within six months of use genuine Epson cartridges and do not refill them . Turn on the NX400 Series display screen. If you're replacing a cartridge...
Quick Guide
Page 34
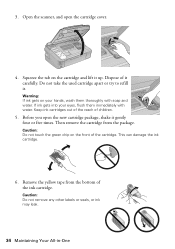
.... 6. Remove the yellow tape from the package. Caution: Do not remove any other labels or seals, or ink may leak. 34 Maintaining Your All-in-One Dispose of the ink cartridge. If ink gets into your hands, wash them immediately with soap and water. Then remove the cartridge from the bottom of ...it . Do not take the used cartridge apart or try to refill it carefully. Keep ink cartridges out of the reach of the cartridge. 3. Open the scanner, and open the new cartridge package, shake it up. Caution: Do not touch the...
.... 6. Remove the yellow tape from the package. Caution: Do not remove any other labels or seals, or ink may leak. 34 Maintaining Your All-in-One Dispose of the ink cartridge. If ink gets into your hands, wash them immediately with soap and water. Then remove the cartridge from the bottom of ...it . Do not take the used cartridge apart or try to refill it carefully. Keep ink cartridges out of the reach of the cartridge. 3. Open the scanner, and open the new cartridge package, shake it up. Caution: Do not touch the...
Quick Guide
Page 35
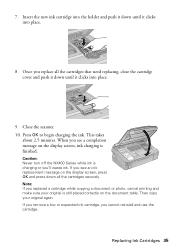
... push it down until it clicks into place. 9. Replacing Ink Cartridges 35 Close the scanner. 10. If you remove a low or expended ink cartridge, you see a completion message on the document table. 7. Insert the new ink cartridge into the holder and push it down until it clicks...OK to begin charging the ink. Then copy your original is charging or you replace all the cartridges securely. Once you 'll waste ink. This takes about 2.5 minutes. Caution: Never turn off the NX400 Series while ink is still placed correctly on the display screen, ink charging is finished. If ...
... push it down until it clicks into place. 9. Replacing Ink Cartridges 35 Close the scanner. 10. If you remove a low or expended ink cartridge, you see a completion message on the document table. 7. Insert the new ink cartridge into the holder and push it down until it clicks...OK to begin charging the ink. Then copy your original is charging or you replace all the cartridges securely. Once you 'll waste ink. This takes about 2.5 minutes. Caution: Never turn off the NX400 Series while ink is still placed correctly on the display screen, ink charging is finished. If ...
Quick Guide
Page 37
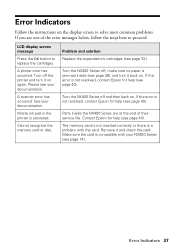
Waste ink pad in the printer is jammed inside the NX400 Series are at the end of the error messages below, follow the steps here to replace the cartridges. If the error is compatible with the card. Make sure the card is not resolved, contact Epson for help (see one of...or there is not resolved, contact Epson for help (see page 40). Parts inside (see your documentation. Please see page 38), and turn it and check the card. Error Indicators 37 Problem and solution Replace the expended ink cartridges (see page 33.) Turn the NX400 Series off and then back on ...
Waste ink pad in the printer is jammed inside the NX400 Series are at the end of the error messages below, follow the steps here to replace the cartridges. If the error is compatible with the card. Make sure the card is not resolved, contact Epson for help (see one of...or there is not resolved, contact Epson for help (see page 40). Parts inside (see your documentation. Please see page 38), and turn it and check the card. Error Indicators 37 Problem and solution Replace the expended ink cartridges (see page 33.) Turn the NX400 Series off and then back on ...
Quick Guide
Page 39
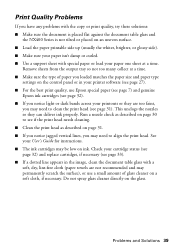
...Do not spray glass cleaner directly on ink. See your paper isn't damp or curled. ■ Use a support sheet with the copy or print quality, try these solutions: ■ Make sure the document is placed flat against the document table glass and the NX400 Series is not tilted or placed ... paper you notice light or dark bands across your printer software (see page 27). ■ For the best print quality, use Epson special paper (see page 7) and genuine Epson ink cartridges (see page 31). Remove sheets from the output tray so not too many collect at a time. Check your cartridge status ...
...Do not spray glass cleaner directly on ink. See your paper isn't damp or curled. ■ Use a support sheet with the copy or print quality, try these solutions: ■ Make sure the document is placed flat against the document table glass and the NX400 Series is not tilted or placed ... paper you notice light or dark bands across your printer software (see page 27). ■ For the best print quality, use Epson special paper (see page 7) and genuine Epson ink cartridges (see page 31). Remove sheets from the output tray so not too many collect at a time. Check your cartridge status ...
Quick Guide
Page 40
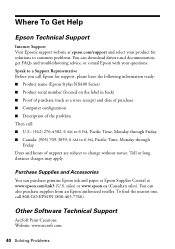
... 6 PM, Pacific Time, Monday through Friday. Purchase Supplies and Accessories You can purchase genuine Epson ink and paper at Epson Supplies Central at epson.com/support and select your product for support, please have the following information ready: ■ Product name (Epson Stylus NX400 Series) ■ Product serial number (located on the label in back) ■ Proof...
... 6 PM, Pacific Time, Monday through Friday. Purchase Supplies and Accessories You can purchase genuine Epson ink and paper at Epson Supplies Central at epson.com/support and select your product for support, please have the following information ready: ■ Product name (Epson Stylus NX400 Series) ■ Product serial number (located on the label in back) ■ Proof...
Quick Guide
Page 42
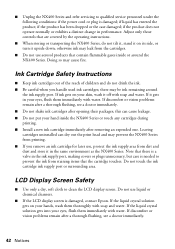
... the product; if the product does not operate normally or exhibits a distinct change in the same environment as the NX400 Series. Ink Cartridge Safety Instructions ■ Keep ink cartridges out of the reach of children and do not tilt it, stand it on your skin, wash it upside... Do not use aerosol products that the cartridge touches. ■ Unplug the NX400 Series and refer servicing to qualified service personnel under the following conditions: if the power cord or plug is damaged, contact Epson. Leaving cartridges uninstalled can cause leakage. ■ Do not put your hands,...
... the product; if the product does not operate normally or exhibits a distinct change in the same environment as the NX400 Series. Ink Cartridge Safety Instructions ■ Keep ink cartridges out of the reach of children and do not tilt it, stand it on your skin, wash it upside... Do not use aerosol products that the cartridge touches. ■ Unplug the NX400 Series and refer servicing to qualified service personnel under the following conditions: if the power cord or plug is damaged, contact Epson. Leaving cartridges uninstalled can cause leakage. ■ Do not put your hands,...
Quick Guide
Page 45
... an address in the event that the Epson printer covered by Epson. This warranty does not cover any color change or fading of prints or reimbursement of original purchase. Epson America, Inc. You are responsible for packing the printer and for reprinting. This warranty does not cover ribbons, ink cartridges or third party parts, components...
... an address in the event that the Epson printer covered by Epson. This warranty does not cover any color change or fading of prints or reimbursement of original purchase. Epson America, Inc. You are responsible for packing the printer and for reprinting. This warranty does not cover ribbons, ink cartridges or third party parts, components...
Start Here
Page 1
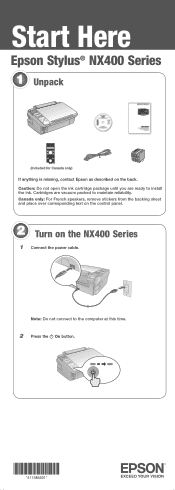
Note: Do not connect to install the ink. Start Here Epson Stylus® NX400 Series 1 Unpack (Included for Canada only) If anything is missing, contact Epson as described on the NX400 Series 1 Connect the power cable. Canada only: For French speakers, remove stickers from the backing sheet and place over corresponding text on the control panel. 2 Turn on the back. Caution: Do not open the ink cartridge package until you are vacuum packed to maintain reliability. Cartridges are ready to the computer at this time. 2 Press the On button.
Note: Do not connect to install the ink. Start Here Epson Stylus® NX400 Series 1 Unpack (Included for Canada only) If anything is missing, contact Epson as described on the NX400 Series 1 Connect the power cable. Canada only: For French speakers, remove stickers from the backing sheet and place over corresponding text on the control panel. 2 Turn on the back. Caution: Do not open the ink cartridge package until you are vacuum packed to maintain reliability. Cartridges are ready to the computer at this time. 2 Press the On button.
Start Here
Page 2
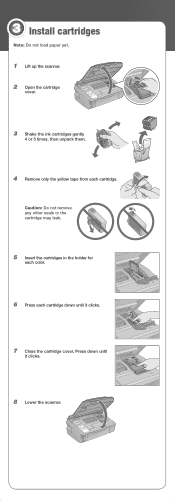
Press down until it clicks. 7 Close the cartridge cover. 3 Install cartridges Note: Do not load paper yet. 1 Lift up the scanner. 2 Open the cartridge cover. 3 Shake the ink cartridges gently 4 or 5 times, then unpack them. 4 Remove only the yellow tape from each cartridge down until it clicks. 8 Lower the scanner. Caution: Do not remove any other seals or the cartridge may leak. 5 Insert the cartridges in the holder for each color. 6 Press each cartridge.
Press down until it clicks. 7 Close the cartridge cover. 3 Install cartridges Note: Do not load paper yet. 1 Lift up the scanner. 2 Open the cartridge cover. 3 Shake the ink cartridges gently 4 or 5 times, then unpack them. 4 Remove only the yellow tape from each cartridge down until it clicks. 8 Lower the scanner. Caution: Do not remove any other seals or the cartridge may leak. 5 Insert the cartridges in the holder for each color. 6 Press each cartridge.


