
Operation Manual
Page 2
... Connection 15 INSTALLATION OF MX-80 F/T TYPE II 17 1. Unpacking steps 17 1.2. Cartridge Ribbon Setting 22 6. Power Connection 34 -i- TABLE OF CONTENTS GENERAL DESCRIPTION 1 1. Repacking steps 3 2. Separator Installation 10 6. Column layout on fanfold paper 28 7.1.4. Column layout on fanfold paper 14 6.4. Unpacking steps 3 1.2. Counting the Parts 17 3. Loading of the Printer 5 4. Cartridge Ribbon Setting 8 5. Separator...
... Connection 15 INSTALLATION OF MX-80 F/T TYPE II 17 1. Unpacking steps 17 1.2. Cartridge Ribbon Setting 22 6. Power Connection 34 -i- TABLE OF CONTENTS GENERAL DESCRIPTION 1 1. Repacking steps 3 2. Separator Installation 10 6. Column layout on fanfold paper 28 7.1.4. Column layout on fanfold paper 14 6.4. Unpacking steps 3 1.2. Counting the Parts 17 3. Loading of the Printer 5 4. Cartridge Ribbon Setting 8 5. Separator...

Operation Manual
Page 4
...Fig. 1 EPSON MX-80 Type II and MX-80 F/T Type II Dot Matrix Printers ... 1 Fig. 2 Contents of Carton 4 Fig. 3 Laying Printer on Firm Surface 5 Fig. 4 Assembly Tools 6 Fig. 5 Removal of Shipping Screws 7 Fig. 6 Removal of Printer Lid 7 Fig. 7 Remounting of Printer Lid 8 Fig. 8 Cartridge Ribbon Setting 8 Fig. 9 Cartridge Ribbon Setting 9...Fig. 21 Assembly Tools 20 Fig. 22 Removal of Shipping Screws 20 Fig. 23 Removal of Printer Lid 21 Fig. 24 Cartridge Ribbon Setting 2 2 Fig. 25 Cartridge Ribbon Setting 22 Fig. 26 Examples of Correct and Incorrect Ribbon Setting 23 Fig. 27 Separator ...
...Fig. 1 EPSON MX-80 Type II and MX-80 F/T Type II Dot Matrix Printers ... 1 Fig. 2 Contents of Carton 4 Fig. 3 Laying Printer on Firm Surface 5 Fig. 4 Assembly Tools 6 Fig. 5 Removal of Shipping Screws 7 Fig. 6 Removal of Printer Lid 7 Fig. 7 Remounting of Printer Lid 8 Fig. 8 Cartridge Ribbon Setting 8 Fig. 9 Cartridge Ribbon Setting 9...Fig. 21 Assembly Tools 20 Fig. 22 Removal of Shipping Screws 20 Fig. 23 Removal of Printer Lid 21 Fig. 24 Cartridge Ribbon Setting 2 2 Fig. 25 Cartridge Ribbon Setting 22 Fig. 26 Examples of Correct and Incorrect Ribbon Setting 23 Fig. 27 Separator ...

Operation Manual
Page 8
... setting or variable by software. (c) Programmable line spacing. (d) Vertical tabulation and horizontal tabulation (e) Buzzer, printer select/deselect function. (4) High throughput by DIP switch setting or software. (7) Complete with versatile functions to...80 characters/line (normal character) (d) 132 characters/line (condensed character) (e) Programmable column length (3) Versatile functions to -replace "throwaway" print head. 2. Characteristics The MX-80 Type II and MX-80 F/T Type II have been designed as a printer with standard equipment including paper end detector, custom cartridge...
... setting or variable by software. (c) Programmable line spacing. (d) Vertical tabulation and horizontal tabulation (e) Buzzer, printer select/deselect function. (4) High throughput by DIP switch setting or software. (7) Complete with versatile functions to...80 characters/line (normal character) (d) 132 characters/line (condensed character) (e) Programmable column length (3) Versatile functions to -replace "throwaway" print head. 2. Characteristics The MX-80 Type II and MX-80 F/T Type II have been designed as a printer with standard equipment including paper end detector, custom cartridge...
Operation Manual
Page 10
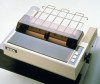
MX-80 Type I I Dot Matrix Printer 1 2. 1. Cartridge Ribbon 1 4. Power Cord (Only European Type 220/240V) 1 5. Separator 1 3. MX-80 Type I I Operation Manual 1 Fig. 2 Contents of Carton -4-
MX-80 Type I I Dot Matrix Printer 1 2. 1. Cartridge Ribbon 1 4. Power Cord (Only European Type 220/240V) 1 5. Separator 1 3. MX-80 Type I I Operation Manual 1 Fig. 2 Contents of Carton -4-

Operation Manual
Page 14
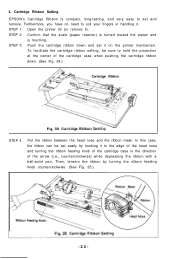
... the following steps: STEP 1. Open the printer lid (or remove it . When remounting the printer lid, be sure to hold the projection at the right corner of the Printer's upper case. (See Fig. 7.) STEP 2. STEP 1. Cartridge Ribbon Setting EPSON's Cartridge Ribbon is touching. Fit the right side of the printer lid onto the projection located at the...
... the following steps: STEP 1. Open the printer lid (or remove it . When remounting the printer lid, be sure to hold the projection at the right corner of the Printer's upper case. (See Fig. 7.) STEP 2. STEP 1. Cartridge Ribbon Setting EPSON's Cartridge Ribbon is touching. Fit the right side of the printer lid onto the projection located at the...

Operation Manual
Page 15
... a ball-point pen. Then, tension the ribbon by hooking it to the edge of the head nose and turning the ribbon feeding knob of the cartridge case in the direction of the ribbon may cause it to come off. (See Fig. 10.) 2. Put the ribbon between the head nose and the... ribbon mask. In this case, the ribbon can be set properly -9- STEP 4. Confirm that the ribbon is neither twisted nor creased and that the cartridge is set easily by turning the ribbon feeding knob counterclockwise. (See Fig. 9.) I Fig...
... a ball-point pen. Then, tension the ribbon by hooking it to the edge of the head nose and turning the ribbon feeding knob of the cartridge case in the direction of the ribbon may cause it to come off. (See Fig. 10.) 2. Put the ribbon between the head nose and the... ribbon mask. In this case, the ribbon can be set properly -9- STEP 4. Confirm that the ribbon is neither twisted nor creased and that the cartridge is set easily by turning the ribbon feeding knob counterclockwise. (See Fig. 9.) I Fig...

Operation Manual
Page 24
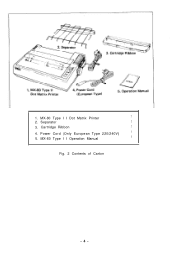
Cartridge Ribbon 1 4. Power Cord (Only European Type 220/24OV) 1 5. 1. Installation of the Printer (1) Operating site selection When installing the MX-80 F/T Type I I, observe the following instructions. (a) Place the Printer on which the MX-80 F/T Type I I is placed. (b) Avoid operating the MX-80 F/T Type. NOTE: Greasy dust may cause the malfunction of the print head. (c) Connect the power cord to an...
Cartridge Ribbon 1 4. Power Cord (Only European Type 220/24OV) 1 5. 1. Installation of the Printer (1) Operating site selection When installing the MX-80 F/T Type I I, observe the following instructions. (a) Place the Printer on which the MX-80 F/T Type I I is placed. (b) Avoid operating the MX-80 F/T Type. NOTE: Greasy dust may cause the malfunction of the print head. (c) Connect the power cord to an...
Operation Manual
Page 28
... counterclockwise. (See Fig. 25.) -22- Then, tension the ribbon by hooking it . Open the printer lid (or remove it on the printer mechanism. Put the ribbon between the head nose and the ribbon mask. Push the cartridge ribbon down . (See Fig. 24.) STEP 4. STEP 1. In this case, the ribbon can be...long-lasting, and very easy to the edge of the head nose and turning the ribbon feeding knob of the cartridge case in the direction of the cartridge case when pushing the cartridge ribbon down and set and remove. Furthermore, you have no need to soil your fingers in handling it to...
... counterclockwise. (See Fig. 25.) -22- Then, tension the ribbon by hooking it . Open the printer lid (or remove it on the printer mechanism. Put the ribbon between the head nose and the ribbon mask. Push the cartridge ribbon down . (See Fig. 24.) STEP 4. STEP 1. In this case, the ribbon can be...long-lasting, and very easy to the edge of the head nose and turning the ribbon feeding knob of the cartridge case in the direction of the cartridge case when pushing the cartridge ribbon down and set and remove. Furthermore, you have no need to soil your fingers in handling it to...

Operation Manual
Page 29
NOTES: 1. Separator Installation The separator of the ribbon may cause it to smooth paper feeding. Confirm that the ribbon is neither twisted nor creased and that the cartridge is set properly. Incorrect setting of the Printer contributes to come off. (See Fig. 26.) 2. Set the separator by inserting its edge into the two holes located at the rear part of the frame of Correct and Incorrect Ribbon Setting 5. Fig. 26 Examples of the printer mechanism. (See Fig. 27.) I Fig. 27 Separator Installation -23-
NOTES: 1. Separator Installation The separator of the ribbon may cause it to smooth paper feeding. Confirm that the ribbon is neither twisted nor creased and that the cartridge is set properly. Incorrect setting of the Printer contributes to come off. (See Fig. 26.) 2. Set the separator by inserting its edge into the two holes located at the rear part of the frame of Correct and Incorrect Ribbon Setting 5. Fig. 26 Examples of the printer mechanism. (See Fig. 27.) I Fig. 27 Separator Installation -23-

Operation Manual
Page 46
... Print head operation and printing quality (2) Operation of paper. If printing of characters up to the last line is out of the printer mechanisms (motor, cartridge ribbon mechanism, belt, etc.) The self-test function is another way to the ON position, and the paper end detecting function will ... be printed. are printed out on again, or apply the INIT signal. Self -Test The MX-80 Type I I has a self-test (self-diagnostic) function to prevent erroneous printing when the Printer is to be continued, the paper end detecting function may resume operation. (3) There is pre-programmed ...
... Print head operation and printing quality (2) Operation of paper. If printing of characters up to the last line is out of the printer mechanisms (motor, cartridge ribbon mechanism, belt, etc.) The self-test function is another way to the ON position, and the paper end detecting function will ... be printed. are printed out on again, or apply the INIT signal. Self -Test The MX-80 Type I I has a self-test (self-diagnostic) function to prevent erroneous printing when the Printer is to be continued, the paper end detecting function may resume operation. (3) There is pre-programmed ...

Operation Manual
Page 84
... Turn the power off the printer lid and cartridge ribbon. Put a new head on the terminal board. NOTES: 1. Inadequate connection may cause malfunctioning of cleaning. MAINTENANCE 1. STEP 5. Insert the head cable into the head connector carefully. The Printer should be moved without the ...the head connector on the carriage assembly and replace the head lock lever. STEP 6. Preventive Maintenance Preventive maintenance for the MX-80 Type II and MX-80 F/T Type I I Printer was purchased. (2) Print head In case of a print head trouble or a worn dot wire, replace the print ...
... Turn the power off the printer lid and cartridge ribbon. Put a new head on the terminal board. NOTES: 1. Inadequate connection may cause malfunctioning of cleaning. MAINTENANCE 1. STEP 5. Insert the head cable into the head connector carefully. The Printer should be moved without the ...the head connector on the carriage assembly and replace the head lock lever. STEP 6. Preventive Maintenance Preventive maintenance for the MX-80 Type II and MX-80 F/T Type I I Printer was purchased. (2) Print head In case of a print head trouble or a worn dot wire, replace the print ...

Operation Manual
Page 86
SPECIFICATIONS (1) PRINT METHOD: Serial impact dot matrix (2) PRINT SPEED: 80 CPS (3) PRINT DIRECTION: Bidirectional with logical seeking Unidirectional in the bit image mode (4) NUMBER...132 Condensed Enlarged : 8.25 66 (8) MEDIA HANDLING Paper Feed : Adjustable sprocket pin feed (and/or friction feed for MX-80 F/T TYPE II) Paper Width Range MX-80 Type II MX-80 F/T Type II Fanfold paper: 4" to 10" 4" to 10" (101.6 mm to 254 mm) (101.6 ... Optional: RS232C, IEEE 488, etc. (10) INKED RIBBON Color: Black Type: Exclusive cartridge Life Expectancy: 3 million characters...
SPECIFICATIONS (1) PRINT METHOD: Serial impact dot matrix (2) PRINT SPEED: 80 CPS (3) PRINT DIRECTION: Bidirectional with logical seeking Unidirectional in the bit image mode (4) NUMBER...132 Condensed Enlarged : 8.25 66 (8) MEDIA HANDLING Paper Feed : Adjustable sprocket pin feed (and/or friction feed for MX-80 F/T TYPE II) Paper Width Range MX-80 Type II MX-80 F/T Type II Fanfold paper: 4" to 10" 4" to 10" (101.6 mm to 254 mm) (101.6 ... Optional: RS232C, IEEE 488, etc. (10) INKED RIBBON Color: Black Type: Exclusive cartridge Life Expectancy: 3 million characters...

