User Manual
Page 3
...This Manual . . . 1 2 1 Setting Up Your LX-80 Printer Printer Parts 3 3 Printer Location Paper Feed Knob Installation Ribbon Installation Ribbon Replacement 4 4 5 8 Paper Loading 9 Control Panel Test Pattern 10 12 Connecting the LX-80 to Your Computer . . . . 13 First Printing ... 23 Bidirectional Printing . . . . . . 24 Changing Pitches 24 NLQ Mode 26 4 Printer Control Codes . 29 ASCII Codes 29 ESCape Code . . . . . . . Printer Codes . . . 30 31 Embedded codes 32 Inserted codes 32 Programming Languages . . . . 33 . . .
...This Manual . . . 1 2 1 Setting Up Your LX-80 Printer Printer Parts 3 3 Printer Location Paper Feed Knob Installation Ribbon Installation Ribbon Replacement 4 4 5 8 Paper Loading 9 Control Panel Test Pattern 10 12 Connecting the LX-80 to Your Computer . . . . 13 First Printing ... 23 Bidirectional Printing . . . . . . 24 Changing Pitches 24 NLQ Mode 26 4 Printer Control Codes . 29 ASCII Codes 29 ESCape Code . . . . . . . Printer Codes . . . 30 31 Embedded codes 32 Inserted codes 32 Programming Languages . . . . 33 . . .
User Manual
Page 4
... First NLQ definition program Second NLQ definition program 61 61 62 63 64 65 66 67 67 70 71 iv 5 LX-80 Features Demonstration Programs Pica Printing Changing Pitches Cancelling Codes Resetting the Printer Pitch Comparison Near Letter Quality Mode 35 35 36 37 37 38 38 39 6 Print Enhancements and Special Characters...
... First NLQ definition program Second NLQ definition program 61 61 62 63 64 65 66 67 67 70 71 iv 5 LX-80 Features Demonstration Programs Pica Printing Changing Pitches Cancelling Codes Resetting the Printer Pitch Comparison Near Letter Quality Mode 35 35 36 37 37 38 38 39 6 Print Enhancements and Special Characters...
User Manual
Page 5
... by Function Near Letter Quality Mode Character Width (Pitch Character Weight Print Enhancement Mode and Charcter-Set Selection Special Printer Features Line Spacing Forms Control Page Format User-defined Characters Dot Graphics D The DIP Switches E Using the Optional... Tips Semicolons and command placement String variables Graphics and low ASCII codes Appendixes A ASCII Codes and Character Fonts . . Printer Location Tractor Unit Installation Loading Continuous Paper 73 74 75 75 76 78 78 80 81 81 82 83 86 86 88 89 A-1 A-3 A-5 B-1 B-12 C-1 C-1 C-1 C-1 C-2 C-2 C-2 C-2 ...
... by Function Near Letter Quality Mode Character Width (Pitch Character Weight Print Enhancement Mode and Charcter-Set Selection Special Printer Features Line Spacing Forms Control Page Format User-defined Characters Dot Graphics D The DIP Switches E Using the Optional... Tips Semicolons and command placement String variables Graphics and low ASCII codes Appendixes A ASCII Codes and Character Fonts . . Printer Location Tractor Unit Installation Loading Continuous Paper 73 74 75 75 76 78 78 80 81 81 82 83 86 86 88 89 A-1 A-3 A-5 B-1 B-12 C-1 C-1 C-1 C-1 C-2 C-2 C-2 C-2 ...

User Manual
Page 6
NowandThen Rarely H Technical Specifications Printing Character size Characters per line Paper Printer Dimensions and Weight Environment Interface I The Parallel Interface Data Transfer Sequence Interface timing Signal relationships F-1 F-1 F-1 F-1 F-1 F-3 F-3 F-3 F-3 F-4 F-4 F-4 F-6 ... Cancelling Functions with SelecType Other software Beeper Error Warnings Data Dump Mode Coding Solutions POKEing codes Special printer drivers Solutions for Seven-Bit Systems Solutions for Specific Systems Applesoft BASIC solutions Apple II solutions TIBRMS-8P0CTT"Msos ...
NowandThen Rarely H Technical Specifications Printing Character size Characters per line Paper Printer Dimensions and Weight Environment Interface I The Parallel Interface Data Transfer Sequence Interface timing Signal relationships F-1 F-1 F-1 F-1 F-1 F-3 F-3 F-3 F-3 F-4 F-4 F-4 F-6 ... Cancelling Functions with SelecType Other software Beeper Error Warnings Data Dump Mode Coding Solutions POKEing codes Special printer drivers Solutions for Seven-Bit Systems Solutions for Specific Systems Applesoft BASIC solutions Apple II solutions TIBRMS-8P0CTT"Msos ...
User Manual
Page 7
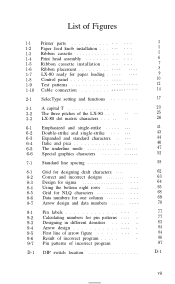
List of Figures 1-1 Printer parts 1-2 Paper feed knob installation 1-3 Ribbon cassette 1-4 Print head assembly 1-5 Ribbon cassette installation 1-6 Ribbon placement . . . . 1-7 LX-80 ready for paper loading . . . . . . 1-8 Control panel 1-9 Test patterns 1-10 Cable connection 3 5 5 6 7 8 9 10 12 14 2-1 SelecType setting and functions 17 3-1 A capital T 3-2 The three pitches of the LX-80 3-3 LX-80 dot matrix characters 23 25 26 6-1 Emphasized and...
List of Figures 1-1 Printer parts 1-2 Paper feed knob installation 1-3 Ribbon cassette 1-4 Print head assembly 1-5 Ribbon cassette installation 1-6 Ribbon placement . . . . 1-7 LX-80 ready for paper loading . . . . . . 1-8 Control panel 1-9 Test patterns 1-10 Cable connection 3 5 5 6 7 8 9 10 12 14 2-1 SelecType setting and functions 17 3-1 A capital T 3-2 The three pitches of the LX-80 3-3 LX-80 dot matrix characters 23 25 26 6-1 Emphasized and...

User Manual
Page 8
... levers E-4 E-6 Pin feed holder adjustment E-5 E-7 Open in feed cover E-5 E-8 Top of page position E-6 I-1 Parallel interface timing I-3 List of Tables 2-1 SelecType modes 2-2 Mode combinations 5-1 Summary of LX-80 pitches 6-1 International characters in NLQ mode 6-2 International characters in draft mode 6-3 International characters in draft italic 9-1 Graphics modes D-1 DIP switch functions D-2 International DIP switch settings...
... levers E-4 E-6 Pin feed holder adjustment E-5 E-7 Open in feed cover E-5 E-8 Top of page position E-6 I-1 Parallel interface timing I-3 List of Tables 2-1 SelecType modes 2-2 Mode combinations 5-1 Summary of LX-80 pitches 6-1 International characters in NLQ mode 6-2 International characters in draft mode 6-3 International characters in draft italic 9-1 Graphics modes D-1 DIP switch functions D-2 International DIP switch settings...
User Manual
Page 9
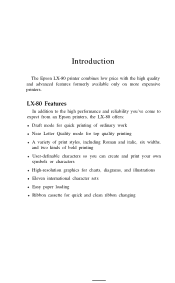
Introduction The Epson LX-80 printer combines low price with the high quality and advanced features formerly available only on more expensive printers. LX-80 Features In addition to the high performance and reliability you've come to expect from an Epson printers, the LX-80 offers: l Draft mode for quick printing of ordinary work l Near Letter Quality mode for top quality...
Introduction The Epson LX-80 printer combines low price with the high quality and advanced features formerly available only on more expensive printers. LX-80 Features In addition to the high performance and reliability you've come to expect from an Epson printers, the LX-80 offers: l Draft mode for quick printing of ordinary work l Near Letter Quality mode for top quality...
User Manual
Page 10
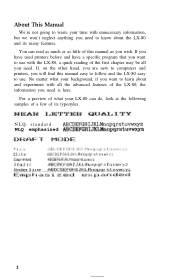
...specific program that you want to learn about the LX-80 and its typestyles. standard ABCDEFGHIJKLMnopqrstuvwxyz WLQ emphasized ABCDEFGHIJKLMnopqrstuvwxyz 2 NLQ. If, on the other hand, you are new to computers and printers, you will find this manual as you wish. No matter what your LX-80 can read as much or as little of ...this manual easy to follow and the LX-80 easy to use with all you need is here. For a preview...
...specific program that you want to learn about the LX-80 and its typestyles. standard ABCDEFGHIJKLMnopqrstuvwxyz WLQ emphasized ABCDEFGHIJKLMnopqrstuvwxyz 2 NLQ. If, on the other hand, you are new to computers and printers, you will find this manual as you wish. No matter what your LX-80 can read as much or as little of ...this manual easy to follow and the LX-80 easy to use with all you need is here. For a preview...
User Manual
Page 11
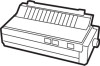
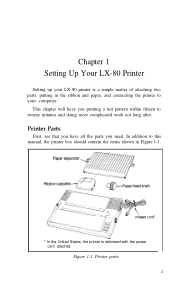
...within fifteen to your LX-80 printer is delivered with the power cord attached. Printer Parts First, see that you have you need. In addition to this manual, the printer box should contain the items shown in the ribbon and paper, and connecting the printer to twenty minutes ...and doing more complicated work not long after. Printer parts 3 Figure 1-1. cord* * In the United States, the printer is a simple matter of attaching two parts, putting in Figure l-1. Chapter 1 Setting Up Your LX-80 Printer Setting up your computer.
...within fifteen to your LX-80 printer is delivered with the power cord attached. Printer Parts First, see that you have you need. In addition to this manual, the printer box should contain the items shown in the ribbon and paper, and connecting the printer to twenty minutes ...and doing more complicated work not long after. Printer parts 3 Figure 1-1. cord* * In the United States, the printer is a simple matter of attaching two parts, putting in Figure l-1. Chapter 1 Setting Up Your LX-80 Printer Setting up your computer.

User Manual
Page 12
... for cordless telephones. These can wipe out valuable information in your computer's memory and disrupt your LX-80, the first and simplest piece to install is that the printer be matched with any large electrical machines or appliances. In addition to the items in the box...to your dealer will tell you which you use the LX-80's Centronics® parallel interface. Accidentally turning off a switch can cause disruptive power fluctuations. l Protect the printer from base units for the cable to reach. Printer Location Now that can't use to manually advance the paper...
... for cordless telephones. These can wipe out valuable information in your computer's memory and disrupt your LX-80, the first and simplest piece to install is that the printer be matched with any large electrical machines or appliances. In addition to the items in the box...to your dealer will tell you which you use the LX-80's Centronics® parallel interface. Accidentally turning off a switch can cause disruptive power fluctuations. l Protect the printer from base units for the cable to reach. Printer Location Now that can't use to manually advance the paper...

User Manual
Page 13
The parts of this cassette are labelled in a cassette that makes ribbon installation and replacement a clean and easy job. Ribbon cassette 5 Figure 1-2. Paper feed knob installation Ribbon Installation The LX-80 printer uses a continuous-loop, inked fabric ribbon, which is enclosed in Figure 1-3. Figure 1-3.
The parts of this cassette are labelled in a cassette that makes ribbon installation and replacement a clean and easy job. Ribbon cassette 5 Figure 1-2. Paper feed knob installation Ribbon Installation The LX-80 printer uses a continuous-loop, inked fabric ribbon, which is enclosed in Figure 1-3. Figure 1-3.

User Manual
Page 14
Always be sure that the printer is against the black roller so it too will not get in your way. Note: Moving the print head by hand to the center of the printer so that the other parts of the LX-80 so that the paper bail is turned off before you can harm the printer. Figure l-4. Move the assembly by hand when the printer is turned on can see the print head assembly shown in Figure 1-4. Also be in your way. Print bead assembly To install the ribbon, first open the lid at the front of the printer will not be sure that you move the print head.
Always be sure that the printer is against the black roller so it too will not get in your way. Note: Moving the print head by hand to the center of the printer so that the other parts of the LX-80 so that the paper bail is turned off before you can harm the printer. Figure l-4. Move the assembly by hand when the printer is turned on can see the print head assembly shown in Figure 1-4. Also be in your way. Print bead assembly To install the ribbon, first open the lid at the front of the printer will not be sure that you move the print head.
User Manual
Page 16
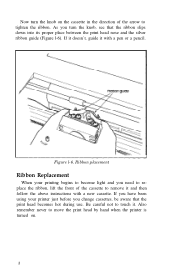
...'t, guide it with a new cassette. Be careful not to tighten the ribbon. Figure l-6. Also remember never to move the print head by hand when the printer is turned on the cassette in the direction of the cassette to remove it . Ribbon placement Ribbon Replacement When your... printer just before you turn the knob on . 8 As you change cassettes, be aware that the ribbon slips down into its proper place between the print ...
...'t, guide it with a new cassette. Be careful not to tighten the ribbon. Figure l-6. Also remember never to move the print head by hand when the printer is turned on the cassette in the direction of the cassette to remove it . Ribbon placement Ribbon Replacement When your... printer just before you turn the knob on . 8 As you change cassettes, be aware that the ribbon slips down into its proper place between the print ...
User Manual
Page 18
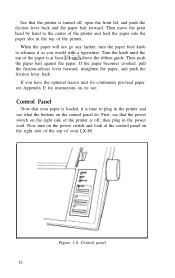
... the paper will not go any farther, turn on its use. Then push the paper bail against the paper. then plug in the printer and see that your LX-80. Control panel 10 If the paper becomes crooked, pull the friction-release lever forward, straighten the paper, and push the friction lever back.... Now turn the paper feed knob to plug in the power cord. Control Panel Now that the power switch on the right side of the printer is...
... the paper will not go any farther, turn on its use. Then push the paper bail against the paper. then plug in the printer and see that your LX-80. Control panel 10 If the paper becomes crooked, pull the friction-release lever forward, straighten the paper, and push the friction lever back.... Now turn the paper feed knob to plug in the power cord. Control Panel Now that the power switch on the right side of the printer is...
User Manual
Page 19
... the next section. 11 l The ON LINE button switches the printer between on-line and off -line. When the printer is on-line, the ON LINE light glows and the printer is on, press the ON LINE button to indicate that the printer is out of the next page. In addition, you use for... the paper one line at a time. l The FF (Form Feed) button advances the paper to accept data. l The ON LINE light glows green when the printer can also be used to accept data. There are described below: l The POWER light glows green when the power is on. Their primary functions are...
... the next section. 11 l The ON LINE button switches the printer between on-line and off -line. When the printer is on-line, the ON LINE light glows and the printer is on, press the ON LINE button to indicate that the printer is out of the next page. In addition, you use for... the paper one line at a time. l The FF (Form Feed) button advances the paper to accept data. l The ON LINE light glows green when the printer can also be used to accept data. There are described below: l The POWER light glows green when the power is on. Their primary functions are...

User Manual
Page 20
... Pattern Now you'll see the same test in the NLQ (Near Letter Quality) mode, turn the printer on while holding down the LF button on with the power switch. Make sure that your LX-80 print something even though it and that are shown in its ROM (Read Only Memory) for the... draft mode. To see your printer has paper in it 's not connected to a computer yet. Now, hold down the FF...
... Pattern Now you'll see the same test in the NLQ (Near Letter Quality) mode, turn the printer on while holding down the LF button on with the power switch. Make sure that your LX-80 print something even though it and that are shown in its ROM (Read Only Memory) for the... draft mode. To see your printer has paper in it 's not connected to a computer yet. Now, hold down the FF...

User Manual
Page 21
...in connecting your cable has a grounding wire, fasten it to the grounding screw below the connector. 13 It is best to have plugged your printer cable into the cable connector of interface, you will fit the connector. If your cable will probably never think about interfaces again. (If ...kind of your dealer will tell you what a Centronics parallel interface is, your computer manual or your LX-80 printer. Connecting the LX-80 to Your Computer Now that the test pattern has shown that your printer is working well, it's time to hook it up to your computer expects to communicate through a ...
...in connecting your cable has a grounding wire, fasten it to the grounding screw below the connector. 13 It is best to have plugged your printer cable into the cable connector of interface, you will fit the connector. If your cable will probably never think about interfaces again. (If ...kind of your dealer will tell you what a Centronics parallel interface is, your computer manual or your LX-80 printer. Connecting the LX-80 to Your Computer Now that the test pattern has shown that your printer is working well, it's time to hook it up to your computer expects to communicate through a ...

User Manual
Page 22
...most computers you can easily find the correct connector for the printer cable, but if you plan to use your LX-80 for example). If you are printed on automatic line feeds in Appendix D. 14 All you plan to your LX-80 print. Cable connection Next connect the other commercial software program, ...just load the program in the back of your LX-80 printer. First Printing Exercise Now it is time to do . Note: If all the lines...
...most computers you can easily find the correct connector for the printer cable, but if you plan to use your LX-80 for example). If you are printed on automatic line feeds in Appendix D. 14 All you plan to your LX-80 print. Cable connection Next connect the other commercial software program, ...just load the program in the back of your LX-80 printer. First Printing Exercise Now it is time to do . Note: If all the lines...
User Manual
Page 23
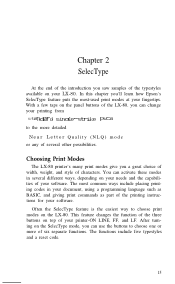
In this chapter you can change your printing from $:ll~~, i!+, 1") (I:/ cl r' (:I j, r) (:.:I.. 1, Et! ..' !:I;. 't;, r j, 1.: ( With a few taps on your LX-80. Chapter 2 SelecType At the end of the introduction you saw samples of the typestyles available on the panel buttons of the LX-80, you 'll learn how Epson's SelecType feature puts the most-used print modes at your fingertips.
In this chapter you can change your printing from $:ll~~, i!+, 1") (I:/ cl r' (:I j, r) (:.:I.. 1, Et! ..' !:I;. 't;, r j, 1.: ( With a few taps on your LX-80. Chapter 2 SelecType At the end of the introduction you saw samples of the typestyles available on the panel buttons of the LX-80, you 'll learn how Epson's SelecType feature puts the most-used print modes at your fingertips.
User Manual
Page 24
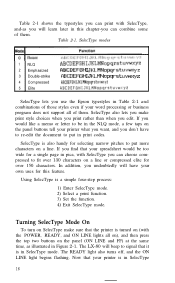
...narrow pitches to put in print codes. SelecType is also handy for over 130 characters on a line. If you find that the printer is in this feature. Table 2-1 shows the typestyles you can print with SelecType, and-as illustrated in Figure 2-1. Turning SelecType Mode... Cl I'" !iii t, L.1 v w 2: y z kECDEFSHIJKLnN@pqrstuvwxyz ABC~EFGHIJKt.MNopqrstL~~~~I K l... The LX-80 will beep to be too wide for this chapter-you use the Epson typestyles in Table 2-1 and combinations of those styles even if your printer is turned on (with the POWER, READY, and ON LINE lights all of them...
...narrow pitches to put in print codes. SelecType is also handy for over 130 characters on a line. If you find that the printer is in this feature. Table 2-1 shows the typestyles you can print with SelecType, and-as illustrated in Figure 2-1. Turning SelecType Mode... Cl I'" !iii t, L.1 v w 2: y z kECDEFSHIJKLnN@pqrstuvwxyz ABC~EFGHIJKt.MNopqrstL~~~~I K l... The LX-80 will beep to be too wide for this chapter-you use the Epson typestyles in Table 2-1 and combinations of those styles even if your printer is turned on (with the POWER, READY, and ON LINE lights all of them...


